Hey everyone, welcome back to FilmmakingElements.com and I’m back again with the next article. We’re covering Offline Media errors occurring after importing your XML from a different editing software or an NLE.
Now we’re not talking about offline media in the sense of clips offline in Davinci Resolve, we relink to it, and everything’s good to go.
I’m talking about situations that you’re going to run into in your XML linking. Where potentially you have a clip that’s offline in your timeline and that clip doesn’t exist in your media pool. What you want to do is have Davinci Resolve automatically swap clips out as they become available so you don’t have to do this entire process manually.
I also want to cover clip conflicts, meaning resolve may have found other clips that have the same tape name or clip name.
Even the same timecode as the one that you have in your timeline and it knows there might be a problem and might not be the correct clip in your timeline.
So how do you go about dealing with that? We’re going to cover all of that in this article. Let’s start right now.
Why Davinci Resolve shows Media Offline when linking an XML
To start off we’re going with the hypothetical situation of, you have just brought in an EDL, XML, or AAF file, and there is a clip missing right dead in the middle of your timeline.
Normally what the process is when you import an XML in Davinci Resolve, it is gonna find as many of the clips as it can, and then what it’s gonna say is, oh, these clips here happen to be missing which will be shown as media offline clips error.
Would you like to look in a different place? Now, why might clips be missing from your XML? Well, there are a few reasons-
- One could very well be you’re waiting for visual effect shots to come in.
- Maybe you’re waiting for high res versions of stock clips that you need to bring in.
- Maybe it’s archival footage or something like that.
- Or maybe some of the footage just not came to you.
Automatically Relink The Offline Media
Now what you ideally wanna do is as you import an XML, and see a clip that is Red and shows media offline.
Note down its name and search for it on your computer via the file browser. If you are unable to find it, let the editor know so that they can send the file to you.
As you get these elements, take them and import them into your project in any bin and have Davinci Resolve conform them automatically for you.
Now as great as that idea sounds, you have to make sure that resolve is set up to do that so that it does do what you expect it to do, and you don’t run into a problem.
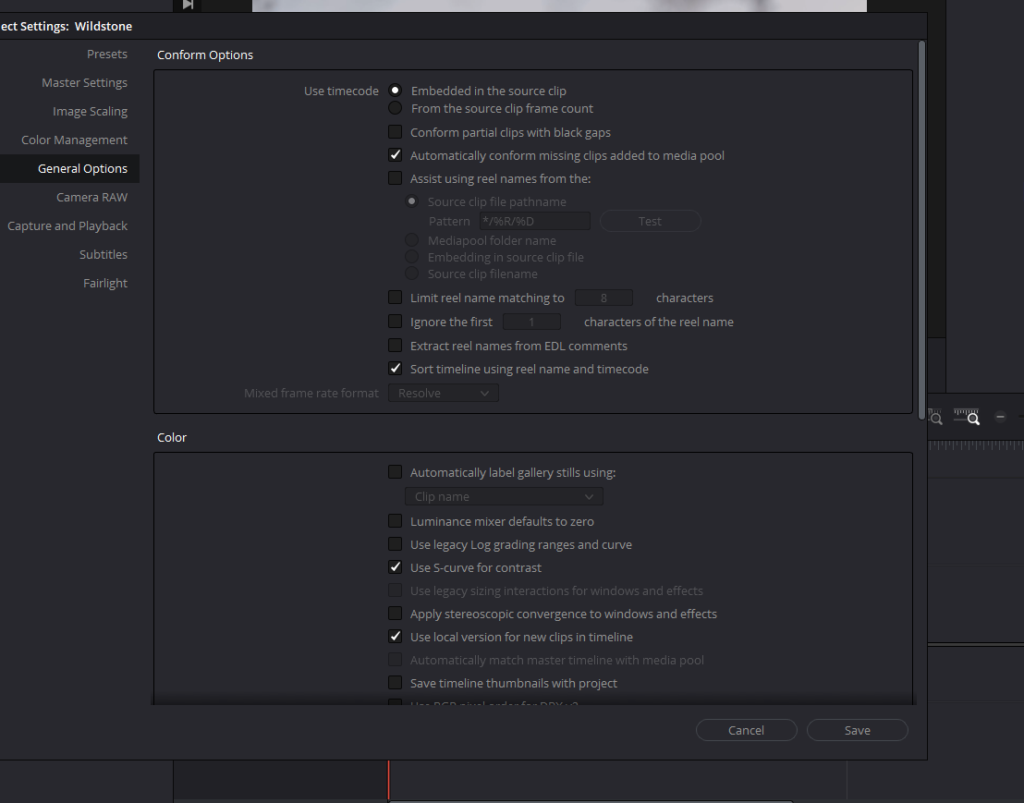
- From the menu on top Select, File>Project Settings
- Go into “General Options”
- Tick the check box which states “Automatically conform missing clips added to the media pool.”
- Hit Save.
Now, believe it or not, Davinci Resolve is actually set up to do this automatically for you, but I intentionally wanted to make sure that it was not set like that.
Why would I do that? Well, the reason is that you know, I am assuming that you’re sitting down in front of your own color grading station or your own version of resolve.
Not necessarily going into a place where you have a lot of other conform artists or colorists sitting in front of the same machine and settings might be set up slightly differently.
When you are linking back to an XML from now onwards, do make sure this check box is ticked.
Manually Linking The Media Offline Clips
Now, there are instances when you have finally got the missing clip and you have imported it into your project, but it does not automatically relink in the timeline and it still shows the red space stating media offline.
In that case, you will have to manually relink it. Follow the given steps below to do that.
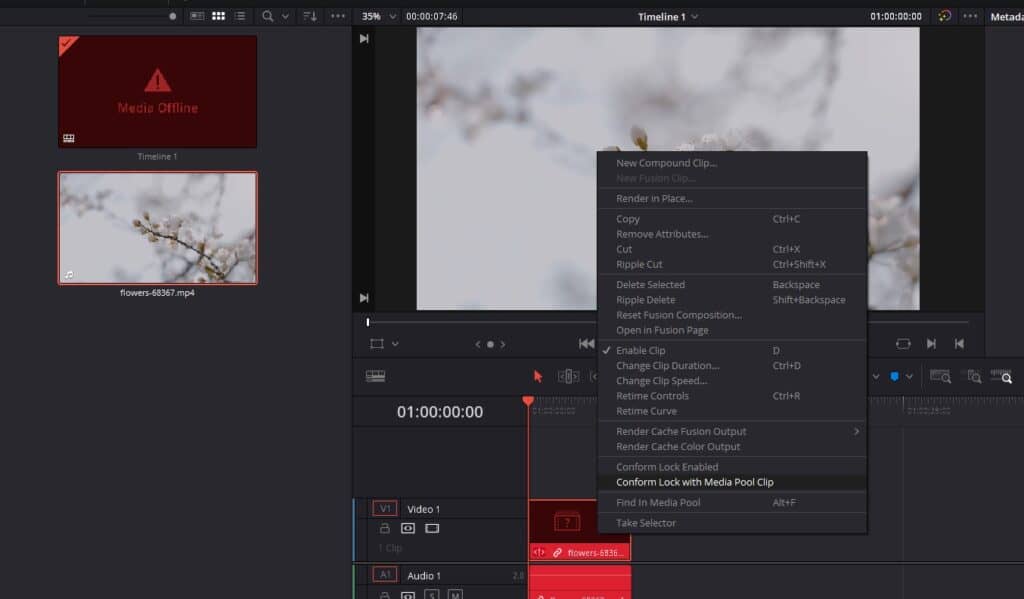
- On the Edit page, select the offline red clip on the timeline.
- Right Click, and select “Conform Lock Enabled“
- This will uncheck the option and you are ready to replace it.
- Select the clip you want to replace it from in the media pool.
- Now that both are selected, come back to the offline clip in the timeline.
- Right-click>Conform Lock with Media Pool Clip.
- Right Click again and select “Conform Lock Enabled.”
By using this method, you are able to successfully relink the missing files while you import your XML into Davinci Resolve. Do keep in mind that, XML has its own metadata which stores the timecode info for every clip on the timeline.
So when you click on “Conform Lock with Media Pool Clip,” the clip will be replaced exactly from where it was cut while editing by utilizing the timecode information in the XML.
XML linked to the wrong clip in Davinci Resolve
So let’s talk about the next scenario where possibly what’s happened is that Resolve has linked the wrong clip into our timeline, and we just like to swap it out.
Why does the XML links to the wrong clip?
There can be several different reasons why this happened. Let’s suppose there were two cameras on set while shooting. The file name convention both cameras were using was C007, C008, C009, and so on.
If both the cameras were using the same file name conventions, there are high chances of a conflict when you import files from both cameras into Davinci Resolve.
This will confuse as to which clip is the right one and Davinci Resolve might link to the wrong clip when you import the XML.
Solution
You can follow the same instructions given above but there can be an instance that a lot of clips have been wrongly linked. Follow the steps below to make this tedious task done swiftly.
- On the top left corner of the screen, select “Davinci Resolve”
- Select “Keyboard Customization”
- In the search box type, “Conform Lock with Media Pool Clip“
- Give it a shortcut and hit “Save”
- Now select the clip that got wrongly placed on the timeline.
- Select the clip in the Media Pool on the left side.
- Rather than right-clicking, just press the keyboard shortcut you just assigned, and, congratulations!
- You relinked the right clip.
Once we take the clip and replace it, the timecodes metadata in the XML will line it up perfectly.
However, if the timecode differs between the shot that’s in your timeline and the shot that’s in your media pool, what Resolve is going to do is it’s going to take the very start of the clip and line it up with the start of the shot.
Exclamation Mark On a clip in Davinci Resolve
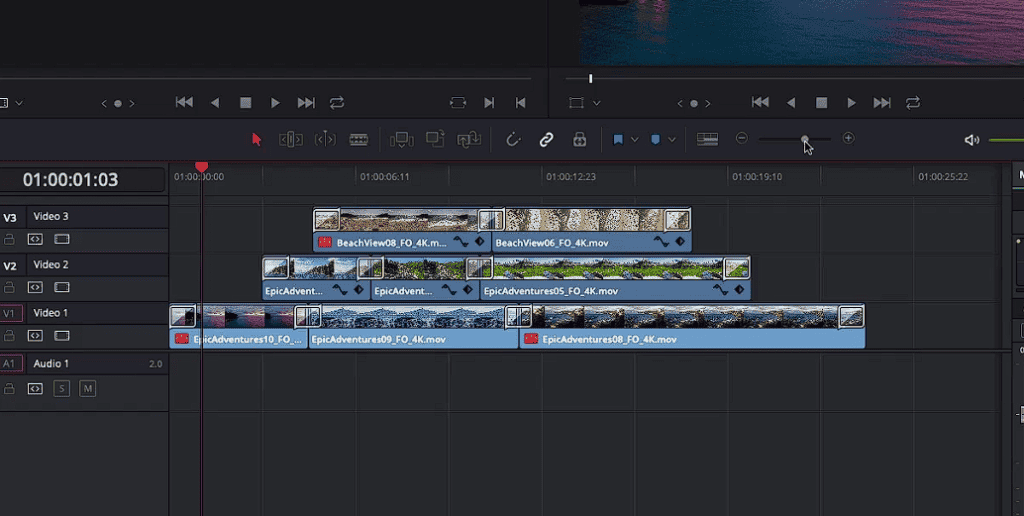
Now, let’s sidestep this, and let’s talk about the exclamation mark that we have in our timeline.
You see a red exclamation mark in front of a clip when resolve has linked a clip when you imported the XML and is having a conflict with another clip in the project or even your computer’s storage.
You can confirm this by right-clicking on the clip. The “Conform Lock Enabled” option is unchecked which is vice-versa from the default action of Davinci Resolve.
Solution
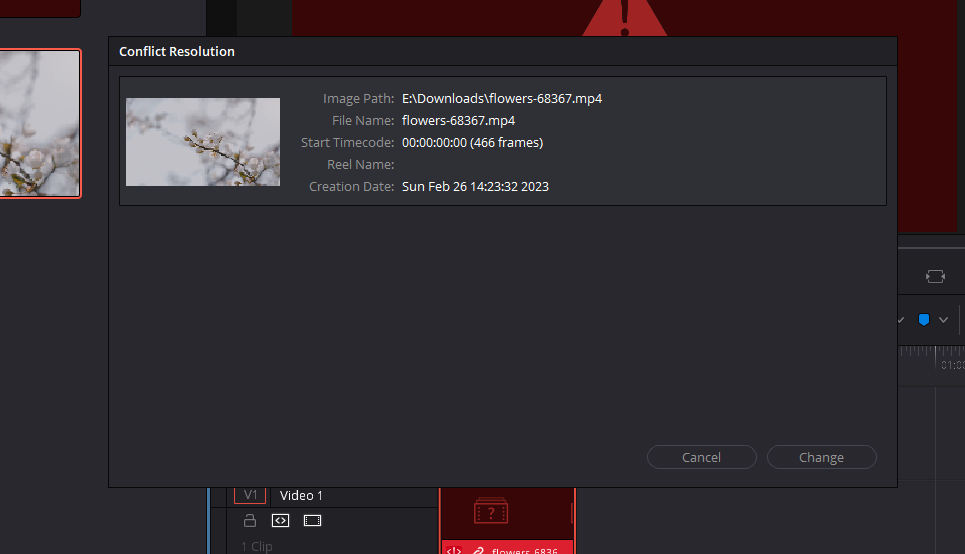
Now, how are you going to know exactly what the conflict is with this shot and what shots it’s having conflicts with?
- What you have the ability to do is simply come down to that little exclamation mark and double-click on it.
- Once you double-click on it, you’ll see all the shots there that are potentially shots that should replace the one that’s in the timeline.
- Why? Because you’ll notice they don’t have any reel names and all their timecodes match up.
- Now, obviously, you will know which is the correct clip because you or someone on your team has worked with it.
Another perfect example is, let’s say for some reason Davinci Resolve kept going to the low res clip or the proxy version of the clip.
We wanted to swap it out very quickly, we could easily get in and switch the conflict right from within here and relink it back to the original media file for the final color grading or final edit and render.
So, this is it! You have now mastered the art of linking the Offline Media clips while importing an XML in Davinci Resolve.
If you are facing another issue with Offline Media read this article: Davinci Resolve Media Offline 7 Reasons & Fixes
- Also Read: Adobe After Effects System Requirements
- Also Read: How to Use Dual Screens in DaVinci Resolve?
- Also Read: Improve Audio Quality In Davinci Resolve

