“Professionals and video editing enthusiasts use DaVinci Resolve, which is one of the most powerful post-production software programs. It has many options and functional capabilities available for a video editing user, which is why it is called a “feature-rich” program and is famous in filmmakers’ community.
It helps to create high-quality video content. One of the most important facets related to video editing is “rendering” which is converting an edited video project into a final video file.
It’s difficult to have a thorough understanding of the render process when dealing with sophisticated video editing projects.
Time is a precious thing for everyone but don’t panic if the rendering process takes time. Rendering is a time-consuming process but I believe it gives great results. It takes time when you are working on a large and complex video project.
However, DaVinci Resolve offers a Render Cache feature that can remarkably accelerate the rendering process by caching rendered frames in the memory.
One of the most crucial tools for video editing is render buffering. It helps in accelerating productivity, enhancing playback quality, and cutting down on rendering time. The popular video editing program DaVinci Resolve has great features introduced. DaVinci Resolve has proven itself as an all-in-one tool for editing, color grading, audio editing, and visual effects.
DaVinci Resolve can be slow and resource-intensive when rendering, regardless of all of its strengths and powers. Making your unique render file can be helpful when this happens.
This article will discuss the Best Render Cache Setting for DaVinci Resolve.
Before starting to build your own Render Cache, it is necessary to understand what it is and why it is important.
What is Render Cache in DaVinci Resolve?
It is an important trait in DaVinci Resolve that permits you to for the time being store rendered frames of your project in memory or a disk, which can outstandingly decrease the rendering time and enhance playback performance. This is especially useful when working with high-resolution footage or complex effects that require a lot of processing power. In DaVinci Resolve, there are two types of caching available: Smart and User.
While using, it will improve the delivery time and make the editing process more efficient. It represents in the Timeline with a red bar and this red bar will turn to Blue when the caching process is completed.
Why is Render Cache crucial?
It is important for few a reasons and you must know about them. It can greatly speed up your procedure by allowing you to preview with smooth real-time playback your project before a full render is completed. Secondly, it can help in enhancing playback efficiency, making it simpler to edit and change.
DaVinci Resolve can playback your timeline rapidly by using pre-rendered versions of your project rather than having to render everything from scratch, which can be time-consuming and resource-intensive. This is the final key of delivery because it gives a guarantee of reliable playback and clarity.
You can make sure that your final project will look and sound entirely as you meant by manually rendering out your project to a particular format and quality level.
Understanding this main feature:
Before we start, it’s important to understand the fundamentals of DaVinci Resolve’s image cache system. DaVinci Resolve generates a cache file that contains the rendered frames when you render a clip or sequence. DaVinci Resolve can use the cached frames rather than re-rendering the footage the next time you play the clip, which can save a lot of time.
But, do keep in mind that caching can consume a lot of space and my personal suggestion would be to change the directory for the rendered cache to external fast storage.
Optimized media, proxy media, and render cache files are the three different categories files in DaVinci Resolve. While rendering cache files are produced when you render individual clips or sequences, optimized media, and proxy media files are created when you transcode or create proxies for your footage.
How to enable Render Cache in DaVinci Resolve?
To enable the setting, follow these steps:
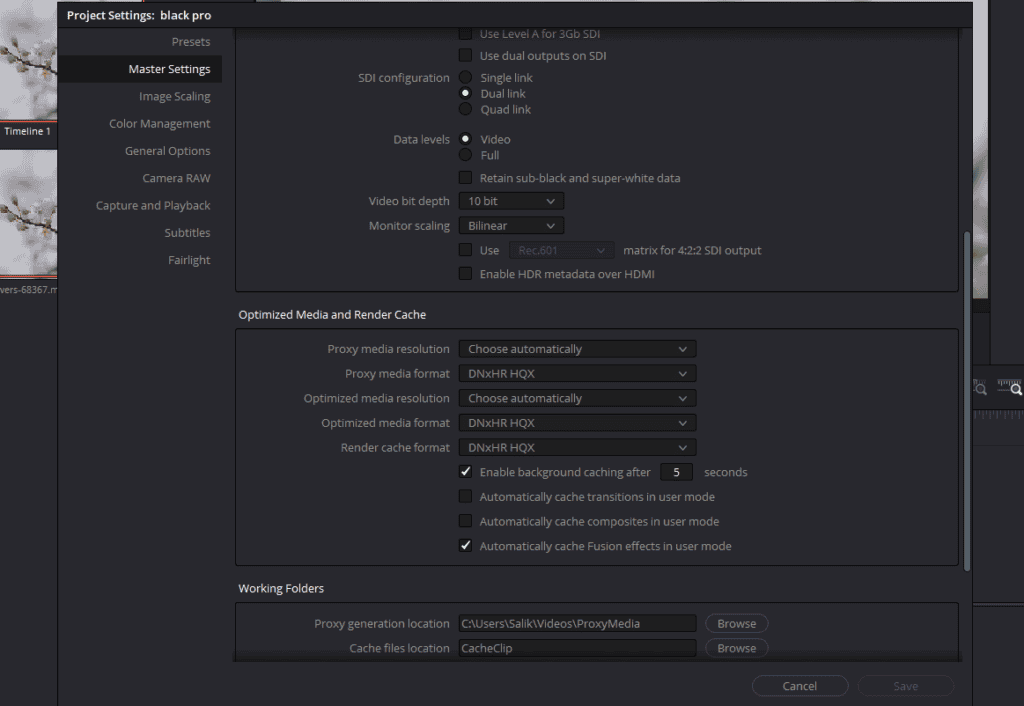
- There is an easy step first go to the “Project setting” and then click on the “Master tab”.
- Afterward, you have to scroll down to the Render Cache section.
- Choose ProRes or DNxHR LB for the Render Cache Format because these are lightweight and fast codecs. The best format from my experience is GoPro Cinemform YUV 10-Bit.
- But keep in mind that this is not proxy and you might use the cache files for your final files too. So you have to balance the right format in terms of your needs and the storage space you can allocate for the cached images.
- Keep “Optimized media resolution” on “Choose automatically”.
- Also select a fast and dependable storage device, like SSD.
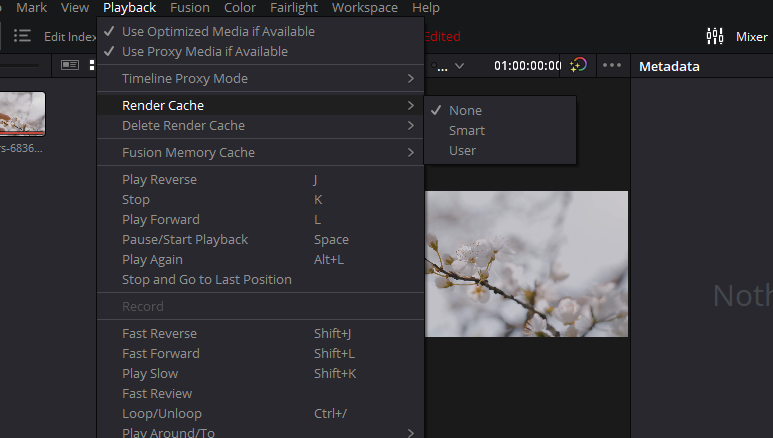
- To enable automatic caching of computationally intensive effects and timeline clips, select Playback > Render Cache > Smart in DaVinci Resolve.
- To manually select which clips and effects to cache, as well as enable automatic caching of specific processor-intensive effects such as transitions, composites, and Fusion Effects, choose Playback > Render Cache > User. This option also allows customization of caching settings in the Master Settings of the Project Settings.
- To disable all render caching, select Playback > Render Cache > Off in DaVinci Resolve.
- In the Color and Edit pages, you can cycle among the render cache modes by pressing Option-R.
What are the best Render Cache settings in DaVinci Resolve?
Render Cache Format:
Three main options are available: Uncompressed, ProRes, and DNxHR.
- The uncompressed file will give great results but also take up much space.
- ProRes and DNxHR are both high qualities but they will take up less storage space than uncompressed files. Now it’s very important to take the right decision to select the appropriate format based on your storage and performance needs.
If you have a lot of storage and want the highest quality then go with Uncompressed but if you don’t have much storage and want much quality, choose ProRes or DNxHR.
Background Caching
Make sure you have checked the box, “Enable Background Caching After 5 Seconds.” You can change the time according to your preferences. What happens when you check this box is, when you are editing or color grading and you take a coffee break, Davinci Resolve will start caching after 5 seconds of inactivity.
Working Folders
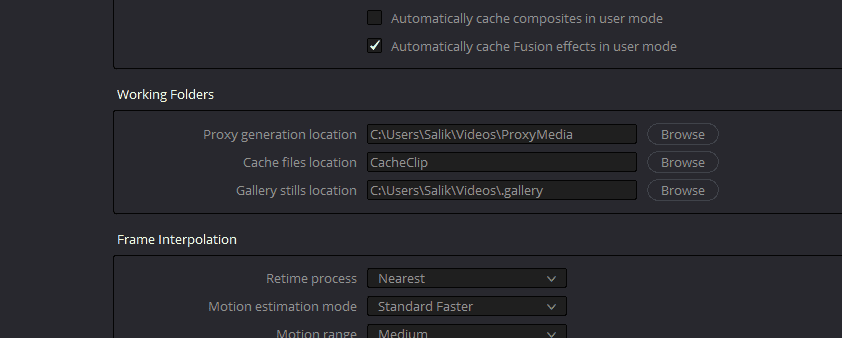
Don’t forget to change the Cache files location to a faster external drive or an SSD for future proofing your internal storage and its longevity. To do this follow these steps:
- From the menu on top, select “File’”
- Go to “Master Settings” and scroll down to “Working Folders”
- Change your file location in, “Cache Files Location”
Allocation of more RAM to Davinci Resolve for Caching:
When you are caching files in Davinci Resolve, you might want to increase the allocated RAM of the software. Caching also takes place as a background activity and utilizes a lot of memory.
If you have a lot of Ram and want to set aside a specific quantity of memory for rendering, this option can be helpful. To do this fo to-
- From the top, select the “Davinci Resolve” drop-down menu
- Select Perfrences>Memory and GPU
- Increase “Limit Resolve Memory Usage to” and “Limit Fusion Memory Cache to” according to your system config.
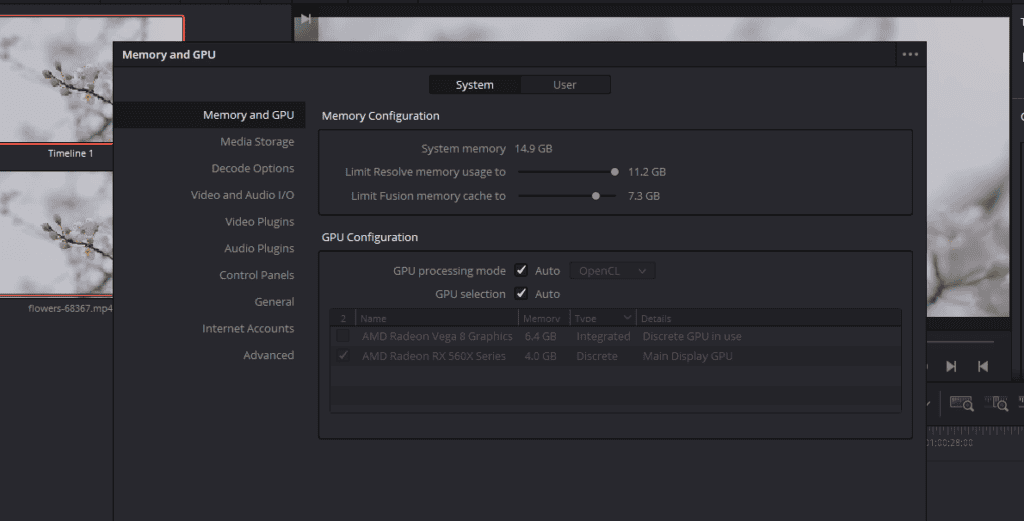
It’s essential to note that allocating too much memory for render caching can make other computer processes slower, so it’s advised to leave at least 4GB of RAM for other processes.
How to know caching is happening?
- Cache indicators along the bottom of the Timeline Ruler in the Edit page show the status of the cache. Red indicators mean that the clips have not yet been cached, while blue indicators mean that the clips have already been cached and are ready to play in real-time.
- In the Color page, cache indicators are node-specific and show which nodes in the grading node tree have been cached.
- First, when either Smart or User caching is enabled, caching occurs automatically whenever you play clips with red caching indicators. This helps to ensure that the clips are cached and ready to play in real-time.
- Second, if background caching is enabled in the Project settings (which is turned on by default), and you don’t make any changes to your project for a user-defined number of seconds (adjustable in the Master Settings panel of the Project Settings), caching will automatically begin during periods of user inactivity. This allows you to take a break while DaVinci Resolve caches the clips and effects for you.
- The caching indicators and settings in DaVinci Resolve can help you optimize your workflow and improve playback performance. Ensuring that you cache clips and effects can reduce the time it takes to play them in real-time and prevent lag or dropped frames.
Why clear Render Cache?
DaVinci Resolve can operate more quickly if the rendering memory is cleared. The software’s speed may be slowed down when the cache grows too big, which may cause frustration and wasted time.
By deleting all of the temporary files that are kept in the cache, clearing the cache makes room available and improves software performance.
Although there is a common mistake that users do while using this amazing feature, which causes many problems and issues.
How to Delete Render Cache in DaVinci Resolve the right way?
- Select the project you want to delete the render cache for in DaVinci Resolve.
- I recommend that you only delete cached files of a project you have finally completed.
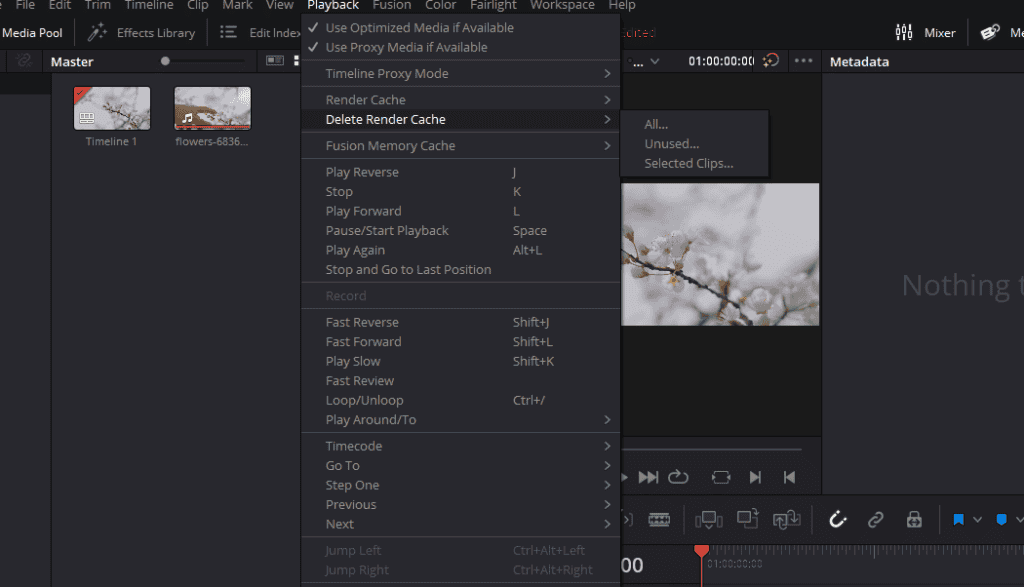
- Select “Playback” from the top menu.
- Select the “Delete Render Cache” drop-down menu.
- To get rid of all the Render Cached files click on “All.”
- To get rid of cache files of only selected clips, click on “Selected Clips.” make sure you have already selected the clip before using this option.
- To get rid of any cached files that aren’t currently being used in your project, click the “Unused” cache files option.
- A prompt asking you to affirm your desire to clear the cache will appear. To continue, press Agree.
- The cache will commence being cleared by DaVinci Resolve. Depending on the size of your undertaking and the volume of data, this could take a while.
In DaVinci Resolve, every single setting is necessary to make the fastest and most wonderful video. We cannot ignore any feature of this amazing post-production software. All features help you and give great results.
DaVinci Resolve Render Cache Smart Vs User:
In DaVinci Resolve, there are two types of Render files.
- Smart
- User
a) Smart Render Cache:
The Smart Render Cache is intended to operate automatically with no human involvement. However, the Cache Levels setting in the Project Settings makes it possible to modify the cache size. By using this feature a user can continue on the creative aspect and let the software look after the other things.
For editors working on large projects with multiple timelines and effects, the Smart Render memory is helpful.
b) User Render Cache:
A manual cache that the person creates is called the User Render Cache. It allows users to choose particular timeline segments they want to cache, which can speed up the rendering of those segments.
The timeline or clip that the user wants to cache must be selected before they can click the Render Cache button to make a User Render Cache. To hasten the rendering process, this will produce a cache file. The User Cache is also useful for previewing effects, color grading, and another adjustment before committing to a final render. By rendering out specific sections of your project, you will see how changes happen.
Editors who are working on particular parts of a project and want to hasten the rendering process for those sections can benefit from using the User Cache. It can enhance the performance of those sections and be useful when dealing with intricate effects or high-resolution footage.
See this table to understand how Smart and User option affects render caching in Fusion and Color Page.
| Page | User Mode | Smart Mode |
| Fusion Page | Render Cache Fusion Output set to On clips are cached, while Auto clips are ignored except for those with Fusion Effects, which are cached in Auto mode with the “Automatically cache Fusion Effects in User Mode” Project Setting on. | First, cached are H.264, H.265, DCP, JPEG2K, or camera raw clips edited into a timeline, with Camera Raw clips using selected project or clip debayer settings. Second, source-level caching is used for Speed effects, allowing for easy movement of clips on the Timeline. Finally, Fusion Clips, clips with Fusion Effects, and manually flagged clips in Smart mode are also cached. |
| Color Page | To improve performance, DaVinci Resolve caches nodes that have been manually flagged by selecting Node Cache > On after right-clicking. This also caches all upstream nodes to the left of the selected node in User mode. | DaVinci Resolve simplifies the editing process by automatically caching nodes that use Motion Blur, Noise Reduction, Resolve FX, and OFX plug-ins. These cached nodes improve playback performance and save time by avoiding the need to render the same effects repeatedly. In addition to this automatic caching, users can manually flag nodes to be cached in Smart mode, further increasing the efficiency of the editing process. |
Using the Rendered Cached files at export
The utilize full extent and intention of using the Render Cache is to save time as much as possible. As I said earlier that what format you choose can heavily affect your project from start to delivery. If you have chosen formats like ProRes or DNxHR in “Render Cache Format” you do not just improve your real-time performance while editing or color grading. Follow the steps below to use cached images at rendering to save time-
- After completing your project
- Go to the delivery page
- Under the “Advanced Settings”
- Tick the box “Use Render Cached Images”
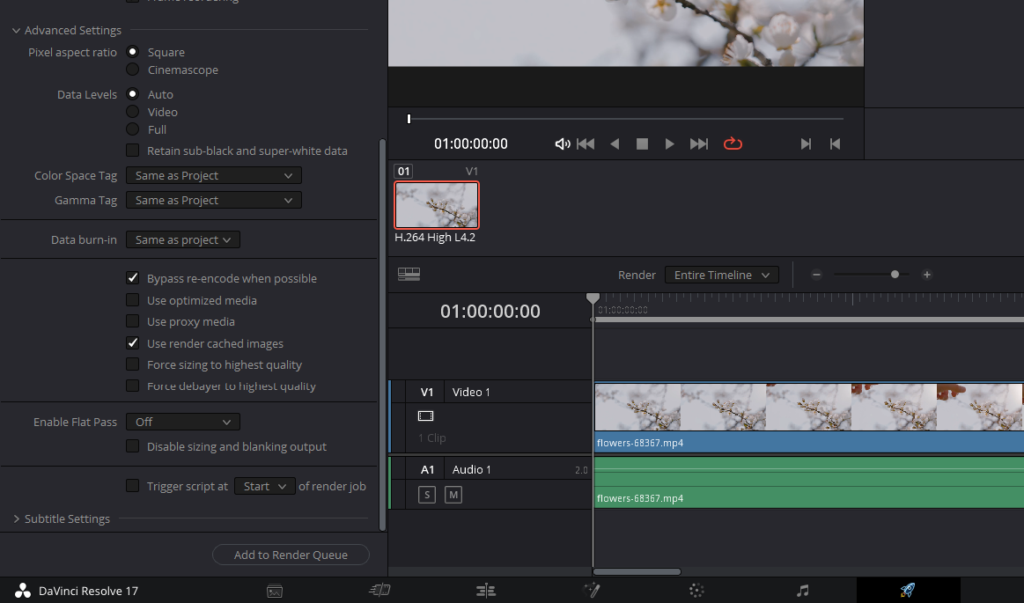
You can use the same cache to finally render the project at the delivery page. Follow the
Don’t make this one RENDER CACHE Mistake in DaVinci Resolve.
When working with video editing software like DaVinci Resolve, render caching can be a powerful tool to help speed up the editing process.
When you use it, you must be conscious of possible mistakes you might make. Failure to manage the render cache correctly is one error in particular that really can result in problems, such as slowdown and even data loss.
The Render Cache mistake to avoid:
The mistake to avoid when using this feature in DaVinci Resolve is failing to properly manage the file. If the render cache becomes too large or is not managed properly, it can lead to slow performance and even data loss.
One common mistake that can lead to issues with the render cache is failing to regularly clear out old cached files. Over time, as you work on a project and make changes to the timeline, the render cache can become filled with outdated cached files that are no longer needed.
If these files are not cleared out regularly, they can take up valuable hard drive space and slow down the performance of DaVinci Resolve. Additionally, if you make changes to the timeline that affect parts of the video that have already been cached, those cached files may no longer be accurate and can cause playback issues.
Another error to prevent is incorrectly configuring DaVinci Resolve’s render cache preferences. The software will handle the render cache for you automatically by default, but it’s crucial to make sure the settings are set up according to your preferences.
The maximum quantity of disc space that DaVinci Resolve is permitted to use for the render cache, for instance, as well as the period of time that cached files, should be kept before being deleted, are two examples. This rendering cache can rapidly bloat and cause problems if these settings are not set up correctly.
Final Talk about DaVinci Resolve’s features:
It is a powerful feature in DaVinci Resolve that can significantly speed up the rendering process. By following the best cache settings, you can optimize the Render Cache for your specific video project and reduce rendering times.
Remember to clear the Render Cache when necessary to free up memory and storage space. With the right Render Cache settings, you can create high-quality video content more efficiently and effectively.
The Smart Render Cache, an automated process, examines the video and caches the frequently used sections of the timeline. By using the manual User Render Cache method, the user can choose which portions of the timeline they want to cache. The editor’s particular
needs and preferences will determine which form of Render Cache is best to use because both have their advantages.
- Also Read- Davinci Resolve XML Import Media Offline Fix
- Also Read- Davinci Resolve Media Offline 7 Reasons & Fixes
- Also Read- Best Samsung T5 SSD Alternative For BMPCC 4k & 6k