
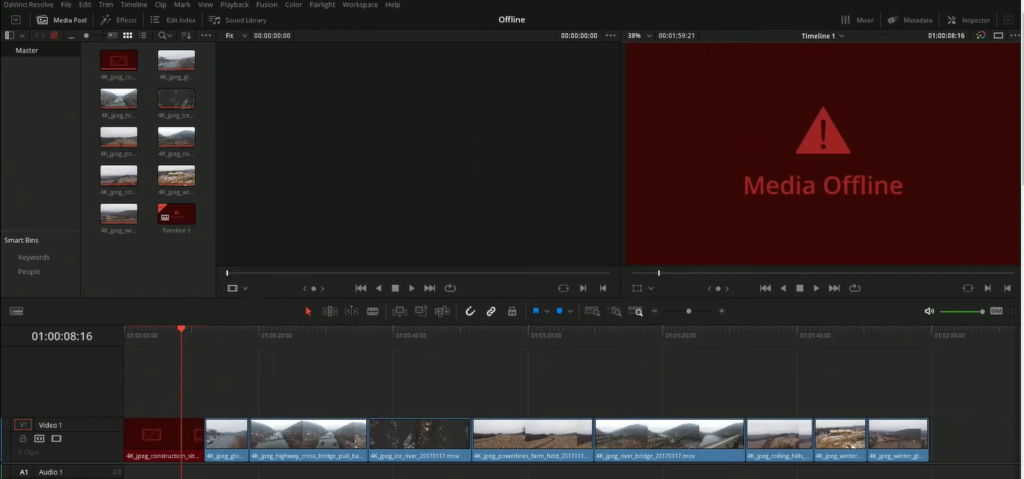
DaVinci Resolve has become an indispensable companion for video editors, offering exceptional free and paid editing tools as well as grading and color corrections. Although this software is reliable overall, the “Media Offline” error remains a common issue when importing clips, something which can be quite frustrating to deal with!
If you’ve ever experienced the aggravation of having your clip display incorrectly in the media pool, particularly when you are just about to start your project and you face a media offline error or in some cases, audio is playing without an image to match it. This article has just what you need. Discover how easy it is to troubleshoot and fix the dreaded “media offline” problem within DaVinci Resolve.
Deep Diving In Davinci Resolve Media Offline 7 Reasons & Fixes
Sick of seeing the “Media Offline” message in DaVinci Resolve? Don’t worry; we’ve got you covered. Our comprehensive guide will help you figure out what’s causing this issue and how to get your project up and running again quickly and easily. So say goodbye to stress, and let’s resolve this together!
Reason 1: Media was moved
If you find yourself in the midst of a “Media Offline” error, don’t panic! This is a typical experience when media has been relocated, like if you started editing off an SD card and then removed it while trying to navigate back to your project. DaVinci Resolve can effortlessly detect where the original source material comes from and easily fix this issue.
For optimal results, avoiding editing directly off an SD card is advisable. Instead, you should transfer the footage to a storage device such as a hard drive, NAS, or internal disk drive for permanent and secure content storage. This way, your work will remain intact and uncompromised in case of any unplugging or shifting around.
Solution: Locate the media
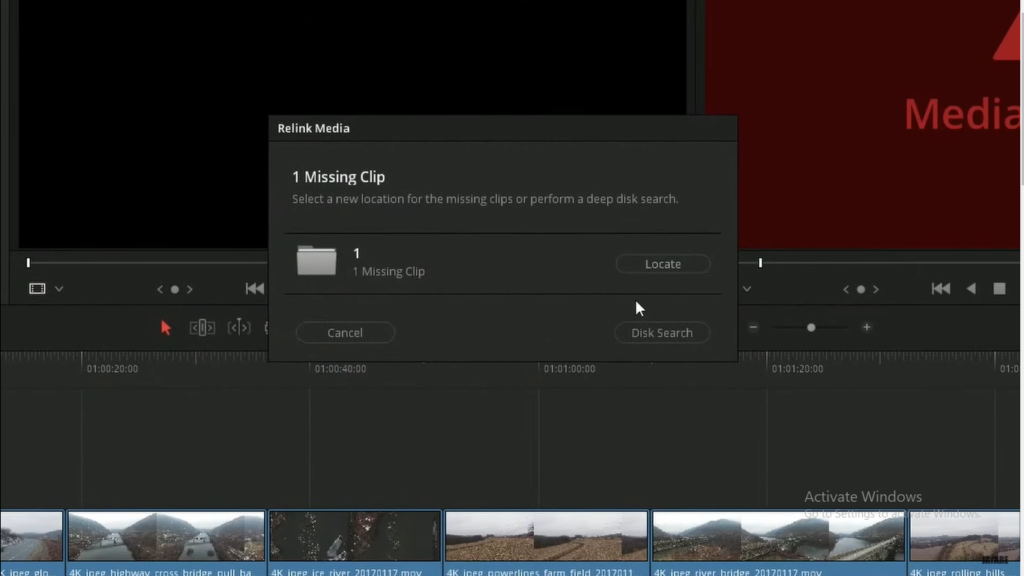
In order to help DaVinci Resolve locate your media, there are three distinct processes you should take:
- Locate: For an expeditious and effective solution, search within a specific folder if you know where your media has been moved. Utilizing this method will save time and simplify the process!
- Disk Search: If you have a vast amount of content on your device, it is not suggested to use the deep disk search option as this may take quite some time. This method will scan every single file and folder in your system!
- Comprehensive Search: If you are looking for the perfect balance between Locate and Disk Search, this is it! This option works best if you have your media structured into neatly organized folders.
How to relocate in DaVinci Resolve to Fix the “Media Offline” Error
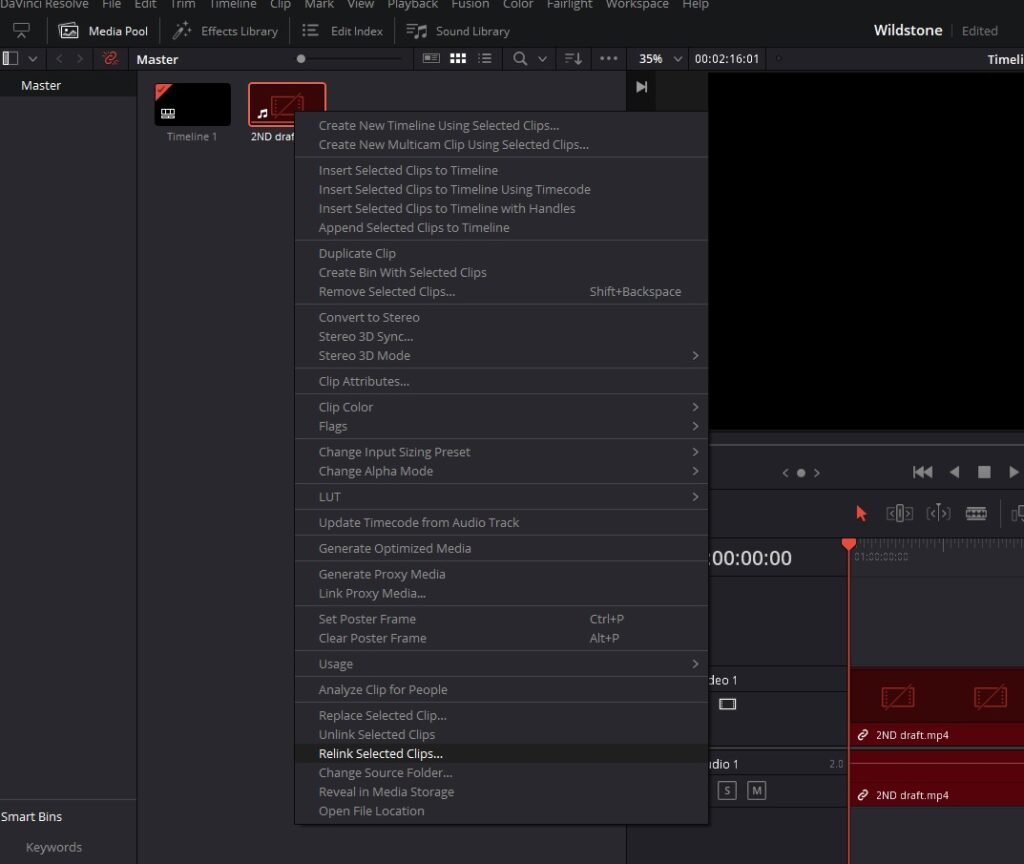
To relocate, first, right-click on the media offline clip and select Locate. Then, you can easily find your way to the new location of said media before selecting it – DaVinci Resolve will do all of the hard work for you! Alternatively, follow these steps:
- Select the offline media in your timeline to get started.
- Right-click and select “Find In Media Pool”
- The clip with a red thumbnail will appear in the media pool.
- To relink your offline clips, simply right-click and select the “Relink Selected Clips” button.
- After finding the right media, simply select it and press “OK” to confirm.
- The clip has been reconnected, and the media is now accessible.
Tips to Prevent Offline Media
To prevent offline media, you can take the following steps:
- Always copy your media to a permanent location before editing.
- Use descriptive filenames to make it easier to locate media.
- Avoid moving or renaming media files outside of DaVinci Resolve, especially when you have started the project.
- Keep all your media files in one location to make it easier to manage.
Reason 2: Media was deleted
If you encounter a “Media Offline” message in Davinci Resolve due to deleted media, it means that the media files used in your project have been removed from their original location, and the software is unable to locate them.
There are several reasons why media files may get deleted, such as accidental deletion, storage device failure, or intentional removal. Regardless of the cause, it’s important to take immediate action to prevent further data loss.
Solution: Restore the media
Here are some possible fixes for this issue:
- Check the Trash or Recycle Bin: If you or someone else deleted the media files accidentally, check the Trash or Recycle Bin to see if they are still there. If they are, restore them to their original location.
- Look for backups: If you have a backup of your media files, you can restore them from there. If you don’t have a backup, make sure to create one in the future to avoid similar issues.
- Check other locations: If you store your files in multiple locations, check each location to see if the missing files are there. If they are, move them back to their original location.
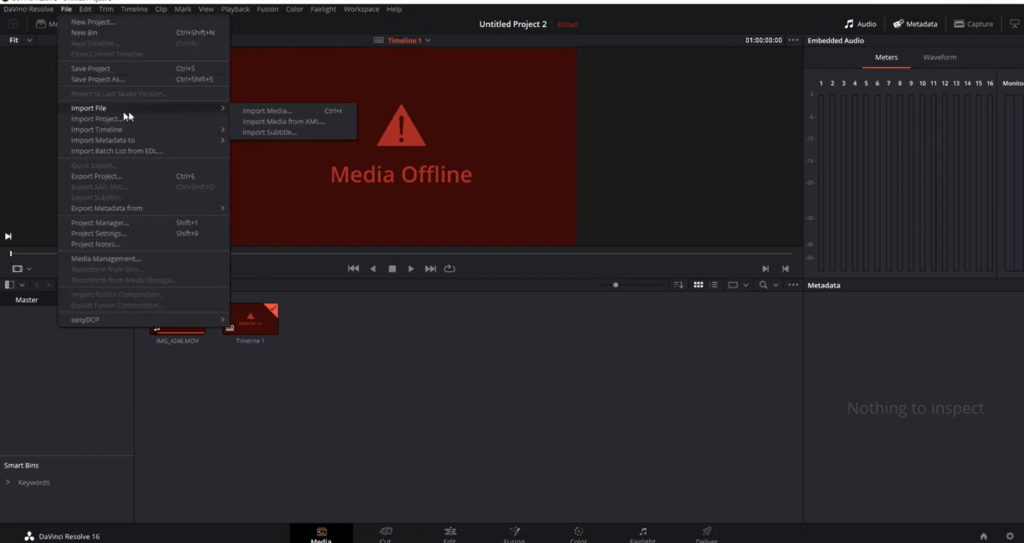
- Re-import media: If you can’t locate the missing files, you may need to re-import them into your project. Make sure to give them the same name and file type as the original files to avoid any issues.
- Use the Relink option: If you have moved the media files to a different location, or using the backup drive to restore, you can use the Relink option in Davinci Resolve to link them back to your project. Select the offline media files, right-click on them, and choose “Relink Selected Clips.”
- Contact support: If none of the above solutions work, contact Davinci Resolve support for assistance.
- Prevent future issues: To avoid similar problems in the future, make sure to keep your media files organized and backed up regularly. Avoid deleting or moving files unless you’re sure they’re no longer needed.
Reason 3: Media is corrupted
When media files become corrupted, it means that the data within the file has become damaged or lost. This can happen for a variety of reasons, such as file transfer errors, storage device malfunctions, or issues with the file itself. In the context of using DaVinci Resolve, a corrupted media file can result in the program displaying the “Media Offline” message, which prevents the user from accessing and using the file in their project.
One common cause of media corruption is file transfer errors. This can happen when transferring files between devices, such as copying files from a camera’s memory card to a computer or when downloading files from the internet.

Another cause of media corruption is storage device malfunctions. Hard drives, memory cards, and other storage devices can experience physical damage, electrical problems, or other issues that can cause data to become corrupted or lost. In some cases, the device may need to be repaired or replaced in order to restore the data.
Finally, media files themselves can sometimes be faulty and become corrupted. This can happen if the file was created improperly during the encoding process on the set by the DIT or affected by a virus or other malware. To prevent this, it is important to use reliable sources for media files and to ensure that they are stored properly.
Solution: Replace the media
There are several potential reasons why you’re experiencing “media offline” issues in Davinci Resolve. Here are some common causes and solutions:
- Using the original media: the only way out of this problem is to retransfer the data to the working drive if you have any backup.
- Contacting support: If you feel that the problem occurred because of the storage device you can get in touch with the support. They are able to easily recover the lost data.
Reason 4: Slow Storage Device
When working with DaVinci Resolve, having a fast and reliable storage device is crucial to ensure smooth performance and avoid the “Media Offline” error message. Slow storage devices, such as mechanical hard drives or older SSDs, can cause this issue due to their limited read and write speeds.

Solution: Optimize Storage Device
If you encounter this problem, the first step is to check your storage device’s speed and ensure that it meets the minimum requirements for your project’s media. If your device is running slow, there are several ways to fix the issue:
- Upgrade to a faster storage device: If your current device is too slow, consider upgrading to a faster one. Solid-state drives (SSDs) with high read and write speeds are recommended for optimal performance with DaVinci Resolve. They have also become cheaper to own.
- Use a RAID array: If you have multiple hard drives, you can combine them into a RAID array to increase their read and write speeds. RAID 0 strips data across multiple drives and can significantly boost your storage device’s performance. This solution is for someone who is doing video editing as a full-time job because it can be expensive.
- Optimize your media: You can optimize your media by transcoding it to a lower resolution or using proxy files. This reduces the amount of data that needs to be read from the storage device, resulting in faster performance.
- Use an external storage device: If your computer’s internal storage device is slow, you can use an external device with faster read and write speeds. Thunderbolt 3 and USB 3.1 Gen 2 devices are recommended for optimal performance.
- Close other applications: If you have multiple applications running, or have a limited amount of RAM, it can compete for system resources and slow down DaVinci Resolve. Closing other applications can free up system resources and improve performance.
- Clean up your storage device: If your storage device is full or fragmented, it can slow down your system’s performance. Clean up your device by deleting unnecessary files or defragmenting it.
- Adjust DaVinci Resolve’s settings: You can adjust DaVinci Resolve’s playback settings to reduce the demand on your storage device. For example, you can reduce the playback resolution or frame rate to improve performance.
Reason 5: Clear Render Cache
The “Media Offline” message may appear if the render cache has been cleared. This can happen due to a system crash or by accidentally pressing the clear button.
In video editing, rendering refers to the process of creating a final output file that can be played back smoothly without any lag or stuttering. Rendering requires significant processing power and can take a long time, especially for complex projects with many video and audio tracks, effects, and transitions. Though render cache improves your real-time playback while editing, it sometimes gets corrupted or gets unsupported if you have updated Davinci Resolve in between a project.
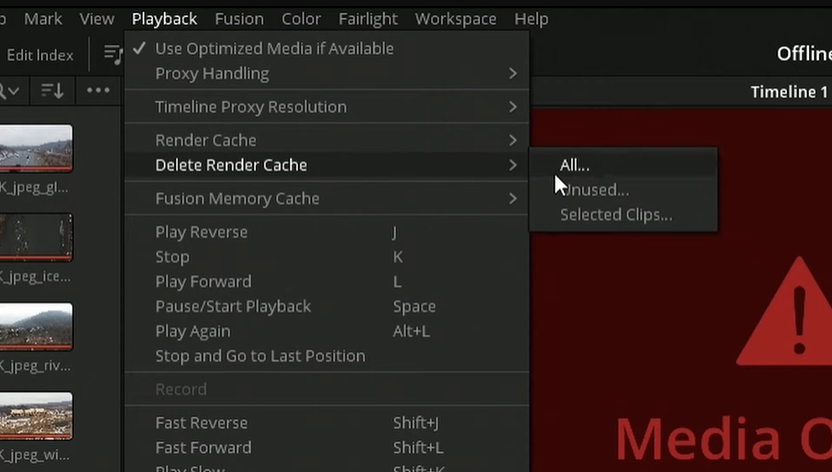
Solution: Deleting Old Render Cache

By going into Playback from the menu on top, and selecting Delete Render Cache>All, you will be deleting all the cache that was stored for this project. You can recreate the cache for faster editing by going into Render Cache and selecting Smart or User.
Reason 6: “Media Offline” Error in DaVinci Resolve with H265/HEVC files
One of the most common problems is the “Media Offline” error when importing a clip that is H.265 or HEVC codec.
Seeing a clip not displaying correctly in the media pool can be frustrating, especially when the audio is playing without an image. In this section, we will show you how to fix this.
Which cameras shoot in H.265/HEVC?
Knowing which cameras shoot in H.265 codec helps future proofing and designing a workflow for faster deliveries for your upcoming projects.
- Apple iPhones
- DJI Drones
- GoPro Action Cameras
- Fujifilm X-T3/T4
- Sony A7S III
- Canon EOS R5

Solution for the “Media Offline” due to H.265/HEVC
Let’s explore other vital factors or solutions to this problem;
- Understanding the Problem
- Why does it occur?
- Various solutions available online
- Why may some solutions not work?
- The best solution – HEVC Video Extensions
- How to download and install HEVC Video Extensions
- Testing the solution
- Alternative solutions
- The problem with exporting h.265 clips
- Comparing Mac OS and Windows 10
Understanding the Problem
When you import a clip into DaVinci Resolve, it immediately shows a “Media Offline” error. If you press play, you can hear the sound, but the video does not play. This error is because DaVinci Resolve cannot decode the h265 video properly. There are many articles available online that suggest various solutions to fix the media offline problem. However, some may be misleading or not work for your specific case.
Why Does the Media Offline Problem Occur?
As mentioned earlier, the media offline problem occurs when DaVinci Resolve cannot decode the h265 video properly. This is because h265 is a new video codec that not all video players or editors do not support. Like many other editors, DaVinci Resolve has trouble decoding h265 video because it requires additional extensions to play.
Various Solutions Available Online
There are many articles available online that suggest various solutions to fix the media offline problem. However, some of these solutions may not work for your specific case. For example, some articles suggest re-linking selected clips, changing the source folder, or re-importing the clips. While these solutions may work in some cases, they are not guaranteed to fix the media offline problem.
Why May Some Solutions Not Work?
The reason why some solutions may not work is that they need to address the root cause of the problem. The media offline problem occurs because DaVinci Resolve cannot decode the h265 video properly. Therefore, re-linking selected clips or changing the source folder will not fix the problem.
The Best Solution – HEVC Video Extension
The best solution to fix the “Media Offline” problem is downloading and installing the Microsoft HEVC Video Extensions. This extension is not free and costs $0.99. Once you have installed the extension, close and reopen DaVinci Resolve, and your videos will play without any problems.

How to Download and Install HEVC Video Extensions
- To download and install HEVC Video Extensions, follow these simple steps:
- Go to the Microsoft Store and search for “HEVC Video Extensions” or click here.
- Click on the “Get” button to download and install the extension.
- Wait for the installation process to complete.
- Close and reopen DaVinci Resolve.
- Import your video files again, and they should play without any problems.
Reason 7: Flashing and Flickering of Media Offline in Rendered Videos
When working with some videos in Davinci Resolve, some users have reported a frustrating issue where they receive an offline media error in a few frames which flashes while playing the video, which causes flickering in their rendered videos. Let’s discuss how to fix this issue and prevent it from happening again!

Why Offline Media Error Occurs
Users trying to edit iPhone, Sony or even GoPro videos in DaVinci Resolve can result in an offline media error. The problem arises because newer cameras shoot in a newer codec, H.265, while DaVinci Resolve prefers H.264. When rendering videos, the mismatched codec can lead to stuttering and flickering in the final product.
How to Fix the Flashing and Flickering of Media Offline in Videos
Fortunately, the issue can be solved by using free software called Handbrake to transcode the video into the preferred codec. Here’s how to fix the offline media error:
- Download and install Handbrake from their official website, handbrake.fr.
- Once installed, open the Handbrake application.
- In Handbrake, click the “Open Source” button to select the video file that must be transcoded.
- Choose the desired preset, such as “Fast 1080p30” or “HQ 1080p30 Surround,” and click “Start Encode.”
- Once the video is transcoded, import it into DaVinci Resolve and edit as usual.

Additional Tips to Avoid Offline Media Error
To prevent the offline media error from happening again, follow these tips:
- Shoot videos in the H.264 codec instead of H.265 codec.
- If shooting videos in H.265 codec is a must, transcode them using Handbrake before importing them into DaVinci Resolve.
- Always use the latest version of DaVinci Resolve.
- Check the codec of the video before importing it into DaVinci Resolve. If it’s not in H.264, transcode it using Handbrake.
Fix #2 for Flashing and Flickering of Media Offline in Videos
This fix works when you are using the Studio version of Davinci Resolve.
- Go to the “Davinci Resolve” menu from the top left corner.
- Click on Preferences> User, and tick the “Stop playback when a dropped frame is detected” and also tick the “Stop renders when a frame or clip cannot be processed.”
- This will help you detect any flashing issues so you don’t miss out.
- Now head to the System section in the Preferences.
- In “Memory and GPU” tick the Auto check box in front of GPU Processing Mode.
The offline media error in DaVinci Resolve can be frustrating, but it can be resolved by transcoding the video using Handbrake. It’s important to keep in mind the codec of the video while shooting and importing it into DaVinci Resolve to avoid encountering the issue.
Conclusion
If you are a colorist and often face this problem after receiving the XML from the editor, it’s always best to do the back-and-forth communication with them.
In some cases because of last-minute edit changes, a few media files such as stock footage are added afterward, which are not transferred to you. Keeping the director and the editor in the loop makes the job very easier.
To conclude, Davinci Resolve Media Offline is a frustrating problem to have. While it can easily be remedied with any one of the proposed solutions discussed above, it’s still essential that you take preventative measures to keep your media and projects organized, updated, and backed up regularly.
This allows for a smoother editing experience without needing additional fixes and hacks when the project or media experiences an abrupt shutdown. In addition, ensure that your computer and software keep up to date with updates to prevent future occurrences of Davinci Resolve Media Offline.
With the understanding that this annoyance can certainly be avoided by thoughtfully managing how one uses the platform and keeping one’s files organized, users of Davinci Resolve can return to creating captivating films for audiences everywhere.
- Also Read- How To Nest In Davinci Resolve (Compound Clips)
- Also Read- How To Put GIFs in Davinci Resolve (2 Easy Ways)
- Also Read- How To Save Videos As MP4 In Davinci Resolve