
Hi, welcome back to FilmmakingElements.com, your one-stop source for all things related to the art and technique of filmmaking. In today’s blog post, we’re going to delve into the world of color grading, specifically focusing on how to invert colors in DaVinci Resolve.
This powerful, professional-grade software has become a go-to choice for filmmakers, video editors, and colorists alike. Inverting colors can create striking visual effects that can help you tell a compelling story or add a unique touch to your footage. We’ll walk you through three different methods to achieve this effect, catering to various skill levels and project requirements.
Whether you’re new to DaVinci Resolve or a seasoned pro, this guide will help you expand your color grading toolkit and unlock your creative potential. So, let’s dive in and learn how to invert colors in DaVinci Resolve!
1. Inverting Colors in DaVinci Resolve Using the Color Tab and Curves Menu
We will explore the first method to invert colors in DaVinci Resolve using the Color tab and the Curves menu. This method is relatively simple and straightforward, making it an excellent choice for users of all skill levels.
Step 1: Navigate to the Color Tab
To begin inverting colors in DaVinci Resolve, first, open your project and ensure that your video footage is placed on the timeline. Then, navigate to the Color tab, which is located at the bottom of the DaVinci Resolve interface. The Color tab is where most of the color grading work takes place, and it’s likely the first place users will look when attempting to invert colors.
Step 2: Access the Curves Menu
Once you’ve navigated to the Color tab, you’ll see several menus and windows related to color grading tools. You’ll need to access the Curves menu, which is an essential tool for adjusting the tones, color balance, and contrast of your footage. If you’re already in one of the other menus, click on the Curves icon, which looks like a curved diagonal line. This icon can be found at the top of the tools panel, and clicking on it will bring you to the Curves menu.
Step 3: Select the RGB Curve
In the Curves menu, you’ll notice there are various color channels, such as the Red, Green, Blue, and Luma channels. To invert the colors, you’ll need to work with all the channels including the luma channel, and make sure the chain-looking icon is selected.
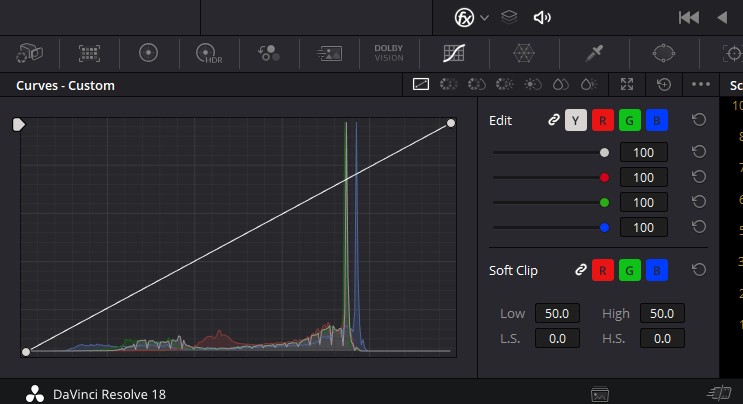
Step 4: Invert the RGB Curve
The RGB curve is represented by a diagonal line that spans from the bottom left to the top right of the curve window. This line represents the relationship between the input and output values of your image, where the horizontal axis corresponds to the input values, and the vertical axis corresponds to the output values.
To invert the colors, you’ll need to modify the curve so that it represents the inverse relationship between input and output values. Click on the top right point of the curve, which represents the highlights, and drag it down to the bottom right corner of the curve window. Then, click on the bottom left point of the curve, which represents the shadows, and drag it up to the top left corner of the curve window. Your RGB curve should now be a diagonal line that spans from the top left to the bottom right of the curve window.

By inverting the curve in this manner, you’re effectively swapping the input and output values of your image, causing the colors to become inverted. For example, an input value that corresponds to a bright highlight will now be mapped to a dark shadow, and vice versa.
Step 5: Adjust Additional Curves (Optional)
If you’d like to fine-tune the appearance of your inverted colors, you can adjust the individual Red, Green, and Blue curves separately. This will allow you to control the intensity and balance of each color channel, leading to a more refined and visually pleasing result.
To do this, select one of the individual color channels (Red, Green, or Blue) by pressing there respective buttons R for red, G for Green, and B for blue. Once you’ve selected a color channel, you’ll see its corresponding curve displayed in the Curves window.
You can now adjust the curve by clicking and dragging the points on the curve to change the relationship between input and output values for that specific color channel. You can add new points to the curve by clicking on the curve line and dragging the points to the desired position. This allows you to have more control over the color channel’s behavior.
For example, if you want to reduce the intensity of the red channel in your inverted footage, you can adjust the Red curve by lowering the highlights and raising the shadows. Experiment with the individual color channel curves until you achieve the desired look for your inverted colors.
2. Inverting Colors in DaVinci Resolve Using the Invert Color OFX
In the previous section, we explored the first method to invert colors in DaVinci Resolve, which involves using the Color tab and the Curves menu. In this section, we will discuss the second method to achieve this effect, which is by using the “Effects” library and the Invert Color plugin. This method is also simple and effective, providing another option for users looking to invert colors in their footage.
Step 1: Navigate to the Color Page
To start inverting colors using the Effects Library, open your project in DaVinci Resolve and ensure that your video footage is placed on the timeline. Then, navigate to the Color page, which is located at the bottom of the DaVinci Resolve interface, alongside other tabs like Edit, Fairlight, and Deliver. The Color page is where you’ll find most of the color grading tools and features, including the Effects Library.
Step 2: Access the Effects Library
With the Color page opened, you’ll see various panels and tools related to color grading. To access the Effects Library, locate the “Effects” button in the top right corner of the Color page. Click on the button, and the Effects Library panel will appear.
Step 3: Search for the Invert Color Plugin
In the Effects Library panel, you can browse through various plugins and effects to enhance your footage. To find the Invert Color plugin, use the search bar located at the top of the Effects Library panel. Type “invert” into the search bar, and the Invert Color plugin should appear in the search results.
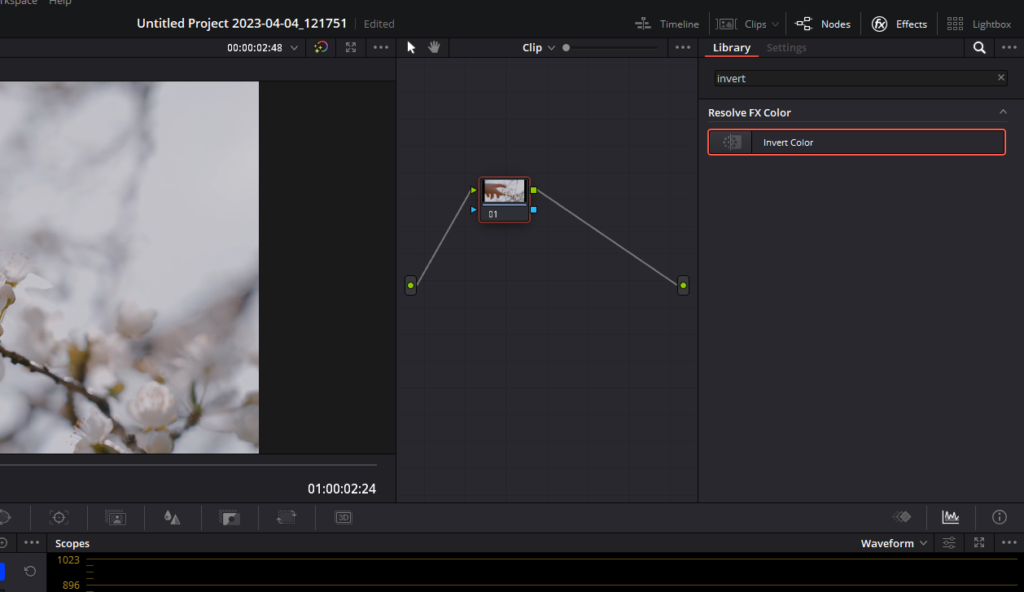
The Invert Color plugin is a versatile tool that allows you to invert any color channel, including the alpha channel. This plugin has numerous applications in advanced workflows, particularly when inverting alpha or key channels for specific purposes. It’s important to note that this is not a “film negative” plugin; it simply inverts the colors of your footage.
Step 4: Create a New Node for the Invert Color Plugin
Before applying the Invert Color plugin to your footage, it’s a good practice to create a new node in the node tree. Nodes are used in DaVinci Resolve’s color grading workflow to organize and apply various effects and adjustments. By creating a new node for the Invert Color plugin, you’ll have more control over the effect and can easily disable or modify it later.
To create a new node, right-click on an existing node in the node tree, which can be found in the Node Editor panel. Select “Add Node” from the context menu, and then choose “Add Serial Node.”
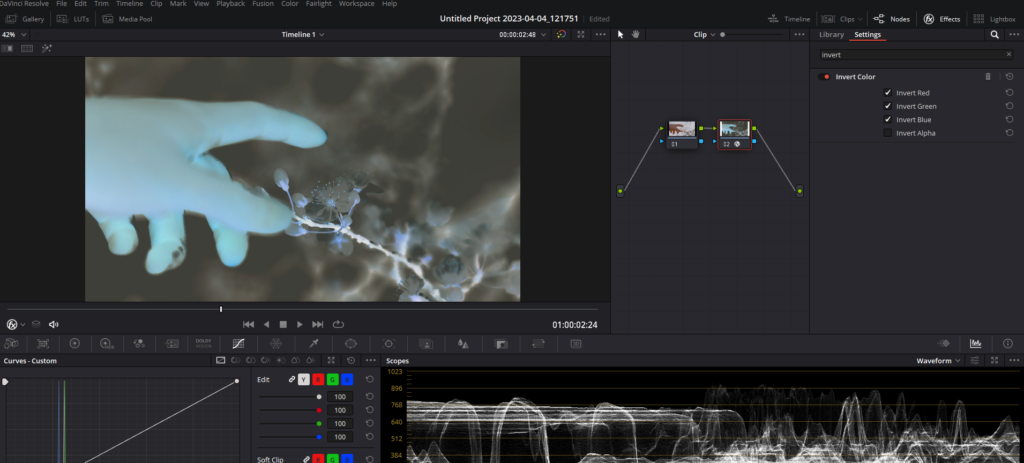
Step 5: Apply the Invert Color Plugin to the Node
With the new node created, you can now apply the Invert Color plugin to your footage. To do this, click and drag the Invert Color plugin from the Effects Library panel onto the new node in the Node Editor panel. Once the plugin is applied, you’ll notice that the colors in your footage have been inverted.
3. Inverting Colors in DaVinci Resolve Using the Fusion Page
In the previous sections, we discussed two methods for inverting colors in DaVinci Resolve: using the Color tab with the Curves menu, and using the Effects Library with the Invert Color plugin. In this section, we’ll explore the third way to invert colors, which involves utilizing the Fusion page of DaVinci Resolve.
Step 1: Navigate to the Fusion Page
To begin inverting colors using the Fusion page, open your project in DaVinci Resolve, and ensure that your video footage is placed on the timeline. Then, navigate to the Fusion page, which is located at the bottom of the DaVinci Resolve interface, alongside other tabs like Edit, Color, Fairlight, and Deliver. The Fusion page is where you can access DaVinci Resolve’s powerful node-based compositing tools and effects.
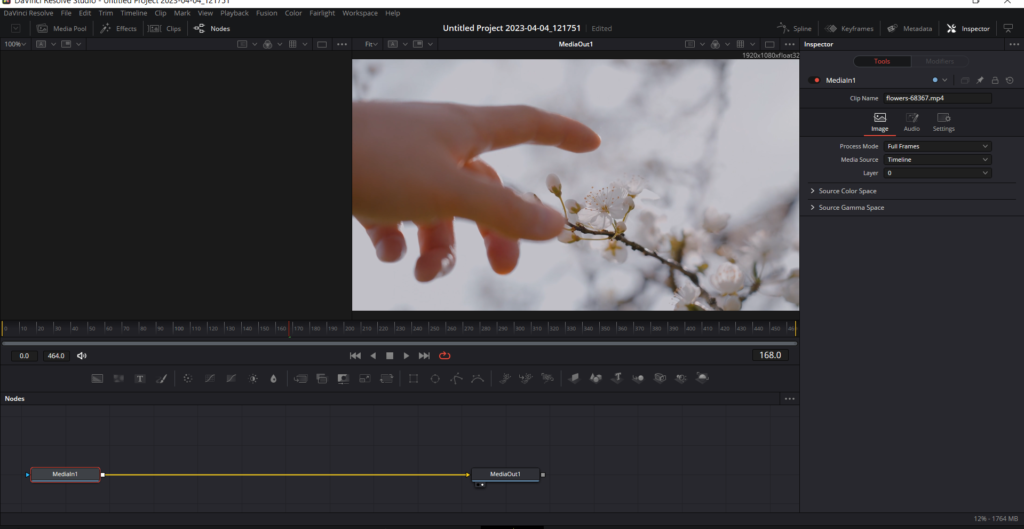
Step 2: Select the MediaIn1 Node
Once you’ve navigated to the Fusion page, you’ll see the node editor panel, where you can find various nodes representing the different elements and effects in your composition. Locate the MediaIn1 node, which represents the input video footage in your composition. Click on the MediaIn1 node to select it.
Step 3: Add an Invert Color Node
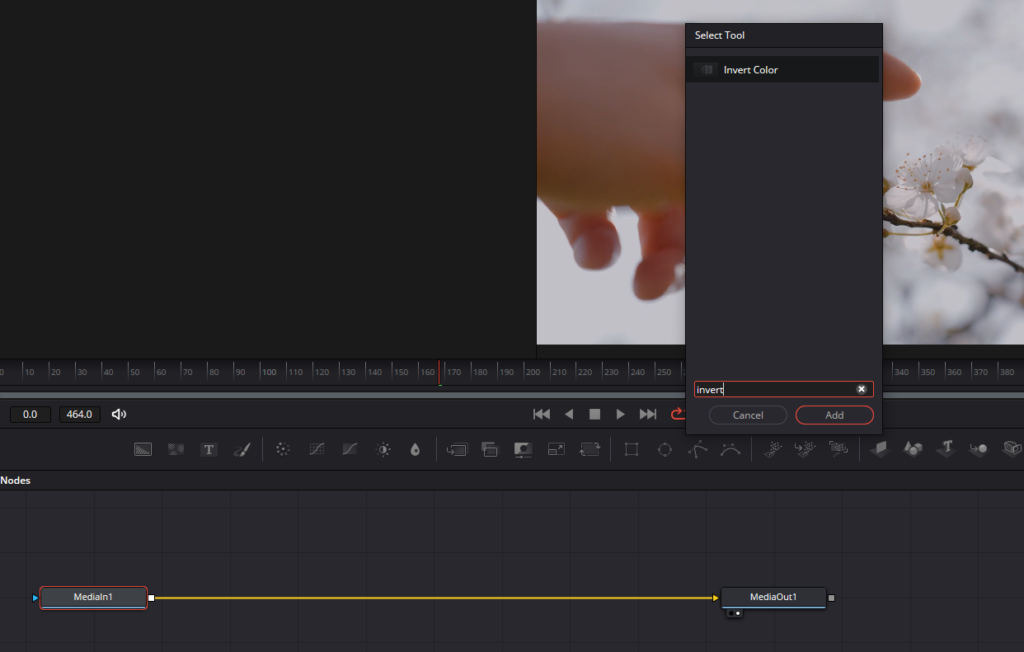
With the MediaIn1 node selected, it’s time to add an Invert Color node to your node tree. To do this, press Shift + Space simultaneously to bring up the “Select Tool” window. In the search bar of the “Select Tool” window, type “invert” to find the Invert Color node. Click on the Invert Color node in the search results, and then click on the “Add” button to add the node to your node tree.
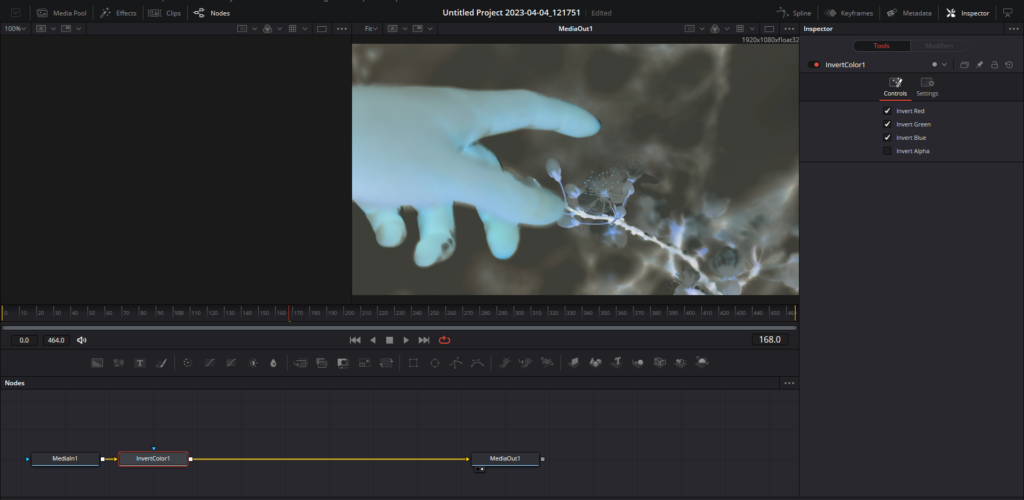
By connecting the nodes in this manner, you’re applying the inverted colors effect to your video footage, which then passes through the Invert Color node and finally to the MediaOut node for display in the viewer window.
In conclusion, these three methods offer quick and easy ways to invert colors in DaVinci Resolve, allowing you to create unique visual effects in your video projects. By using the Color tab with the Curves menu, the Effects Library with the Invert Color plugin, or the Fusion page with the Invert Color node, you can achieve a compelling look for your footage with just a few simple steps.
As you continue to explore the vast range of features and tools available in DaVinci Resolve, you’ll find that there are always new techniques and creative possibilities to discover. With dedication and practice, you’ll be well on your way to mastering DaVinci Resolve and creating stunning, professional-quality projects that captivate your audience.