
Welcome back to FilmmakingElements.com, your one-stop destination for everything related to the magic of filmmaking. Today, we’re diving into the fascinating world of music video production and exploring the 8 best music video effects you can achieve using DaVinci Resolve. With its powerful editing tools and a wide array of visual effects capabilities, DaVinci Resolve has become the go-to software for both beginners and seasoned professionals in the film industry.
In this article, we’ll guide you through the most striking and captivating effects that you can use to elevate your music videos to a whole new level. From retro vibes to futuristic aesthetics, these effects are sure to leave your audience spellbound. So, let’s jump right in and discover the creative potential DaVinci Resolve has to offer for your next music video project!
Effect 1 – Ghost/Double Exposure Effect
The first effect on our list is the mesmerizing ghost or double exposure effect. This versatile effect can be used as a transition or simply as an added visual element in your music video. The best part? It’s surprisingly easy to achieve in DaVinci Resolve.
Step-by-Step Guide
- Duplicate the clip: Select the clip you’d like to apply the effect to, then hold down the Alt or Option key on your keyboard and click and drag the clip up to duplicate it.
- Offset the clip: Zoom in on your timeline, and drag the duplicated clip a few frames forward or backward. This will create the foundation for the double exposure effect.
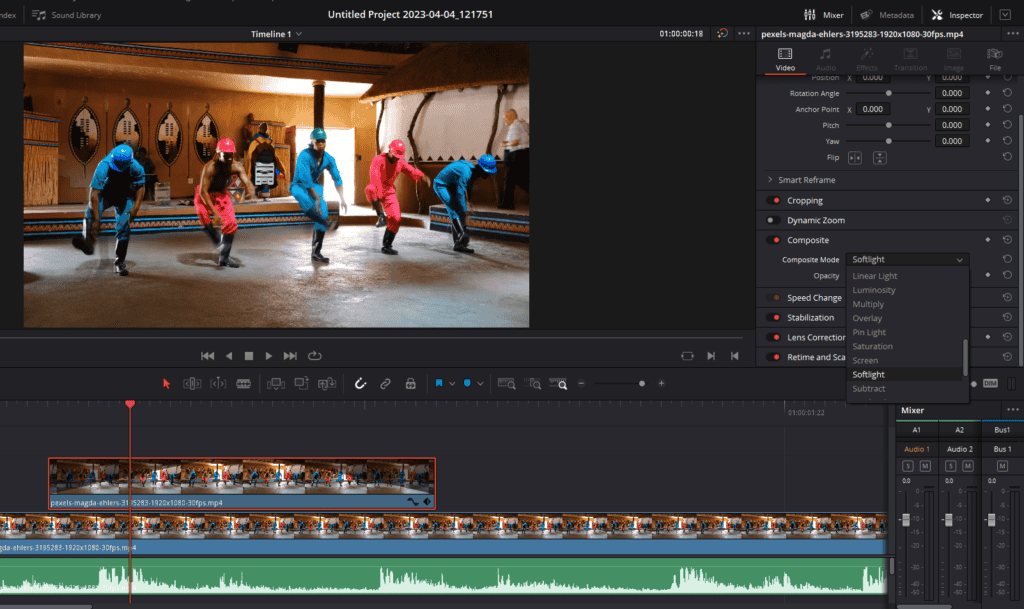
- Choose the composite mode: With the upper clip selected, navigate to the composite mode settings in the Inspector panel on the right side and choose “Soft Light”. Feel free to experiment with other composite modes as well, as they can lead to different looks for the effect.
- Fade in and out: To create a more dynamic and captivating effect, gradually fade the ghost effect in and out of the clip. For a fade-out effect, hover your mouse over the upper right-hand corner of the video clip until a white handle, known as a fade handle, appears. Click and drag the handle to the left to create the fade-out. To achieve a fade-in effect, position your mouse over the upper left-hand corner of the video clip or image until the fade handle becomes visible. Click and drag the handle to the right to initiate the fade-in.
- Add a touch of color: If you’re feeling adventurous, duplicate the clip once more and change its composite mode to “Hue”.
Effect 2 – Rewind Effect
The second effect we’re covering is the rewind effect. This technique adds a sense of time-warping to your music video, making it look like the visuals are jumping back and forth in time. Not only is it an eye-catching effect, but it’s also quite simple to achieve in DaVinci Resolve.
Step-by-Step Guide
- Choose your clip: Find the clip you’d like to apply the rewind effect to.
- Cut the clip: Press the ‘B’ key on your keyboard to access the blade tool and cut the clip at the desired starting point.
- Duplicate the clip: Hold down the Alt or Option key on your keyboard, click and drag the clip to duplicate it, and place it right next to the original clip.
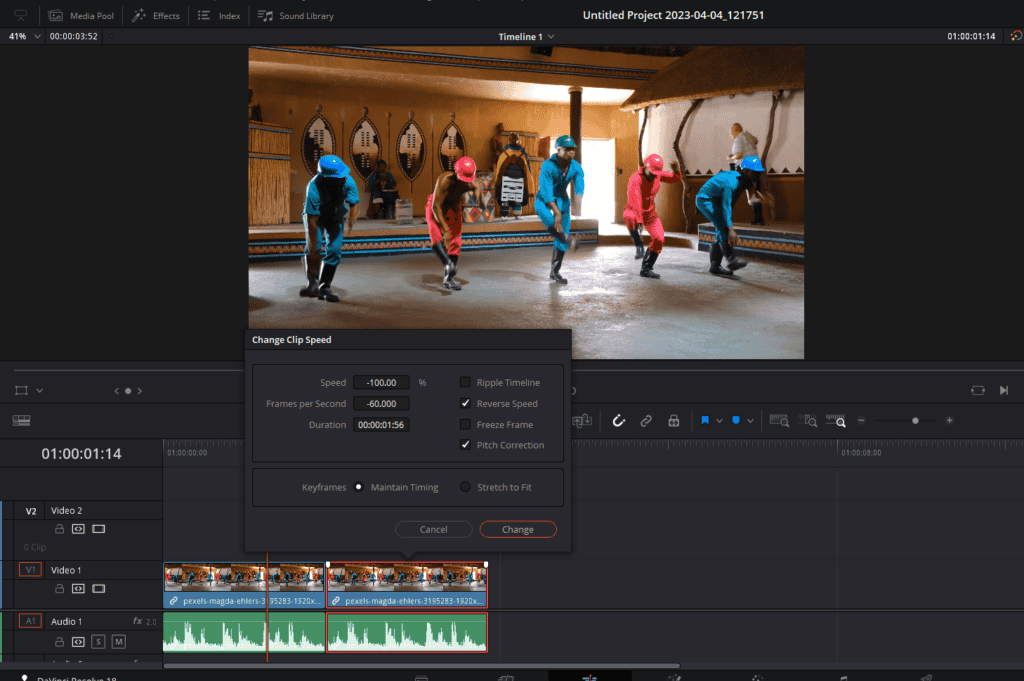
- Reverse the clip speed: Right-click on the duplicated clip, select “Change Clip Speed,” and check the “Reverse Speed” box. Click “Change” to apply the effect.
- Create a repeating rewind effect: If you’d like the rewind effect to occur multiple times, simply highlight both clips and duplicate them as many times as desired, dragging them in front of one another on the timeline.
- Cut to the beat: To enhance the visual appeal of the rewind effect, make sure to cut and synchronize the effect with the beat of the music. This will create a more cohesive and polished look for your music video.
With the rewind effect added to your music video, you’ll create a dynamic and visually engaging experience that keeps your audience captivated. By mastering this simple technique, you can add a touch of time-bending magic to any project.
Effect 3 – Drawing Stylized Effect
The third effect we’ll explore is a visually stunning drawing stylized effect that gives your music video a hand-drawn appearance. This effect works particularly well when synchronized with the drop of the beat, giving your video a distinctive and artistic touch.
Step-by-Step Guide
- Choose your clip: Select the clip you’d like to apply the drawing stylized effect to.
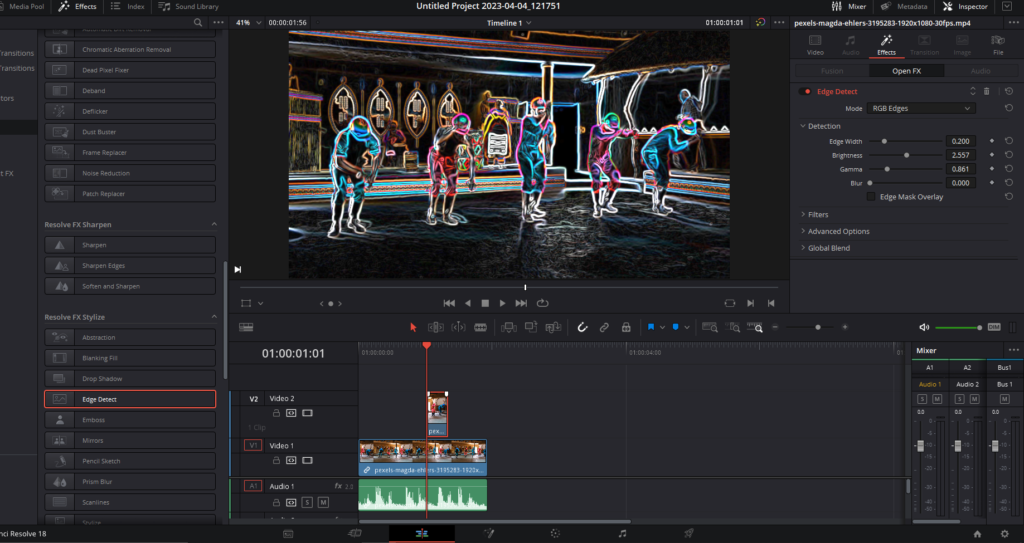
- Add the Edge Detect effect: Click on Effects on the top left corner of the edit page of Davinci Resolve to access the effects library, click on “Open FX” and locate the “Edge Detect” effect. Drag it onto your clip to apply it.
- Adjust the settings: With the clip selected, navigate to the Effects > Open FX tab in the Inspector panel on the right and start tweaking the settings. Adjust the Edge Width, Brightness and Gamma to achieve the desired look for your hand-drawn effect.
- Layer the clips: To add depth and complexity to the effect, consider layering clips on top of each other. Add a fade-in effect or cut between clips, depending on the desired result.
- Synchronize with the beat: For the best visual impact, make sure to time the drawing stylized effect with the beat of the music. This can be done by cutting clips together or by fading in the effect as needed.
With the drawing stylized effect in your creative arsenal, you can add an artistic and unique touch to your music videos. By combining this effect with well-timed cuts and beat synchronization, you’ll create a truly memorable and engaging visual experience for your audience.
Effect 4 – Light Rays Effect
The fourth effect we’re covering is the Light Rays effect. This visually striking effect adds a burst of light to your music video, creating an eye-catching and dynamic appearance. Perfect for highlighting specific moments or accents in your video, the Light Rays effect is a powerful addition to your creative toolbox.
Step-by-Step Guide
- Choose your clip: Select the clip you’d like to apply the Light Rays effect to on the edit page of Davinci Resolve.
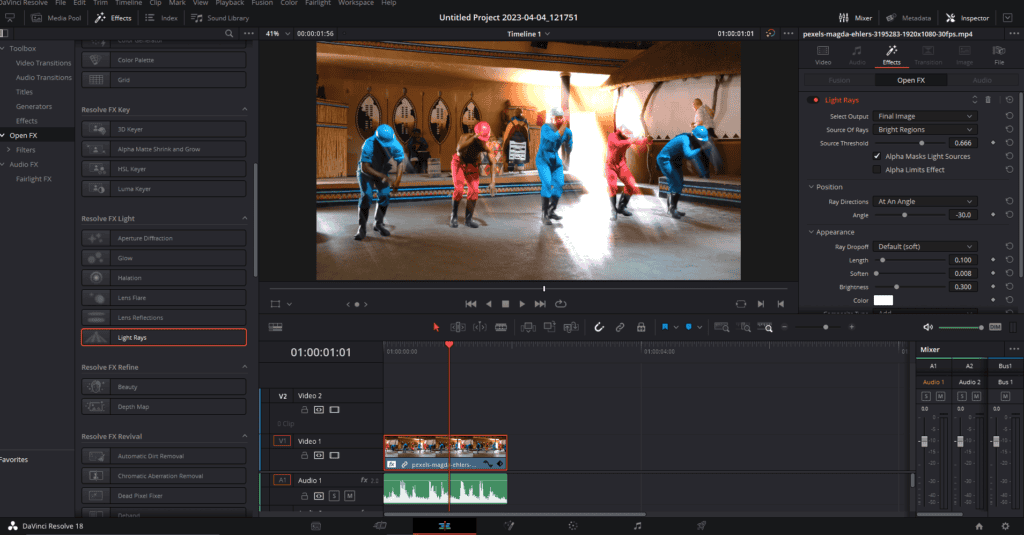
- Add the Light Rays effect: In the effects library on the left, navigate to “Open FX” and find the “ResolveFX Light” section. Locate the “Light Rays” effect and drag it onto your clip.
- Adjust the settings: With the clip selected, you can now tweak the settings for the Light Rays effect from the Inspector panel on the right and go to Effects> Open FX.
- Keyframe the effect: You can keyframe various options in the Light Rays setting in the OpenFX tab so that it flows with your music video. To add keyframes in DaVinci Resolve, locate the diamond-shaped icon in the Inspector panel. Clicking this icon will create a keyframe at the current playhead position, move the playhead to a newer position on the same clip and change the parameter again, allowing you to adjust properties and create smooth transitions between different parameter values over time.
- Customize the effect: Tweak the settings further to achieve the desired look for your Light Rays effect. Adjust the source threshold, direction, X & Y positions, and softness as needed. You can also change the color of the light rays to match the mood or style of your music video.
Once you’ve added the Light Rays effect to your music video, you’ll have a stunning visual element that can accentuate key moments and add depth to your project.
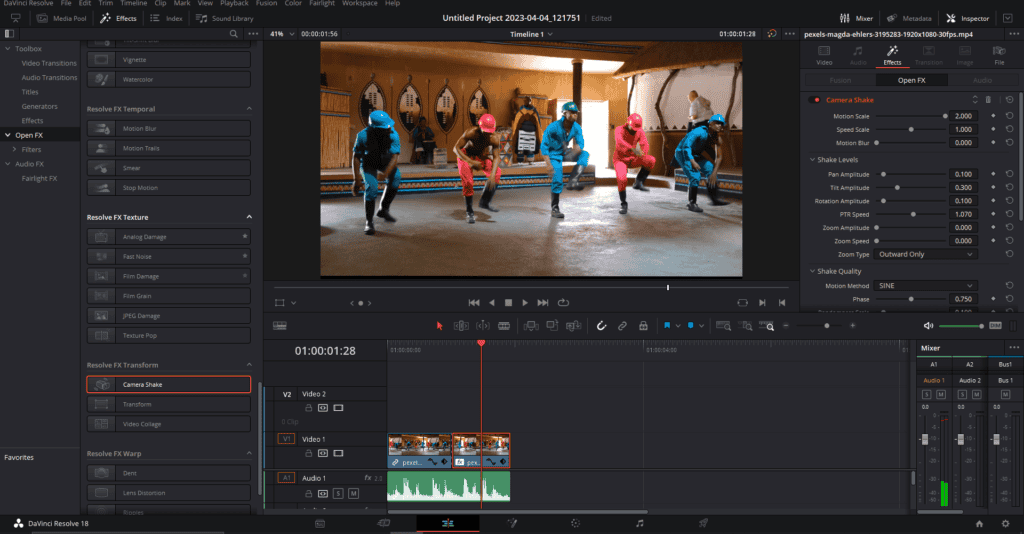
Effect 5 – Camera Shake Effect
The fifth effect we’ll discuss is the Camera Shake effect. This technique adds a dynamic shake to your music video in sync with the beat, such as when a kick drum hits. This can create a powerful, intense feel during drops or bass-heavy sections of your song.
Step-by-Step Guide
- Choose your clip: Select the clip you’d like to apply the Camera Shake effect to.
- Add the Camera Shake effect: In the effects library on the left, scroll down to the “ResolveFX Transform” section, find the “Camera Shake” effect, and drag it onto your clip.
- Find the impact point: Identify the moment in the clip where you want the Camera Shake effect to occur, such as when a cymbal is hit or the light ray effect happens.
- Adjust the settings: In the Inspector, click on “Open FX” and locate the Camera Shake effect. Double-click on the effect to reveal the parameters. Adjust the motion scale, speed scale, and PTR speed as desired.
- Keyframe the effect: To control when the Camera Shake effect occurs, add keyframes. Set a starting keyframe right before the impact point, then add another keyframe at the impact point with the desired intensity. Move a few frames forward (for example, when the light rays effect ends) and add another keyframe. Then, go one frame forward and turn the intensity back down to create another keyframe.
By incorporating the Camera Shake effect into your music video, you’ll add an extra layer of energy and intensity that complements the rhythm of the song.
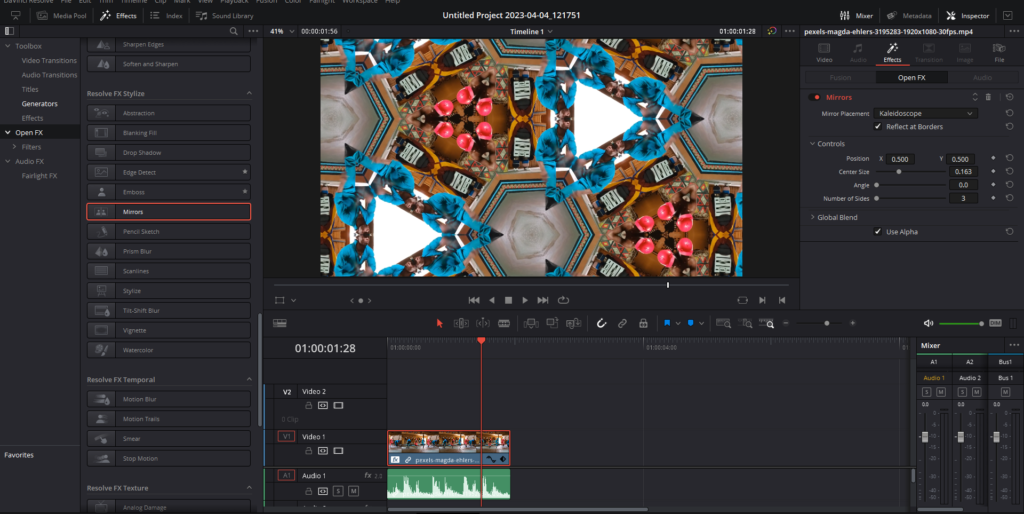
Effect 6 – Mirror/Kaleidoscope Effect
The sixth effect we’ll explore is the Mirror/Kaleidoscope effect. This mesmerizing effect adds a trippy, psychedelic element to your music video, transforming ordinary footage into a visually stunning experience. It’s perfect for adding creativity and depth to your project.
Step-by-Step Guide
- Choose your clip: Select the clip you’d like to apply the Mirror/Kaleidoscope effect to.
- Add the Mirror effect: In the effects library on the left, go to “Resolve FX Stylize” and find the “Mirrors” effect. Drag it onto your clip. The default setting will apply a mirror effect from the center outwards.
- Customize the effect: In the Inspector, click on “Open Effects” to access the settings for the Mirror effect. You can choose between three basic settings, including the Kaleidoscope option under “Mirror Placement.” Experiment with different designs to find the perfect look for your video.
- Keyframe the effect: You can keyframe the pattern or position of the Kaleidoscope effect to match the beat of the music. Set keyframes at the beginning and end of the clip or at specific moments to create dynamic transitions and movement within the effect.
- Create unique designs: By selecting individual mirrors and adjusting their parameters, you can create custom shapes and distortions. Rotate and change the angle of the mirrors to achieve a truly unique look.
- Layer mirrors: To further enhance the effect, you can add multiple mirrors and customize your own kaleidoscope design. This allows you to create a one-of-a-kind visual experience for your music video.
The Mirror/Kaleidoscope effect adds a unique, trippy touch to your music video that can captivate your audience.
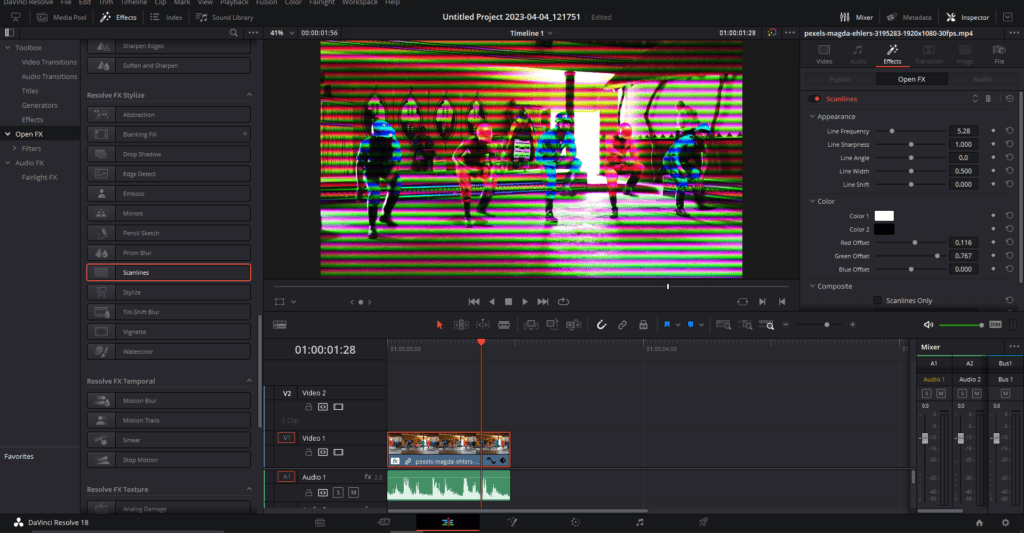
Effect 7 – Scan Lines Effect
The final effect we’ll discuss is the Scan Lines Effect. This effect gives your footage a vintage TV appearance with colorful, trippy lines. It adds a nostalgic and intriguing visual touch to your music video.
Step-by-Step Guide
- Choose your clip: Find the clip you want to apply the Scan Lines effect to.
- Add the Scan Lines effect: In the Effects library on the left, under the “Resolve Stylize” effects, select “Scanlines” and drag it onto your clip. By default, you’ll see a basic version of the effect.
- Customize the effect: In the Inspector, click on “Open FX” to access the settings for the Scan Lines effect. Adjust the line frequency and change the color using the Hue column. To create a unique look, play with the red and green offsets for a cool color contrast.
- Animate the effect: To create dynamic movement in the effect, keyframe the line frequency and line angle. For example, keyframe the line frequency at the beginning, middle, and end of the clip to change the size of the lines throughout the video. To add rotation, keyframe the line angle at the beginning and end of the clip, adjusting the angle as needed.
- Experiment with the effect: There’s no one-size-fits-all approach to this effect, so feel free to experiment with different settings and animations to find the perfect look for your music video.
The Scan Lines Effect can add a captivating vintage TV vibe to your music video, making it stand out and engage your audience.
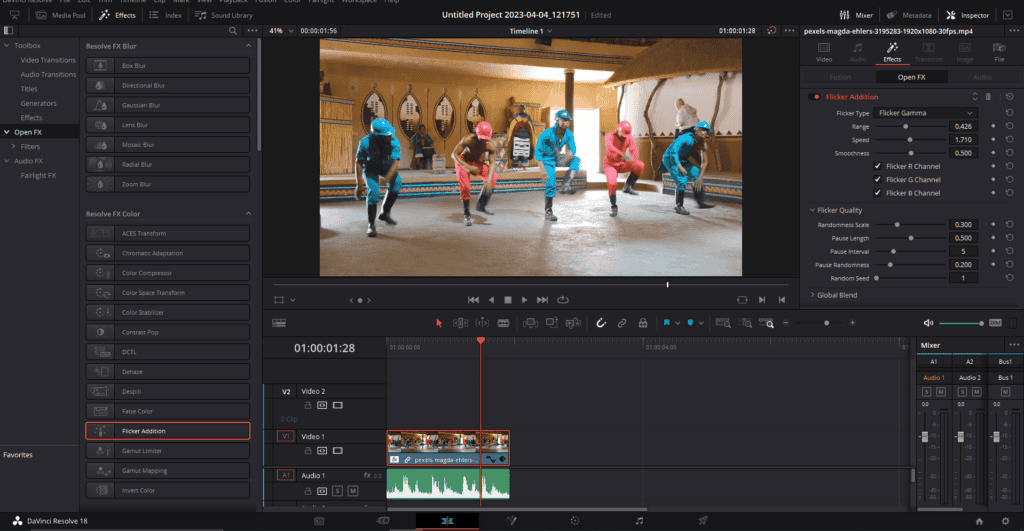
Effect 8 – Strobe Effect
The 8th effect in our Best Music Video Effects In Davinci Resolve list is strobe effect. The Strobe Effect is an excellent way to give your music video an energetic, concert-like atmosphere. This effect mimics the look of strobe lights at a concert or club and can enhance the overall visual impact of your video.
Step-by-Step Guide
- Choose your clip: Select the clip you want to apply the Strobe Effect to.
- Add the Strobe Effect: In the Effects library, under the “Open FX” section, select “Flicker Addition”. Drag this effect onto your clip.
- Customize the effect: To adjust the intensity of the strobe effect, play with the “Range” setting. The higher the range, the stronger the strobe effect will appear. Adjust the “Speed” setting to control how fast the strobe flickers on and off. This can help you create different moods, from a pulsing party atmosphere to a tense horror flick feel.
- Combine with other effects: The Strobe Effect can be even more impressive when combined with other effects from your arsenal. Layer and blend multiple effects to create a visually engaging and dynamic music video.
- Preview your work: After applying and customizing the Strobe Effect and other effects, preview your video to see how they all come together. Make any necessary adjustments to ensure that the layering and pacing of the effects work well with your video’s content and music.
The Strobe Effect adds an energetic, concert-like vibe to your music video, making it more engaging and visually appealing.
Last Words
Thank you for reading our article on the Best Music Video Effects in DaVinci Resolve! We hope you found it informative and inspiring as you explore new ways to enhance your music videos. Don’t hesitate to experiment with these effects and create visually stunning and memorable videos that captivate your audience. Keep exploring DaVinci Resolve and unlock your full creative potential. Happy editing!