Hi, I’m Salik, the author of FilmmakingElements.com. I have been a filmmaker for over 10 years. I am also a certified DaVinci Resolve Trainer and I have used DaVinci Resolve for many of my projects. Have you ever been captivated by the perfect shot, only to have it marred by an unsightly reflection? Whether it’s a distracting mirror image or a little shiny surface, unwanted reflections can detract from the visual storytelling of your video project. Fortunately, there’s no need to reshoot or settle for less-than-perfect footage.
DaVinci Resolve, the industry-leading color grading and video editing software, offers a variety of powerful tools to help you remove those pesky reflections and restore the visual clarity of your masterpiece. In this blog article, we’ll dive into three proven methods for banishing reflections in DaVinci Resolve, ensuring that your video projects always shine in the best possible light.
So, whether you’re a seasoned pro or a budding enthusiast, read on to discover the secrets to achieving crystal-clear, reflection-free footage in no time.
Method 1- Removing Reflections From Sunglasses
If you’ve ever encountered unwanted reflections in your sunglasses, you’ll be delighted to know that there’s a straightforward, three-step process to get rid of them in DaVinci Resolve. This method involves creating a serial node, masking the affected area, tracking the footage, and adjusting the effect to achieve the perfect result. Let’s dive into each step in detail.
Step 1: Creating a Serial Node and Mask
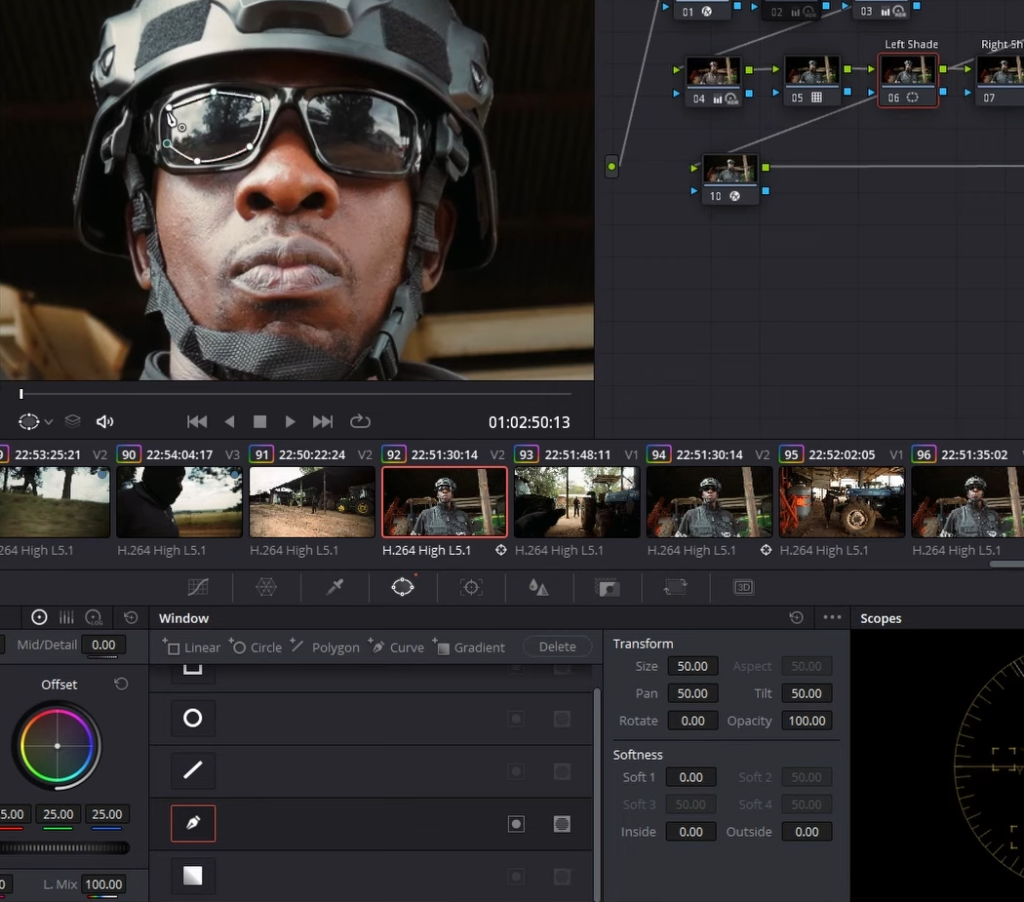
Head to the color page of Davinci Resolve. The first step in removing unwanted reflections is to create a serial node. You can do this by using the Alt + S shortcut or by right-clicking, selecting “Add Node,” and then “Add Serial.” Go to the window tab and choose the curve pen tool (pen-looking icon). Zoom into your image and create a mask around the area affected by the reflection. Once done, you’ve successfully isolated the region you want to modify.
Step 2: Apply Tracking
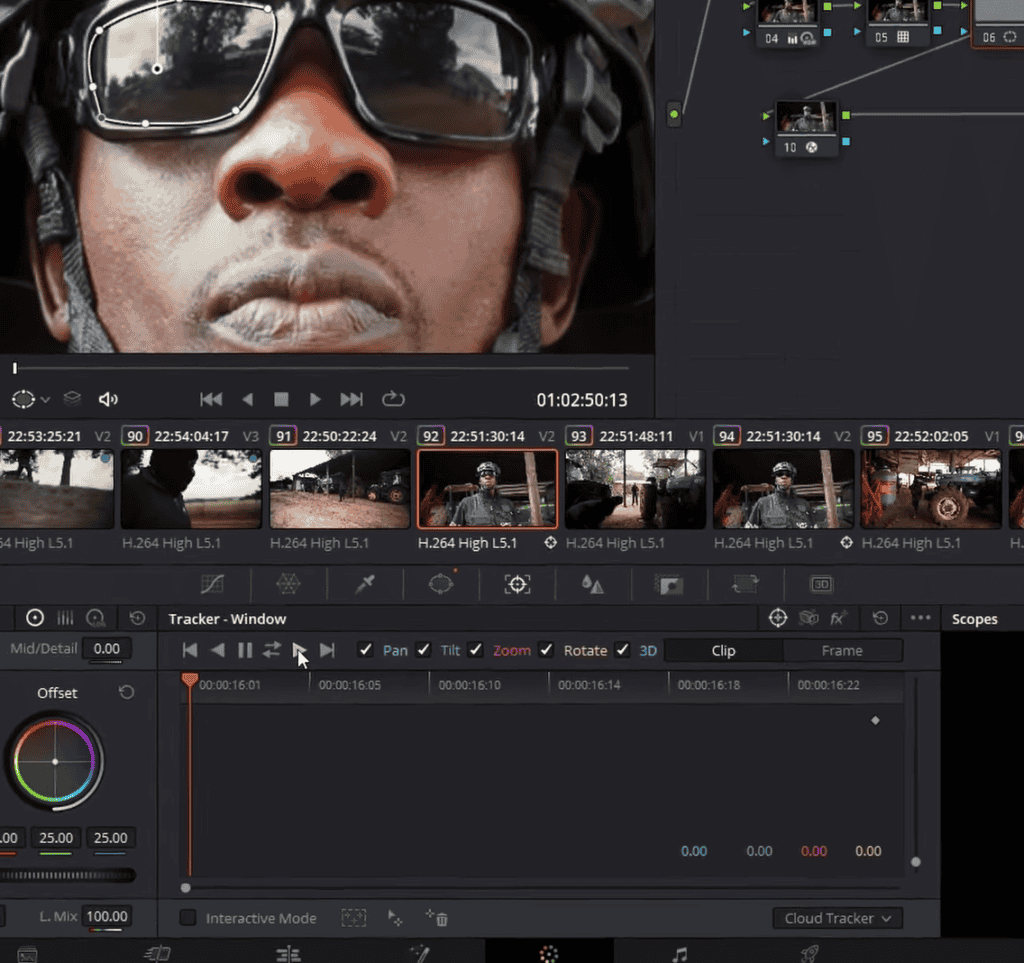
Since most footage includes some degree of camera movement, it’s crucial to apply tracking to ensure that the mask follows the reflection throughout the clip. DaVinci Resolve’s powerful tracking function makes this process a breeze. Go to the tracker window, ensure your playhead is at the beginning of the clip, and apply tracking. The software will automatically analyze and adjust the mask’s position, keeping it in sync with the reflection.
Step 3: Add and Refine the Effect
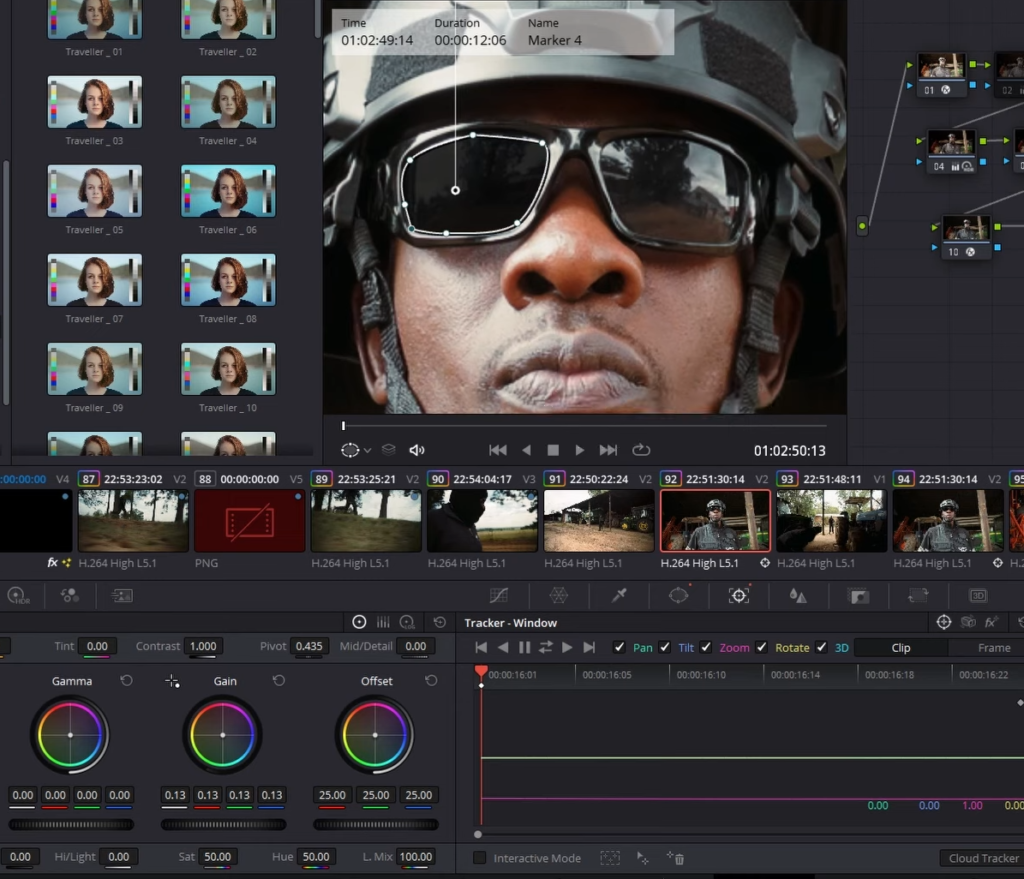
With the mask and tracking in place, it’s time to eliminate the reflection. Go to the primary color wheels and pull down the gain until the reflection is reduced. Be cautious not to make the area pitch black, as it will appear unnatural. To compare the effect, use Ctrl + D to toggle the node on and off. If you notice pixelation or artifacts around the masked area, return to the window tab and adjust the softness settings until you achieve a smooth, natural appearance.
It’s important to note that the order in which you apply this effect can impact your final result. While you can apply the reflection removal before color grading and correction, it’s generally recommended to do it afterward for the best outcome.
Method 2- Tackling Reflection, Shine and Glare on Skin in DaVinci Resolve
Filmmakers and video editors often encounter unwanted shine or glare on a subject’s skin, particularly on the forehead or bald spots. While using diffusion during filming could be a solution, it’s not always feasible or practical.
Thankfully, DaVinci Resolve offers a range of techniques to fix these issues in post-production. We will take you through the process of reducing reflection or glare on skin and achieving a more natural appearance in your footage using DaVinci Resolve.
Step 1: Assess the Footage and Create a New Node
Before diving into the editing process, it’s essential to inspect your footage and determine if the glare can be fixed in post-production. Ensure the glare isn’t clipped, meaning the highlights are not overexposed to a point beyond recovery. Once you have confirmed the glare is salvageable, you can proceed with the editing process.
The primary goal is to adjust the hue, saturation, and luminance of the affected area to create a more natural appearance. To do this, head to the color page of Davinci Resolve, you’ll first need to create a new node. Press Alt + S to add a new serial node to your node tree. Once the new node is created, zoom in on your image to focus on the subject’s skin.
Step 2: Adjust the Mid-tone Detail
One of the key factors contributing to unwanted glare is the sharpness and contrast at the edges of the shiny area. To address this issue, it’s crucial to adjust the Mid/Detail in the affected region rather than using the contrast slider. The mid/Detail option is present above the Offset Wheel in the Primaries- Color Wheels section on the left of the color page of Davinci Resolve..
Lowering the Mid/Detail will make the image appear more even, but it might also result in a soft-looking image. To resolve this issue and retain facial details, qualify the skin using the qualifier tool in DaVinci Resolve. With the qualifier tool selected, click and drag over the subject’s skin to create a selection. You can then fine-tune the selection as needed, isolating the skin while preserving the details of the face.
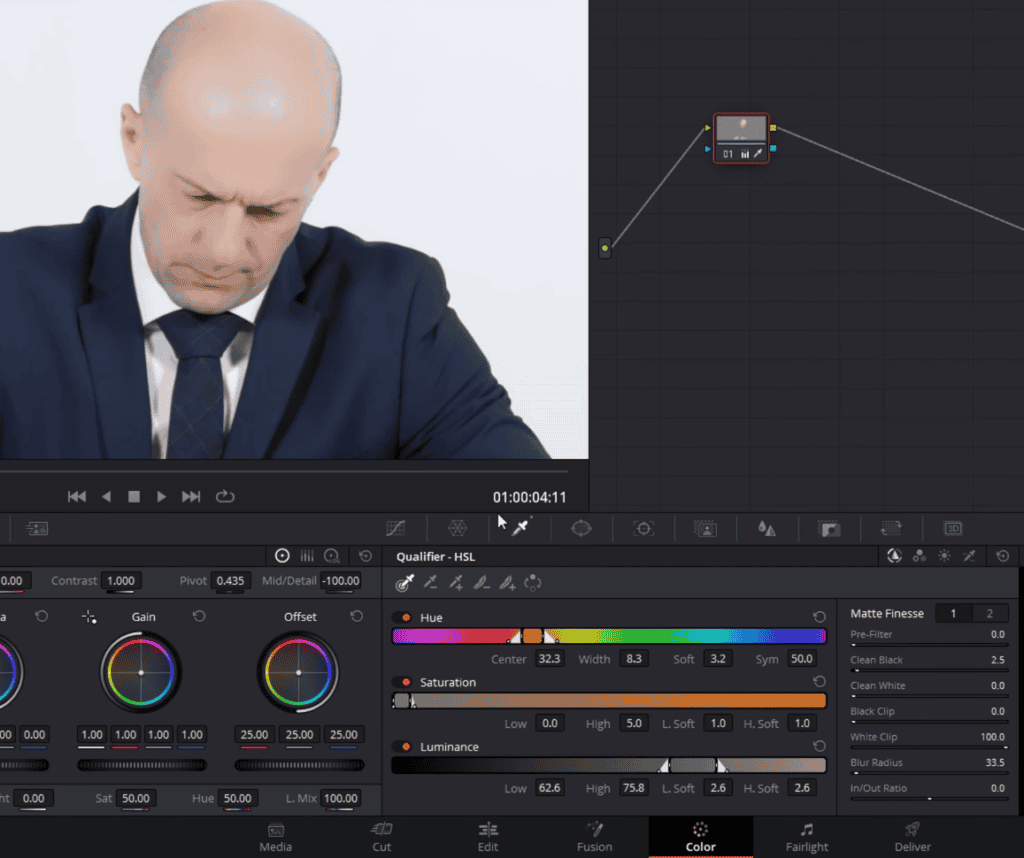
Step 3: Create a Power Window and Track Movement
With the skin qualified, the next step is to create a power window around the affected area. For example, if the glare is on the subject’s forehead, create a power window that encompasses this region. To do this, navigate to the window tab in DaVinci Resolve and select the appropriate power window shape. Click and drag to create the power window around the affected area, adjusting the shape and size as necessary.

Once the power window is in place, it’s essential to track the subject’s movement throughout the shot. This will ensure that the adjustments you make to the glare remain consistent as the subject moves. To track the movement, go to the tracker window in DaVinci Resolve, and click on the “Track Forward” and “Track Reverse” buttons. The software will analyze the footage and automatically adjust the position of the power window to follow the subject’s movement.
After tracking is complete, soften the edges of the power window to blend the effect seamlessly with the rest of the image. This will prevent any noticeable transitions or hard edges in your final output.
Step 4: Adjust Hue, Saturation, and Luminance
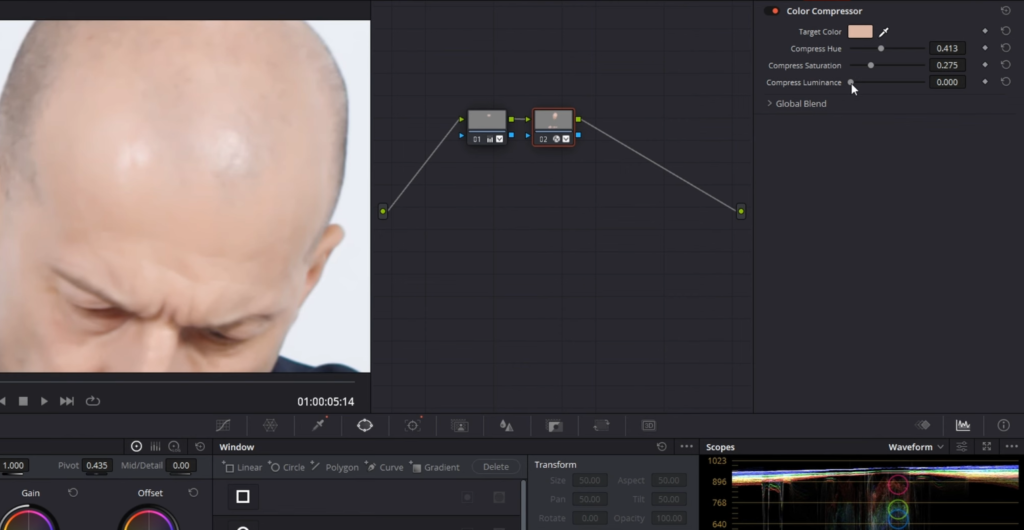
Now that the power window is in place and the subject’s movement is tracked, the next step is to adjust the hue, saturation, and luminance of the affected area. To do this, add a new node to your node tree by pressing Alt + S. Copy the qualification from the previous node by selecting it, pressing Ctrl + C, and pasting it onto the new node using Ctrl + V.
With the qualification copied, disable the power window and the mid-tone detail adjustment on the new node so that we have the skin qualification. This will allow you to focus solely on adjusting the color within the selected region.
To make these color adjustments, you can use the Color Compressor tool in DaVinci Resolve. Click on the Effects button in the top right corner and look for Color Compressor. Drag it onto the node. First, select a specific color on the subject’s skin by using the color picker available in color compression ofx and selecting the skin of the color, that you want to match, ideally from an unaffected area. Next, adjust the compress hue, compress saturation, and compress luminance settings within the Color Compressor tool to match the selected target color.
As you make these adjustments, continually check the progress by zooming in and out of the image. This will help ensure the adjustments look natural and blend seamlessly with the surrounding skin. Additionally, you may need to fine-tune the key selection to include only the desired portions of the image. Adjust the saturation and luminance settings accordingly to achieve the best possible result.
Method 3- Removing Reflections in a Mirror Using DaVinci Resolve
Mirrors can often create challenges for filmmakers, especially when it comes to removing an unwanted reflection. In this tutorial, we’ll demonstrate how easy it is to remove reflections in a mirror using DaVinci Resolve. By following these simple steps, you can create a seamless and professional-looking video with minimal effort.
Mirror reflections can be a challenge to deal with when filming a scene. Unwanted reflections can be distracting and may ruin the visual impact of your footage. Fortunately, there is a simple solution to this problem using DaVinci Resolve. In this blog post, we will provide a comprehensive guide on how to remove mirror reflections seamlessly, leaving you with polished and professional-looking footage.
Step 1: Film the Scene with a Single Camera
When using this method, make sure you have the clear view of the mirror without any reflections after the main action has taken place. This additional footage will be used later in the editing process to replace the unwanted reflection.
Step 2: Prepare the Clips for Editing
Import the footage into DaVinci Resolve, go to the edit page of Davinci Resolve and find the point in the video where there is no reflection in the mirror. Use the blade tool to cut the clip at this point.
Next, select the part of the video where there is no reflection and create a freeze frame of the section of the video you will use to replace the reflection. Right-click on the clip, navigate to “Change Clip Speed,” and select “Freeze Frame.” You can then stretch the freeze frame to any desired length.
Step 3: Layer the Clips
Layer the clips in the timeline by placing the freeze frame clip below the original footage. The freeze frame will serve as the background, while the original footage will be cropped to remove the reflection.
Step 4: Crop the Reflection
With the original footage selected, go to the Inspector panel, and navigate to the cropping section. Crop the side of the clip where the mirror is until the reflection disappears. This will reveal the freeze frame clip underneath, effectively removing the reflection from the mirror.
Step 5: Match Color Temperature
In some cases, you may notice a difference in color temperature between the two clips. To correct this, select the freeze frame clip (the bottom layer), and go to the color tab in DaVinci Resolve. Adjust the gain and the temperature and tint slider to match the color temperature of the original footage.
Step 6: Adjust Softness and Tweak the Edit
With the original footage still selected, you can now adjust the Softness slider in the Cropping options in the Inspector panel of the cropped edge to create a more seamless transition between the two clips. Continuously tweak the softness and the position of the cropped edge until the desired effect is achieved.
By following these steps, you can easily remove mirror reflections from your footage using DaVinci Resolve. This technique is a simple and effective solution to the problem of unwanted reflections, allowing you to create more polished and professional-looking scenes.
Remember to film the scene with a single camera, create a freeze frame, layer the clips, crop the reflection, match color temperature, and adjust the softness as needed. With these skills in your editing toolkit, you’ll be well-prepared to tackle any reflection challenges that arise in your video projects, ensuring a visually pleasing result.
In conclusion, we would like to extend our heartfelt gratitude to all the readers who have taken the time to explore this tutorial. We hope that the step-by-step guide provided here has been helpful and informative. Your interest and support are greatly appreciated, and we’re always here to help you enhance your video editing skills. Thank you once again, and happy editing!







Got a Question?
Find us on Socials or Contact us and we’ll get back to you as soon as possible.