Hi, I’m Salik, the author of FilmmakingElements.com. I have been a filmmaker for over 10 years. I am also a certified DaVinci Resolve Trainer and I have used DaVinci Resolve for many of my projects. This article articulates everything you need to know about nodes in DaVinci Resolve.
Now, if you want to be a master at color grading, particularly in Davinci Resolve, you need to master Nodes first. The basic structure of the color page revolves around it.
Knowing when to use which Node in your Node Graph not only saves your time but increases your production quality. To be very specific, just like Adobe Photoshop is layer-based editing software, Davinci Resolve is a node-based software.
We have created this article as a holy guide to consider whenever you doubt any node type. Let’s start.
The concept of nodes in Davinci Resolve!
Davinci Resolve is a node-based color corrector, where each node is a graphical representation of each correction. It allows us to come up with all different kinds of creative looks, And it’s going to help us stay organized because, in some nodes, we may be fixing a problem just by applying a color correction. In other nodes, we could be applying a creative look.
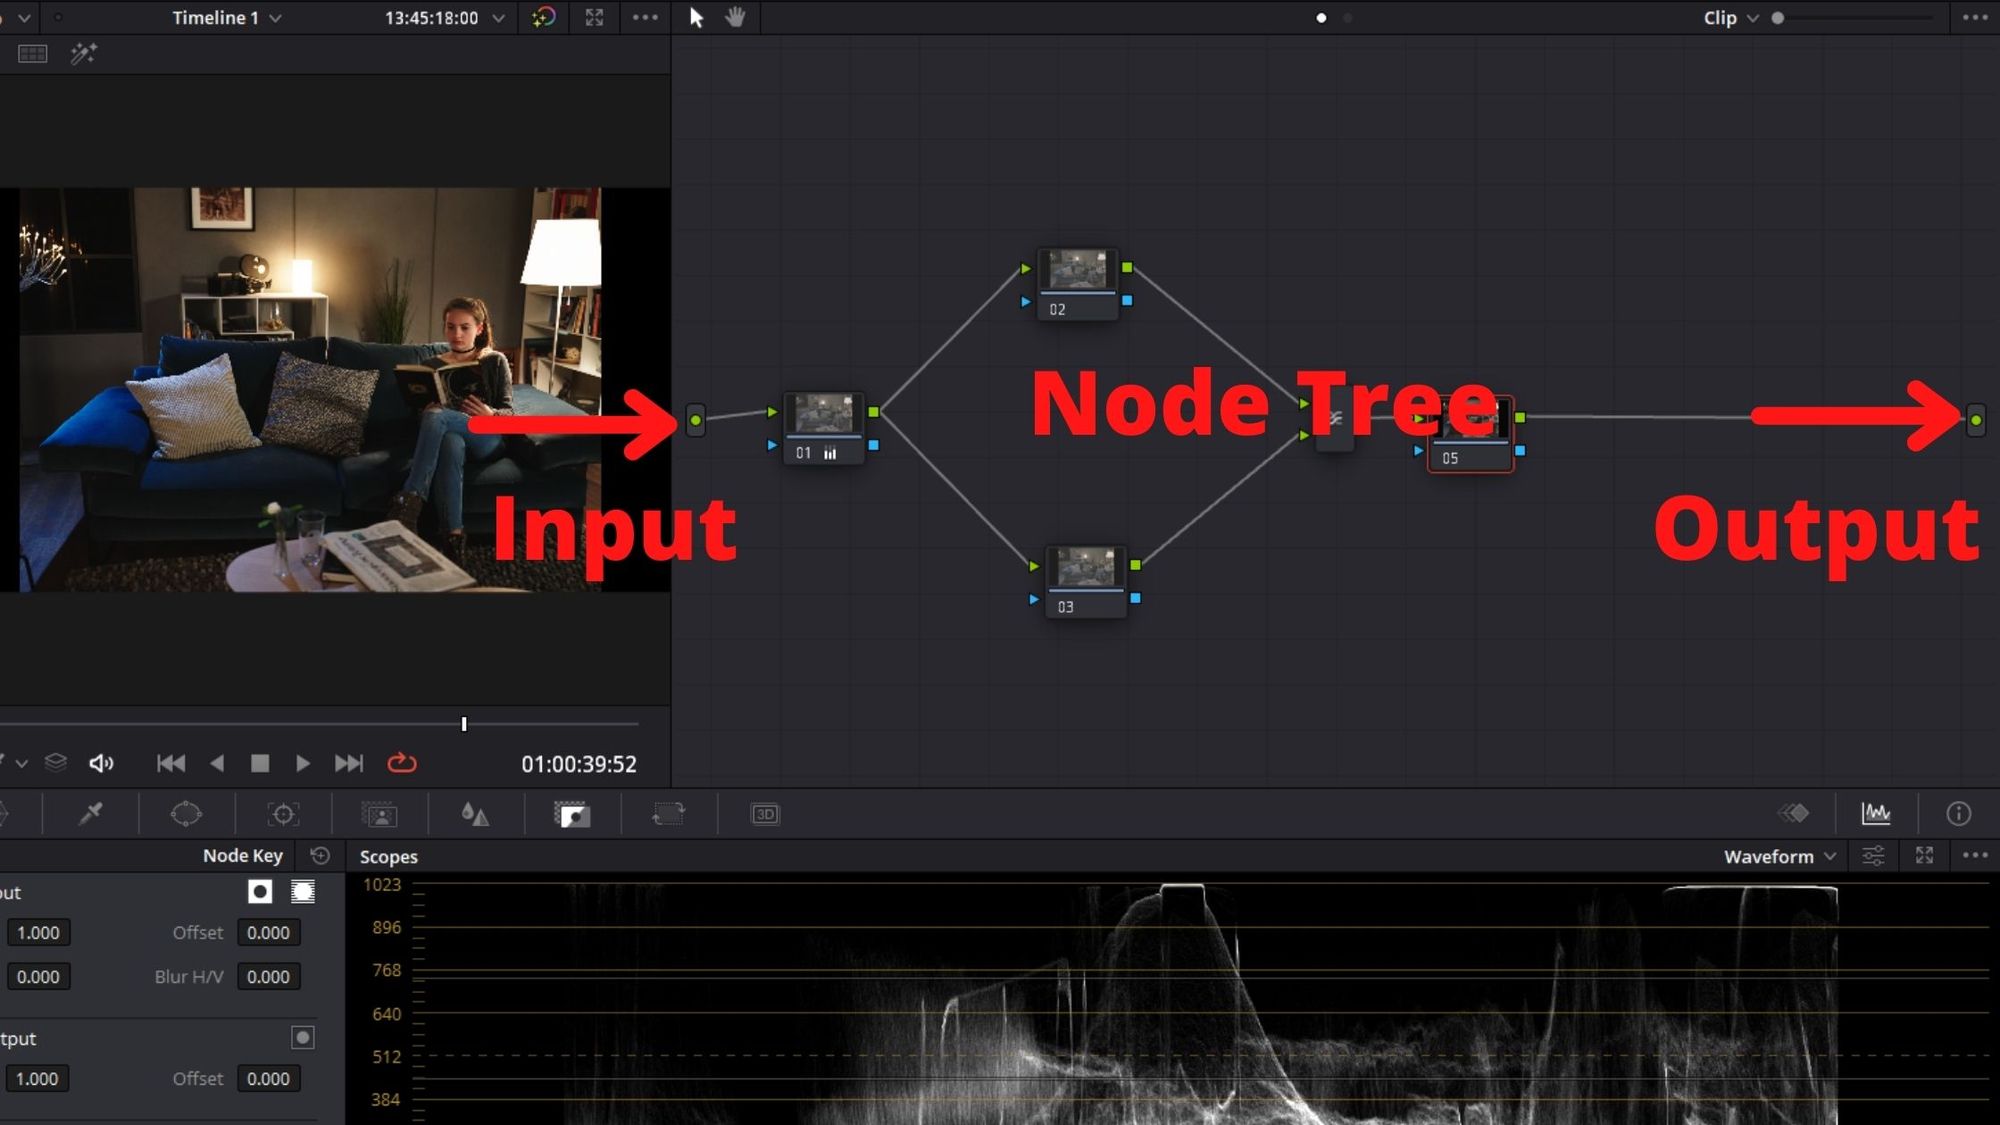
Now a few things to point out. In the Node Editor, we have the source bar, which is the native signal (left green circle), all the nodes in between, and the output bar (right green circle), which is then processed signal coming from the nodes going out.
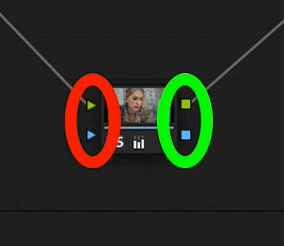
Nodes are attached via connections, i.e., the lines between the nodes. Each node features two input channels and two output channels. The green dots are used to pass the image or corrected image data from one node to the next, and the blue dots are used to pass key information from one node to the next.
A geeky definition would be. The yellow dots of every node passes the RGB signal to the other nodes, and the blue dot passes the Alpha channel.
Now, with the basics out of the way, let’s take a closer look at the different kinds of nodes and their ideal usage.
What is a Serial Node In Davinci Resolve?
The serial or corrector node is the standard color corrector to perform primary and secondary color corrections. When you open the color tab, you must have noticed that it opens with a node already in the node editor. That is a serial node.
You can add as many nodes as you want, but the game’s name is to use them as little amount as possible. It helps in completing your color grading projects in lesser time.

There are three ways to add another serial node:
- Right-click in the node graph> go to Add Node>Select Corrector
- On the very top bar menu, go to Color>Nodes>Add Serial Node
- Or you can use the shortcut Option/Alt + S
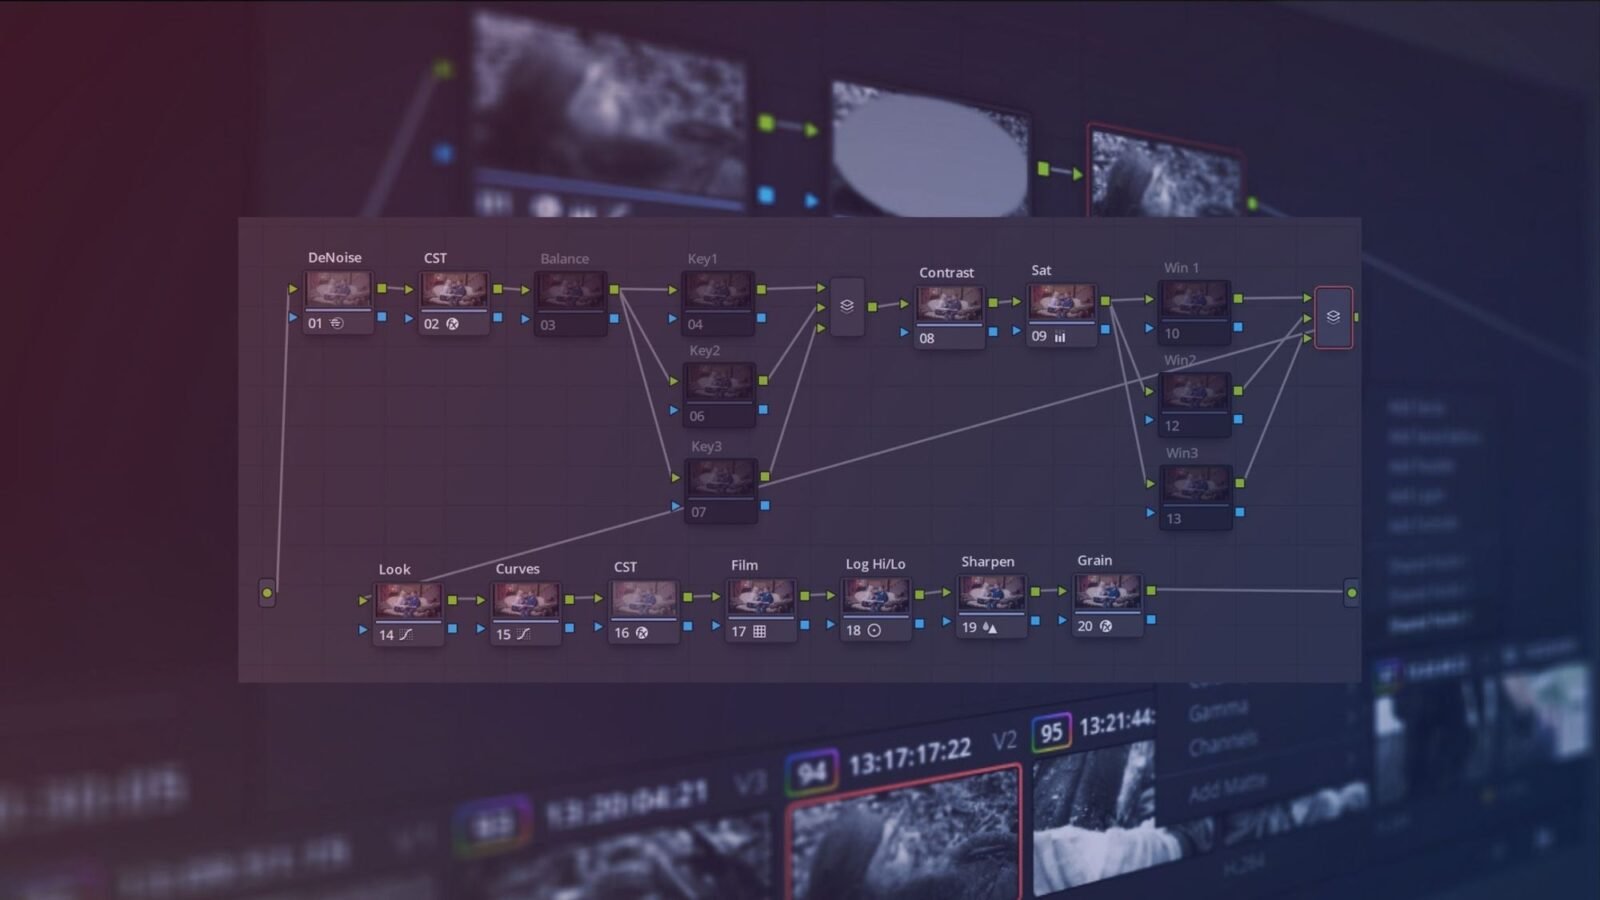
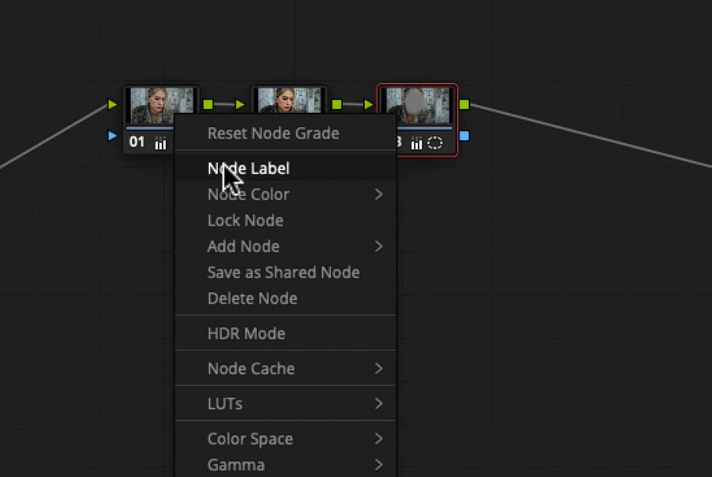
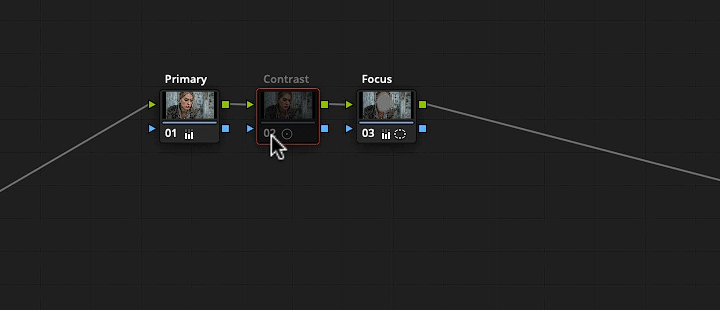
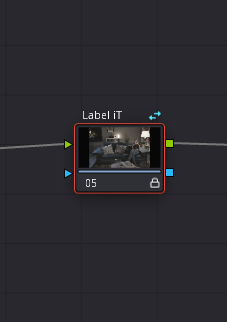
Now, a nice feature of the Node Editor is that we can label each of the nodes. All you have to do is right-click on a node, select “Node Label,” and give it a name. Labeling nodes help you remember which one does what when there is a spider web of them.
The benefits of doing it this way are it allows us to keep our grades organized and say, for instance, if the client wants to dial back the Contrast, You’d double click on the node labeled Contrast and reduce it.
You can also turn off the node or disable it by clicking on the number just below it. You can also use the Keyboard Shortcut Command/CTRL+ D to turn it on and off with the node highlighted.
You also have the option to disable all the nodes for a before and after comparison using the keyboard Shortcut Alt/Option+ D now.
Now an important concept when working with serial nodes and nodes generally. Each subsequent node we add is taking as its input the output of the node before it. A real-world example of this would be like pouring paint from one bucket into another.
So if we had multiple serial nodes, It would be like pouring one bucket into the next and then taking that bucket and pouring it into the next one after that and so on and so forth.
So say, for instance, if I were to completely eliminate the saturation in one node and then try to boost the saturation in the next, you would see that you will not be able to do that Because the previous node isn’t giving you any color information to work with.
In fact, just by virtue of changing the order of the nodes, we will have an impact on the Look.
Just by changing the node order, your grade versions can vary a lot. So it’s important to understand this concept as we can, in fact, use it for a creative advantage. Alright, next up, we’re going to dive into using parallel nodes.
You can also add a node before the one you are currently on by going on the very top bar menu going to Color>Nodes>Add Serial Before Current.
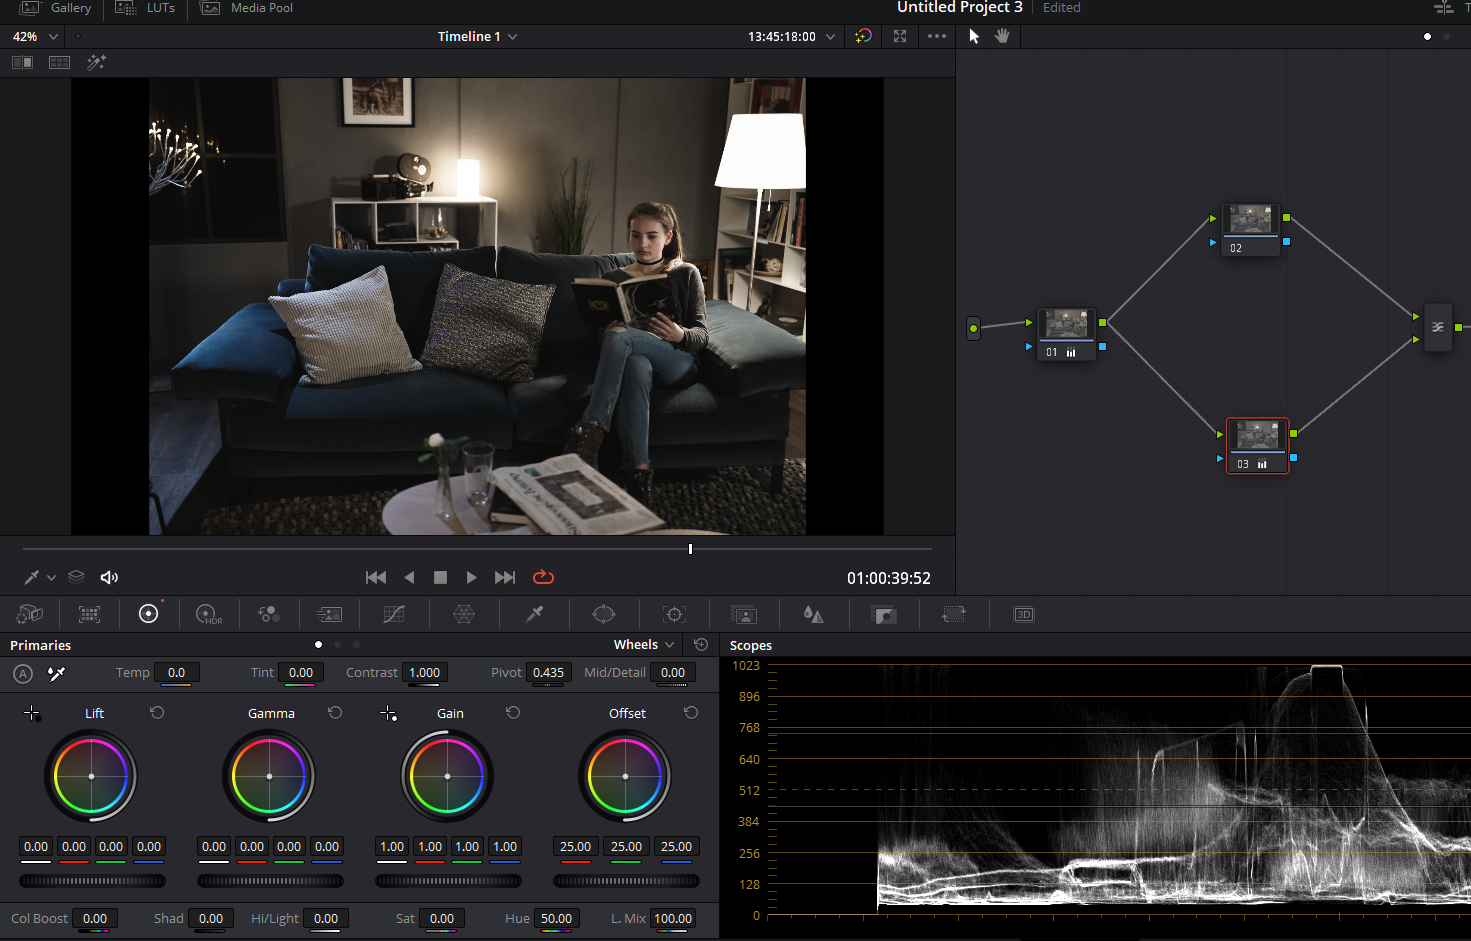
What is a Parallel Mixer Node In Davinci Resolve
Parallel Mixer Node is another corrector like the serial node, but it’s used to apply multiple corrections at a single grade stage. Sound confusing? Well, don’t worry, this can actually be really straightforward.
So coming back to our earlier example, instead of thinking of pouring a bucket of paint into the next bucket and then into the next one after that, like with serial nodes, it’s like pouring multiple paints into the same bucket where all the paints are blended equally. See, that’s simple.
It makes a lot of sense to use parallel nodes when you want to apply a multiple secondary color correction at the same stage of the color grade.
The advantage of this is that it makes sense from an organizational standpoint, but each node is sampling the same input data from the previous node, and any changes we make to one will not affect the key in the others.
Parallel Mixer Node visually looks like a layer of nodes, but all the corrections in a Parallel Node tree are applied together; that is why it is called Parallel Node.
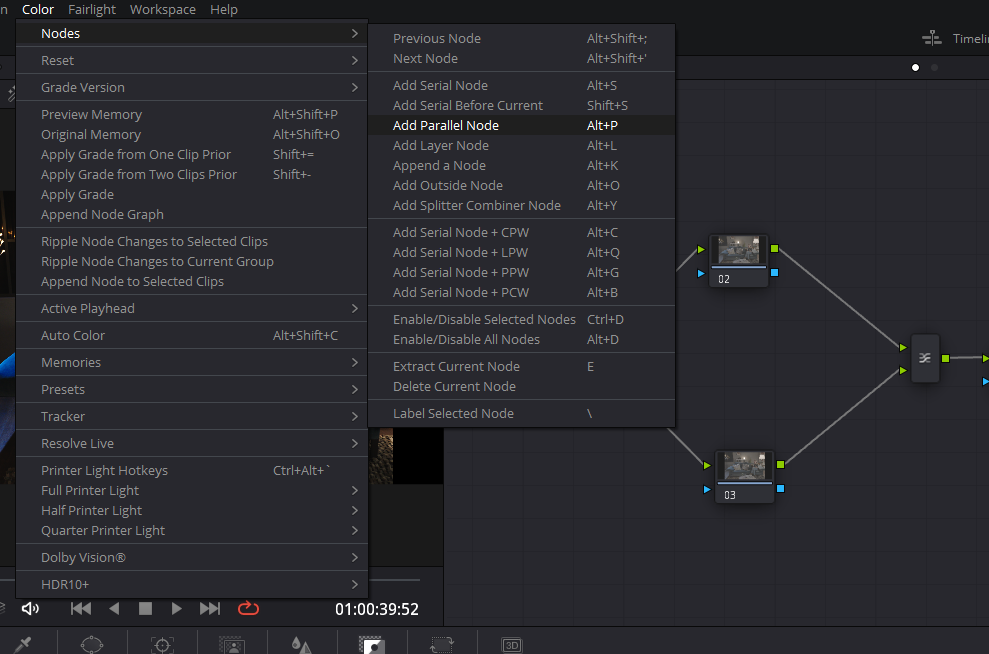
You can add one by going to the Color>Nodes>Add Parallel Node.
You might be thinking, why shall I use this when I can use a serial node. When using a Parallel Node, you can add your Look into one node and key the skin in the other at the same time in the other parallel node.
This way, your Look will not affect your skin tones because you have isolated them parallelly. I suggest that you experiment on your own to see what you can come up with.
I use Parallel Mixer Nodes in my workflow as a secondary color-correcting phase. I do all the secondary grading in the parallel nodes to avoid conflict and complexity.
What is a Layer Mixer Node In Davinci Resolve?
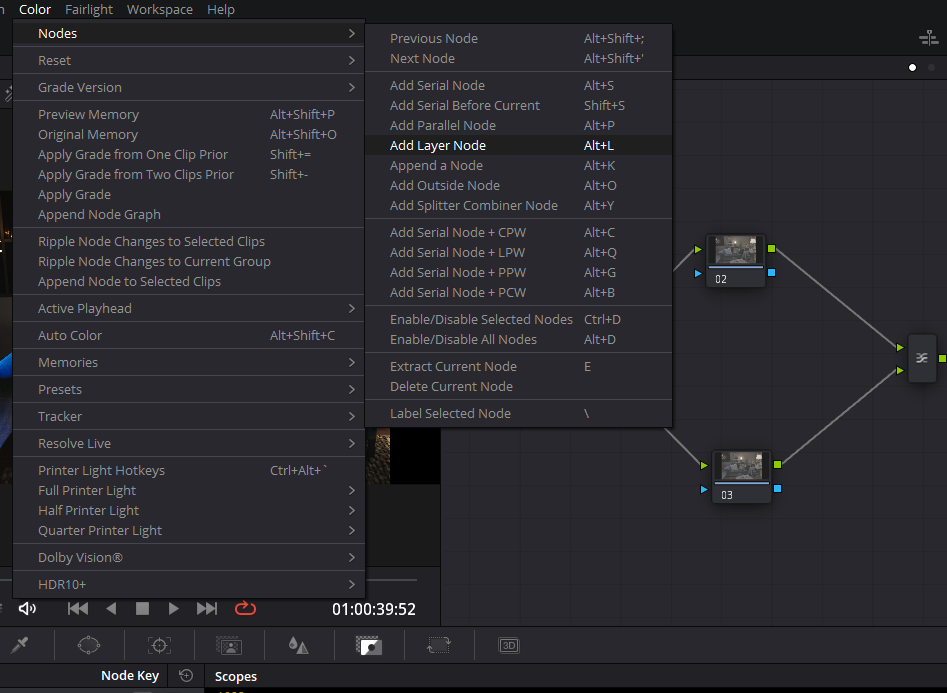
Alright, we’re on now to the Layer Mixer Node, which is for applying different compositing effects similar to what you’d find in Photoshop or other compositing programs.
The only difference is the node at the bottom acts like it is on the top. Confusing, but that’s how it works. So to see the corrections applied on the top node, you need to switch off the bottom node. As I said, the bottom node acts like it’s on top.
To add one. Go to the Color Menu>Nodes>Add Layer Node. Layer Nodes are connected to a mixer at the end where you can apply different Composite Modes just like Overlay, Screen, Softlight, Hardlight, and many more.
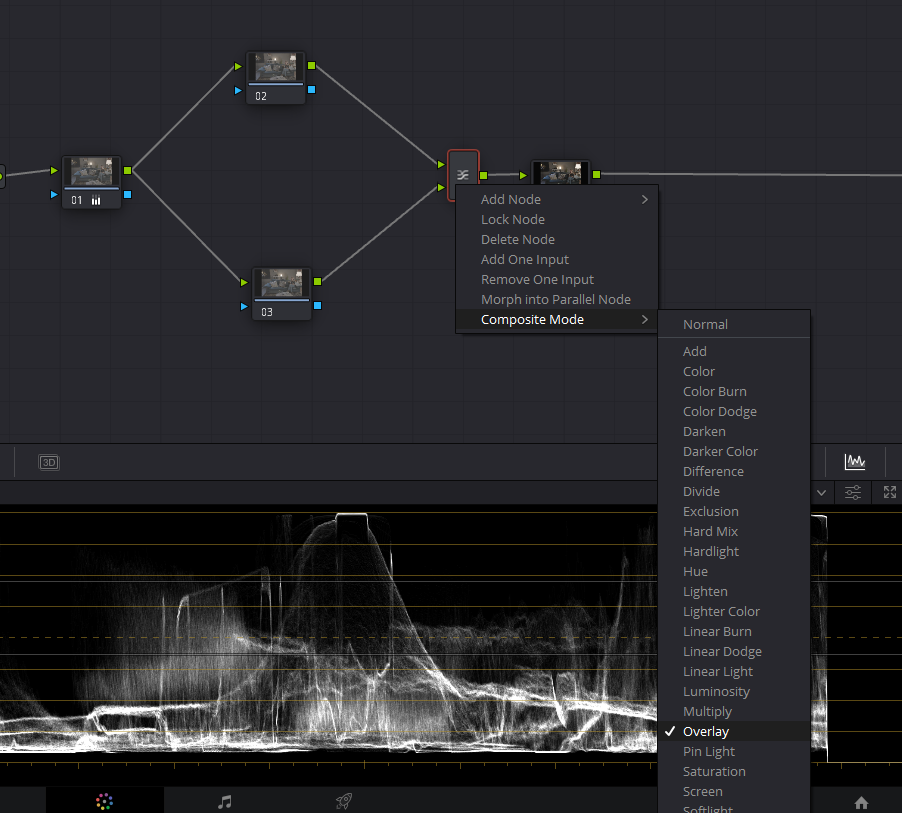
When we right-click on the Layer mixer and then go down to Composite mode, we will be presented with all the different compositing modes supported in DaVinci Resolve.
For example, by selecting Overlay Composite Mode in Layer Mixer, you create a bleach bypass look in Davinci Resolve. Since we’re blending these nodes together and we already have the overlay mode selected, a really quick way to create a Bleach bypass look is to reduce the saturation to zero in one of the nodes.
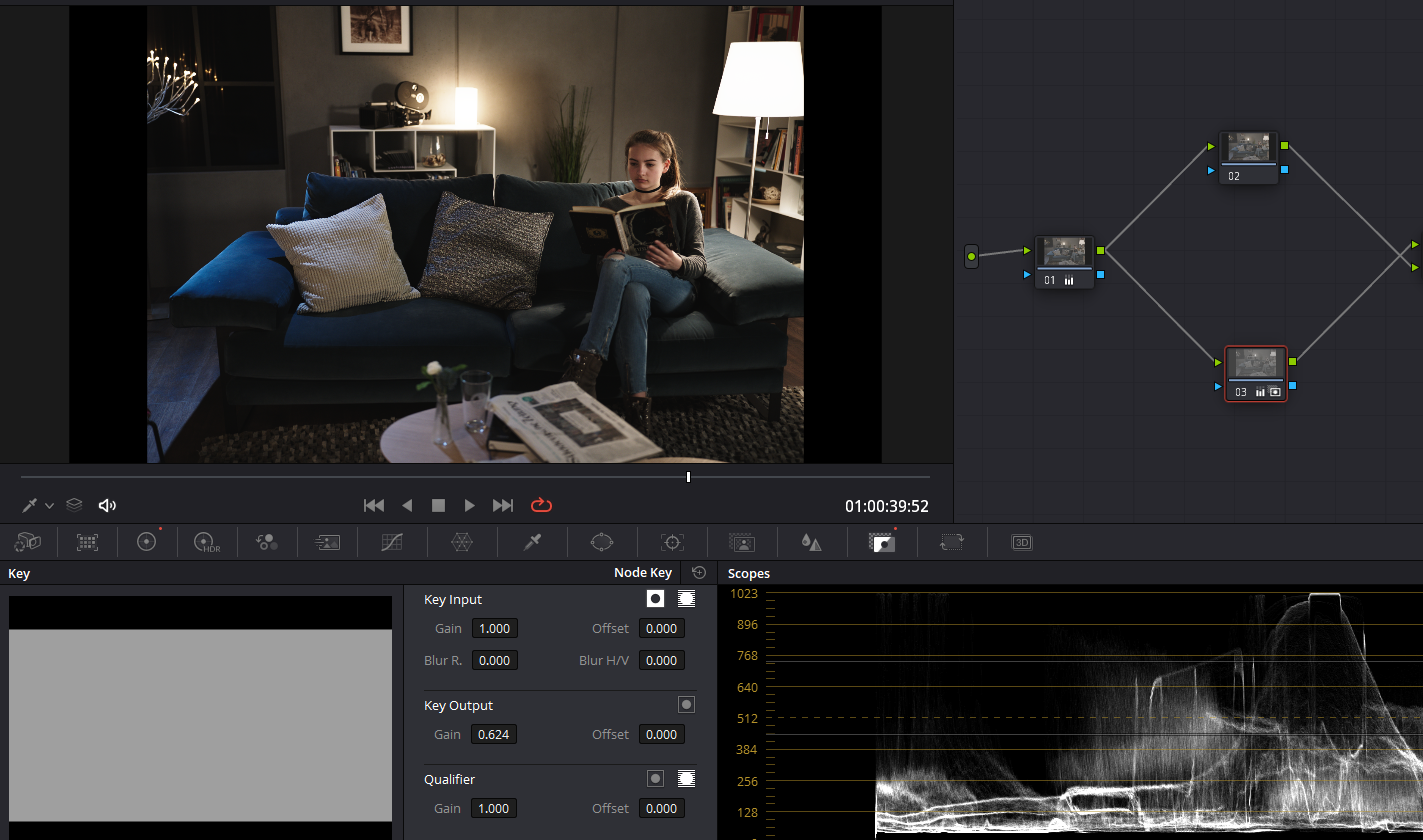
We can also change the priority of the inputs by deleting the connections and then redrawing them, having them go to different inputs, and this will actually change the Look. So you might experiment with this technique. Also, if you feel the output is too strong, you can go to the key menu and dial it back by adjusting the “Key Output Gain” control.
What are Shared Nodes in Davinci Resolve?
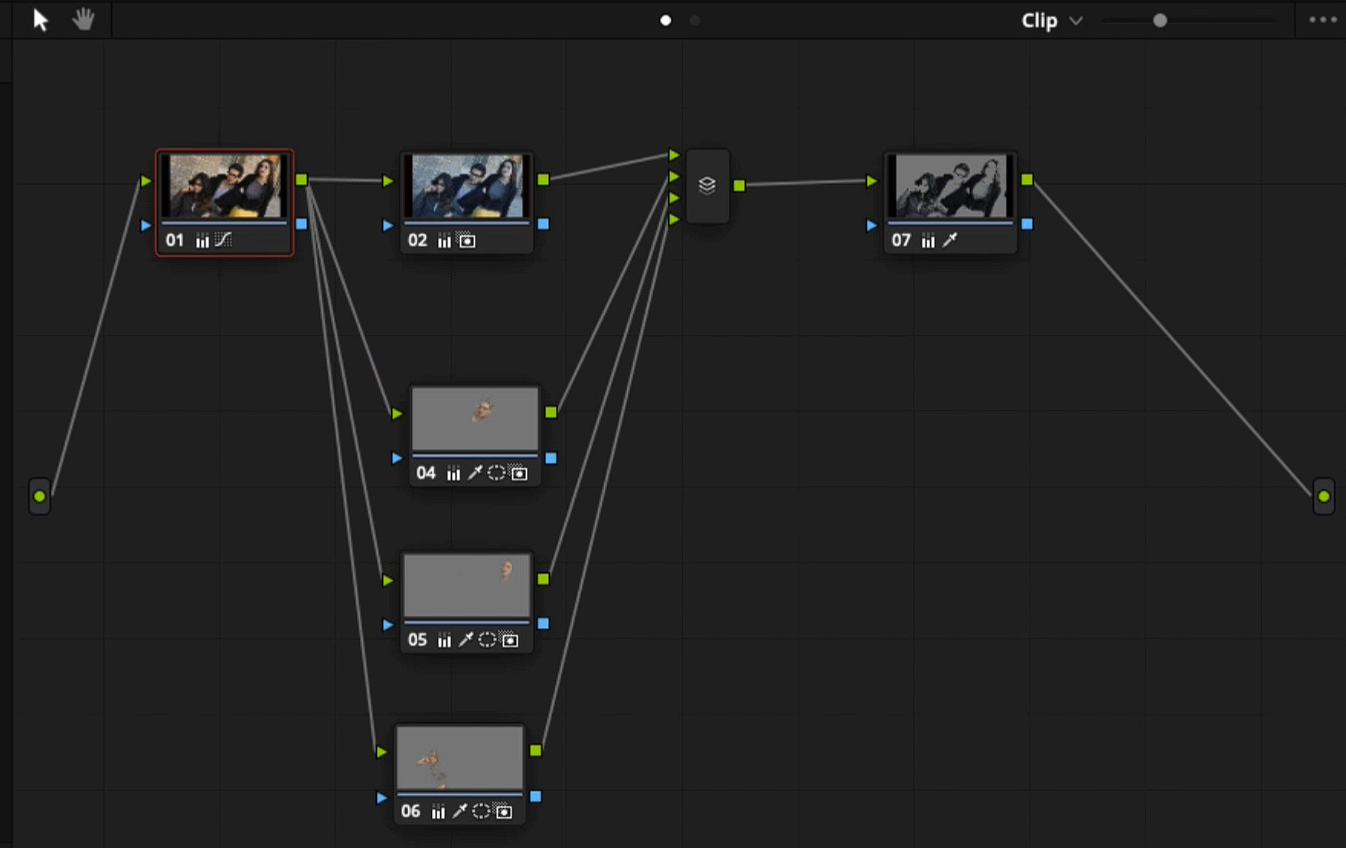
The shared nodes are really powerful and change the way in which we work on groups of shots quite considerably. Shared nodes are shared across multiple shots but do not require those shots to be in the same group.
A shared node can be created and placed in multiple node trees. It will apply the same adjustment to all of those node trees if it is changed or deactivated in one of those node trees. That change carries through all the other node trees, which contain an instance of that particular shared node.
This means we can set up a node that takes care of noise reduction or a vignette in a particular way and then apply those adjustments with a simple right-click.
We no longer have to delete all manually but one node, take a still and then use the append node graph option. To paste that one single node in all the clips.
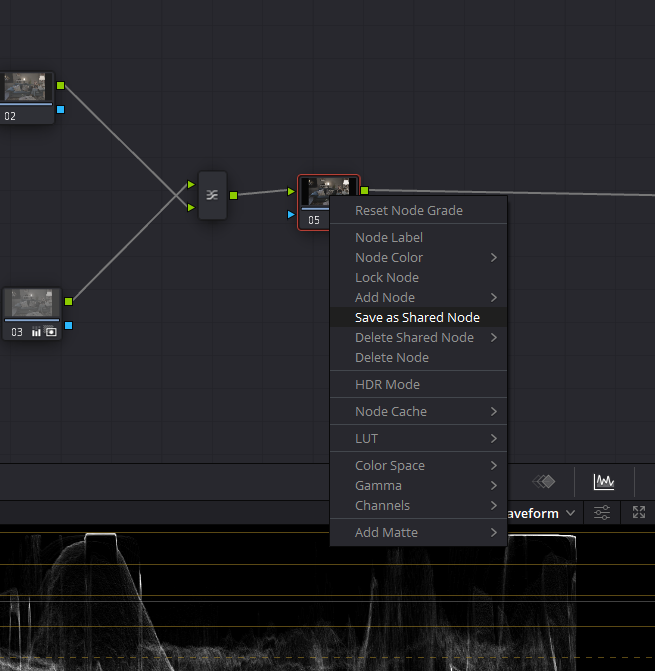
Now we can save any node we want as a shared node; all we need to do is right-click on an already existing node in your node tree and choose “save as shared node.”
Now by default, it’s given the name “shared node 1”. You can change it by right-clicking on it and selecting “Node Label.”
We can then move to different shots and right-click got to “add node,” Then, at the bottom of the list, we have our shared nodes saved and referred to by their name.
So let’s say, for example, we’re working on two shots that are taken from the same angle. But we’ve had a lighting change for whatever reason. Let’s say the sun has moved to the camera settings, got tweaked, whatever.
We can get them in the same color balance using our primary grades but save a secondary grade as a shared node. We can then just apply it to the second shot instead of having to redo that secondary from scratch on that second shot.
We could also do the same for static circular vignettes, which may fit for these two shots, but it may not be suitable for others in the edit, and we can also use this method to apply noise reduction as well.
One important thing to consider when using them is that they are all effectively the same node appearing in different node trees simultaneously. This is not like copying and pasting a node onto something else where you can then change it.
If you make a change to a shared node, All other instances of that shared note are changed in the exact same way.
If you turn a shared note off in one tree, it will be deactivated on every other shot in which it is present.
What is a Splitter Combiner Node In Davinci Resolve?
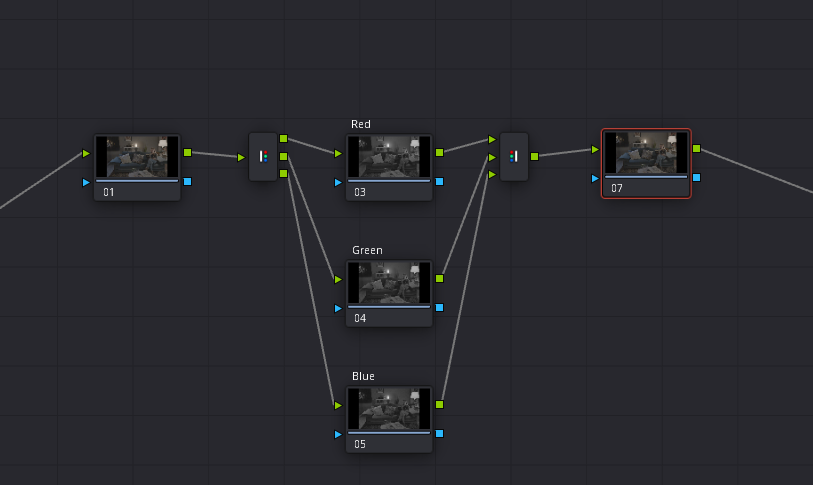
The splitter combiner nodes take the color channels (RGB) that make up our image and split them up so that we can work on each channel separately within a dedicated character node, then reassemble those channels, including any adjustments that we’ve made.
Now, this may sound like a complicated thing to do, but it does have its uses, especially for things like noise reduction or blur, sharpen with greater accuracy.
By using the shortcut Alt+Y, you can create a Splitter Combiner Node tree. You can use this node tree to target a channel specifically.
Let’s suppose there is a lot of Chroma Noise in your shot and most of the noise is in the red channel. By splitting your RGB channels, you simply go ahead in just your Red channel and use Noise Reduction.
Also, some professional colorists like to apply grain to just a specific channel for a distinct look. To better understand the value of it, try to inculcate it in your color grading projects for corrections and creative uses as well.
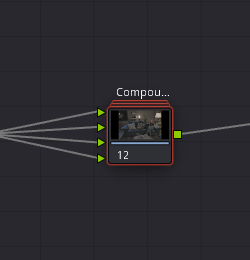
How To Combine Nodes (Compound Nodes) in Davinci Resolve?
OK, node trees can get a little wild, right? So we’re going to take a look at a really powerful way to keep everything under control, much like we can nest clips or sequences in Adobe Premiere Pro.
We can also collapse multiple nodes down into a single node that contains all the separate components that went into it. This is called a compound node, and it’s a lot like a nested clip, but the nodes in our node tree.
Now we’ve covered parallel nodes and layer nodes before and how they help us keep organized. And because they are a number of nodes grouped together based on a particular goal or function, they are the first and most logical candidates for becoming compound nodes.
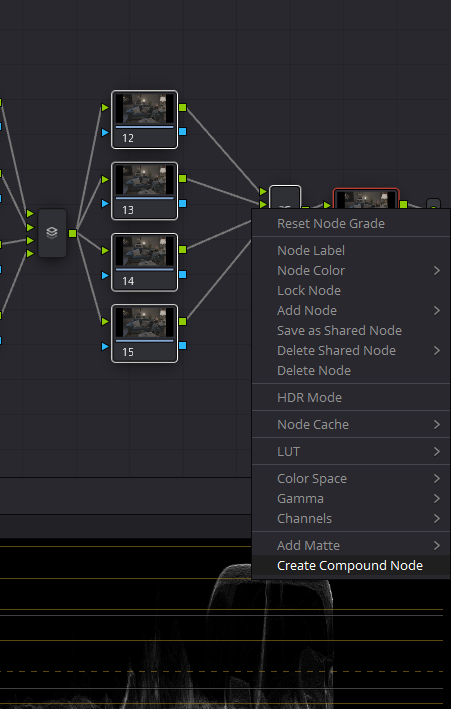
By selecting all the relevant nodes by clicking and dragging, right-click any one of the selected nodes and choose “create compound node” from the bottom of the drop-down menu.
Now all the selected nodes will vanish and will be replaced by a node that looks like a few playing cards stacked on top of each other. Now, this compound node contains all of the previously selected nodes. You can right-click on it and select “Decompose Compound Node” to remove it.
Also, now that all your nodes, which you used to create a look, are in one compound clip, you can use your “Key Output Gain” to lessen the intensity of it according to taste.
Making Efficient Node Trees in DaVinci Resolve
DaVinci Resolve is a powerful color grading software that allows creative professionals to manipulate the look and feel of video footage. With its vast set of features and tools, it can be overwhelming for beginners. The key to unlocking its potential lies in understanding its node structure, which forms the backbone of any grading project.
The following guide is based on an informative video that provides a step-by-step approach to building an efficient node tree. The idea is to set up a framework that you can adapt for any project. Let’s break down the essential elements.
Building Your Node Tree
The Primaries
It’s time to build the main node tree structure. Using shortcut Alt+S on Windows or Option+S on macOS on the Color Page of Davinci Resolve, create four Serial nodes, right-click on every node, and click on ‘Node Label’ to name them as follows:
- Exposure
- Balance
- Contrast
- Saturation
These nodes will host your primary adjustments.
The Secondaries
In addition to the primary nodes, you can add three Parallel nodes for your secondary adjustments by using the shortcut Alt+P on Windows or Option+P on macOS. You can label them based on your project’s specific needs, such as:
- Temperature
- Texture Pop
- Skin Tone Adjustment
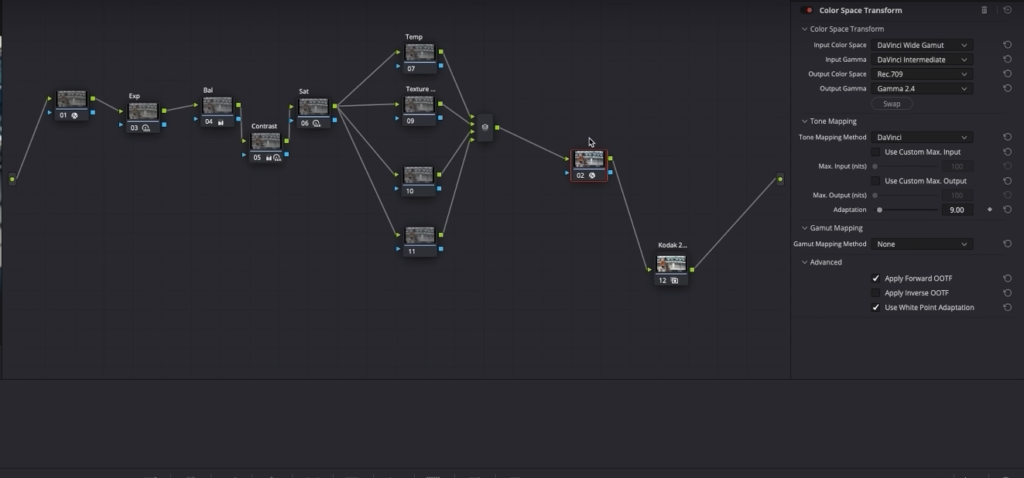
The Magic: Where Creativity Happens
Once you have your primaries and secondaries set up, you can utilize DaVinci’s built-in LUTs, like Rec 709 Kodak 2383, or create a custom look using curves or any other tool that fits the project.
Practical Tips: Working Clip-by-Clip
- Exposure: Use the HDR tool for exposure adjustments, ensuring that nothing is clipping.
- Balance: Navigate to the color wheels and play with the offset to balance your shot.
- Contrast: You can use the offset-gain method for contrast adjustments.
- Saturation: The HDR tool is excellent for nuanced saturation control.
Thanks For Reading!