Hi, I’m Salik, the author of FilmmakingElements.com. I have been a filmmaker for over 10 years. I am also a certified DaVinci Resolve Trainer and I have used DaVinci Resolve for many of my projects. Today, we’re going to discuss a simple technique for editing to the beat in DaVinci Resolve. This method is perfect for visual learners and helps you visualize where your cuts need to go. We will be using the Transient Detection feature in the Fairlight tab to achieve this.
So let’s jump right into the technique and learn how to make your video edits synchronize perfectly with the beat of your chosen music track.
Edit To Beat Using Transient Detection in DaVinci Resolve.
In this comprehensive section, we’ll dive deeper into the process of editing to the beat in DaVinci Resolve using transient detection. Follow these detailed steps to create a captivating and harmonious video that syncs flawlessly with your chosen music track:
1. Prepare your project
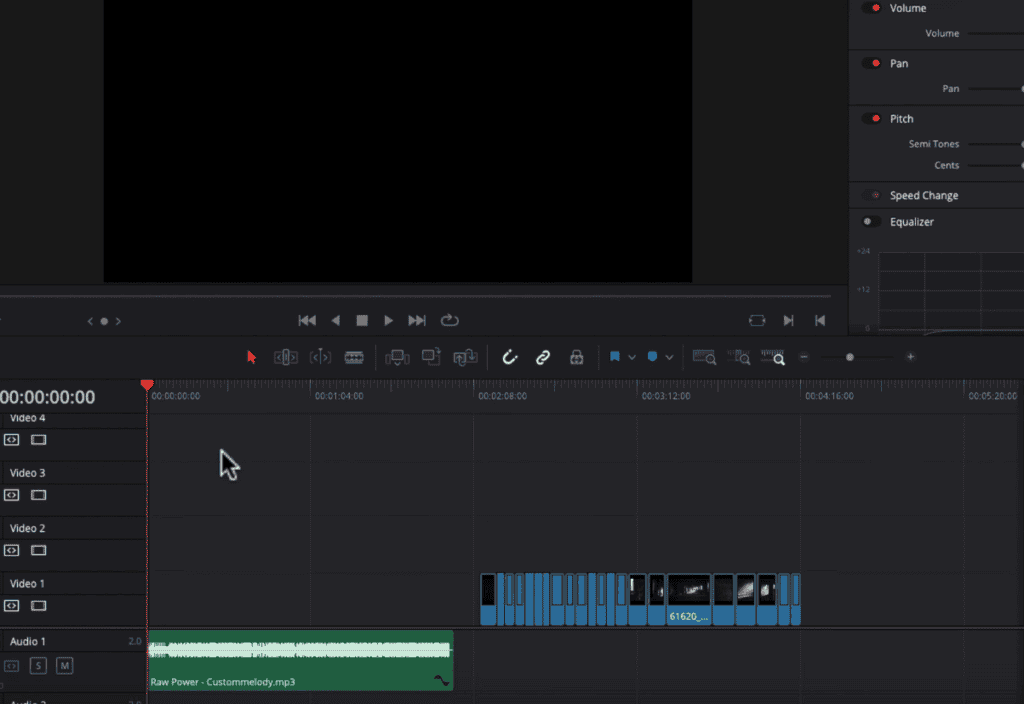
Create a new project, and add the audio to your timeline. Organize your video clips in a bin, ready to be used in the desired sequence.
2. Switch to the Fairlight tab
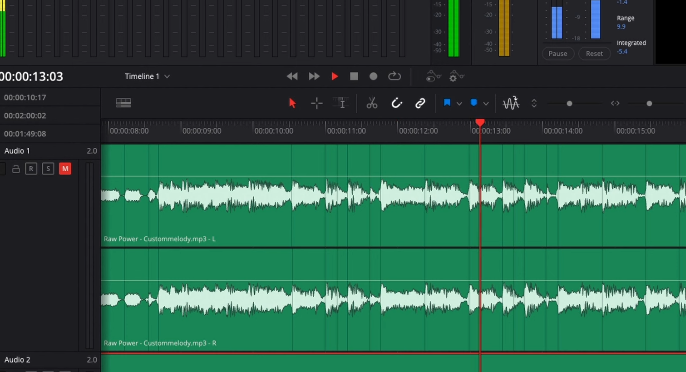
To access the powerful transient detection feature, click on the musical notes icon located at the bottom of the screen to switch from the Edit tab to the Fairlight tab. The Fairlight tab offers advanced audio editing tools that will help you achieve precise synchronization with your music.
3. Enable transient detection
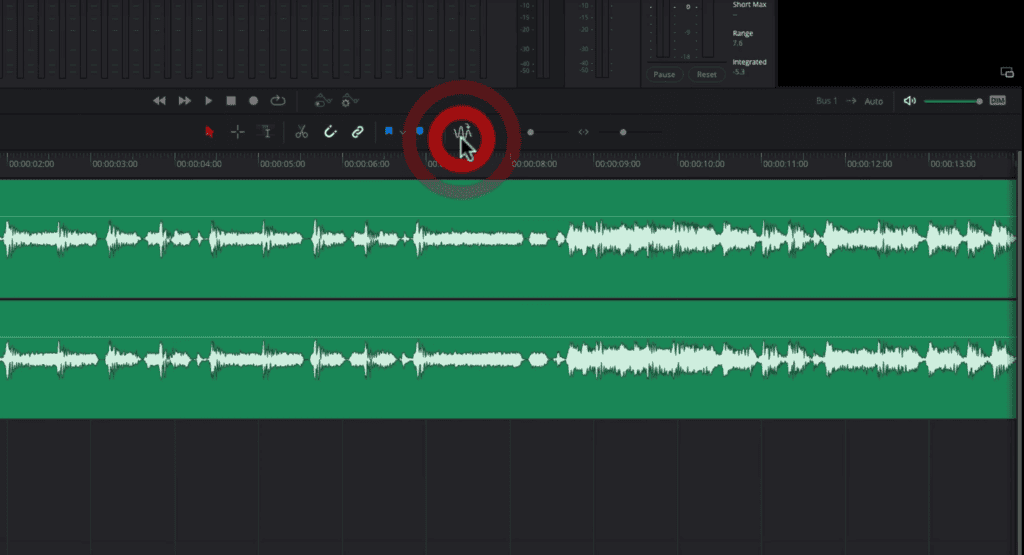
In the Fairlight tab, find the wavy icon in the toolbar at the top of the audio timeline and click on it to enable transient detection. This indispensable feature will assist you in identifying the beats within your audio track.
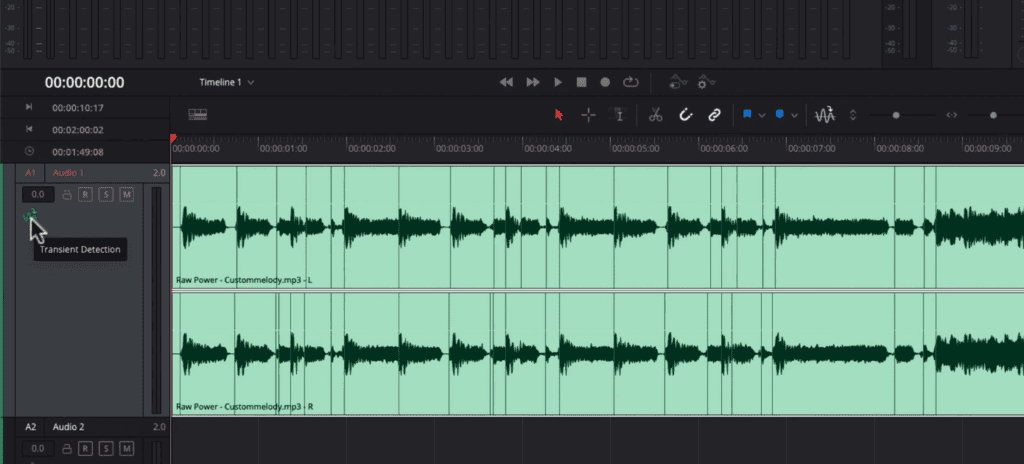
4. Activate transient detection for each track
If you don’t immediately see any markers on your audio clip, verify that transient detection is turned on for each track individually. To do this, look for the transient detection toggle (same icon) in the track header section of the timeline on the right of the track. Once enabled, you will see vertical lines indicating the beats.
5. Analyze and identify the beats to edit to
Transient detection marks all the beats, including drums, snare drums, and bass guitars. To determine which beats are most suitable for editing, listen to the audio track carefully while observing the visual representation of the beats. The kick beats are usually the most prominent and suitable for syncing your video edits. You can zoom in on the waveform for a closer look at the beat structure.
Enhancing Precision: Isolating Specific Beats in DaVinci Resolve
In this subtopic, we will explore how to get even more precise with your transients, isolating specific beats such as the kick drum or bass guitar. This technique can help you create a more refined edit that aligns perfectly with the desired beats in your music track.
Follow these steps to isolate specific beats in DaVinci Resolve:
- Duplicate your audio clip: On the Fairlight page, first, copy your audio clip to a new track. Hold the Option (Mac) or Alt (Windows) key, click on the clip, and drag it down to create a new track. Mute the original track by pressing the “M” button on the left of the track.
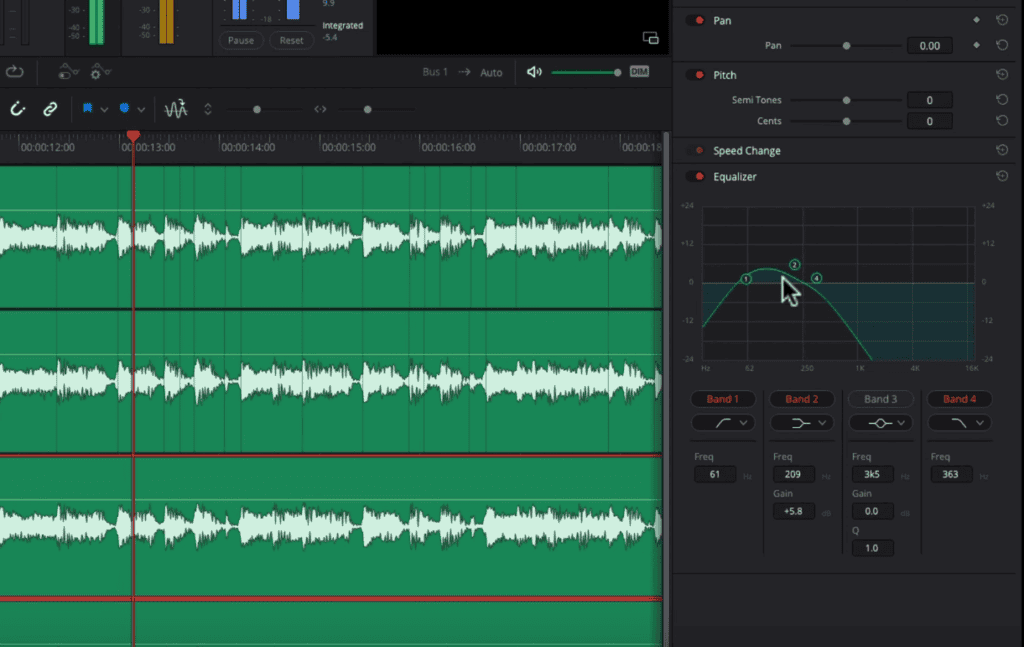
- Open the Inspector: Select your duplicated clip and open the Inspector to access additional editing options. Click on the Inspector button on the top right corner.
- Isolate sounds using the Equalizer (EQ): In the Inspector, locate and activate the equalizer (EQ) for your duplicated clip. This tool will allow you to focus on specific frequency ranges, helping you isolate the sounds you want to edit to, such as the kick drum or bass guitar. The EQ consists of multiple bands that can be adjusted to emphasize or attenuate specific frequencies. By manipulating these bands, you can effectively isolate the desired low-end sounds while eliminating higher frequency ranges that might interfere with your editing precision.
- Refine EQ band adjustments: With the EQ activated, you can now work on refining the adjustments to the individual bands to better isolate the low-end sounds. To do this, first, turn off any unnecessary EQ bands, such as band 3 (click on the Band 3 button to turn it off). Then, focus on adjusting the remaining bands, typically bands 1 and 4. As you play the audio clip, make adjustments to these bands, experimenting with different settings to achieve the desired level of isolation for the kick drum or bass guitar. For example, you might need to bring down band 4 to the left to remove higher frequency sounds, while adjusting band 1 to the right to emphasize the low-end thumping of the bass guitar or kick drum.
- Carefully listen and fine-tune the EQ settings: The final step in isolating specific beats in your audio track is to play the audio clip and carefully listen to the isolated beats, ensuring that you can clearly hear the desired sounds, such as the thumping of the bass guitar or the kick drum. As you listen, make any necessary adjustments to the EQ bands to further refine the level of isolation.
Refining Beat Detection with EQ Adjustments in DaVinci Resolve
In this subtopic, we will discuss how to further refine the transient detection by using EQ adjustments, enabling you to create even more precise and accurate edits in DaVinci Resolve.
Follow these steps to refine beat detection using EQ adjustments:
- Return to the Edit tab: After isolating the specific beats with equalizer, go back to the Edit tab in DaVinci Resolve. Select the audio clip you have been working with (duplicate clip).
- Create a New Compound Clip: Right-click the selected audio clip and choose “New Compound Clip.” This action will apply the EQ adjustments to the clip, making the desired beats more visible in the waveform. You can rename the compound clip if you wish, but it’s not necessary.
- Compare waveforms: Observe the differences between the original waveform and the compound clip’s waveform. You should see that the desired beats, such as the kick drum or bass guitar, are more apparent in the compound clip’s waveform.
- Run Transient Detection on the new layer: Switch back to the Fairlight tab and enable transient detection for the new compound clip. You should notice fewer transients, making it easier to identify the specific beats you want to edit to.
- Tweak the EQ settings: Depending on the song you’re working with, you might need to make additional EQ adjustments to further isolate the desired beats. Feel free to experiment with the EQ settings until you achieve the desired level of beat isolation.
Adding Markers to Transients for Precise Video Editing
In this subtopic, we will discuss how to add markers to the detected transients in DaVinci Resolve, making it easier to align your video edits with the beats for a more professional and polished result.
Follow these steps to add markers to transients:
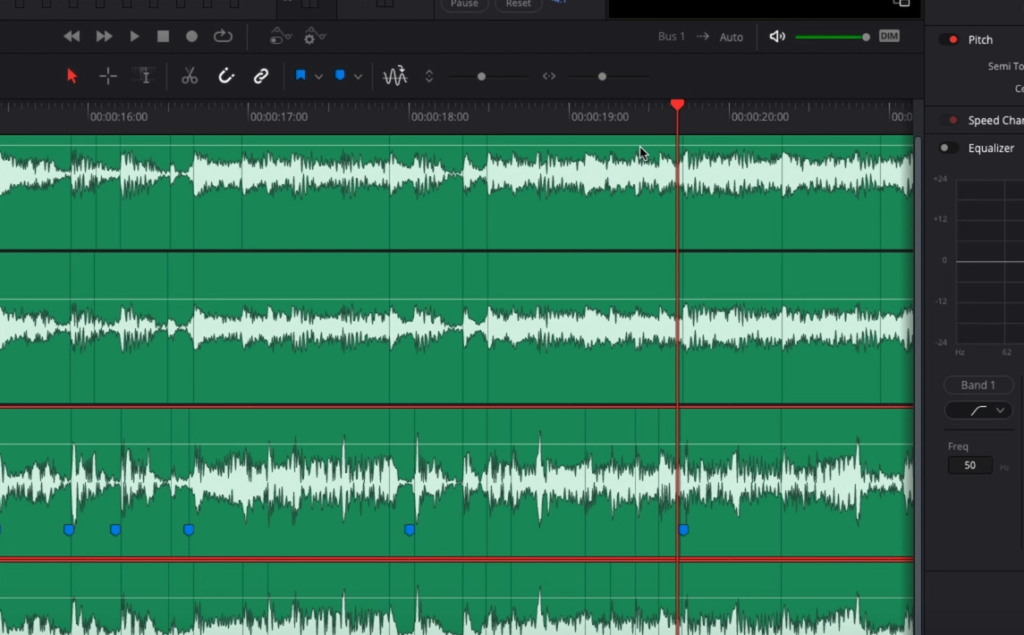
- Stay in the Fairlight tab: Ensure that you are in the Fairlight tab, where you have already enabled transient detection and refined it with EQ adjustments.
- Adjust navigation options: Click on the Timeline View Options (first icon in the toolbar above the audio timeline). In the “navigation options” deselect all options except “Transient Detect.” This setting allows you to navigate between transients using the arrow keys.
- Navigate between transients: Select your audio clip and use the up and down arrow keys to jump between transients. If you find that transients from another track are interfering with your navigation, move that track out of the way temporarily.
- Add markers to transients: As you navigate between transients, press the letter “M” on your keyboard to add a marker at each desired beat. Focus on the larger waveforms that correspond to the beats you want to edit to, such as kick drums or bass guitar hits.
- Listen and refine markers: If you’re uncertain about a transient’s location, listen to the audio to verify the beat’s position. Adjust the markers as needed to ensure they are as close to the desired beats as possible, making it easier to edit your video in sync with the music.
- Edit video to the beat: Once you have added enough markers to match the number of video clips you want to edit, move to the Edit tab to align your video edits with the markers. The markers will serve as a guide, allowing you to create precise cuts that match the beat of the music.
Cutting Video Clips and Editing to the Beat
Once you’ve added markers to the transients in your audio track, it’s time to cut your video clips and edit them to match the beat. In this subtopic, we will guide you through cutting and ripple deleting video clips in DaVinci Resolve to create a polished and synchronized final product.
Follow these steps to edit your video clips to the beat:
- Jump to the Edit tab: Click back into the Edit tab and adjust your tracks for better visibility.
- Import video clips: Bring in your video clips and arrange them in the order you want to use them.
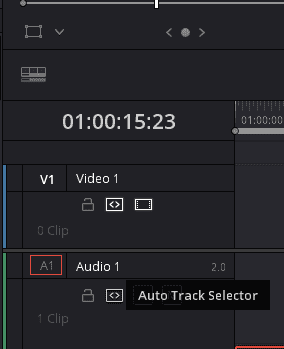
- Prepare for ripple delete: Before cutting your video clips, turn off the “auto track selector” for your audio tracks. The icon looks like a rectangular box with two arrows pointing the opposite directions. This ensures that the ripple delete function will only affect your video tracks.
- Cut and ripple delete video clips: Navigate to each marker on your timeline and use the ripple delete function to cut the video clip at that point, removing everything after the cut. Don’t worry if the clip’s section is not perfect; you can adjust it later.
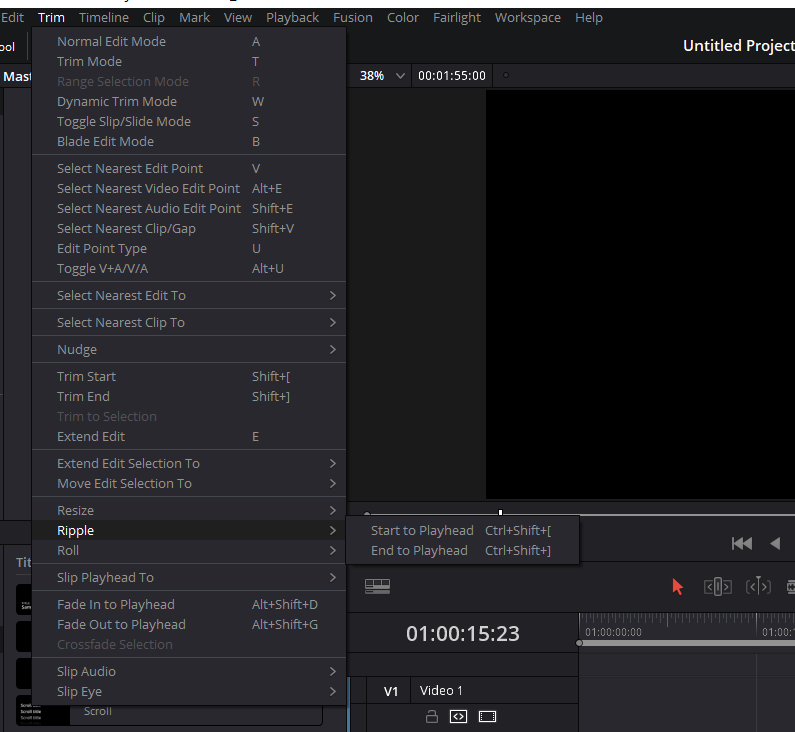
- Check and reassign keyboard shortcuts: If you’re unsure of your keyboard shortcuts for ripple delete, go to the Trim menu on the top, and in the Trim sub-menu, look for “Start to Playhead” and “End to Playhead.” Note these shortcuts, as you’ll be using them throughout the editing process.
- Jump between markers: Use the Shift and up and down arrow keys to jump between markers quickly, allowing for efficient editing.
- Edit video clips to the beat: Using the ripple delete keyboard shortcut, cut each video clip at the corresponding marker. Continue this process until all clips are edited to the beat.
- Preview the edited video: Mute the audio track with the markers and EQ adjustments, and unmute the original audio track. Play the video to see how the cuts align with the beat.
- Adjust clips as needed: If you notice any clips that need adjustments, move them slightly to achieve the desired synchronization with the beat.
By following these steps, you can cut and edit your video clips to match the beats in your audio track, creating a professional and engaging final product. With practice, you’ll become more efficient at editing video clips to the beat, making your videos stand out and capturing your audience’s attention. Best Of Luck!