
Welcome back, filmmakers! In this post, we’ll be exploring the 2 ways of creating echo effect in DaVinci Resolve and showing you how to achieve that perfect repetition of a sound in your clips. The echo effect is quite different from reverb, and we’ll be delving into the details, explaining the various knobs and dials, and providing you with tips on how to achieve the desired results.
Understanding the Echo Effect
The echo effect is all about repeating the same sound multiple times, like a voice calling out “hello” over and over. This is distinct from reverb, which is the sound bouncing off various surfaces to create a more continuous reverberation. The echo effect can be used to create a sense of depth and space, like when a character stands on the edge of a cliff or inside a train tunnel, and their voice carries into the distance.
Getting Started with Echo in DaVinci Resolve
To master the echo effect in DaVinci Resolve, you’ll need to familiarize yourself with the various settings and options available. We’ll guide you through the process and explain each element in detail. However, the key to achieving the perfect echo effect lies in experimenting with your clips and finding the right combination of settings for your specific project.
1. Applying the Echo Effect in DaVinci Resolve In the Edit Tab Of Davinci Resolve
In this section, we will walk you through using the echo effect in the DaVinci Resolve Edit tab on a specific audio clip. This technique can add depth and character to your audio, and it’s easy to implement with our step-by-step guide.
Preparing Your Workspace
Before diving into the echo effect, ensure you have good headphones to work with. While the echo effect will be noticeable on any speaker, using quality headphones can help you fine-tune the effect for the best results.
Adding the Echo Effect to an Audio Clip
- Open DaVinci Resolve and import your clip into the timeline.
- To add the echo effect, you can either apply it to a single audio clip in the Edit tab or to the whole track in the Fairlight tab. We will demonstrate both ways.
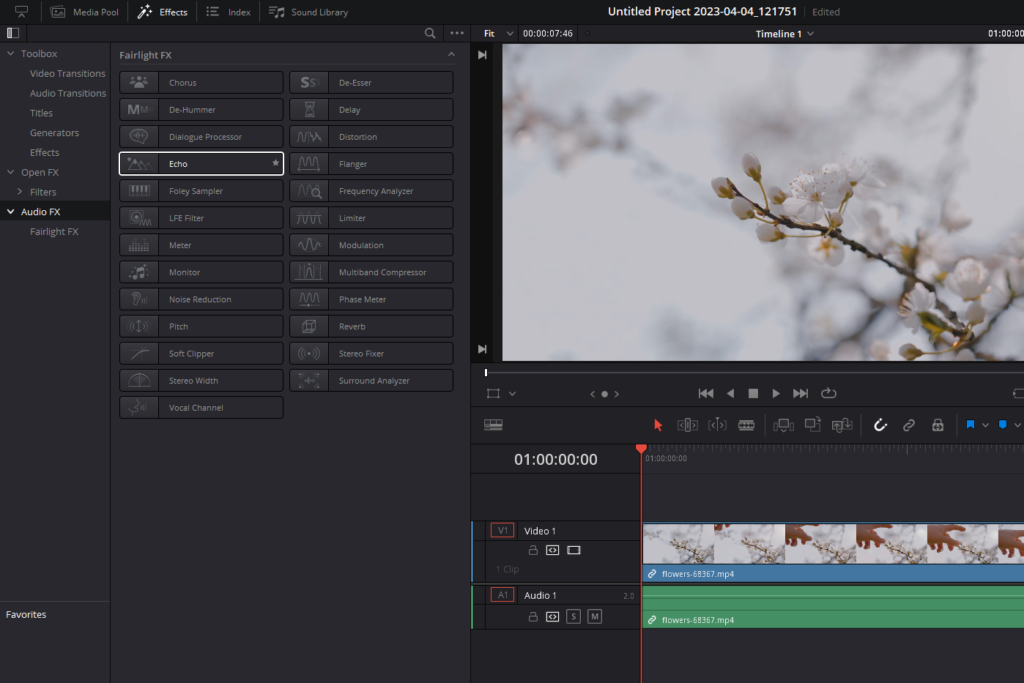
- In the Edit tab, close the media pool by clicking the icon in the top left corner. Then, open the Effect panel.
- Locate the Echo effect in the Effects library under the Audio FX section. To apply the effect to a single audio clip, simply click, drag, and drop it onto the desired clip in the timeline.
- Alternatively, if you wish to apply the echo effect to the entire track, navigate to the Fairlight tab instead. This method is useful when you want to add the effect to multiple clips in the same track.
Remember, you can apply any effect directly to an individual clip or an entire track, depending on your needs. Experiment with both methods to determine which works best for your project.
2. Mastering the Echo Effect in DaVinci Resolve Fairlight Page
Audio effects are crucial for enhancing the overall quality of your video production. In this comprehensive guide, we will explore the Echo effect in DaVinci Resolve Fairlight, breaking down the process and parameters for applying it on a track level, as well as fine-tuning the settings for a tailored audio experience.
Applying the Echo Effect to an Entire Track in Fairlight
Instead of applying the Echo effect on individual clips, you can apply it to an entire track in Fairlight. To achieve this, follow these steps:
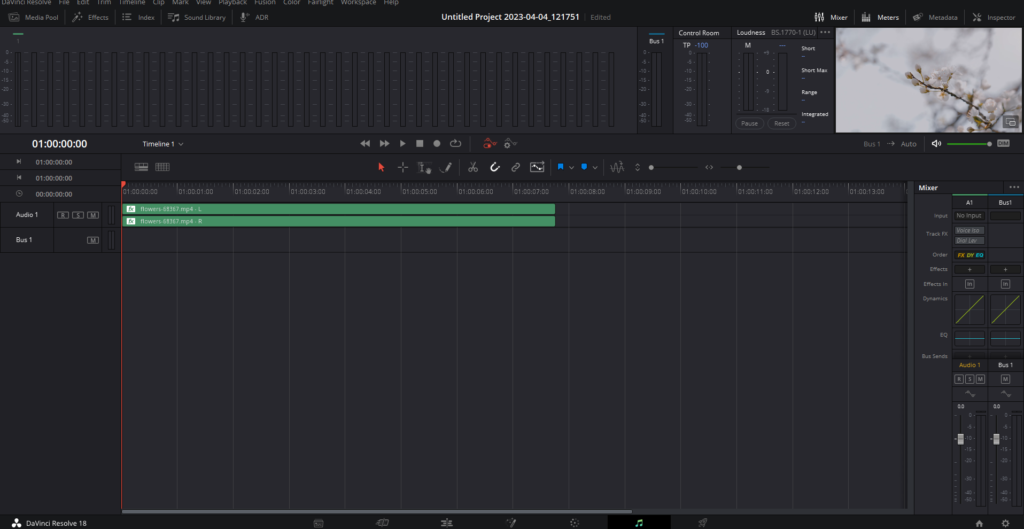
- Open Fairlight by clicking the musical notes icon at the bottom of the screen.
- Open the Mixer panel by clicking on “Mixer” at the top of the screen. If you don’t see the Mixer panel, go to “Workspace” > “Show Panel in Workspace” and ensure “Mixer” is checked.
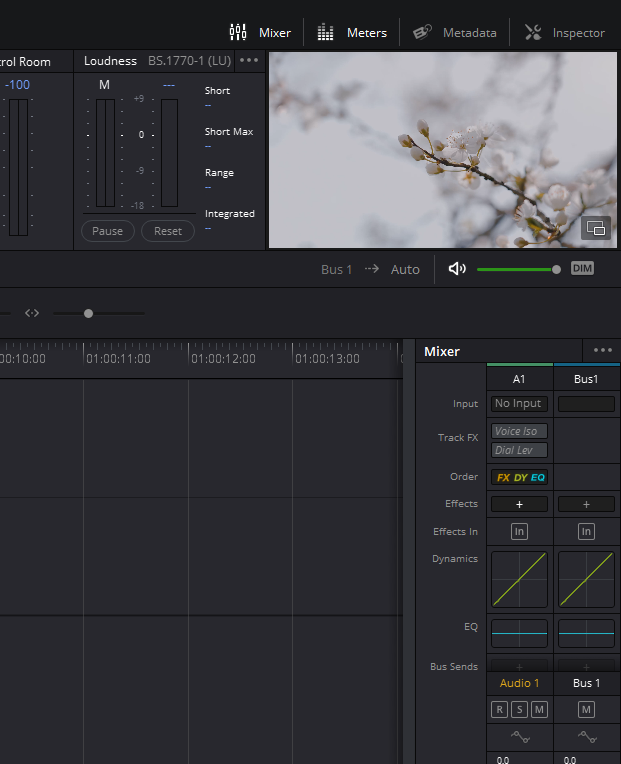
- In the Mixer panel, locate the “Effects” section. If it’s not visible, click the three dots to reveal a list of options, and make sure “Effects” is checked.
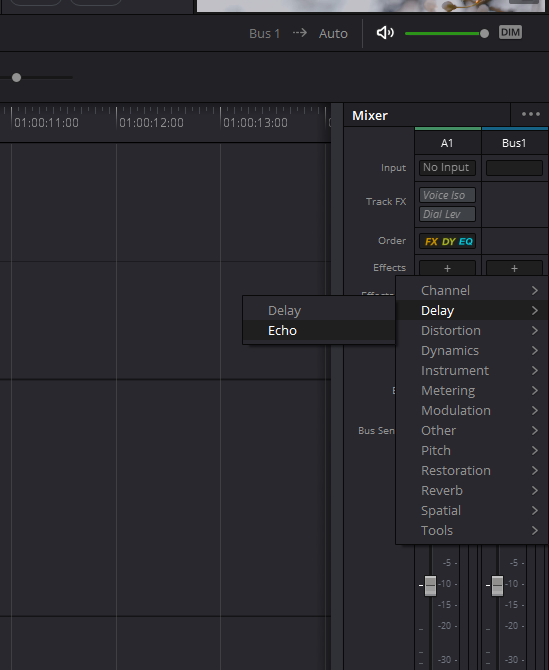
- Click the “+” icon, navigate to “Delay,” then “Fairlight,” and select “Echo” to apply the effect to the entire track.
Echo Effect Window Overview: A Comprehensive Guide
The echo effect window is an essential tool for sound engineers and audio enthusiasts who want to create a distinctive audio experience in their projects. This comprehensive guide will cover various controls and settings within the echo effect window and provide tips on how to fine-tune the effect for optimal results.
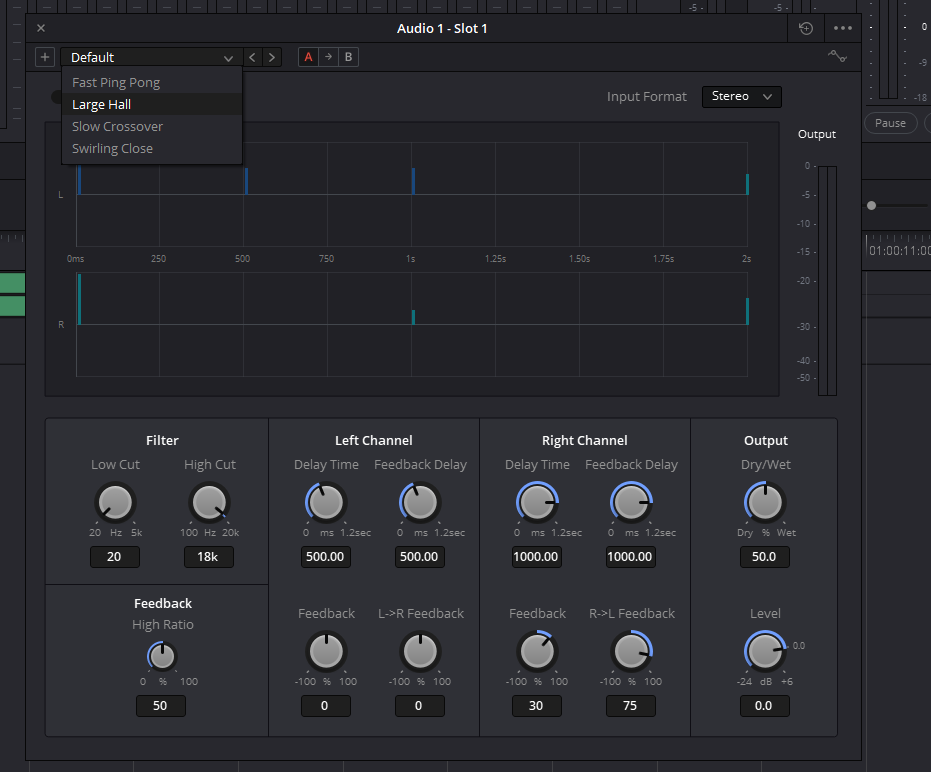
- Add a Preset: The Add a Preset feature allows users to save their custom echo effect settings for future use or load presets created by others. This function simplifies the process of replicating specific audio effects across different projects or sharing settings with colleagues.
- AB Buttons: The AB Buttons enable users to quickly compare two different effect settings, providing an efficient way to identify the most suitable option for a particular audio clip. By switching between the A and B settings, users can easily determine which configuration produces the desired echo effect.
- Reset Button: The Reset Button returns the effect settings to their default values, offering a convenient way to start fresh when experimenting with various configurations. This feature ensures that users can easily revert to the original settings if their adjustments do not produce the desired results.
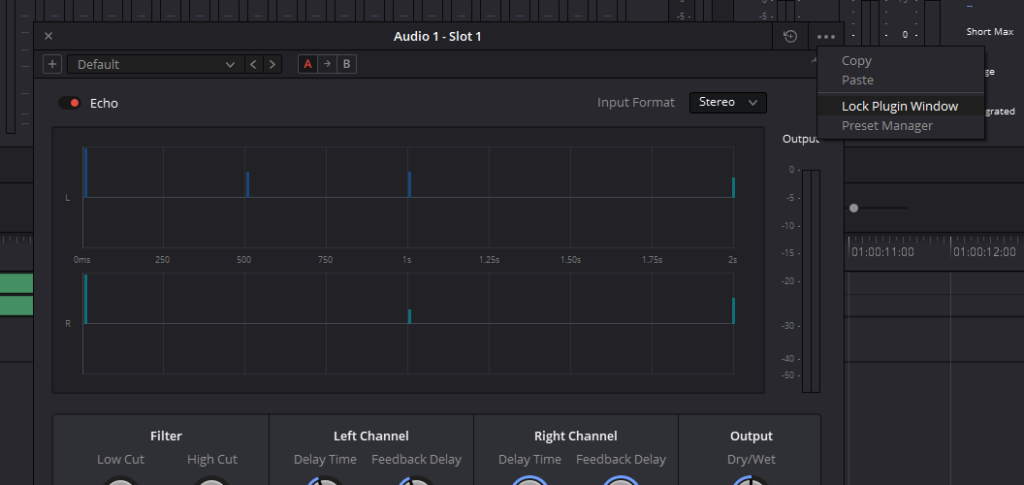
- Lock Plugin Window and Preset Manager: The Lock Plugin Window feature keeps the plugin window in place, preventing it from being accidentally closed or moved while working on a project. The Preset Manager allows users to organize their custom presets, making it easier to locate and apply specific settings in future projects.
- On/Off Button: The On/Off Button enables or disables the echo effect, allowing users to hear the difference between the processed and unprocessed audio. This feature is particularly useful when fine-tuning the settings to achieve the desired echo effect.
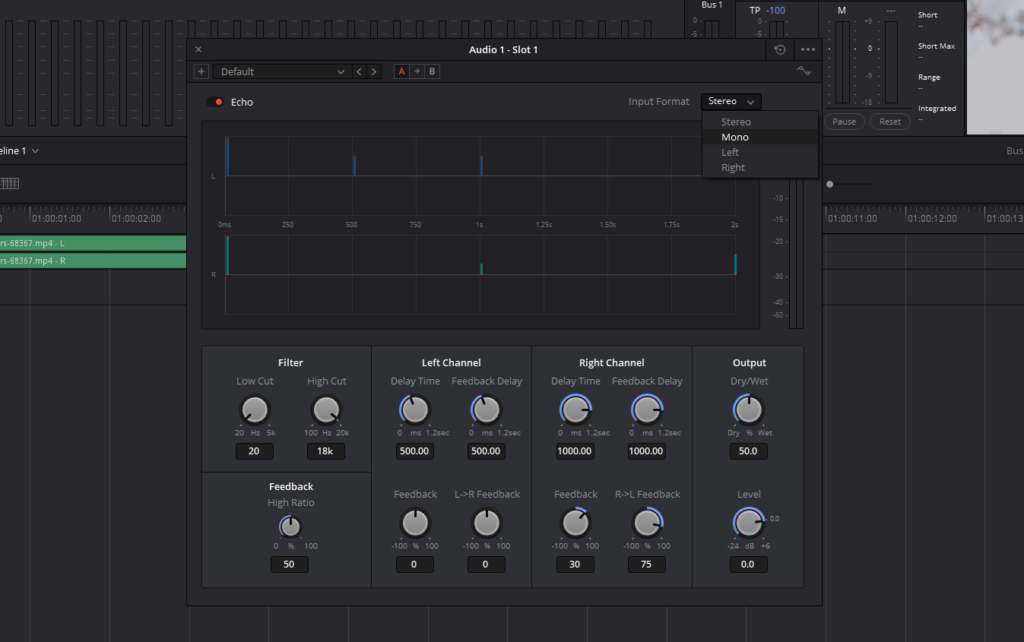
- Input Format: The Input Format setting allows users to choose between mono or stereo input, depending on their audio source. This flexibility ensures compatibility with a wide range of audio files and recording setups.
- Intensity Graph: The Intensity Graph provides a visual representation of the echo effect’s intensity and spacing, helping users better understand how their adjustments impact the final output. This visualization can be instrumental in achieving the desired echo effect.
- Output Meter: The Output Meter monitors the output levels of the audio clip as it passes through the effect, providing essential information for adjusting the overall output level and maintaining a balanced mix.
Fine-Tuning the Echo Effect: Advanced Settings and Techniques
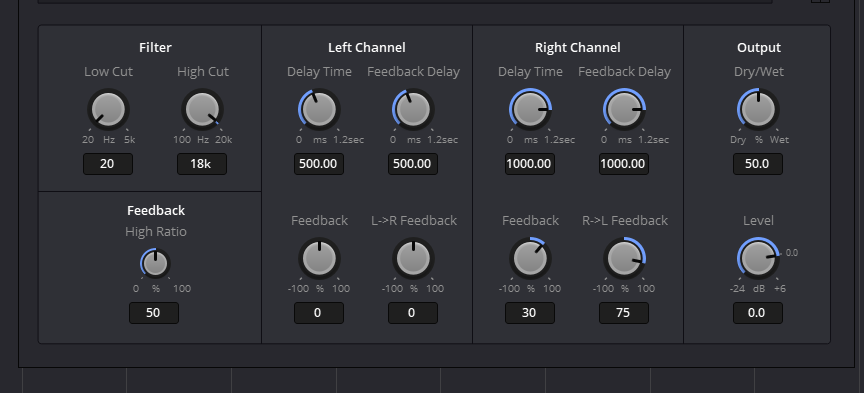
Filters:
- Low Cut Filter: The Low Cut Filter functions as a high pass filter, removing lower frequencies below a specified threshold to eliminate unwanted boominess in the audio. This filter can be particularly useful when working with vocal recordings or other audio sources with excessive low-end frequencies.
- High Cut Filter: The High Cut Filter serves as a low pass filter, cutting out higher frequencies above a set limit. This feature can help reduce harshness or excessive brightness in the audio, ensuring a more balanced and natural sound.
- Feedback: The Feedback setting adjusts the dampening filter for the feedback signal in the clip, providing additional control over the echo effect’s overall character. Experimenting with different feedback settings can yield a wide range of echo styles and textures.
Channel Settings:
The echo effect settings can be adjusted independently for the left and right channels in a stereo audio track, offering greater control over the final output:
- Delay Time: The Delay Time setting determines the global delay time for each channel, defining the initial spacing between the original audio signal and the first echo.
- Feedback Delay: The Feedback Delay setting controls the delay between echoes in the feedback loop, providing further customization of the echo effect’s timing and rhythm.
- Feedback: The Feedback setting adjusts the percentage of the signal that is fed back into the feedback loop, influencing the echo’s intensity and sustain.
- Left to Right Feedback / Right to Left Feedback: These settings control the percentage of feedback signal that is sent from one channel to another, enabling users to create complex and intricate echo patterns that add depth and dimension to the stereo image.
Output Settings:
- Wet/Dry Mix: The Wet/Dry Mix setting determines the balance between the original (dry) signal and the processed (wet) signal. By adjusting this parameter, users can seamlessly blend the echo effect with the original audio, ensuring a natural and cohesive sound.
- Level: The Level setting adjusts the overall output level of the audio effect, providing control over the echo’s prominence in the mix. This parameter is essential for maintaining a balanced and dynamic audio track.
Putting It All Together:
The key to mastering the echo effect in DaVinci Resolve Fairlight lies in understanding the various settings and parameters available within the echo effect window. Experiment with different configurations to create a tailored echo effect that complements your audio and enhances your overall video production quality. Listen carefully to the changes in the audio as you adjust the settings and don’t be afraid to try unconventional combinations.
Some additional tips:
- Start with a preset: If you’re unsure where to begin, consider starting with a preset and adjusting the settings from there. This approach can provide a solid foundation for your echo effect and help you achieve the desired sound more quickly.
- Reference other audio tracks: Compare your echo effect to similar effects in other audio tracks or productions to gauge the effectiveness of your settings. This practice can provide valuable insight into how your echo effect stands up against industry standards.
- Collaborate with others: Share your echo effect settings with colleagues or fellow audio enthusiasts to gather feedback and suggestions for improvement. Collaboration can lead to new ideas and creative approaches that might not have been considered otherwise.
By practicing and experimenting with the various settings and parameters available within the echo effect window, you will be able to create immersive audio experiences that captivate your audience. With dedication and persistence, you can become a master of the echo effect and elevate your audio productions to new heights.