
Welcome back to FilmmakingElements.com. In this one we are teaching, how to get that cinematic film look in Davinci Resolve. This is going to be a step-by-step guide to help you through the process.
Diving into the captivating world of film look and film emulation, it’s essential to address a few key points before getting our hands dirty in the creative process. While film emulation can be highly technical, it’s vital not to forget the artistic aspect. Often, technical accuracy and artistic expression can be at odds, causing us to sacrifice the beauty of this technique and color grading as a whole for the sake of technical precision. Let’s make sure to prioritize artistic expression and find the right balance.
In this blog post, we’ll explore various techniques and delve into some of the more technical elements of film look and film emulation.
Film Look In Davinci Resolve Step By Step Guide
In the quest to achieve an authentic film look, it’s important to understand the differences between digital and analog formats. Film images, for example, are typically less sharp and less perfect than their digital counterparts. This is due to the chemical process involved in capturing images on a physical sheet of film, which lends a more natural, organic feel to the final result. With its unique characteristics, film offers both advantages, such as improved dynamic range and skin tones, and perceived drawbacks, such as imperfections caused by the chemical process.
Grain sharpness is an essential aspect of the film look. Film images are generally less sharp than digital ones, but the grain is often more pronounced, resulting from the chemical reactions on the film. To emulate this effect in DaVinci Resolve, you can experiment with grain saturation using Resolve’s built-in film grain OFX.
To further enhance the film look, you can add various other elements and effects to your footage. While there are more technical tools available for creating a film look, most users will benefit from working exclusively in Resolve without the need for additional plugins. For those interested in exploring alternative options, Film Convert Nitrate and Dehancer are excellent and affordable plugins for Resolve.
As we build our film look, remember that you can customize it to your liking, omitting or limiting some of the effects discussed in this blog post. Whether you’re a colorist working with clients, a director, or a cinematographer coloring your own work, mastering the film look can elevate your projects and deliver truly professional results. So let’s dive in and start crafting our unique film look to impress clients and enhance our artistic vision.
Applying the Film Look LUT in Davinci Resolve
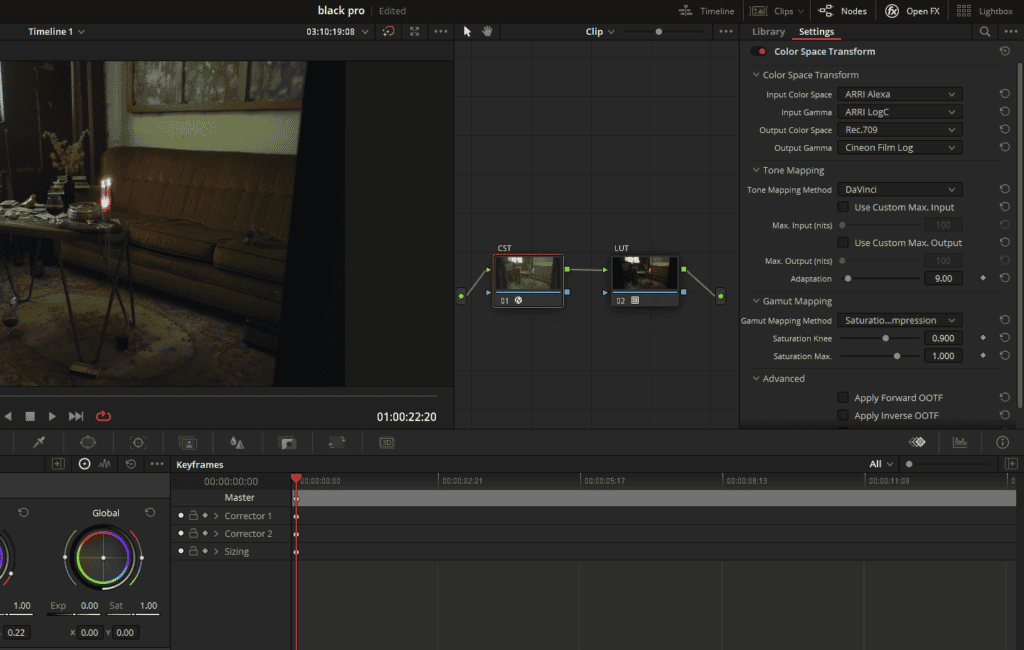
- Configure color management settings: Before starting out, it is important to set the right color management in the Project Settings. Go to the Project Settings by selecting the gear-looking icon on the bottom right corner and go to the “color management” settings. Select DaVinci YRGB for “color science” settings, and set timeline color space to “Rec.709 Gamma 2.4”.
- Add a node: In the color page of DaVinci Resolve, start by adding a new node to the node tree. Use the keyboard shortcut Alt + S or Option + S to create a new Serial Node.
- Access the OpenFX library: Locate the Color Space Transform effect in the OpenFX library, which can be accessed from the top right corner of the color page.
- Apply the Color Space Transform effect: Drag the Color Space Transform effect onto the newly created node.
- Set the input gamma: It is important to set the correct color space for your footage. If your footage was shot on an ARRI Alexa, set the input gamma to Arri logC.
- Set the input color space: Set the “Input Color Space” to Arri Alexa.
- Set the output gamma: Since we’re aiming for a film print emulation, set the output gamma to Cineon Film Log. This will ensure the best results when using the film LUTs built into Resolve.
- Set the output color space: Set the “Output Color Space” to “Rec.709”
- Gamut Method: Set the “Gamut Mapping Method” to “Saturation Compression.”
- Create a new node: After applying the Color Space Transform effect, create another Serial Node by using the keyboard shortcut Alt + S or Option + S.
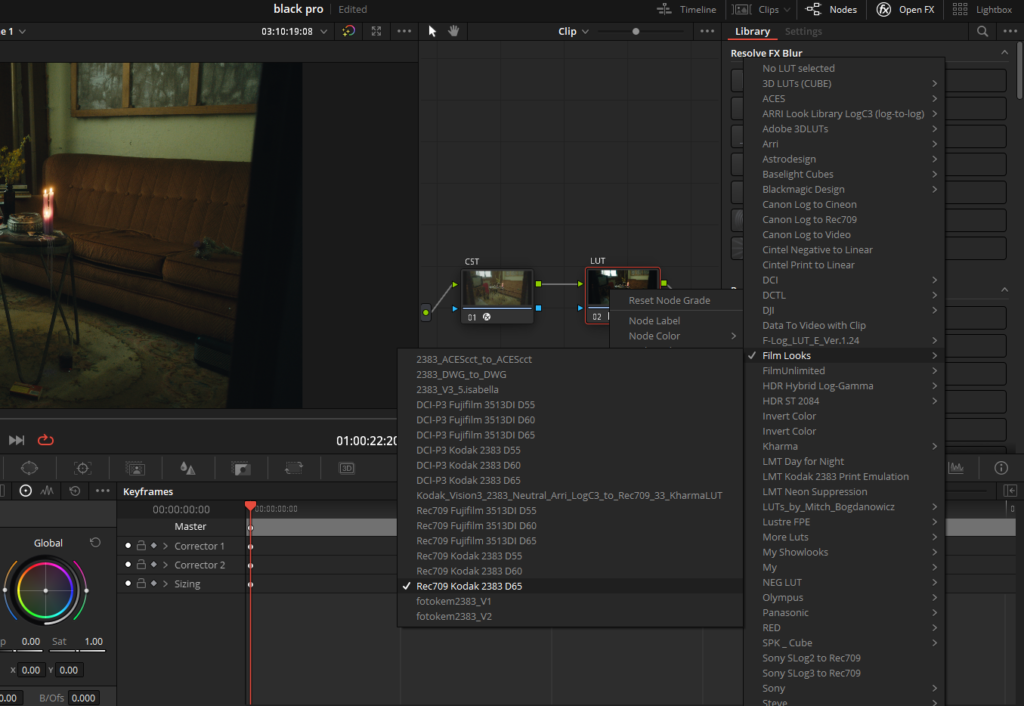
- Apply a LUT: Right-click on the new node, scroll down to “LUT,” and select a film look from the available options. For this example, we’ll use Rec.709 Kodak 2383 D60, but feel free to choose another variant based on your preference.
- Choose a color temperature: The D60, D65, and D55 options indicate different color temperatures for the selected film LUT. You will see the same results but with different color temperatures.
By following these steps, you can achieve a professional film look using the Color Space Transform effect and LUTs in DaVinci Resolve. Experiment with different settings and LUTs to find the perfect film look for your project.
Setting up the correct pipeline for film look in Davinci Resolve
Follow these steps to achieve a professional film emulation:
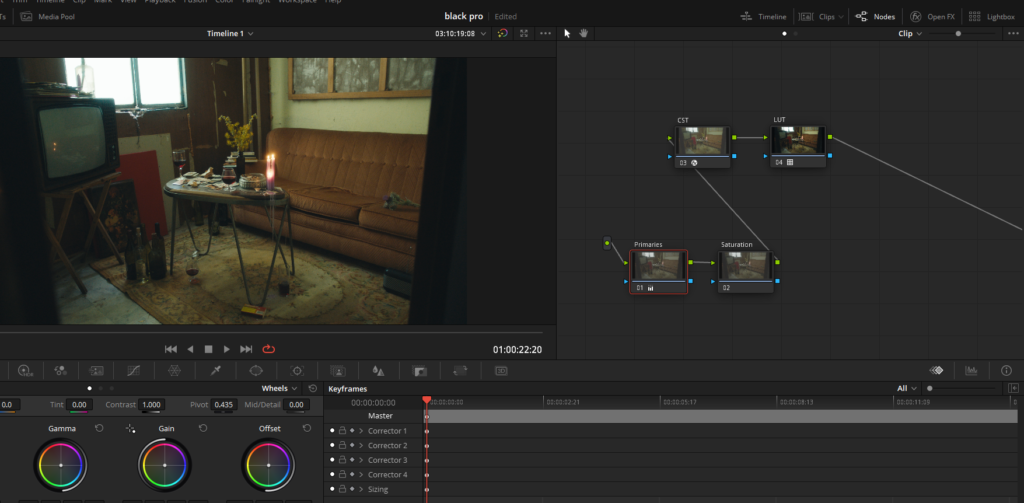
- Label the nodes: To label a node, right-click on it in the node editor and select “Node Label”. For example, label the first node as “CST” (Color Space Transform) and the second one as “LUT” (Look-Up Table).
- Organize the node tree: Place the CST and LUT nodes at the end of the node tree for a more technical and proper conversion. This ensures that all nodes before the CST are in the right color space, allowing for more flexibility in adjustments.
- Add nodes before the CST: Press Shift + S to add a node before the CST. Label this new node “Primaries” and adjust the lift, gamma, and shadows to bring out details in the shadows while preserving highlights.
- Protect highlights while shooting: If you know you’ll be doing a film print emulation, try to protect highlights and preserve details when shooting. Film captures highlights better and suffers in the shadows, so underexposing a bit can help achieve a better result.
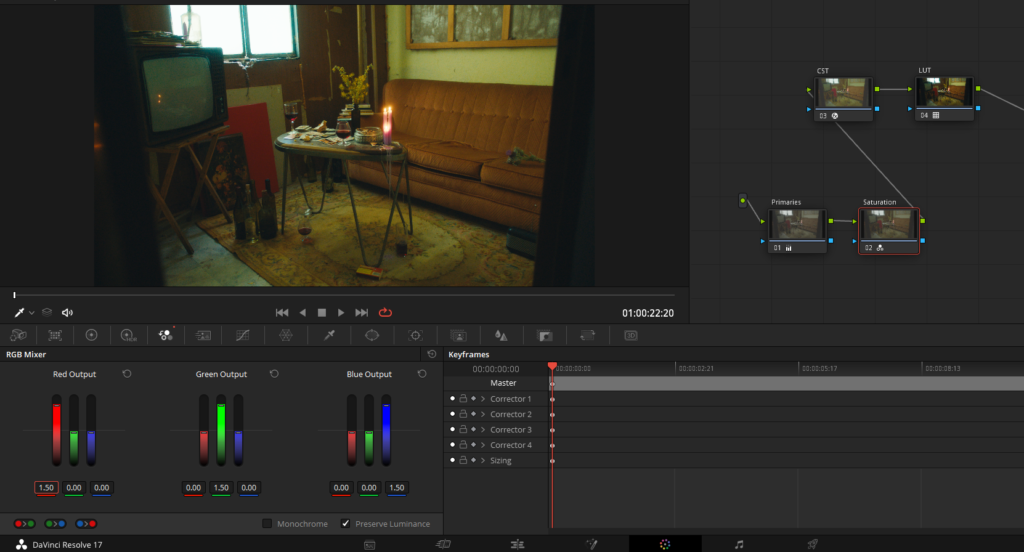
- Adjust the RGB mixer: In the next node, label it “Sat” (Saturation). Select the RGB Mixer from the panel. Max out the red, green, and blue sliders to create a saturated image. Play around with the intensity but make sure all the channels are the same for increased saturation.
To further enhance the film look, we will add effects like blur, halation, and glow to emulate artifacts from the chemical process of the true film.
Adding Softness To The Image
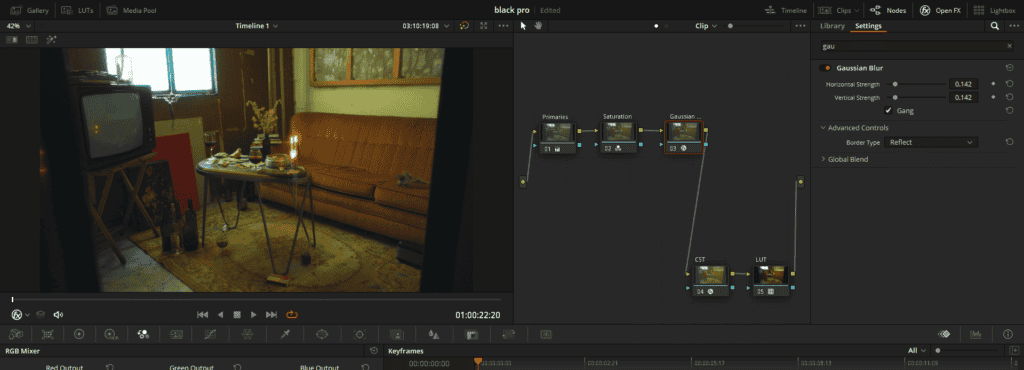
- Add a Gaussian Blur node: Press Alt + S to add a new node. Then, navigate to the OpenFX panel and find the Gaussian Blur effect under the “Resolve FX Blur” section. Apply this effect to the new node. This will help soften the image and reduce sharpness. Make sure that your CST and LUT node is still at the last.
- Adjust the blur intensity: By default, the Gaussian Blur OFX effect is too strong. Set both the “Horizontal Strength” and “Vertical Strength” to zero. Zoom in on a highly detailed, in-focus area of your footage, and slowly adjust the intensity of the blur. Be careful not to make the image too sharp or too blurry. Use stills from real film shots as a reference for the desired level of softness.
- Focus on in-focus areas: When determining the appropriate blur intensity, work on a part of the image that is sharp and in focus. This will help you gauge the overall effect of the blur on the footage.
Recreating the Halation Effect For Film Look In Davinci Resolve
n this subtopic, we’ll delve into recreating the halation effect, an aesthetic characteristic inherent to shooting on film. This effect appears as reddish-yellowish fringing around bright, high-contrast edges and can add a subtle, organic touch to digital files.
Understanding Halation
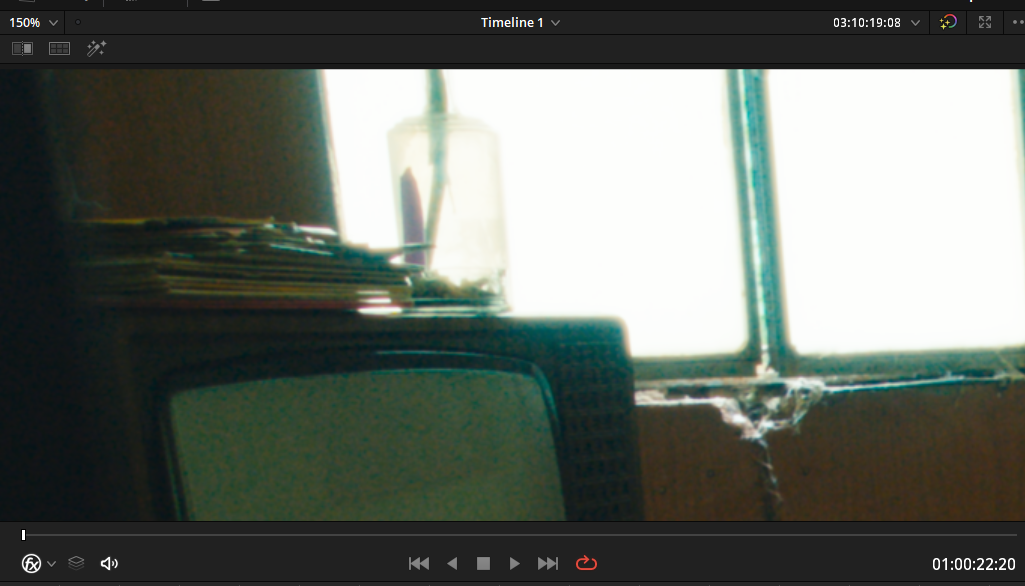
Halation occurs in various film formats, such as 8mm, 16mm, or 35mm, due to the way light interacts with the photochemical film layers. Examining actual film images reveals a blurry, yellowish-reddish fringe surrounding and bleeding into high-contrast edges.
Emulating Halation with DaVinci Resolve
DaVinci Resolve provides several methods for achieving the halation effect. To use the Film Halation OFX plugin, follow these steps:
- Create a new node: right-click in the Node Editor and select “Add Node” followed by “Add Serial.” Alternatively, use the shortcut “Alt+S” to create a new serial node.
- Access the OpenFX panel: On the top-right corner of the DaVinci Resolve interface, click the “OpenFX” button
- Find the Film Halation OFX plugin: In the OpenFX panel, use the search bar at the top to type in “halation.” The Film Halation OFX plugin should appear in the search results.
- Apply the Film Halation OFX plugin: Click and drag the Film Halation OFX plugin onto the new serial node you created in step 1.
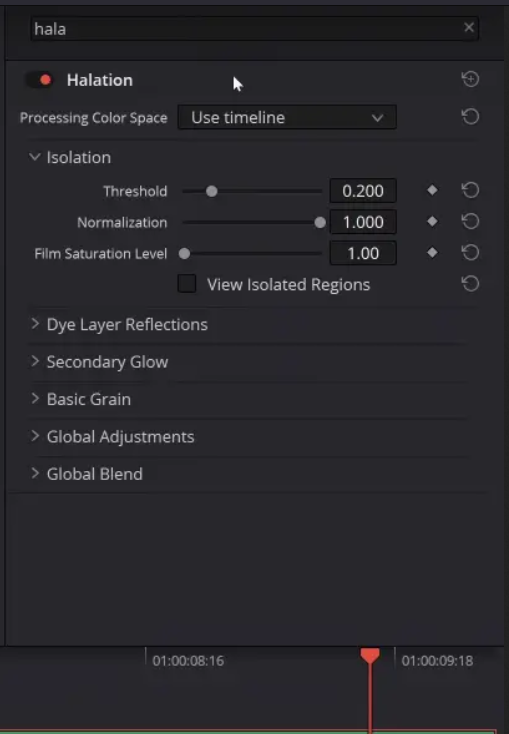
- Choose the Processing Color Space: In the Film Halation OFX plugin settings, select the color space that corresponds to the camera used for shooting. You can find these settings in the Inspector panel on the top-right side of the interface.
- Adjust the Isolation section: Change the “Threshold” to modify the areas affected by the plugin. Check the “View Isolated Regions” box to see the isolated regions. Use the Normalization option to feather the selection.
- Customize the Dye Layer Reflection: In the Film Halation OFX plugin settings, adjust the halation strength, spread, and saturation to achieve the desired effect.
If you don’t have the studio version of Davinci Resolve, follow this guide to create halation: Film Halation Emulation In Davinci Resolve (3 Ways)+Free Powergrade
Adding Glow OFX
In this section, we’ll discuss how to use the glow node to achieve a film look by creating softness and creaminess in your footage.
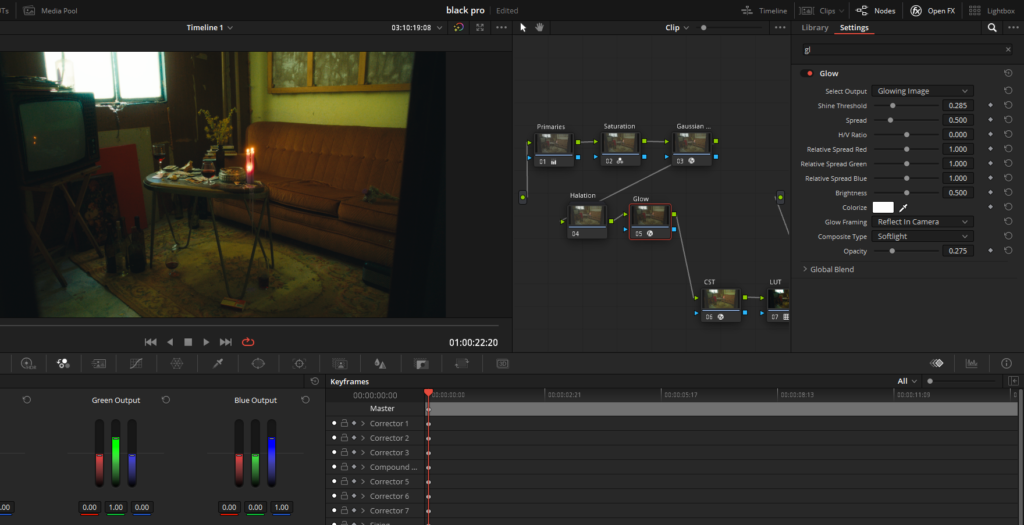
Step 1: Add a glow node
Adding a glow node is essential to recreate the film look, as it provides a soft and creamy appearance that mimics the characteristics of film. In DaVinci Resolve, create a new node, and then search for the “Glow” effect in the OpenFX panel. Drag and drop it onto the new node.
Step 2: Adjust the shine threshold and composite mode
Set the shine threshold to zero and change the composite mode to “Soft Light.” This creates a more subtle effect, resembling the look of film.
Step 3: Adjust the global blend
Fine-tune the effect by pulling back the global blend, which determines the overall strength of the glow. This step helps you achieve the desired level of intensity. Film often exhibits blooming highlights, so adding this effect on top of the halation contributes to the authentic film look. Experiment with the glow settings to find the perfect balance for your footage.
Adding Film Grain To Complete The Film Look
In this section, we’ll discuss the final step to achieving a film look in DaVinci Resolve – adding film grain. Film grain is a result of the chemical process that occurs on actual film, giving it unique characteristics. Adding grain as the last step in your film emulation process ensures a more authentic look.
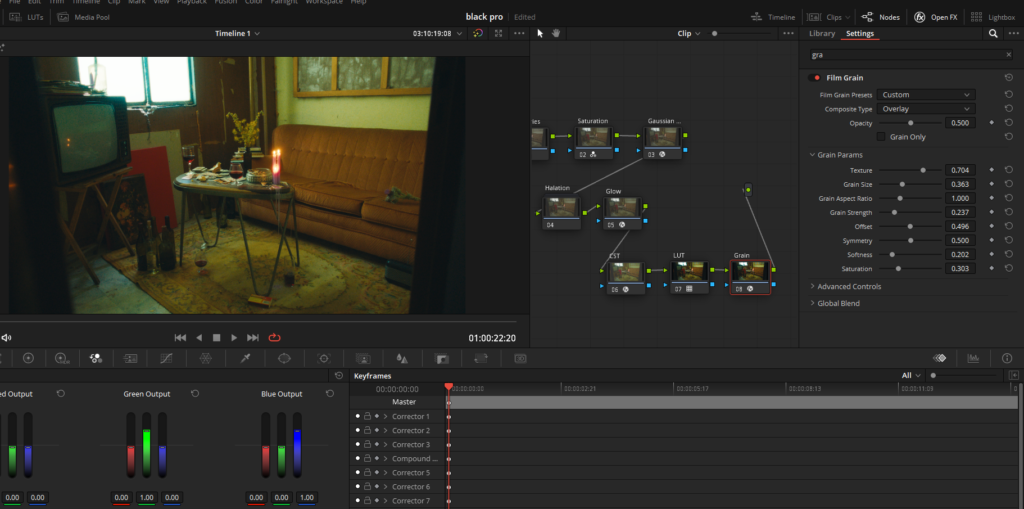
Step 1: Add a new node and apply film grain
Create a new node in DaVinci Resolve and search for the “Film Grain” effect in the OpenFX panel. Drag and drop the effect onto the new node.
Step 2: Choose a film grain preset
Zoom in on your footage to get a better view of the grain effect. Start by selecting a film grain preset, such as the 16mm 500T preset.
Step 3: Customize the grain settings
Adjust the size, strength, texture, and softness of the grain to achieve the desired look. You can make the grain sharper or softer depending on your preference.
Step 4: Adjust grain saturation
Some film grain is saturated, so adding saturation to the grain effect can make it look more realistic. Experiment with the saturation settings to find the right balance.
Step 5: Fine-tune the advanced controls
The advanced controls in the film grain settings allow you to control the intensity of the grain in the shadows, midtones, and highlights.
Step 6: Adjust the global blend
Pull back the global blend slightly to achieve a more authentic film look. This helps ensure that the grain effect blends seamlessly with the rest of the footage.
Once you’ve completed these steps, play back the clip to review the final result. With the addition of film grain, halation, glow, and the right amount of softness, your footage should have a stunning, authentic film look. By following this process, you can achieve impressive film emulation with minimal manual grading.
Further Enhancing the Film Look
In this section, we’ll discuss how to customize the film look further using color grading in DaVinci Resolve. After applying practical film emulation nodes, such as film grain, halation, and glow, you can enhance the footage by making minor adjustments in the primaries.
Step 1: Create a new node for color grading
After the primary grading node, create a new node for color grading. This node will allow you to make adjustments to the footage without affecting the film emulation nodes.
Step 2: Adjust the lift, gamma, and gain for a unique look
To create a cooler look in the shadows, adjust the lift by dragging it toward cooler colors. To maintain warm skin tones, increase the red in the gamma. If you want to give the highlights a green tint, make minor adjustments to the gain.
Step 3: Fine-tune the color grading
Small changes in the primaries can give your footage a completely different look while preserving the beautiful film emulation. Experiment with different adjustments to find the perfect balance that complements your footage.
Free Film Look Powergrade
To help you get started on your journey to mastering the film look, we are excited to offer our readers a free PowerGrade for DaVinci Resolve. This PowerGrade has been meticulously designed to incorporate the essential elements that make up the unique film aesthetic.
How to Get Your Free PowerGrade
- Click here to download the PowerGrade file.
- Save the downloaded file to a location on your computer where you can easily find it later.
How to Import the PowerGrade in DaVinci Resolve
- Launch DaVinci Resolve and open your project.
- In the Color page, open the Gallery panel on the top left.
- Right-click within the Gallery panel and select “Import.”
- Browse to the location where you saved the downloaded PowerGrade file and select it.
- Click “Open” to import the PowerGrade into your Gallery.
Conclusion
In conclusion, achieving a film look in digital footage requires a combination of thoughtful color grading and emulation techniques. By applying adjustments to shadows, midtones, and highlights, and incorporating effects like halation, glow, and film grain, you can create a visually stunning and authentic film aesthetic. The key is to carefully balance these adjustments and effects, keeping in mind the desired outcome.
Also Read: How To Smooth Skin In Davinci Resolve (Full Guide!)
Also Read: How To Create Pro-Mist Filter Effect Davinci Resolve