Welcome back, folks! In today’s informational blog post, we will be discussing how to use the DaVinci Resolve Fairlight Sound Library and the free Blackmagic Sound Library to elevate the quality of your productions.
The DaVinci Resolve Sound Library is an underrated feature that can significantly enhance your projects with high-quality sound effects. But finding and managing these sound effects can be challenging. In this post, we will show you how to set up your DaVinci Resolve Sound Library, where to find royalty-free sound effects, and how to use them to speed up your video editing process.
What is Davinci Resolve Sound Library?
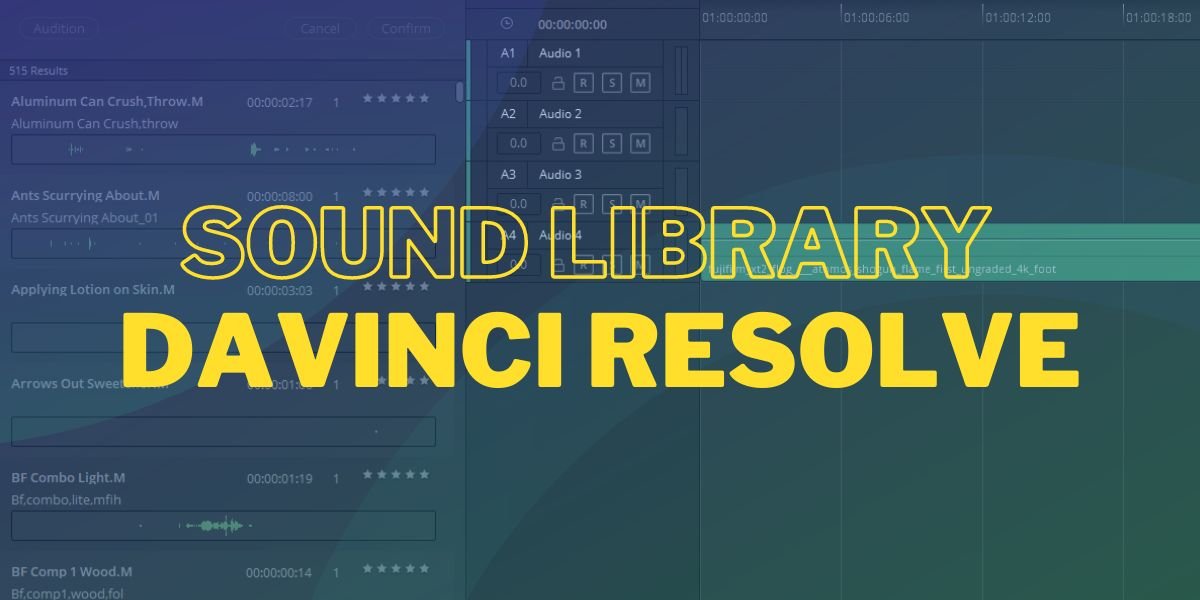
To start, let’s understand what the DaVinci Resolve Sound Library is. It is a section titled “Sound Library” found on the Edit and Fairlight pages of DaVinci Resolve. When opened, it reveals a panel similar to the effects library, where you can add, find, and audition various sounds for your projects.
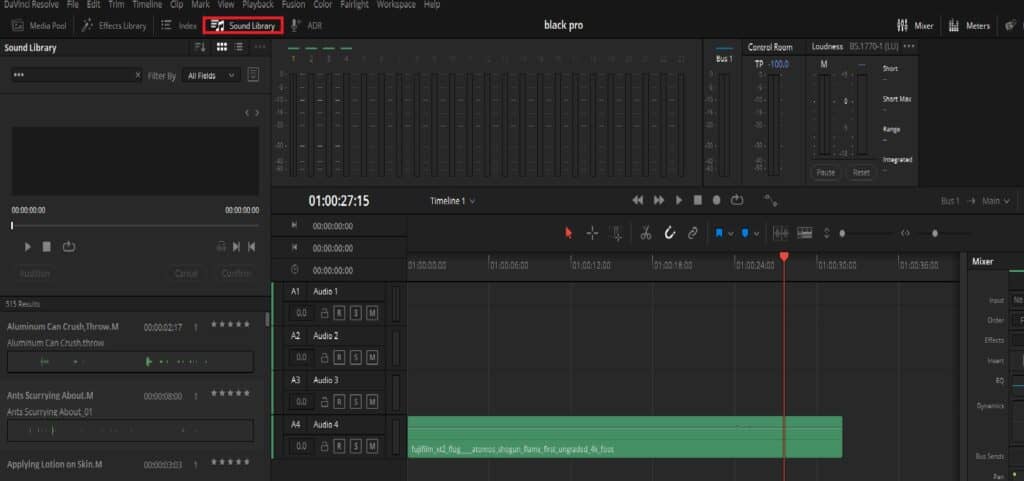
While the Sound Library is available on both the Fairlight and Edit pages, it offers extra powerful features on the Fairlight page, which is where we will focus our attention.
Creating a database for the sound library in Davinci Resolve
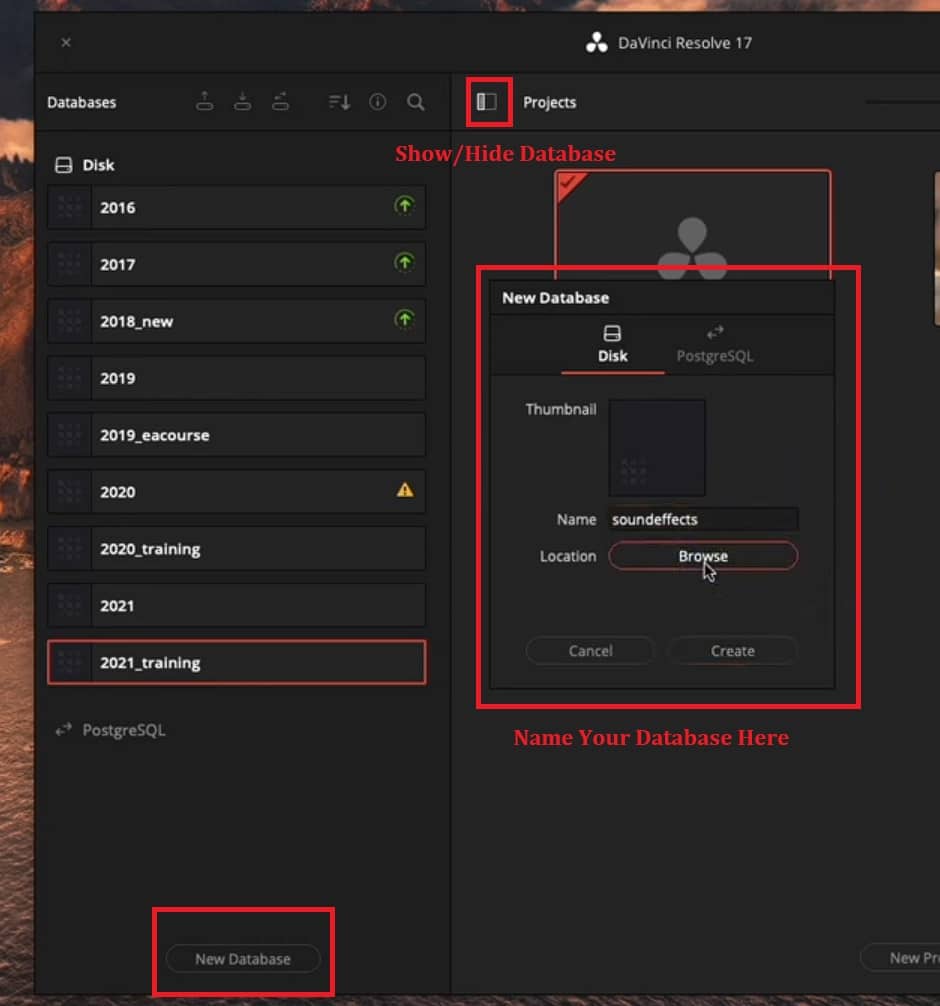
Before you begin adding collections of sound effects to the DaVinci Resolve Sound Library, it’s crucial to set up an organized database structure to facilitate a seamless workflow. The sound library employs DaVinci Resolve’s database structure, which allows each individual database to have distinct sound effects collections.
This feature enables you to view and access sound effects from any database on your system, even if it isn’t the current database for your project. Although this flexibility is advantageous, it can also lead to a cluttered and challenging-to-manage database structure.
To tackle this issue, we recommend creating a new disk database or a PostgreSQL database (if working in a shared network environment) specifically dedicated to your sound effects collections.
Creating a new database in DaVinci Resolve involves the following steps:
- Launch DaVinci Resolve and access the Project Manager, where you create new projects and open existing ones.
- Locate and click the “Show/Hide Databases” button in the top-left corner of the Project Manager to reveal your databases.
- In the pop-out menu displaying all databases, click “New Database” to initiate the creation of a new one.
- Choose either “Disk” or “PostgreSQL” as the database type, depending on your requirements. A shared network environment would typically necessitate PostgreSQL, while a disk database would suffice for most other scenarios.
- Assign an appropriate name to your new database, such as “Sound Effects,” to easily identify it later.
- Select a location on your computer or network to store the database, preferably creating a dedicated folder for it to ensure proper organization.
- After selecting the folder, click “Open,” followed by “Create” to complete the process and establish your new sound effects database.
With the new sound effects database in place, you can return to your project and begin adding sound effects to the DaVinci Resolve Sound Library. By implementing these steps, you’ll establish a more organized and efficient system for managing sound effects in your video projects, ultimately speeding up your editing process and enhancing the overall quality of your work.
Download and add the Free Blackmagic Fairlight Sound Library.
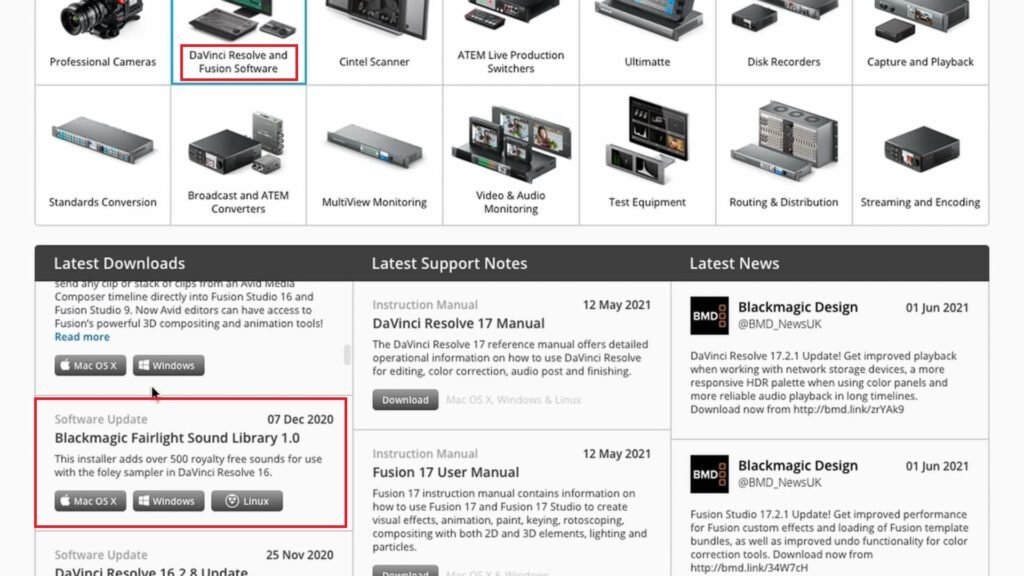
Finding and using high-quality, royalty-free sound effects can significantly enhance your video projects. To access a comprehensive collection of sound effects from Blackmagic Design’s Fairlight Sound Library, follow these steps:
- Visit Blackmagic Design’s support page at blackmagicdesign.com.
- Click on the “DaVinci Resolve and Fusion Software” product family.
- Scroll down to the “Latest Downloads” column and locate the “Blackmagic Fairlight Sound Library.”
- Follow the instructions to download and install the library.
- Make sure to restart your Davinci Resolve if it is already open if the sound library is not showing up.
After installing the Fairlight Sound Library, adding sound effects to your DaVinci Resolve Sound Library is simple:
- Open your project in DaVinci Resolve and navigate to the Fairlight page.
- Click on the Sound Library to open it.
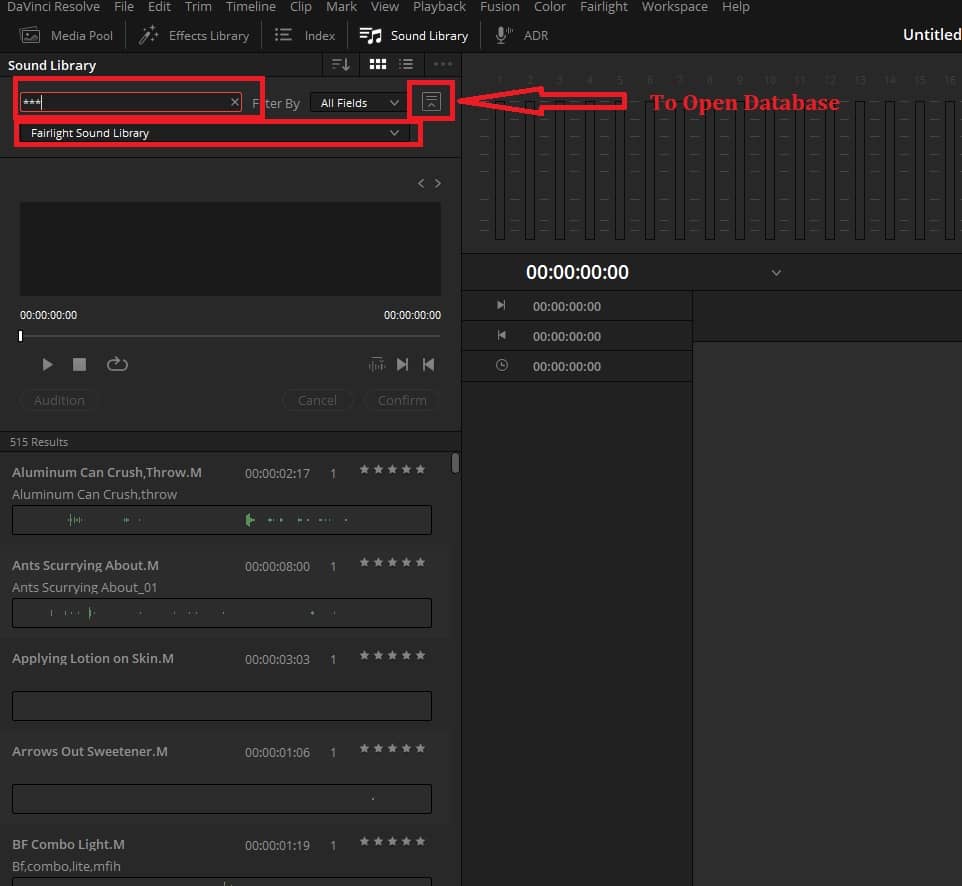
- To change the database for the Sound Library, click on the small box icon with a downward-pointing arrow on the right side of the “All Fields” dropdown menu.
- Select the Fairlight Sound Library.
- If the sound effects are not displayed, type three asterisks (*) that are “***” in the search bar to reveal them.
- You can also type in the sound effect you are looking for in the search bar.
By following these steps and leveraging the extensive collection of sound effects in the Fairlight Sound Library, you can create immersive audiovisual experiences that captivate your audience and elevate your video editing skills.
How to use the Davinci Resolve Sound Library?
The DaVinci Resolve Sound Library offers a rating system, enabling you to quickly find your favorite sound effects, along with a visual representation of the waveform and a description. With 515 tracks available, you can search for specific sound effects, such as gun sounds, and preview them by double-clicking or using the playhead.
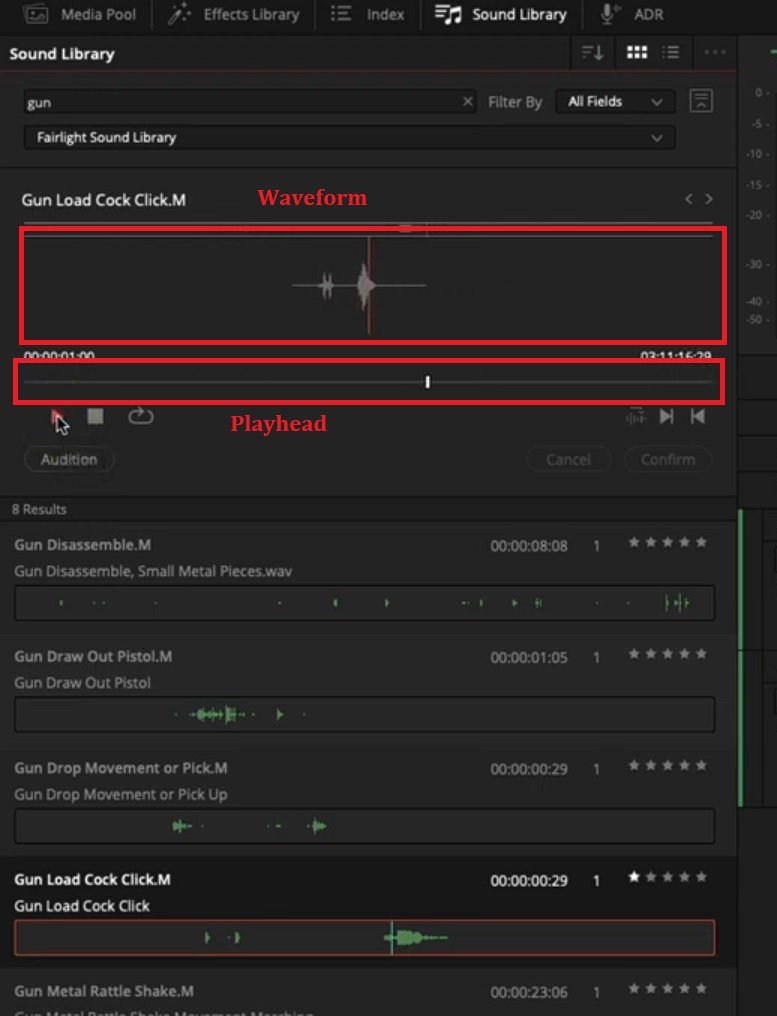
This functionality allows you to evaluate the sound effect and decide whether it suits your project.
First, add music to your project by opening the Media Pool and dragging your chosen audio file onto the designated music track.
In Fairlight, the video player is located in the top right corner, but to gain a clearer view of the video track and make precise adjustments, click on the timeline options icon and enable the “Video Tracks” option.
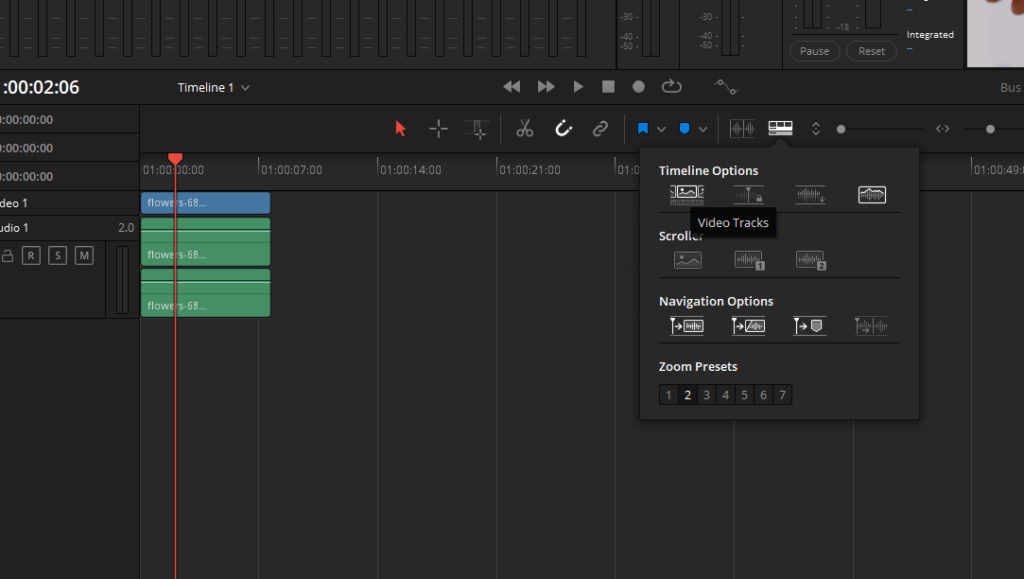
This will reveal the video track, allowing you to trim and synchronize your audio effectively.
By following these steps, you can efficiently combine sound effects and music with your video content in DaVinci Resolve. The Fairlight Sound Library provides a vast selection of high-quality sound effects to enhance your video projects and create a captivating audiovisual experience for your audience.
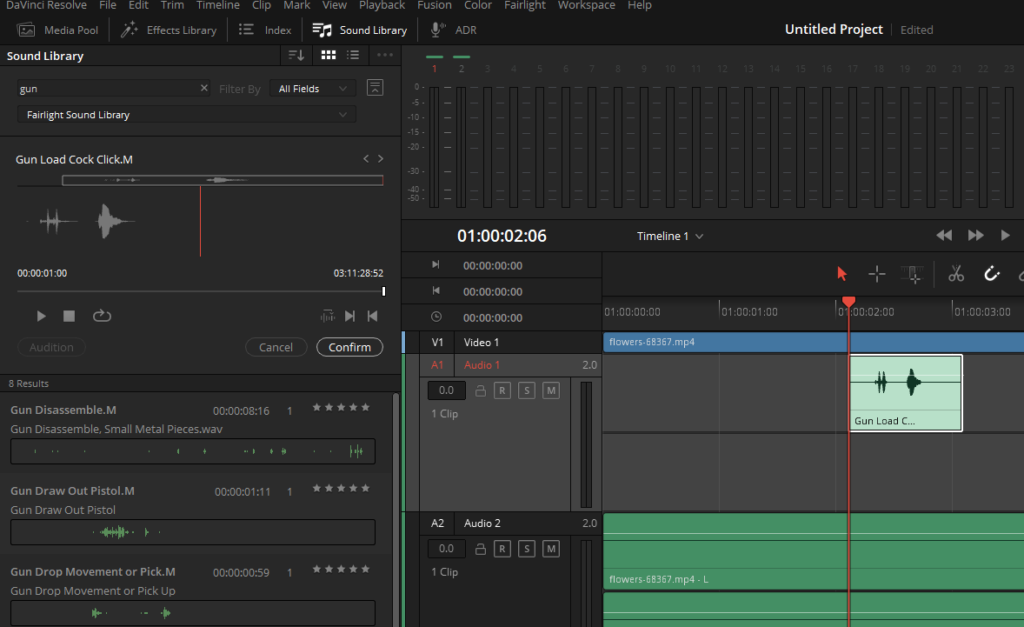
In DaVinci Resolve, adding sound effects to your project can significantly enhance the overall experience. Here’s a more efficient way to add sound effects to your timeline using the Sound Library:
- After adding music to your project, return to the Sound Library.
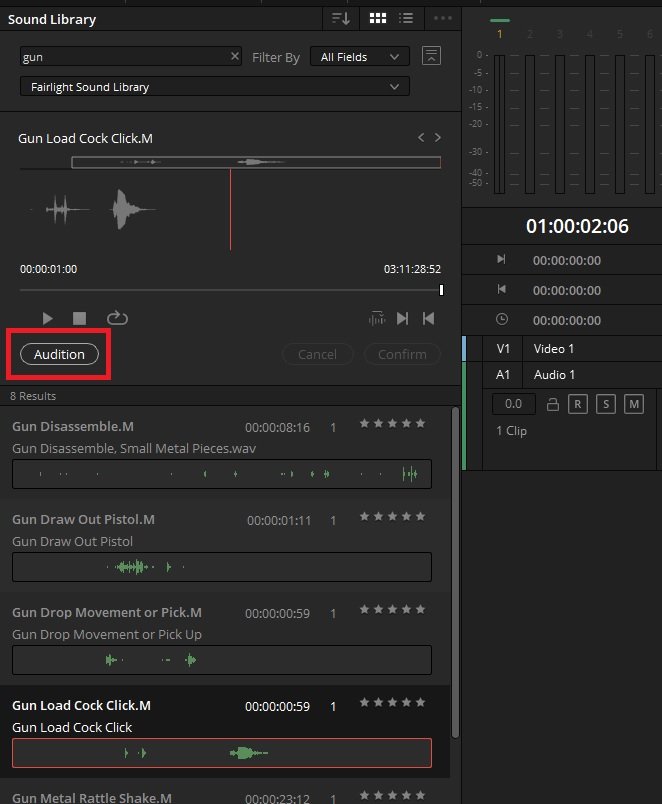
- Locate the desired sound effect (e.g., gun load cock click) and ensure it’s ready to be added.
- Instead of dragging the sound effect to the timeline, use the audition button in the Sound Library’s top interface. Before doing so, make sure to select the track you want to add the sound effect to.
- Press the audition button. This action will preview the sound effect on the selected track without committing it to the timeline.
- If satisfied with the sound effect, click the confirm button to permanently add it to the timeline.
By utilizing the audition and confirm buttons in the Sound Library, you can quickly and efficiently preview and add sound effects to your timeline, creating a more immersive audiovisual experience for your audience. This method also saves time by eliminating the need to reposition sound effects in the timeline manually.
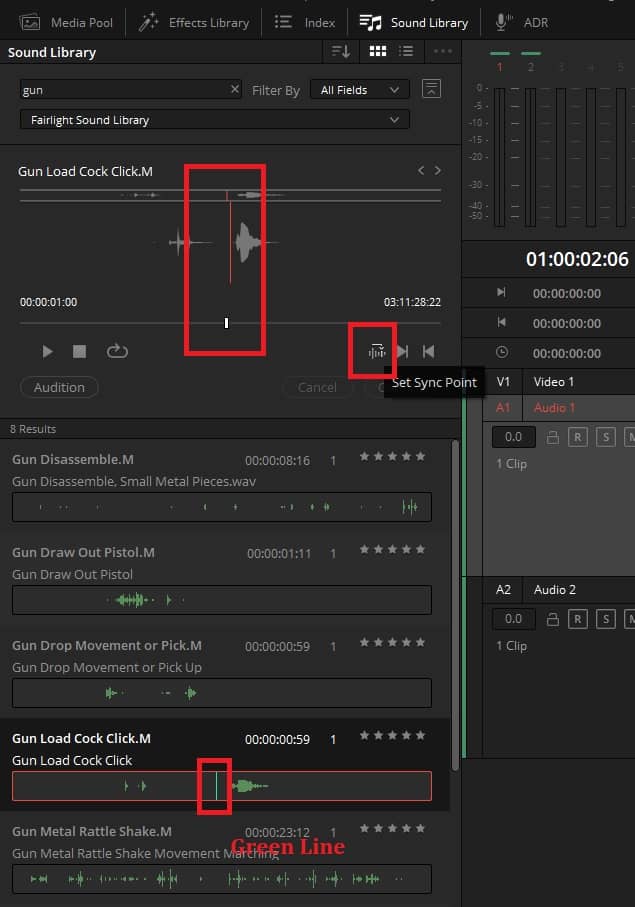
How to use “Set Sync Point” in Sound Library Davinci Resolve?
In DaVinci Resolve, using sync points can help you accurately position sound effects in your timeline, resulting in a more polished and professional project. Here’s how to use sync points to align sound effects in your timeline:
- After auditioning a sound effect, you may notice it’s not in the right place. To fix this, pay attention to the green line on the sound effect, which indicates the sync point.
- Set the sync point by clicking the ‘Set Sync Point’ icon. This action will move the green marker to your desired position on the sound effect.
- Position the playhead where you want the sound effect and sync point to align with the track.
- Select the track and press the audition button. The sound effect will now be in a much better position, allowing you to quickly check its accuracy in the timeline.
- If needed, adjust the volume to emphasize the sound effect.
- Once satisfied, click the confirm button to add the edited sound effect to the timeline.
Using sync points in DaVinci Resolve enables you to work more efficiently, ensuring that your edits are frame-accurate for the desired sound effects. This technique is particularly useful when working with the Fairlight Sound Library, which offers a wide range of sound effects to choose from.
How to add your own sound effects in Davinci Resolve?
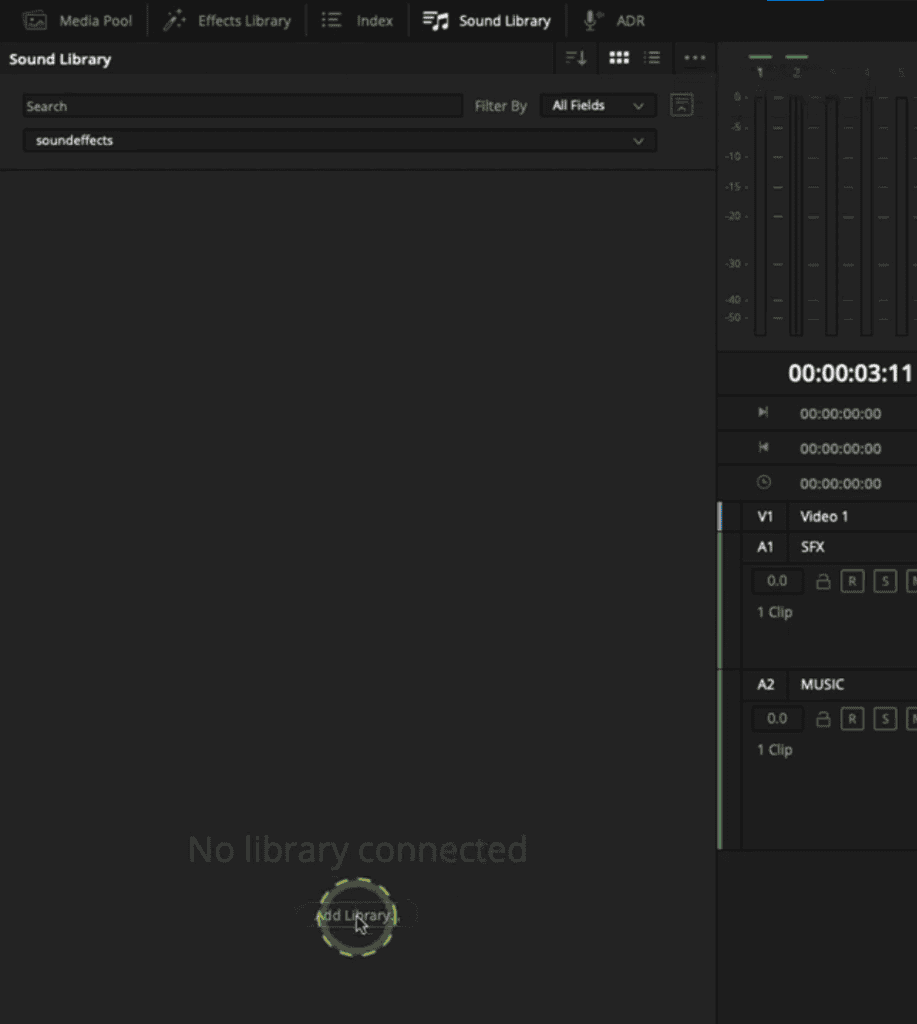
Here’s a step-by-step guide on how to use it to add your own sound effects and elevate your project:
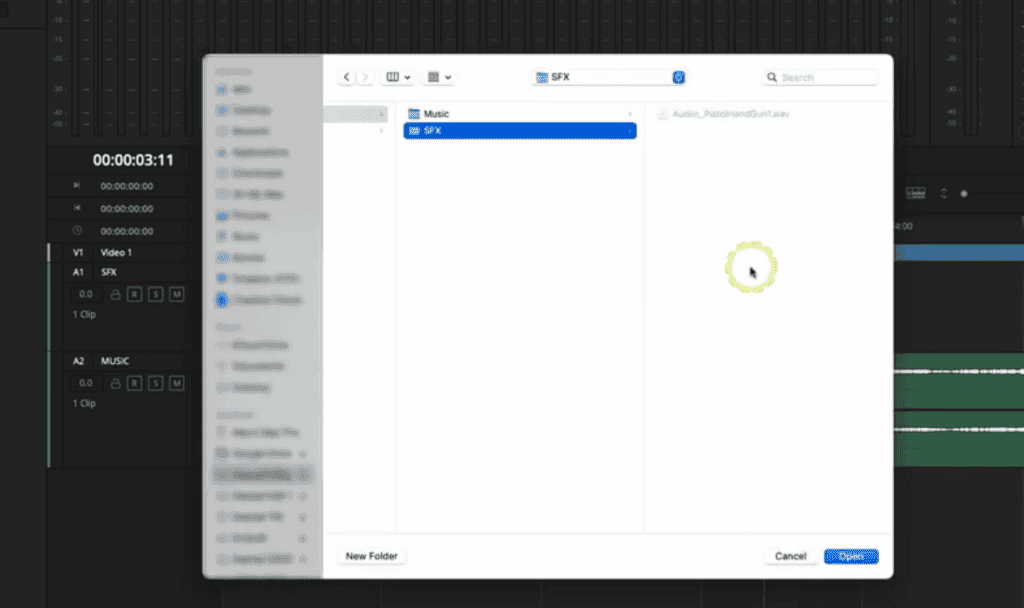
- Clear your search and click the database icon to load your sound effects database. You can add a library either by using the ‘Add Library’ button or clicking the ellipsis and selecting ‘Add Library.’
- Navigate to where you’ve stored your sound effects and add them to the sound library. After scanning, your sound effects should appear when you type in three asterisks.
- Load and listen to your chosen sound effect, such as a pistol handgun sound.
- Find the loud point in the sound effect and set a sync point. This will display a green line on the sound effect.
- Position your playhead and select the sound effects track. Audition the sound effect into the timeline to see how it aligns with your video.
- Reposition your playhead and confirm the change to add the sound effect to your timeline.
- Repeat this process for any additional sound effects you want to add, adjusting the volume as needed.
- With sound effects and music added to your project, you’ll notice a significant improvement in the overall quality of your video production.
By properly utilizing the DaVinci Resolve sound library, you can edit videos faster and elevate your production level with great royalty-free sound effects, resulting in a more polished and professional project.
- Also Read- Export 5.1 Audio From Davinci Resolve
- Also Read- How to Record Audio in DaVinci Resolve?
- Also Read- How To Make Youtube Shorts In Davinci Resolve