
Hi, I’m Salik, the author of FilmmakingElements.com. I have been a filmmaker for over 10 years. I am also a certified DaVinci Resolve Trainer and I have used DaVinci Resolve for many of my projects. I want to share my experience on how to use the Blackmagic Proxy Generator, which is an incredibly useful tool for those of us working in DaVinci Resolve.
If you’ve ever had trouble handling certain file types on your computer or needed to create smaller copies of your files for easier collaboration, then this tutorial is perfect for you.
Proxy files, in case you’re wondering, are smaller and more manageable versions of the original file that we can use for editing. When it’s time to export the video, we can simply swap them back for the camera originals to ensure the best quality.
The Blackmagic Proxy Generator is a separate program that works wonders by automatically generating proxy media from master video files placed in a watch folder. It’s a small, lightweight application that can run in the background while importing media, allowing your DaVinci Resolve program to focus on more creative tasks as the proxies are being generated.
This tool has been a game changer for me, and I hope it can be just as beneficial for you as well.
Understanding various features of the Blackmagic Proxy Generator
Setting the Proxy Format
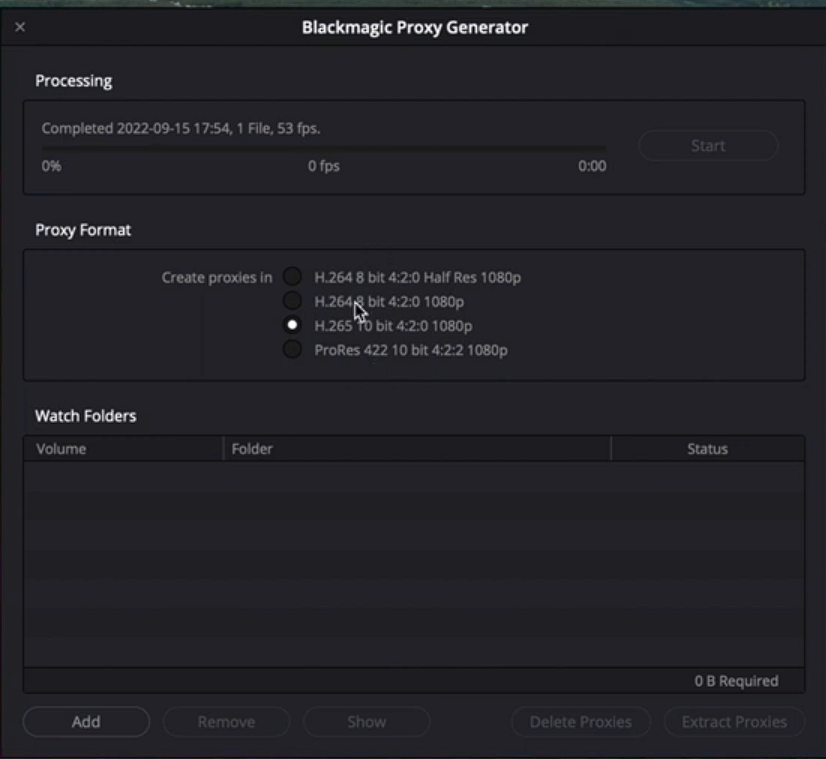
To set your desired proxy format, simply choose from the available options in the list:
- H.264 8 bit 4:2:0 Half Res 1080p
- H.264 8 bit 4:2:0 1080p
- H.265 10 bit 4:2:0 1080p
- ProRes 422 10 bit 4:2:2 1080p
Using Watch Folders
When you open Blackmagic Proxy Generator, there is a section called “Watch Folders”. Watch Folders play a pivotal role in the Blackmagic Proxy Generator. Upon opening the application, you’ll find a dedicated section for these folders. Put simply, Watch Folders are specific directories within your operating system that the Blackmagic Proxy Generator continuously monitors. As new files find their way into a Watch Folder, the program takes note and automatically converts the files into proxy media, all without any extra intervention on your part.
Feel free to create as many Watch Folders as you desire, but keep in mind that your storage media must have sufficient capacity to store both the initial media files and the generated proxy media.
To Add a New Watch Folder
Creating a new Watch Folder can be as unique as your workflow demands. You have the flexibility to create separate Watch Folders for each card, scene, date, or any other classification that suits your needs.
To get started with adding a new Watch Folder, just follow these simple steps:
- Press the “Add” button.
- Either create a new folder or choose an existing one in the file system window.
- Hit the “Open” button.
Once you’ve completed these steps, your new Watch Folder will be visible in the Watch Folders section of the Blackmagic Proxy Generator, showcasing its location and current status.
To Remove an Existing Watch Folder
I’d like to share a handy tip on how to remove an existing Watch Folder from the Blackmagic Proxy Generator when you no longer need it. This process is simple and ensures that your program remains efficient and clutter-free.
It’s important to note that removing a Watch Folder from the Blackmagic Proxy Generator’s watch list doesn’t delete the folder or its files from your drive. Instead, it merely stops the application from keeping tabs on the folder.
To remove an existing Watch Folder, follow these easy steps:
- Choose the desired Watch Folder from the Watch Folders list.
- Click on the “Remove” button.
Monitoring Watch Folders
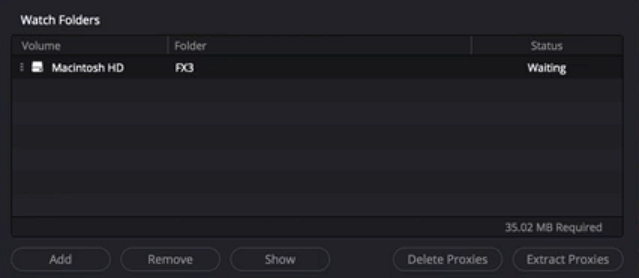
You can see the status of all your watch folders in the Watch Folders section of the Blackmagic Proxy Generator. Understanding the various components of the Watch Folders section can save you time and simplify your editing process.
In the Watch Folders section of the Blackmagic Proxy Generator, you’ll find a list displaying the status of all your Watch Folders. You can easily rearrange the order in which they appear by dragging an entry up or down. Beneath the list, you’ll see the estimated disk space required for proxies. Each Watch Folder has three columns containing crucial information:
- Volume: This column indicates the logical volume (disk, network storage, USB drive, etc.) on which the Watch Folder resides, helping you identify which physical device must be connected to your computer for the Blackmagic Proxy Generator to work properly.
- Folder: This column displays the name of the Watch Folder itself, without showing the folder’s path.
- Status: This column provides information about the current status of the files within the Watch Folder.
Starting and Stopping the Blackmagic Proxy Generator
Once you’ve configured a Watch Folder and selected a proxy format, starting the Blackmagic Proxy Generator is as simple as clicking the “Start” button in the Processing pane. To stop the process, hit the “Stop” button, or press the spacebar to toggle between Start and Stop.
The Processing pane also displays the current job’s status, including the number of clips rendered, a progress bar, a percentage indicator, the current clip’s name, the render’s frames-per-second (fps) rate, and the estimated time remaining for completion.

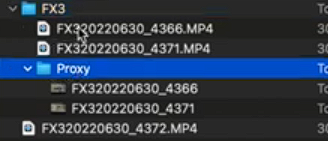
The generated proxy media is saved in a “Proxy” subfolder, located at the same hierarchical level as the original media file. If your original media files are all in one folder, you’ll have a single “Proxy” folder containing all proxy clips. However, if each original media file has its own folder, you’ll see multiple “Proxy” folders—one in each clip folder, with one proxy clip each.
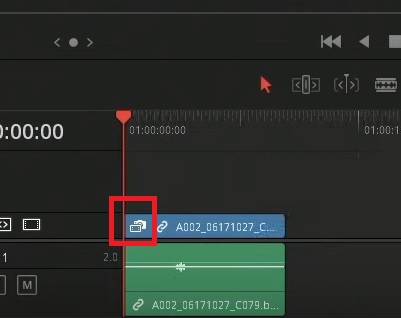
After creating proxies, they are automatically linked to their original source media in DaVinci Resolve when you import the original clips from the Watch Folder into the Media Pool. When a proxy is linked, it shows an icon on the bottom left corner of that clip on the timeline.
Switching Between Blackmagic Proxy Generator Proxies and Original Media
In this section I’m going to discuss how to switch between original source media and proxy media for playback in DaVinci Resolve’s Cut and Edit pages. By understanding these options, you can effectively manage your playback preferences to suit your workflow.
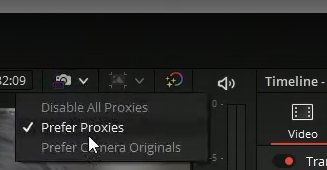
In the Cut page, you can toggle between source media and proxy media using the Proxy Handling icon in the Viewer. On the Edit page, navigate to Playback > Proxy Handling and choose one of the following options:
- Disable All Proxies: Selecting this option disables proxies entirely and enforces the use of original media for playback. If the original media isn’t available, a Media Offline graphic will replace the clip.
- Prefer Proxies: This option prioritizes proxy files for playback. If a clip lacks a proxy file, the original media is used automatically. In cases where the original media is unavailable, proxies will be used, and a purple line will appear across the timeline for the duration of the missing original clips.
- Prefer Camera Originals: This option favors the original media files for playback. If a clip is missing its original media file, the proxy media will be used instead, and a purple line will be displayed across the timeline for the duration of the missing original clips.

Using Blackmagic Proxy Generator Proxy Files for Delivery
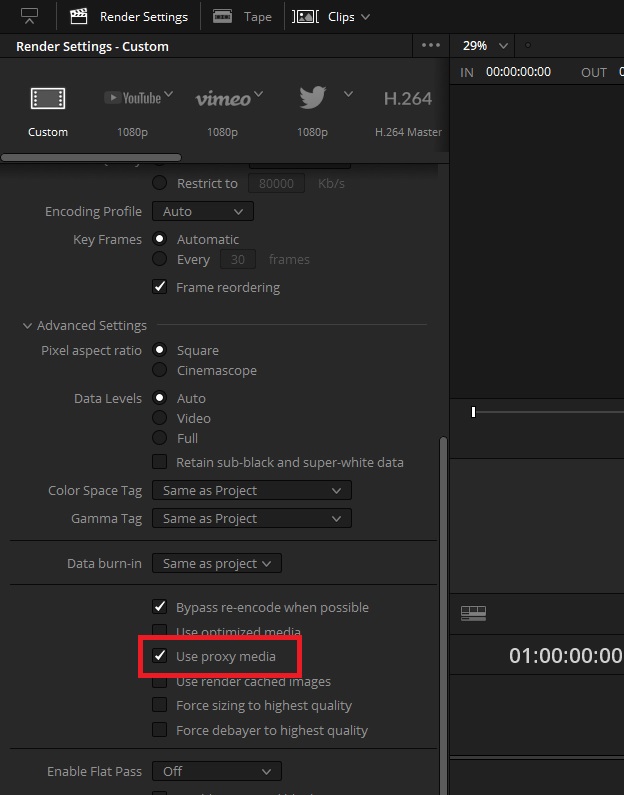
- By default, the Deliver page reverts proxies to the original source media for the final output, ensuring the highest quality render.
- To use proxy media for the final output, check the “Use proxy media” box in the Advanced Settings of the Video Render settings in the Deliver page.
- Using proxy media for final output can save rendering time when creating dailies or quickly generating timeline outputs for producers or audio engineers where master quality isn’t crucial.
- If you’re editing with proxies and don’t have access to the original source media, you’ll need to check the “Use proxy media” box.
Generating Proxy Media in Other Applications
Keep in mind that proxies created in other non-linear editing systems (NLEs) or media asset management systems can be linked to their source media in DaVinci Resolve, provided they meet the following criteria:
- The proxy files must have the same timecode as the source file.
- The proxy files should share the same file name as the source file, excluding extensions.
- The frame rate of the proxy files must match that of the source file.
- The format and codec used for proxy files need to be compatible with DaVinci Resolve.
Linking and Unlinking Clips to Proxy Media
You must manually link the proxies to their source media files in your Media Pool if you have moved the internally generated proxy media from its default location or if you have made proxy media in another application.
To link proxy media to a source clip
- In the Media Pool, select the clip(s) you want to link proxy media to.
- Right-click on one of the selected clips and choose “Link Proxy Media” from the contextual menu.
- Use the file browser to locate the specific proxy file or directory (for multiple clips) to set a new Proxy Media path, then click “Open.” If you choose an incorrect file or directory, a warning dialog will appear, and no linking will occur.
- Upon successful linking, the proxy media icon will appear on the clip’s thumbnail in the Media Pool, indicating that the proxy media is linked to the clip.
To unlink proxy media from a source clip:
- In the Media Pool, select the clip(s) you want to unlink proxy media from.
- Right-click on any of the selected clips and choose “Unlink Proxy Media” from the contextual menu. This action will remove the metadata link between the proxy and the source, setting the status in the Proxy column to “None.”
For better understanding the proxy workflow in detail, read Proxy Workflow on Davinci Resolve (2023 Updated)