
Welcome to this comprehensive guide on the Nikon Z9’s astrophotography tips. As we dive deeper into the wonders of the night sky and the tools we use to capture it, the Nikon Z9 emerges as a formidable player in the world of astrophotography.
The Z9, affectionately also known as Z9, is one of Nikon’s masterpieces, striking a balance between impeccable design and cutting-edge technology. While my initial purchase wasn’t primarily for astrophotography, I’ve been astounded by its capabilities. The 45 megapixels packed into its full-frame sensor means that photographers can zoom into the night sky’s intricate details, capturing moments and views lesser megapixel cameras might miss.
During those few clear nights amidst the Milky Way season, the Z9’s performance was nothing short of spectacular. But beyond the pixels and the sensor, the true advantage of the Z9 lies in the unique features it brings to the table, which we’ll explore in depth. Whether you’re a seasoned astrophotographer or just starting out, the Nikon Z9 promises a transformative experience, and this guide aims to unlock its full potential for you.
Advantages of the Nikon Z9 for Astrophotography
Astrophotography is an art that demands precision, clarity, and depth from the equipment used. Every star, every galaxy, and every nebula holds intricate details that the right camera should be able to capture. Enter the Nikon Z9, a camera that brings several advantages to the table for this specialized form of photography.
1. The Power of 45 Megapixels:
The Z9’s impressive 45-megapixel count is not just a number; it translates to genuine, tangible benefits for astrophotography. With such a dense pixel count on its full-frame sensor, the camera can resolve the night sky’s finest details, offering an unparalleled clarity. When observing celestial objects, the ability to zoom in without losing detail means that even distant galaxies or nebulae can be viewed with a clarity and detail that lesser megapixel cameras may struggle to match. In the vast expanse of the universe, every megapixel counts, and the Z9 ensures that no detail is left behind.
2. Wide Open Aperture Lenses – A Game Changer:
While the camera body plays a significant role, the lens attached can make or break an astrophotography session. The Z9 truly shines when paired with a lens boasting a wide-open aperture. A lens with an aperture of 1.8 or even 2.8 can gather more light in shorter exposure times, essential for capturing clear images of stars or the Milky Way without noticeable star trails. Additionally, using a wider aperture means that you can work with lower ISO settings, reducing noise and maintaining the clarity of the shot. While it’s possible to use apertures like f/4 for astrophotography, you’d find yourself increasing the ISO, which might introduce more noise or ‘muddiness’ into the image. With the Z9’s compatibility with a range of wide aperture lenses, photographers are equipped with the tools they need for sharp, bright, and noise-free celestial shots.
Nikon Z9 Astrophotography Tips
The world of astrophotography is as intricate as the constellations it seeks to capture. To aid photographers in this quest, the Nikon Z9 introduces a suite of innovative features tailored for celestial photography. Among them, the Starlight View stands out as a game-changer.
Starlight View:
One of the Z9’s standout features for astrophotography is the Starlight View. Designed to enhance the visibility of celestial bodies in the viewfinder, it can be a pivotal aid for photographers aiming for precise focus and framing.

How to Access Starlight View:
Navigating to Starlight View is straightforward:
- Enter the camera’s menu.
- Select the ‘Custom’ option.
- Navigate to ‘Shooting/Display’ – this is found in the D menu.
- Once you’re in, look for the option labeled ‘D10’. This is where Starlight View resides.
Explanation of What Starlight View Does:
At its core, Starlight View is designed to enhance the visual experience of stargazing through your camera. When activated, it brightens everything within your frame without affecting the actual exposure settings of the photo you’re about to take. Essentially, it amplifies the exposure, highlights, and whites of the scene in your viewfinder, making celestial bodies like stars pop out against the black expanse of space. This feature is particularly beneficial in real-time framing and focusing, allowing photographers to see and compose their shots more clearly.
Tips on Using Starlight View for Focusing on Stars:
- Manual Focus is Key: Once Starlight View is activated, it’s recommended to switch to manual focus. This ensures that the camera won’t readjust focus when you’re about to take a shot. The Z9’s large sensor combined with the Starlight View’s enhanced visibility means that photographers can get more precise control over their focus.
- Zooming In: Utilize the plus button on the back of the camera to zoom into specific stars. This close-up view can help you tweak the focus ring minutely until the star is sharp and clear.
- Shooting Preferences: If your aim is to capture star trails, you’ll want to have the stars appear slightly blurry. However, if capturing the Milky Way or other detailed celestial objects, aiming for pinpoint sharpness is crucial. Remember, manual focusing gives you the control to decide the level of sharpness based on the image you’re aiming to capture.
- Avoid Refocusing: If you’re used to focusing using the shutter button, ensure that once you’ve achieved your desired focus, refrain from pressing the button halfway again, as this might shift the focus.
Warm Display Color:
In the dark expanse of the night, where astrophotographers strive to capture the majesty of the cosmos, the Nikon Z9 offers a feature that ensures photographers’ eyes remain adapted to the low light, aiding in the seamless operation of the camera without disturbing the ambient darkness. This feature is the “Warm Display Color”.
How to Access Warm Display Color:
Accessing the Warm Display Color is quite user-friendly:
- Dive into the camera’s menu system.
- Head over to the ‘Custom’ option and then ‘Shooting/Display’.
- From there, navigate to ‘D11’. While its name may not immediately suggest its function, this is where you will find the Warm Display Color feature.
Difference between Mode 1 and Mode 2:


The Warm Display Color comes with two distinct modes, each catering to different preferences:
- Mode 1: In this mode, everything, including both your menu settings and the subject you’re shooting (for instance, the Milky Way), is rendered in red. This comprehensive red overlay ensures minimal disturbance to night-adapted eyes while navigating through the camera settings or framing a shot.
- Mode 2: This mode offers a more selective approach. While your menu settings and on-screen writings remain in red, the actual subject of your shot retains its natural colors. This ensures that while your eyes are shielded from bright, disruptive lights when going through the settings, you can still frame and visualize your shot in its genuine colors.
Tips on Adjusting Brightness for Optimal Viewing:
- Customization: The Warm Display Color feature allows you to adjust the brightness of the red display. Depending on the darkness of your surroundings and your personal comfort, you can set the level of red brightness that’s most optimal for your eyes.
- Consider Your Eyesight: Not everyone has the same visual acuity. If you have compromised eyesight or wear glasses (and perhaps forgot them), you might want the red display to be brighter for clearer visibility. On the other hand, those with sharper eyesight might prefer a dimmer setting.
- Balancing Act: Remember, the idea is to strike a balance. The display should be sufficiently bright for easy readability, but not so intense that it becomes a source of distraction or discomfort.
LCD Illumination:
Astrophotography often requires photographers to operate in near-complete darkness, a scenario where every beam of light can be both an aid and a hindrance. Understanding this delicate balance, the Nikon Z9 brings forth the LCD Illumination feature, a boon for photographers aiming to navigate their equipment seamlessly without disrupting the ambient darkness.
How to Activate LCD Illumination:
Activating the LCD Illumination feature on the Nikon Z9 is straightforward:

- Venture into the camera’s menu.
- Look for the option labeled ‘D12’. This is the treasure trove where LCD Illumination resides.
- Upon selecting this feature, you’ll find options to turn it on or off. When turned on, the camera’s buttons will emit a faint, delicate glow, providing just enough light to discern them without overwhelming the eyes or disturbing the surrounding darkness.
Importance of Illuminated Buttons During Night Shoots:
- Ease of Navigation: In the pitch dark, feeling your way around the camera can be cumbersome. Illuminated buttons ensure that photographers can quickly find the button they need without fumbling, leading to a more efficient shooting experience.
- Preserving Night Vision: The soft glow from the illuminated buttons is gentle enough to not interfere with the photographer’s night-adapted vision, ensuring that they can still see their surroundings and the night sky clearly.
- Safety and Confidence: Knowing exactly where each button or dial is located provides photographers with confidence in their equipment. This is crucial when working in challenging conditions where every moment counts.
Comparisons with Older Nikon Models:
While the concept of illumination for easier night-time operation isn’t entirely new, the Z9’s approach refines this idea. For instance:
- Older models like the Nikon D7200 and D7100 did offer similar features, but they were typically accessed through a dedicated button, not through the menu.
- The seamless integration of this feature into the Z9’s menu system allows for a more intuitive and streamlined user experience. Furthermore, the Z9’s advanced technology offers a more consistent and delicate glow, tailored explicitly for astrophotography needs.
- While older models provided the foundational idea, the Z9 has refined and optimized this feature for the modern astrophotographer, underscoring Nikon’s ongoing commitment to enhancing user experience.
Personal Experience with Nikon Z9
Astrophotography, at its core, is more than just capturing the celestial; it’s about the moments, the environment, and the bond between the photographer and their equipment. My personal experience with the Nikon Z9 on one particular night beautifully illustrates this connection.
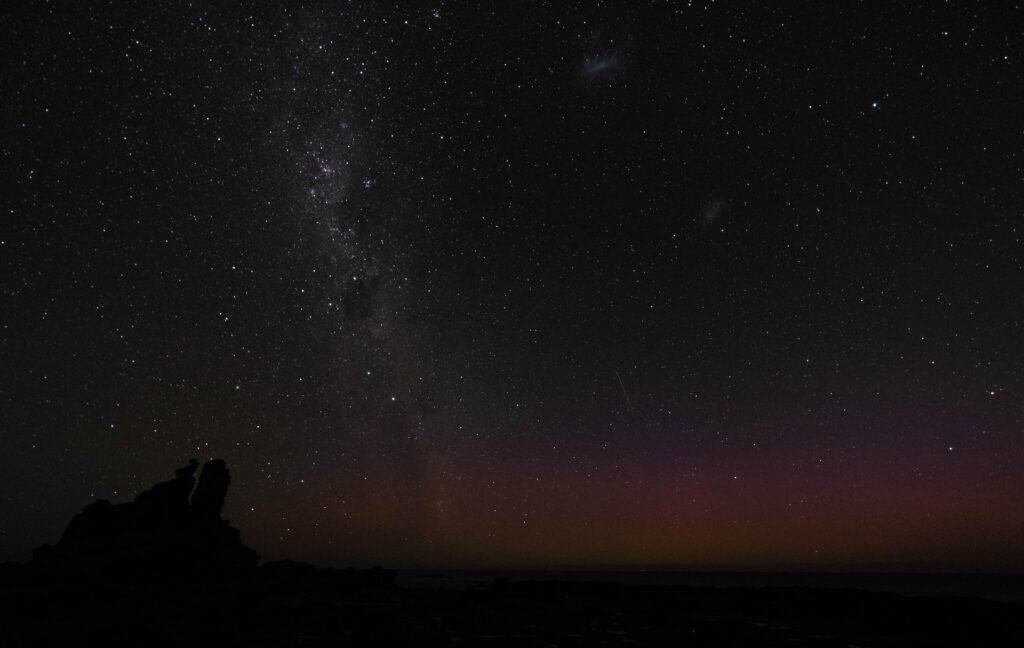
A Captivating Night with the Milky Way:
While on vacation in Victoria, a simple post-dinner stroll turned into an unexpected celestial treat. As the night unfurled, the Milky Way revealed itself in all its splendor, casting a magnificent tapestry of stars against the inky backdrop of the sky. It beckoned, almost challenging me to capture its beauty.
Armed with the Nikon Z9, I ventured out into the night. The anticipation was palpable; it felt as if the Milky Way and the camera were old friends, reuniting after a long hiatus. While the world slept, there I was, lost in the dance of stars, the silence punctuated only by the soft clicks of the Z9.
The experience was nothing short of magical. Every frame, every shot felt like a personal dialogue between me, the Z9, and the vast expanse of the universe. And while the camera was a technological marvel, in those moments, it felt like an extension of my being, effortlessly translating my vision into stunning images.
Results and Camera Settings:
The results were breathtaking. One particular image stood out—a snapshot that not only captured the grandeur of the Milky Way but also the essence of that night. This very image made its way into my calendar, a testament to the Z9’s capabilities and the unforgettable night in Victoria.
While the exact settings I used might be of interest to many, the essence was in the harmony between the Z9 and the universe. However, for the enthusiasts, the details were displayed at the bottom of the screen during my narration.
In conclusion, the Nikon Z9 isn’t just a camera; it’s a storyteller. It takes moments, emotions, and the beauty of the universe and weaves them into memories.
- Also Read: Nikon Z9 Autofocus Settings: Comprehensive Guide
- Also Read: Using Luma Keyer in DaVinci Resolve: Step-by-Step Guide
- Also Read: Top 5 Nikon Z30 Alternatives