
Hi, I’m Salik, the author of FilmmakingElements.com. I have been a filmmaker for over 10 years. I am also a certified DaVinci Resolve Trainer and I have used DaVinci Resolve for many of my projects. In today’s blog post, we will delve into the exciting world of audio visualizers and demonstrate how to create them in DaVinci Resolve. Audio visualizers are a fantastic way to enhance your videos, as they make images move in sync with the beat of the music, adding a lively and engaging element to your content.
What is an Audio Visualizer?
An audio visualizer is a digital representation of music or sound, typically displayed as a series of animated graphics that move in response to the rhythm, amplitude, and frequency of the audio track. These visualizations can be used in various contexts, such as music videos, live performances, and video presentations, providing a captivating and immersive experience for viewers.
Getting Started with DaVinci Resolve
DaVinci Resolve is a powerful video editing and color grading software that offers a wide range of tools and features for creating professional-quality content. One of the software’s strengths is its robust Fusion page, which allows users to perform advanced compositing and visual effects tasks. This is where we will be creating our audio visualizer.
Required Plug-in: Fusion Reactor
To create an audio visualizer in DaVinci Resolve, you will need a third-party plug-in called Fusion Reactor. Fusion Reactor is a collection of plug-ins and tools designed to extend the capabilities of DaVinci Resolve’s Fusion page. One of the plug-ins included in Fusion Reactor enables the creation of audio visualizers that react to music.
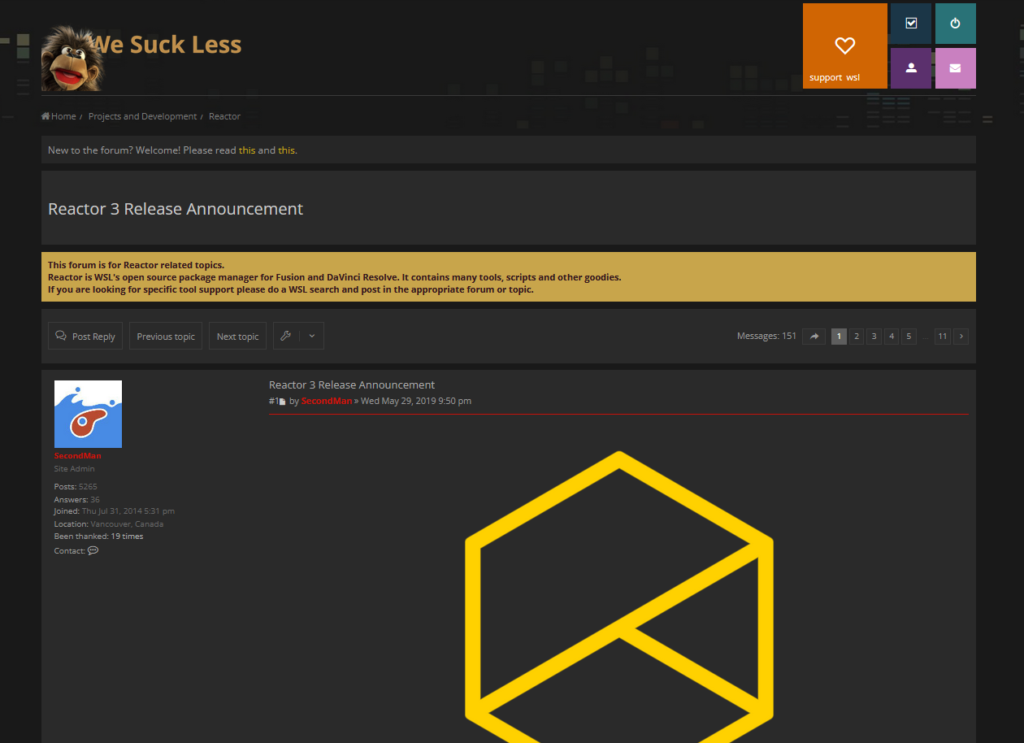
To download Fusion Reactor, follow the link here, and visit the official website
Installing Fusion Reactor for DaVinci Resolve
In this section, we’ll guide you through downloading and installing Fusion Reactor, a third-party plug-in essential for creating audio visualizers in DaVinci Resolve. Follow these steps to successfully set up Fusion Reactor:
- Access the Fusion Reactor website: Click on the link provided to navigate to the Fusion Reactor webpage, hosted by We Suck Less. Ignore the unconventional name and focus on the valuable plug-in they offer.
- Download Reactor 3: Scroll down the webpage until you find Reactor 3. This is the version you’ll need to download. Continue scrolling to locate the installer, and download the corresponding file.
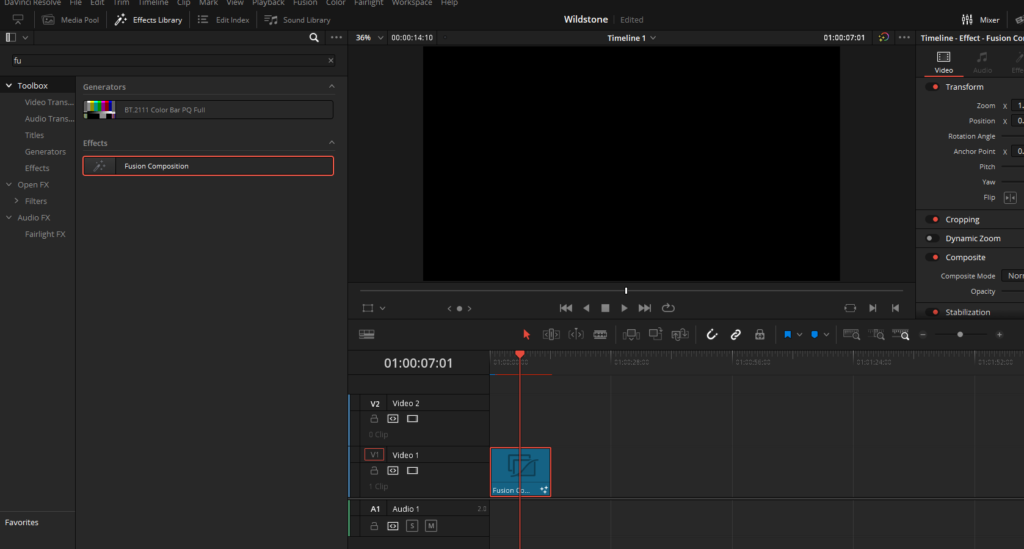
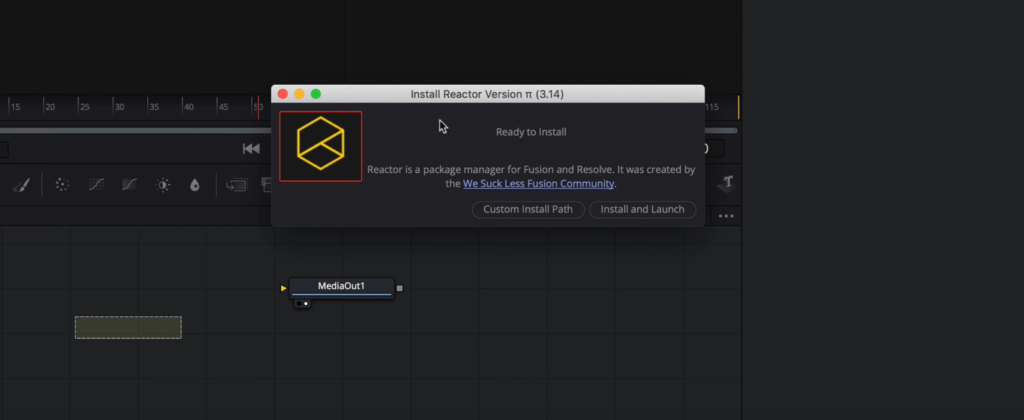
- Import Fusion Reactor into DaVinci Resolve: Open DaVinci Resolve, and head to the Effects Library. Drag a blank Fusion clip onto your timeline, select it, and switch to the Fusion tab. Locate the Fusion Reactor file you downloaded, and drag and drop it into the Fusion tab. A window will appear prompting you to install Reactor—click “Install and Launch.”
- Explore Fusion Reactor: Once the installation is complete, you’ll see the Fusion Reactor window. This interface houses a variety of third-party plug-ins for you to explore and use in your projects.
With Fusion Reactor successfully installed, you’re now ready to animate the DaVinci Resolve logo (or any other image of your choice) and synchronize it with music to create a captivating audio visualizer.
Setting Up the Suck Less Audio Plug-in for Your Visualizer
Now that Fusion Reactor is installed, it’s time to locate and set up the SuckLess Audio plug-in, which is essential for creating your audio visualizer. Follow these steps to prepare the plug-in for use:
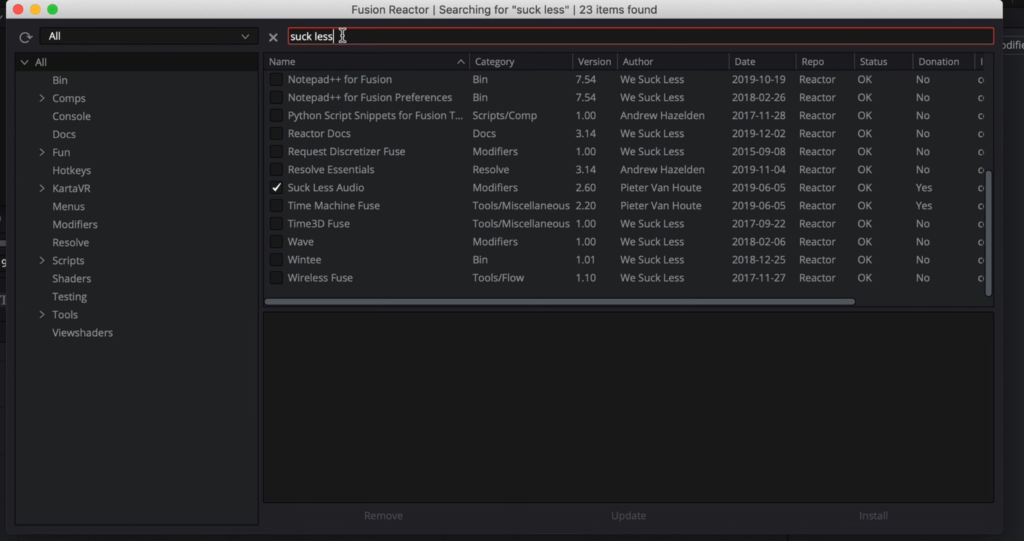
- Find the Suck Less Audio plug-in: In the Fusion Reactor window, use the search bar to type “Suck Less.” This will display the Suck Less Audio plug-in within the search results.
- Select the plug-in: Click on the Suck Less Audio plug-in to ensure it’s checked on. If it’s already checked, you’re good to go.
- Install the plug-in: Click the “Install” button in the lower right corner of the window. If the button is grayed out, it means the plug-in is already installed.
- Restart DaVinci Resolve (if necessary): If you don’t see the Suck Less Audio plug-in when you move to the next section, try restarting DaVinci Resolve to ensure everything loads correctly.
With the Suck Less Audio plug-in installed and set up, you are now ready to start building your audio visualizer in Fusion.
Animating Your Image to Music with the Suck Less Audio Plug-in
With the Suck Less Audio plug-in set up, it’s time to animate your image and synchronize it with your chosen music track. Follow these steps to create your dynamic audio visualizer:
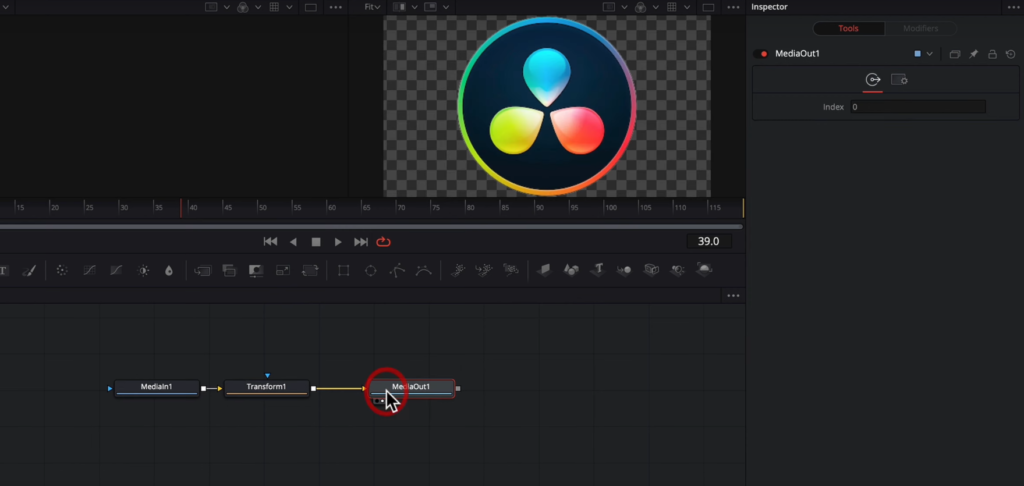
- Import your image: Drag your desired image (e.g., the DaVinci Resolve logo) from the media pool to the node area in Fusion. Close the media pool to create more workspace.
- Add a transform node: Select your image node and click on the transform tool. Press Shit + Space and search for Transform node. The transform node will automatically link to your image node. Connect the transform node to the media out, select media out, and press ‘2’ to view it in the second window.
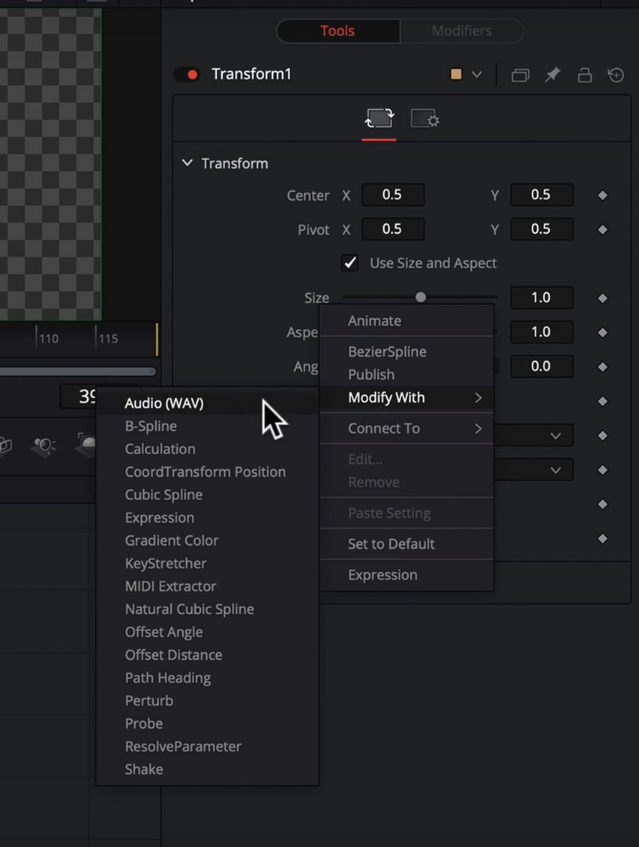
- Modify the transform node: Select the transform node and ensure the Inspector panel is open on the top right corner. Right-click on “Size,” go to “Modify With,” and click on “Audio Wave.” Note that your audio file must be in WAV format, as MP3 files won’t work.
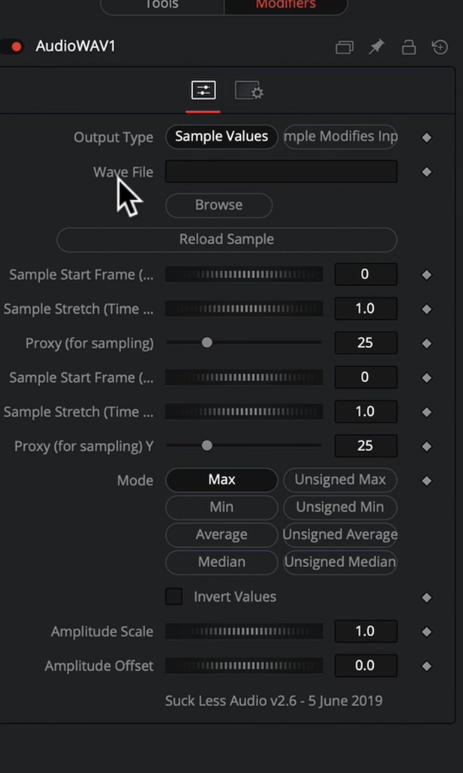
- Customize the animation: Click on the “Modifiers” tab in the Inspector panel. This is where you’ll adjust the animation settings. Keep the Output Type as “Sample Values.”
- Link your music track: Under “Wave File,” click “Browse” and locate your WAV audio file. Import the file to link it with your animation.
- Preview your animation: Press the spacebar to play your animation. You should now see your image animating to the beat of your chosen music track.
Congratulations, you’ve successfully created an audio visualizer in DaVinci Resolve using the Suck Less Audio plug-in!
Fine-Tuning Your Audio Visualizer and Adding Music
In this section, we’ll show you how to fine-tune your animation settings and add the music track to your project, allowing you to hear it alongside your animated image. Follow these steps for a polished audio visualizer:
- Preview your animation: Although your image is animating to the beat, you won’t hear any music yet. Don’t worry; we’ll add the music track shortly. For now, focus on the animation and ensure it’s moving in sync with the music.
- Adjust the animation: If your animation appears too erratic or fast, explore the various settings in the Modifiers tab to modify the animation’s behavior. Experiment with different options to achieve a more balanced visual.
- Tweak the amplitude scale and offset: Adjust the “Amplitude Scale” and “Amplitude Offset” settings to further refine your animation. These options can help you control the size and stability of your image as it reacts to the music.
- Fine-tune the settings: Spend some time playing with the settings to achieve the desired effect for your animation. Remember, it’s all about trial and error, so don’t be afraid to experiment until you’re satisfied with the result.
- Add the music track to your project: Once you’ve fine-tuned your animation settings, it’s time to add the music track to your project so you can hear it.
Adding Music to Your Audio Visualizer and Finalizing the Project
In this section, we’ll walk you through adding music to your audio visualizer and wrapping up the project. By the end, you’ll have a complete audio visualizer that synchronizes both visuals and sound, captivating your audience with your creative masterpiece.
- Jump back to the Edit tab: To add music to your audio visualizer, switch from the Fusion tab to the Edit tab in DaVinci Resolve.
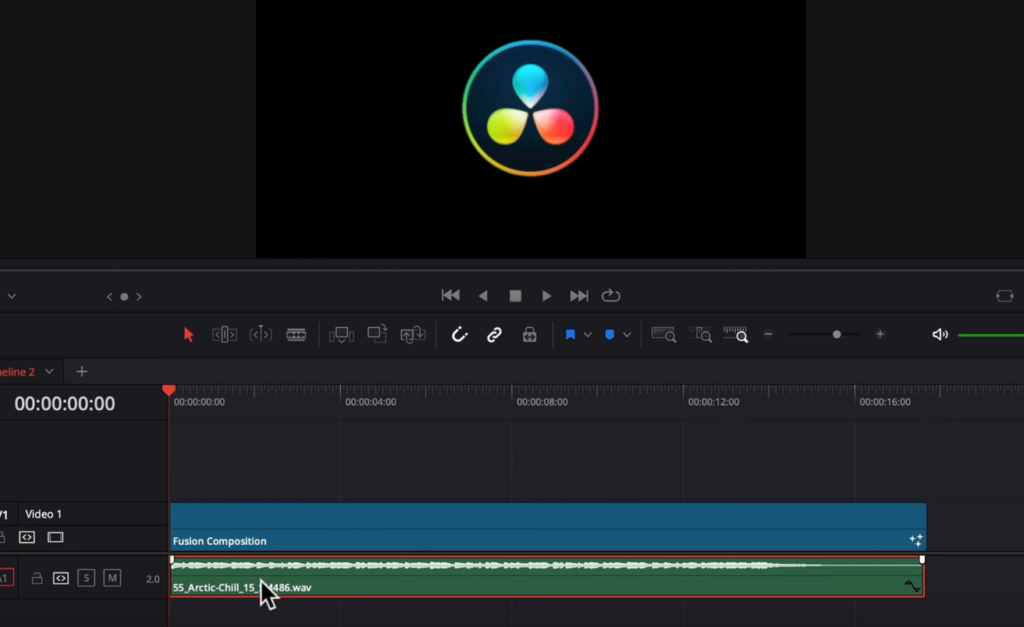
- Import your music track: Locate your WAV audio file in your Media Pool and drag it to your timeline, positioning it directly below the Fusion clip.
- Align the Fusion and audio clips: Adjust the length of your Fusion clip to match the duration of your audio clip. Ensure both clips are aligned at the beginning to achieve perfect synchronization.
- Play the combined clips: Now that the music track is added to your project, play through the timeline to see and hear your animated image in sync with the music. Enjoy the harmony between visuals and sound, and take a moment to appreciate your creation.
- Adjust the length of your clips: If needed, you can shrink or expand both the Fusion and audio clips while maintaining their synchronization. This flexibility allows you to fine-tune the duration of your audio visualizer without disrupting the alignment of visuals and music.
- Celebrate your accomplishment: Congratulations! You’ve successfully created an engaging audio visualizer in DaVinci Resolve. Your visually stunning animation, combined with the captivating music, will undoubtedly impress your audience and elevate your video projects.
Exporting Your Audio Visualizer in DaVinci Resolve
After perfecting your audio visualizer, it’s time to export it for sharing or further use. In this guide, we will walk you through the process of exporting your project from DaVinci Resolve using both preset and custom settings.
- Enter the Deliver tab: To export your audio visualizer, head to the Deliver tab in DaVinci Resolve. This page is designed to help you quickly set up one or more render jobs.
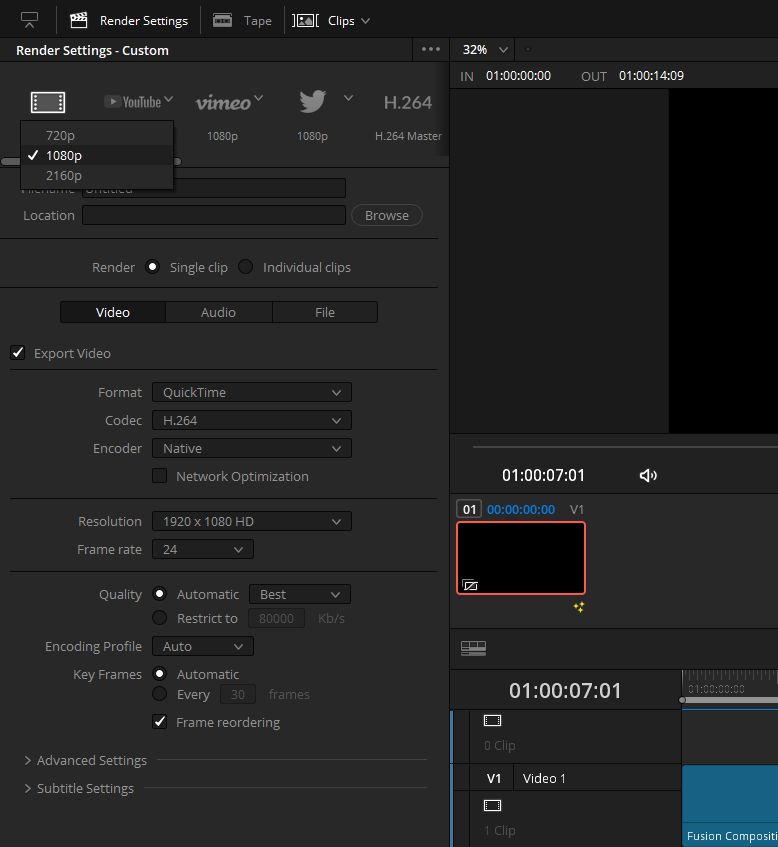
- Choose a preset or custom settings: DaVinci Resolve offers various render presets, such as ProRes, H.264, H.265, YouTube, Vimeo, and Twitter, each optimized for different purposes. To use a preset, click on the disclosure arrow next to the desired preset and choose the required resolution (e.g., 2160p for 4K UHD). Alternatively, you can create a custom export by selecting Custom Export, which provides access to a full range of render settings.
- Set up the video output format: In the Render Settings panel, configure the video output format, including file type, codec, and audio format. Specify the rendered video’s name and location on your workstation and use the advanced controls to optimize render speed and file size.
- Define the timeline range: By default, each job renders the entire timeline, but you can use In and Out points to define a custom range.
- Add to Render Queue: Once you have set up the output format and timeline range, click Add to Render Queue to send the job(s) to the Render Queue.
- Render your project: Select the job(s) in the Render Queue and click the Render button.
Creating a Custom Preset for Exporting
If you prefer to create a custom preset for exporting your audio visualizer, follow these steps:
- In the Deliver tab, select Custom Export.
- Configure the video output format, codec, and audio format according to your preferences.
- Set up any additional export settings, such as resolution, frame rate, or file size.
- Define the timeline range for export, either using the entire timeline or specifying In and Out points.
- Save your custom preset by clicking the Save button or selecting Save As from the Preset dropdown menu.
- Give your preset a name and click OK.
- To use your custom preset, simply select it from the Preset dropdown menu before adding the render job to the Render Queue.
By following these steps, you can efficiently export your audio visualizer in DaVinci Resolve using either the available presets or your custom settings. With your project exported, you can now share your captivating creation with others or integrate it into other video projects.
So there you go, congratulations on successfully making an audio visualizer in Davinci Resolve! Happy Editing!
- Also Read: Top 5 Sony ZV-E10 Alternatives
- Also Read: How To Do Multicam Editing In Davinci Resolve
- Also Read: How To Make A Video Transparent In Davinci Resolve