
Welcome back to FilmmakingElements.com, fellow filmmakers! Today, we’ll be addressing a common issue that many DaVinci Resolve users face: no sound during playback or no sound after export. There are numerous reasons why your audio might not be working, ranging from issues with the clip itself, your computer, or DaVinci Resolve settings. In this blog post, we’ll share 16 fixes to help you get the audio up and running in DaVinci Resolve and allow you to create awesome videos.
Keep in mind, some of these solutions may seem obvious, like adjusting your volume. However, it’s important to cover all bases when troubleshooting audio issues, as the solution can often be found in the simplest of places. So let’s dive in and explore these potential fixes to get your audio back on track in DaVinci Resolve.
16 Fixes For No Sound In Davinci Resolve
Fix 1: Preparing Your Computer for Audio Success in DaVinci Resolve
Before diving into DaVinci Resolve-specific fixes, it’s crucial to ensure your computer settings are properly configured. By taking care of these settings, you can rule out external factors contributing to the absence of sound in DaVinci Resolve. In this section, we’ll discuss two fundamental checks you should perform on your computer before launching DaVinci Resolve.
Check your computer’s volume settings
Ensure that your computer’s volume is turned up and not muted. While it may seem like a no-brainer, it’s surprisingly common for users to overlook this simple step. By confirming that your computer’s audio is functioning correctly, you can better determine if the issue lies within DaVinci Resolve.
Test audio playback outside of DaVinci Resolve
Before importing your clips into DaVinci Resolve, verify that the audio plays correctly using your computer’s default media player (e.g., QuickTime, VLC, etc.). By doing so, you can confirm that the audio issue isn’t related to the original file or your computer’s audio playback capabilities. If the audio works outside of Resolve, you can move on to troubleshooting within the program itself.
Fix 2: Verify your audio file format is compatible with DaVinci Resolve
Before attempting to work with your audio files in DaVinci Resolve, it’s essential to verify that they are compatible with the program. Most audio formats work seamlessly with DaVinci Resolve, but it’s always good to double-check. Blackmagic, the company behind DaVinci Resolve, provides a document detailing the compatible formats for Mac OS and Windows.
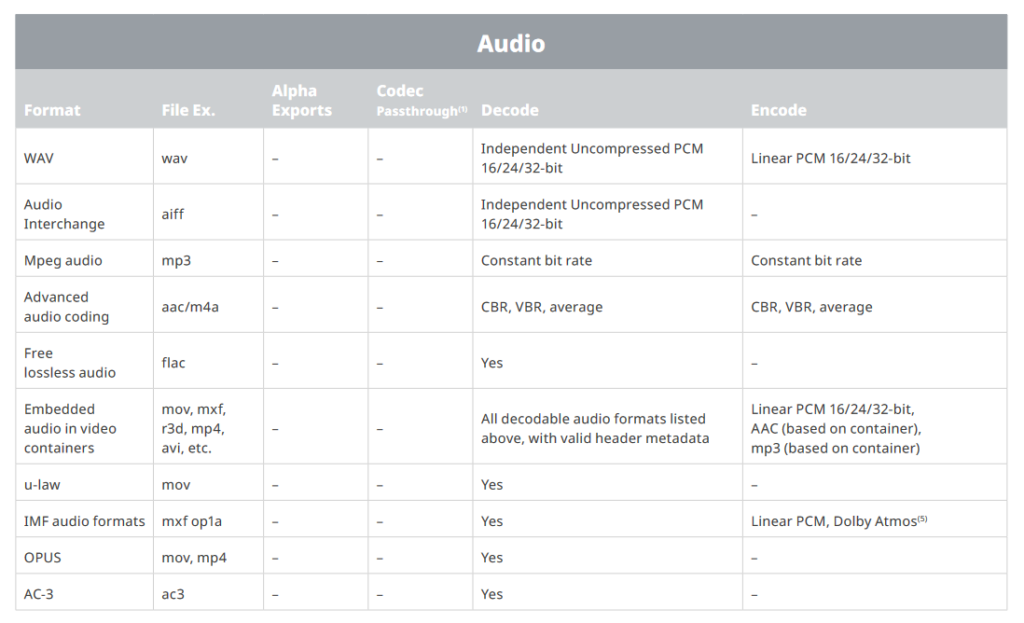
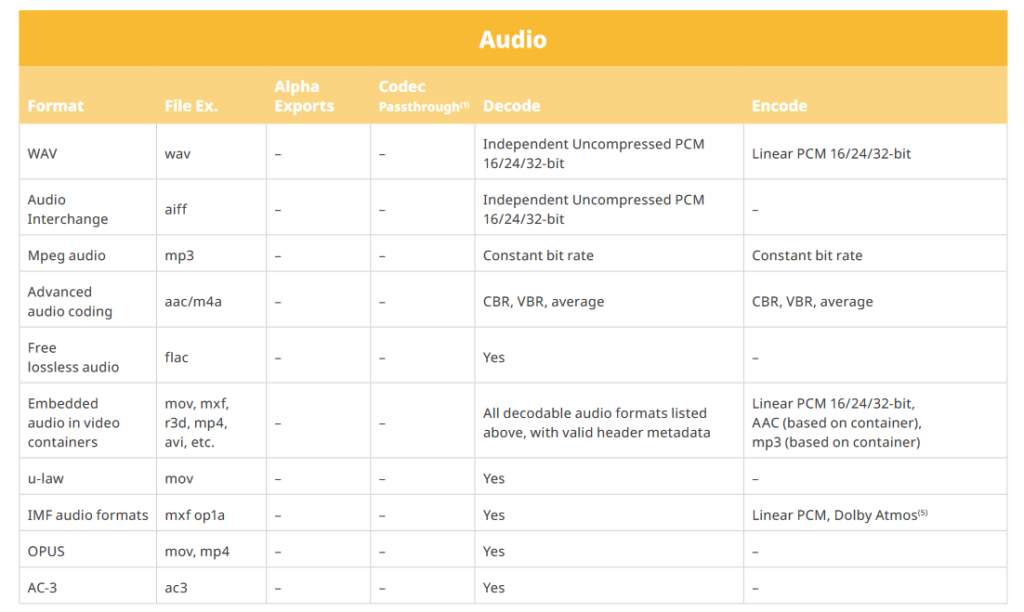
You can find the list of supported audio formats on their website, which includes information on compatible videos, stills, and audio formats. If your audio file isn’t compatible, you can use a free program like Handbrake to convert it to a supported format. Remember, simply changing the file extension is not enough—you must convert the file itself.
Fix 3: Configure your computer’s default output device before launching DaVinci Resolve
Before opening DaVinci Resolve, it’s important to ensure your computer’s default output device is correctly set. Whether you’re using headphones, internal speakers, or external monitors, setting the default output device before launching Resolve can save you from potential headaches.
Keep in mind that if you switch the output device after opening Davinci Resolve, it may not automatically update. As a result, you might need to change the settings within DaVinci Resolve as well.
A Note on Bluetooth Devices
While Bluetooth speakers or headphones can work with DaVinci Resolve, they may cause issues, such as latency problems, delays, or connectivity. In some cases, Resolve may not recognize Bluetooth devices, even if they connect to the computer without issue. For a more reliable experience, we recommend using wired headphones or monitor speakers when working in DaVinci Resolve. While Bluetooth devices can be used, they may not always provide the best performance.
Fix 4: Check and match the sample rate for your headphones and speakers before launching DaVinci Resolve
Before diving into DaVinci Resolve, ensure that your headphones and speakers have the correct sample rate set. It’s essential to match the settings on your computer with the project settings in DaVinci Resolve. We recommend using a sample rate of 48 kHz, as this is the most commonly used rate for video and audio.
To check the sample rate on a Mac, go to the MIDI setup and check the format settings for your output device. For Windows users, head to the Sound settings and check the default format for your output devices. Make sure they are set to 48 kHz.
Windows-specific considerations:
- In the Volume Mixer, ensure that the DaVinci Resolve app is not muted. Some users have reported that the app volume is muted by default on certain Windows systems.
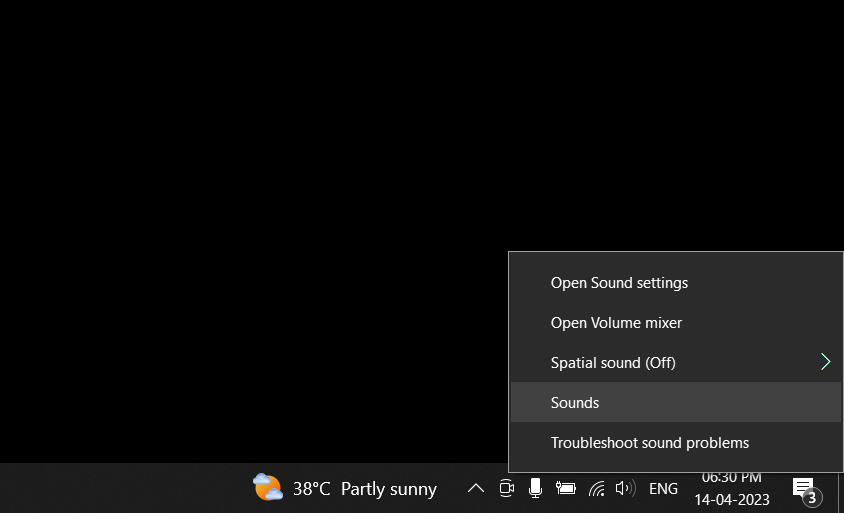
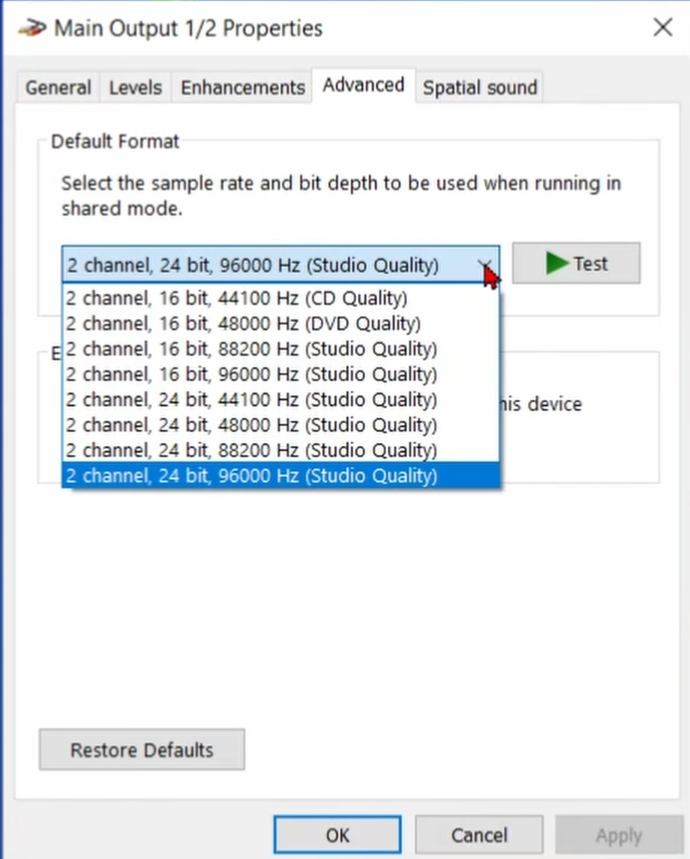
- From the bottom left of the screen, select the speaker looking icon and select Sounds. Go into Playback and choose the output device in use and click on Properties. In the Advanced Audio settings, check the default format for your output devices. Set the sample rate and bit depth to DVD quality (48,000 Hz) or higher.
Fix 5: Check mute, volume slider, and dim settings within the Edit tab
Once you’ve launched DaVinci Resolve and navigated to the Edit tab, it’s essential to verify specific settings that could be affecting your audio output.
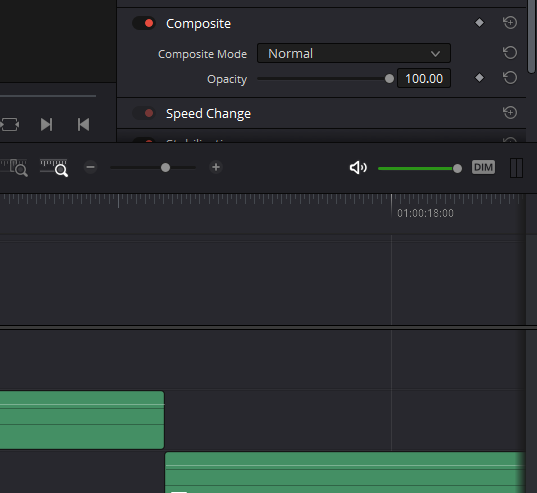
- Mute button: Locate the mute button above the timeline and ensure that it is not activated.
- Volume slider: Check the volume slider and make sure it is set to the appropriate level for your project.
- Dim button: The dim button reduces the volume by about 50% when enabled. Make sure the dim button is turned off to avoid unintentionally lowering the volume.
Fix 6: Configure audio output device in DaVinci Resolve preferences
If you still don’t hear any audio after trying the previous fixes, you should verify that DaVinci Resolve is configured to send audio output to the correct device, such as headphones or speakers. Sometimes, the software might choose the wrong default output device.
To configure the audio output device in DaVinci Resolve, follow these steps:
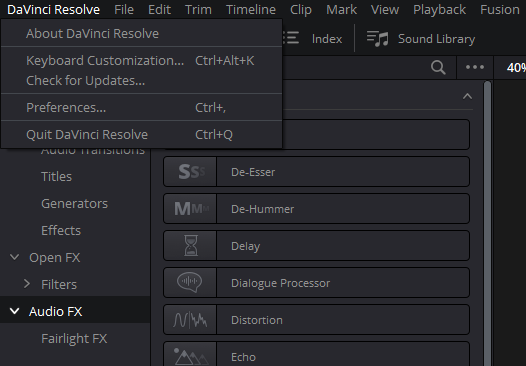
- Click on the DaVinci Resolve menu at the top left of the screen (this applies to both PC and Mac).
- Select Preferences from the dropdown menu.
- In the Preferences window, click on System.
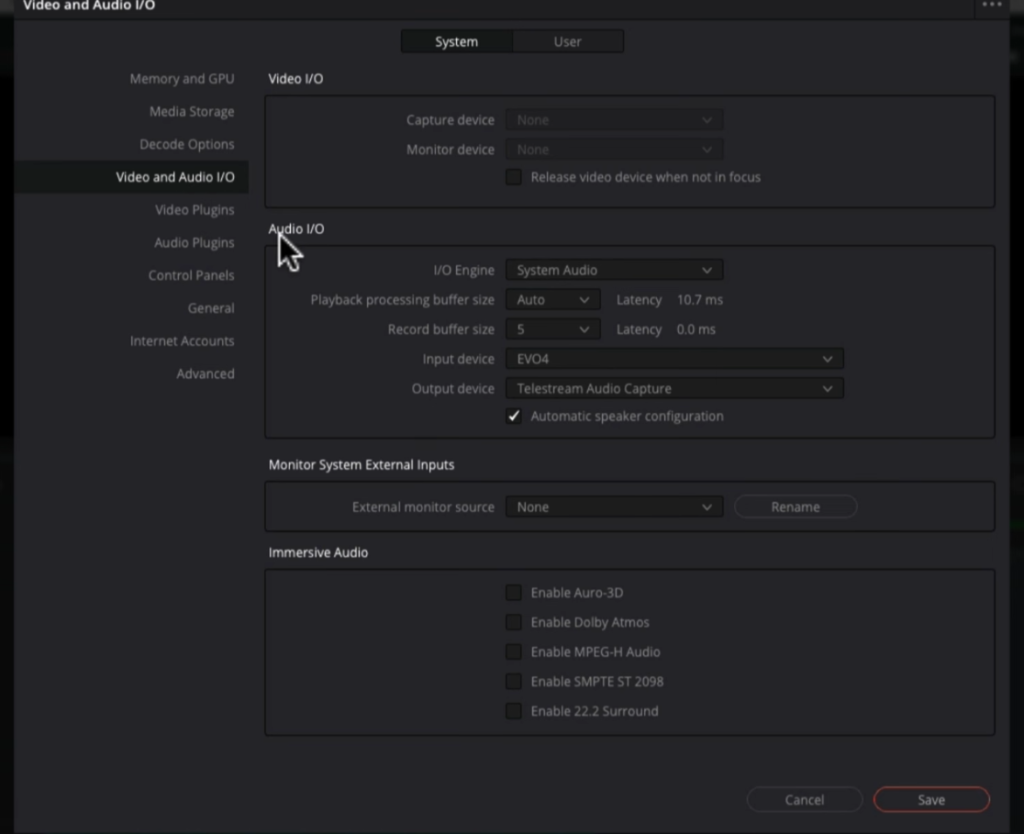
- Navigate to Video and Audio I/O (Input/Output).
- In the Audio section, locate the Output Device dropdown menu.
- Ensure the correct output device is selected. If not, click on the dropdown and choose the appropriate device for your setup (e.g., headphones, speakers, or an audio interface).
- Save your settings and test the audio output in your project.
Fix 7: Adjust monitor speaker configuration
If you still can’t hear audio after trying the previous fixes, you may need to modify the monitor speaker configuration in DaVinci Resolve’s preferences.
To adjust the monitor speaker configuration, follow these steps:
- Go back to Preferences in DaVinci Resolve (click on the DaVinci Resolve menu > Preferences > System).
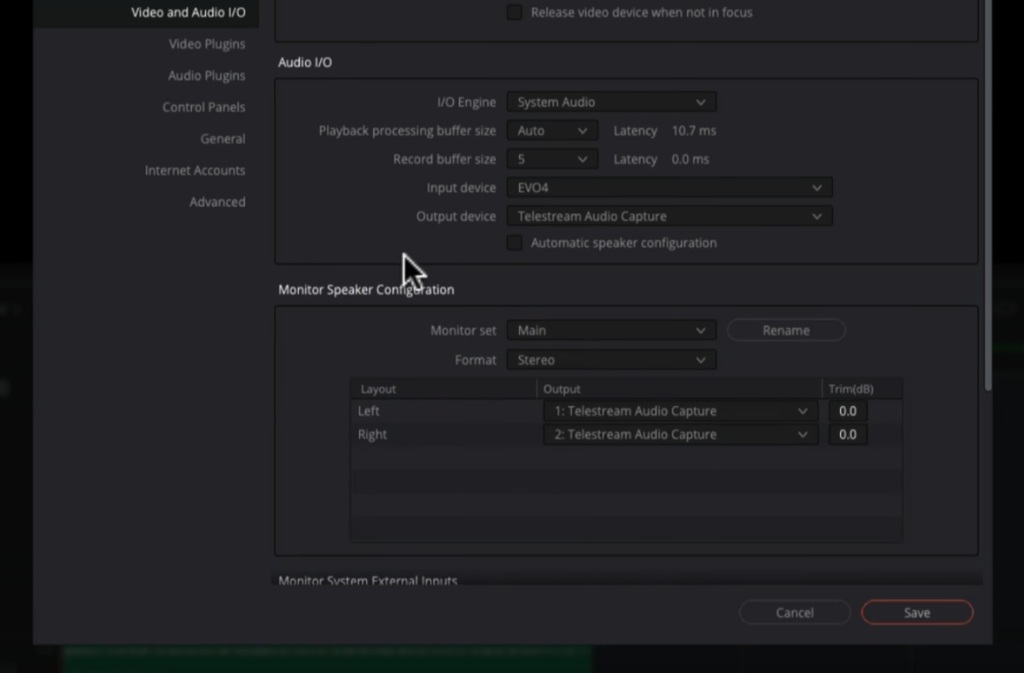
- In the Video and Audio I/O section, locate Automatic Speaker Configuration.
- Uncheck the Automatic Speaker Configuration checkbox if it’s enabled.
- Under Monitor Speaker Configuration, click on the dropdown menu beside Output.
- Choose the correct output device for your setup (e.g., headphones, speakers, or an audio interface). Note that the available options might change depending on whether you’re using a screen recording program.
- In the Monitor Set dropdown, you can leave the default selection as “Main.”
- For Format, you can also leave the default setting as “Stereo.”
By adjusting the monitor speaker configuration in DaVinci Resolve, you can ensure that the correct output device is being used for your audio playback, helping you to resolve any remaining audio issues during editing.
Fix 8: Check volume and waveform visibility in the timeline
If you’re still experiencing audio issues after configuring your speaker settings in DaVinci Resolve, the next step is to inspect the volume and waveform visibility in the timeline.
To check the volume and waveform visibility, follow these steps:
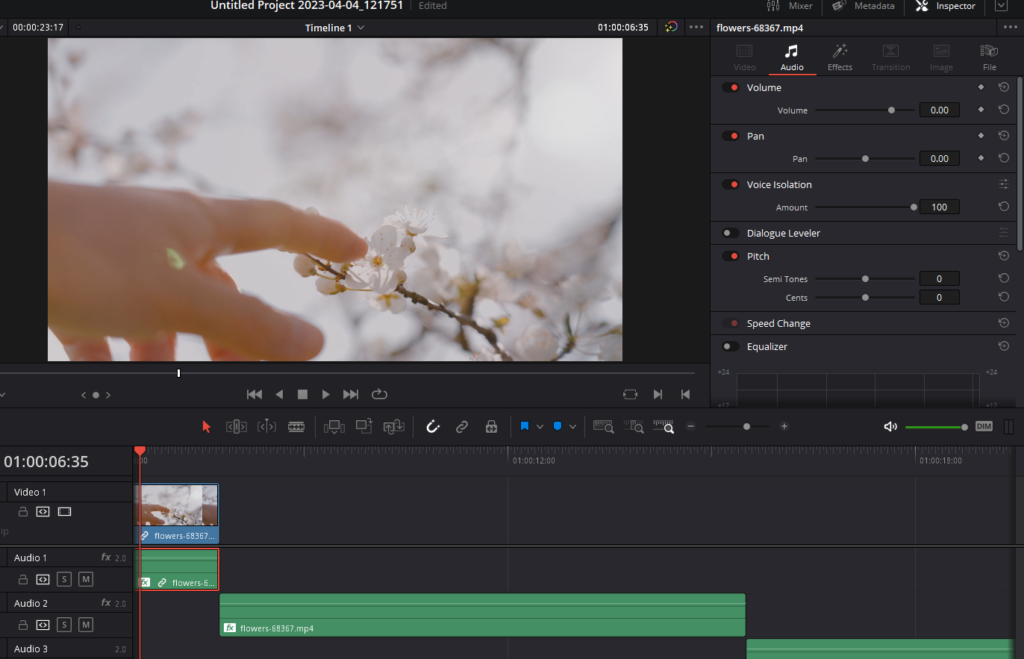
- Select the problematic clip in your timeline.
- Open the Inspector panel.
- Click on the Audio tab within the Inspector panel.
- Ensure that the volume is not set too low. If necessary, adjust the volume to 0 dB or increase it to make the waveform more prominent.
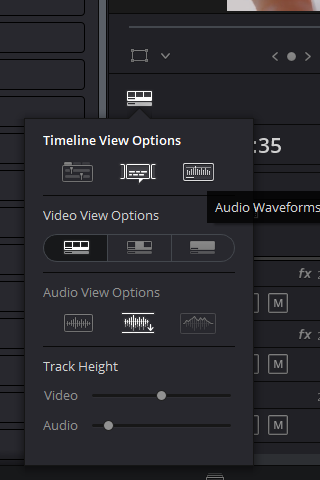
- To view the waveforms on the timeline, go to Timeline View Options above the timecode and enable the Waveforms option. If waveforms are not visible, turning this option on will display them.
- Adjust the Audio View Options and track size to suit your preferences.
Fix 9: Check the faders in the mixer
Another aspect to verify when experiencing audio issues in DaVinci Resolve is the faders in the mixer. Ensuring the faders are set correctly will help you eliminate any potential volume-related problems.
To check the faders in the mixer, follow these steps:
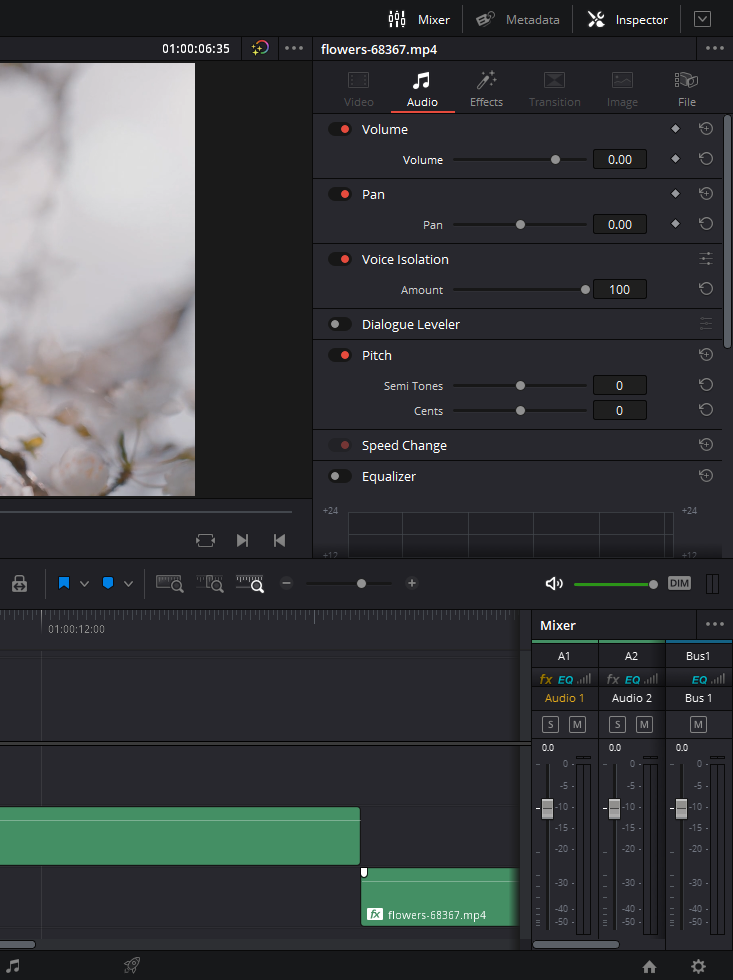

- Click on the Mixer button located at the top of the screen.
- Examine the mixer panel, which should display your audio tracks and buses (such as Bus One for the main output).
- Check the fader sliders for each track and bus, ensuring they are set to 0 dB. If a fader is set too low, you might not hear any audio.
- To reset a fader to 0 dB, simply double-click on it.
By checking and adjusting the faders in the mixer, you can ensure the correct volume levels for your audio tracks and buses.
Fix 10: Verify the source channel in clip attributes
If you’ve tried all the previous fixes and still can’t hear any audio or see any meters moving, there’s another possible solution. Check the source channel settings in the clip attributes to ensure the audio isn’t muted.
Follow these steps to check and adjust the source channel settings:
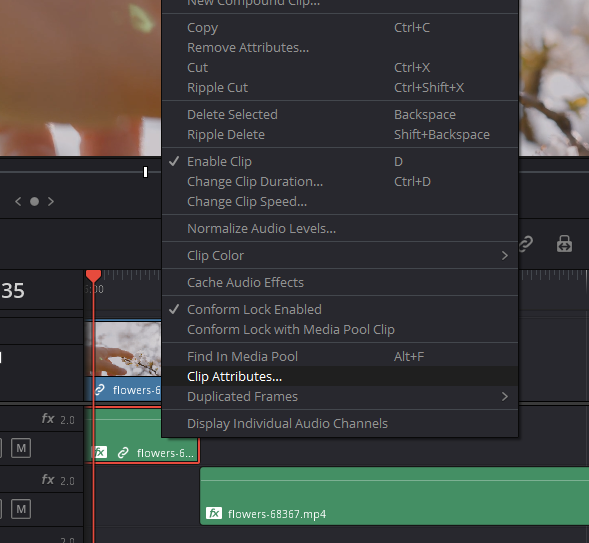
- Select the audio clip with associated audio in the timeline.
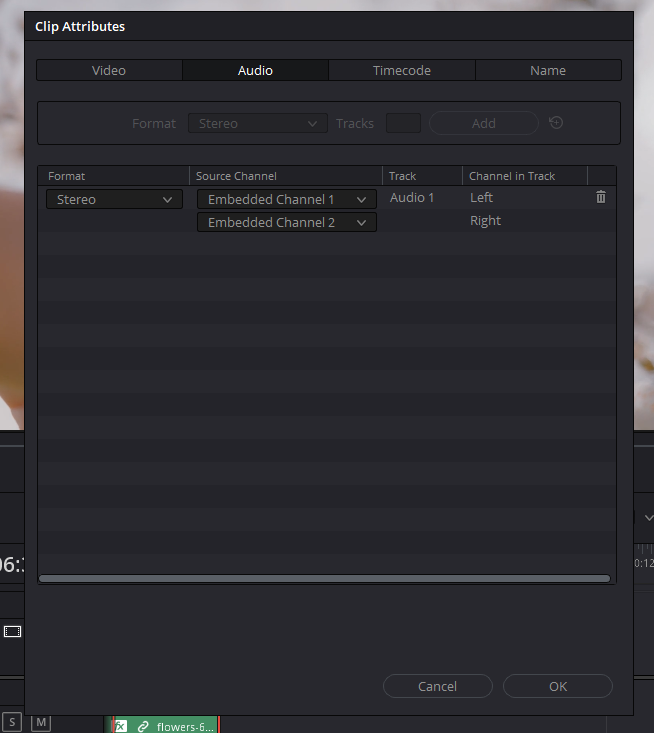
- Right-click on the clip and choose Clip Attributes to open the attributes window.
- Navigate to the Audio section and locate the Source Channel dropdown.
- Make sure the source channel is not set to mute. If it is, change it to the correct setting, such as embedded audio channels (e.g., Embedded 1, Embedded 2) or linked audio (e.g., Linked 1).
- If you only hear audio from one speaker, check if either the right or left channel is muted in a stereo track.
Fix 11: Check bus outputs in Fairlight
If you’ve tried the previous fixes and still can’t hear any audio, head over to the Fairlight section of DaVinci Resolve, where you can gain more control over your audio settings. One crucial thing to check is if your audio track is being sent to Bus 1, the main output in DaVinci Resolve.
To check and adjust bus outputs in Fairlight:
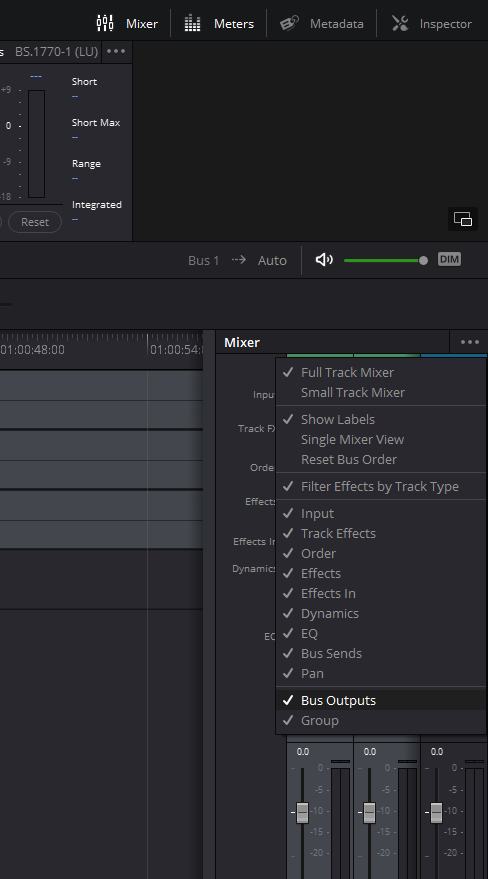
- Click on the musical notes icon at the bottom of the screen to switch to the Fairlight workspace.
- Make sure your mixer is open, and scroll down to the Bus Outputs section. If you don’t see it, click the three dots in the mixer window and ensure that Bus Outputs is checked on.
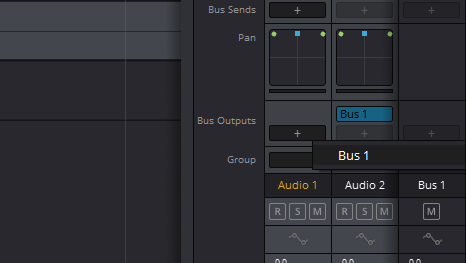
- Verify if Bus 1 is listed under the Bus Outputs section for your audio track. If it’s not, click the “+” icon and select Bus 1 to route your audio track to the main output.
Fix 12: Enable visibility of Bus 1 and audio tracks in the Index
In some cases, you might not see Bus 1 or your audio tracks in the mixer. This issue can occur when their visibility settings are turned off. To fix this, follow these steps:
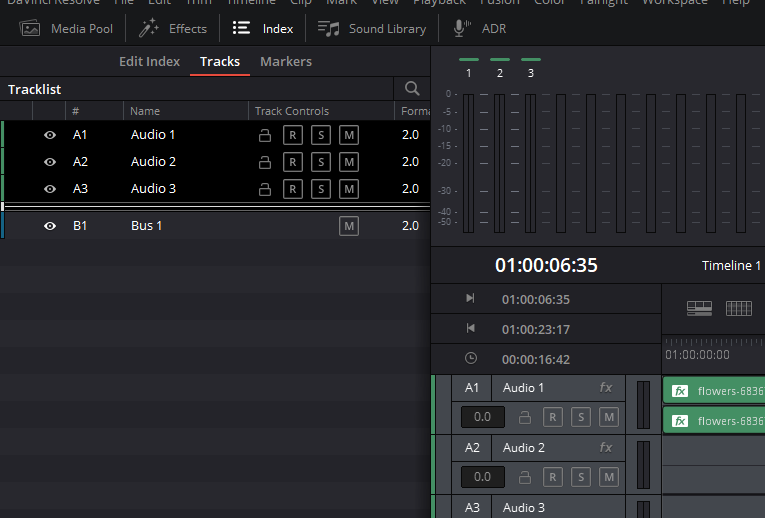
- Click on the Index button at the top of the screen to open the Index panel.
- In the Index panel, you’ll find several categories: Edit Index, Tracks, and Markers. Click on the Tracks tab.
- Under the Tracks tab, you’ll see a list of all available audio tracks and buses, such as Bus 1. If you don’t see Bus 1 or any audio track, ensure that the corresponding eyeball icon is enabled. Enabling the eyeball icon will make the bus or track visible in the mixer.
Fix 13: Check your patch settings
Patch settings in DaVinci Resolve determine how your audio is routed from the application to your output device. Ensuring that these settings are correctly configured is crucial for a smooth audio experience. Here’s how to check and adjust your patch settings:
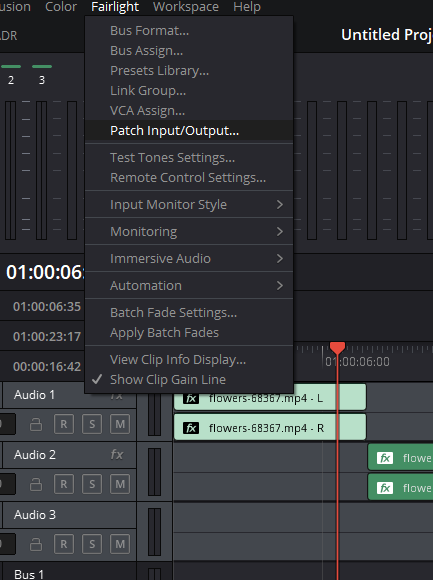
- Navigate to the Fairlight menu at the top of the screen.
- Select Patch Input/Output from the dropdown menu. This will open the Patch Input/Output window.
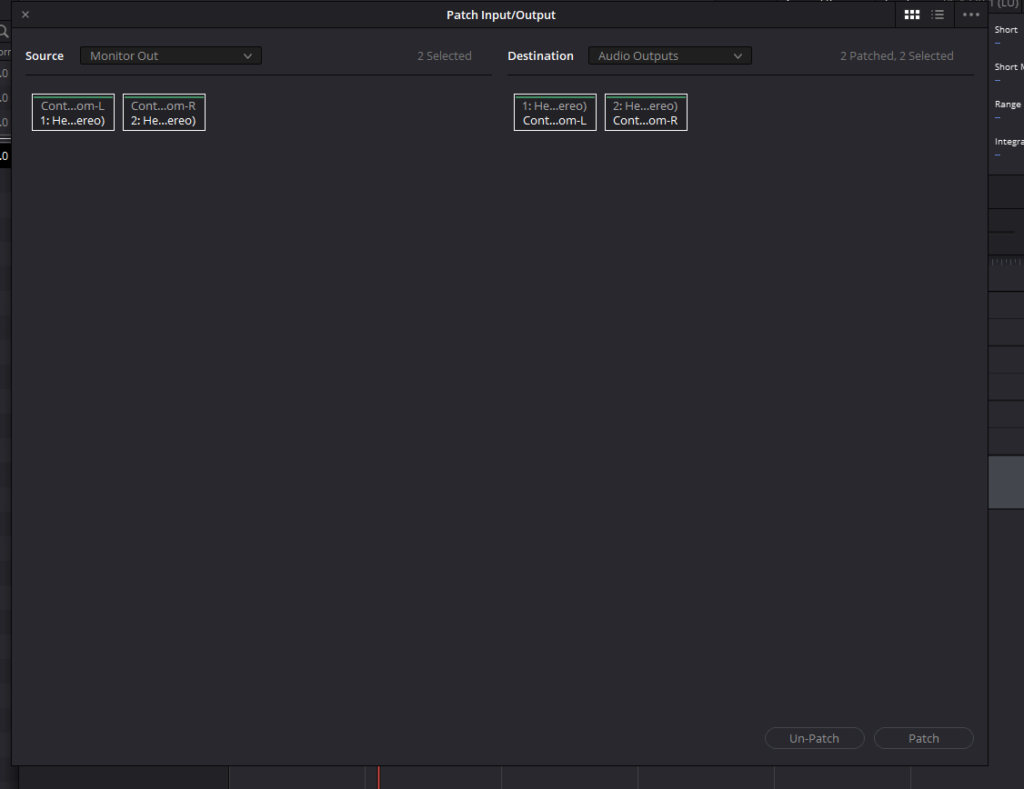
- In the Patch Input/Output window, you’ll see two sections: Source on the left and Destination on the right.
- Under the Destination section, make sure you have Audio Output selected.
- In the Source section, click the dropdown menu and select Monitor Out.
- Ensure that your Control Room channels are patched to the correct output device (e.g., your audio interface or screen recording software). Select your control room and audio outputs by holding the Shift key and selecting them.
- Click on the Patch connections to adjust them.
Fix 14: Move your audio clip to a new track
If you’ve tried all the other fixes and your audio still isn’t working, a simple solution to try is moving your audio clip to a new track. Sometimes, tracks can behave unpredictably, and simply shifting the audio clip to a different track can resolve the issue. Here’s how to do it:
- Right-click in the track area and select Add New Track. Choose Stereo Track from the options.
- Click and drag your audio clip from the original track to the new track.
- Test the audio playback. If the issue is resolved, you can proceed to mute or delete the original track.
- To delete the original track, right-click on the track header and select Delete Track.
By moving your audio clip to a new track, you may eliminate any potential issues with the original track that were causing the audio to not play.
Fix 15: Be cautious with Bluetooth headphones and try restarting your computer
DaVinci Resolve often does not work well with Bluetooth headphones, especially those with built-in microphones. If possible, it’s recommended to use wired headphones when working in DaVinci Resolve. Bluetooth headphones can cause latency issues and other problems, making your editing experience less efficient. Here’s what you can do to improve your audio experience in DaVinci Resolve:
- Connect your Bluetooth headphones before opening DaVinci Resolve. This ensures that the program recognizes the headphones once it’s open.
- If you encounter issues with Bluetooth headphones, check the audio input/output settings and preferences discussed earlier to ensure they are set correctly.
- Restart your computer and DaVinci Resolve to resolve any lingering issues.
- Make sure your audio outputs are set correctly before opening DaVinci Resolve.
Fix 16: Match the sample rate between your devices and DaVinci Resolve
To avoid audio issues in DaVinci Resolve, it’s essential to match the sample rate between your devices (microphone, speakers, headphones) and the program. Here’s how to ensure they match up:
- Set the sample rate of your devices to 48kHz on your computer.
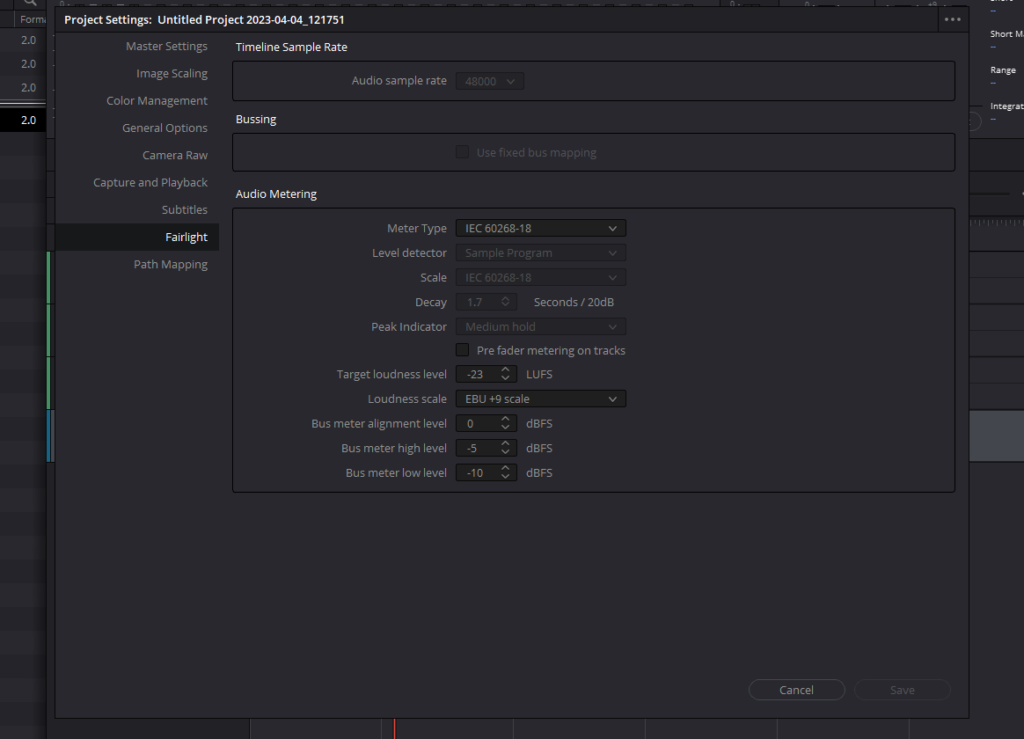
- In DaVinci Resolve, check the Timeline sample rate by clicking on the gear icon at the bottom of the screen to go to the Project Settings and selecting the Fairlight section.
- Ensure the sample rate is set to 48,000. If it doesn’t match your computer settings, create a new project with the correct sample rate, then copy and paste your existing project into the new one.
Thank you for taking the time to read this article. We hope that the fixes provided here have helped you resolve any audio issues you may have encountered in DaVinci Resolve. Your dedication to learning and improving your skills is commendable, and we appreciate your effort in seeking solutions to enhance your editing experience. Remember, the DaVinci Resolve community is always here to support you. We wish you the best of luck in your future projects and happy editing!
- Also Read- Davinci Resolve Voice Isolation: Step By Step Guide
- Also Read- Davinci Resolve Voice Changer: Very Easy
- Also Read- Davinci Resolve Not Recording Audio: 9 Fixes