
Hi, I’m Salik, the author of FilmmakingElements.com. I have been a filmmaker for over 10 years. I am also a certified DaVinci Resolve Trainer and I have used DaVinci Resolve for many of my projects. In this article I will teach, How To Do Multicam Editing In Davinci Resolve. Although it might seem daunting at first, you’ll soon see that it’s much simpler than you think. We’re here to guide you through the entire process step by step.
Follow our step-by-step guide on your PC, and you’ll be impressing everyone with your newfound skills in no time!
Setting Up Your First Multicam Project in DaVinci Resolve
In this section, we’ll walk you through the process of setting up a new project and importing your media files.
- Launch DaVinci Resolve: With the software open on your PC, you’re ready to begin your multicam video project.
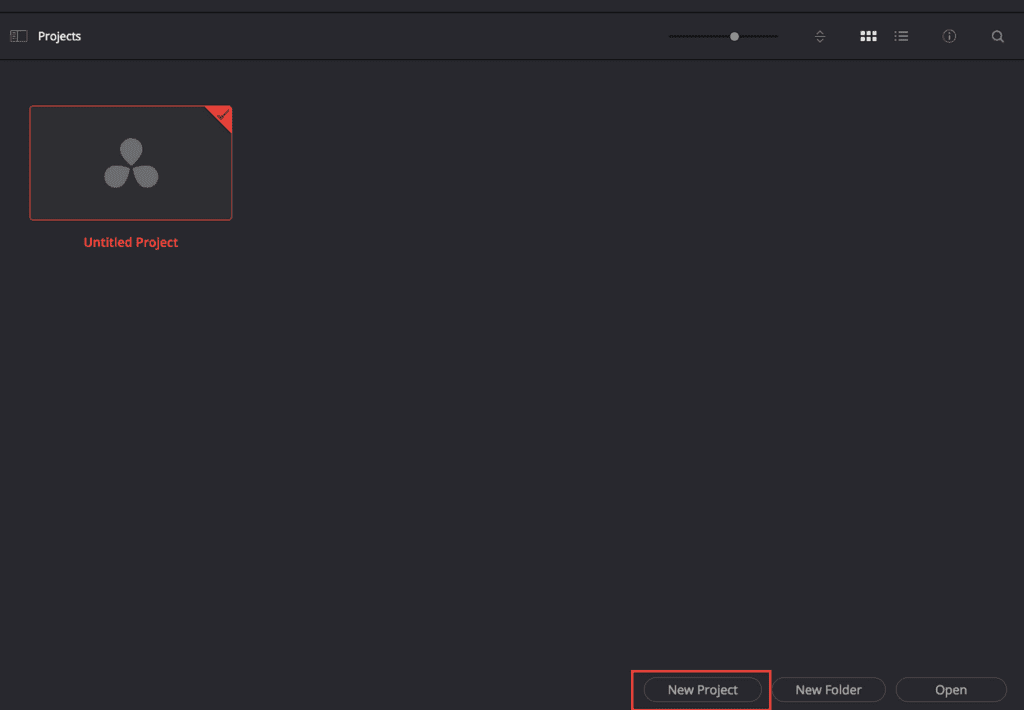
- Create a New Project: Click on “New Project” at the bottom of the screen, and give your project a name.
- Navigate to the Media Page: Along the bottom of the screen, click on the “Media” tab to access the media page where you’ll import your video files.
- Import Video Files: The easiest way to import your media files is by dragging and dropping them from your desktop into the media pool. Ensure that both video files have the same frame rate for optimal results.
- Adjust Project Frame Rate: DaVinci Resolve will prompt you to change the project frame rate to match the clip frame rate, simplifying the process by avoiding manual adjustments. Click “Change” to update the project settings.
- Optimize Performance: If you have an older machine, working with multiple camera angles can be resource-intensive and cause lag. To address this, right-click your clips in the media pool and select “Generate Proxy Media” or “Generate Optimized Media” to create lower-resolution versions of your clips for smoother editing.
Now that your media files are imported and your project is set up, you’re ready to synchronize your clips and start working on your multicam edit.
Creating and Synchronizing a Multi-Cam Clip in DaVinci Resolve
In this part of our multicam editing guide, we will walk you through the process of creating and synchronizing a multi-cam clip in DaVinci Resolve.
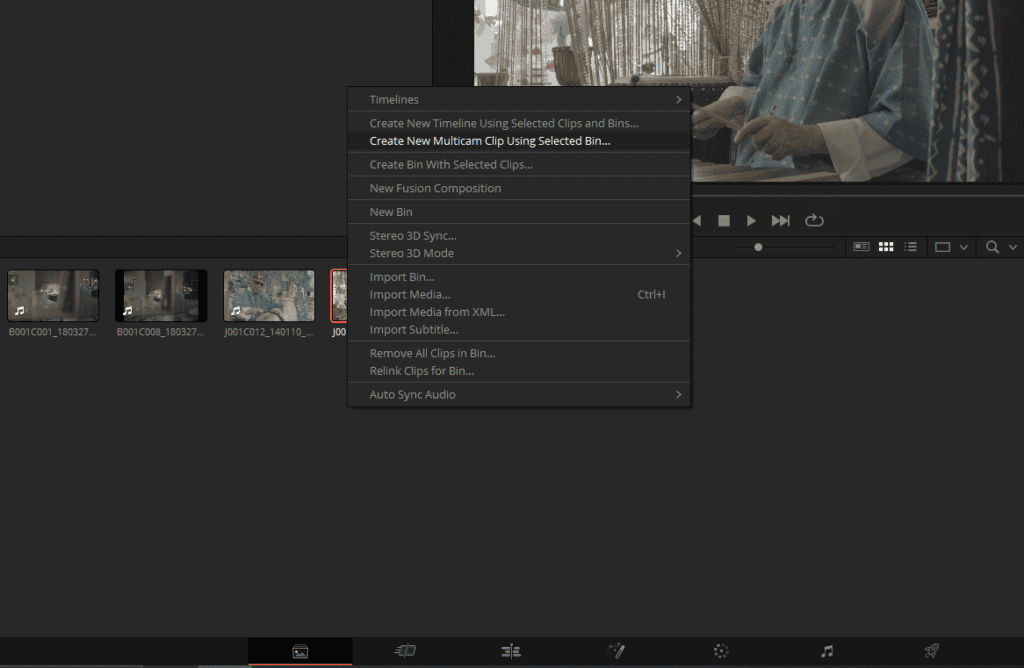
- Select Your Files: In the media tab of Davinci Resolve choose all the files corresponding to different camera angles and right-click on one of the clips. From the context menu, select “Create New Multicam Clip Using Selected Clips.”
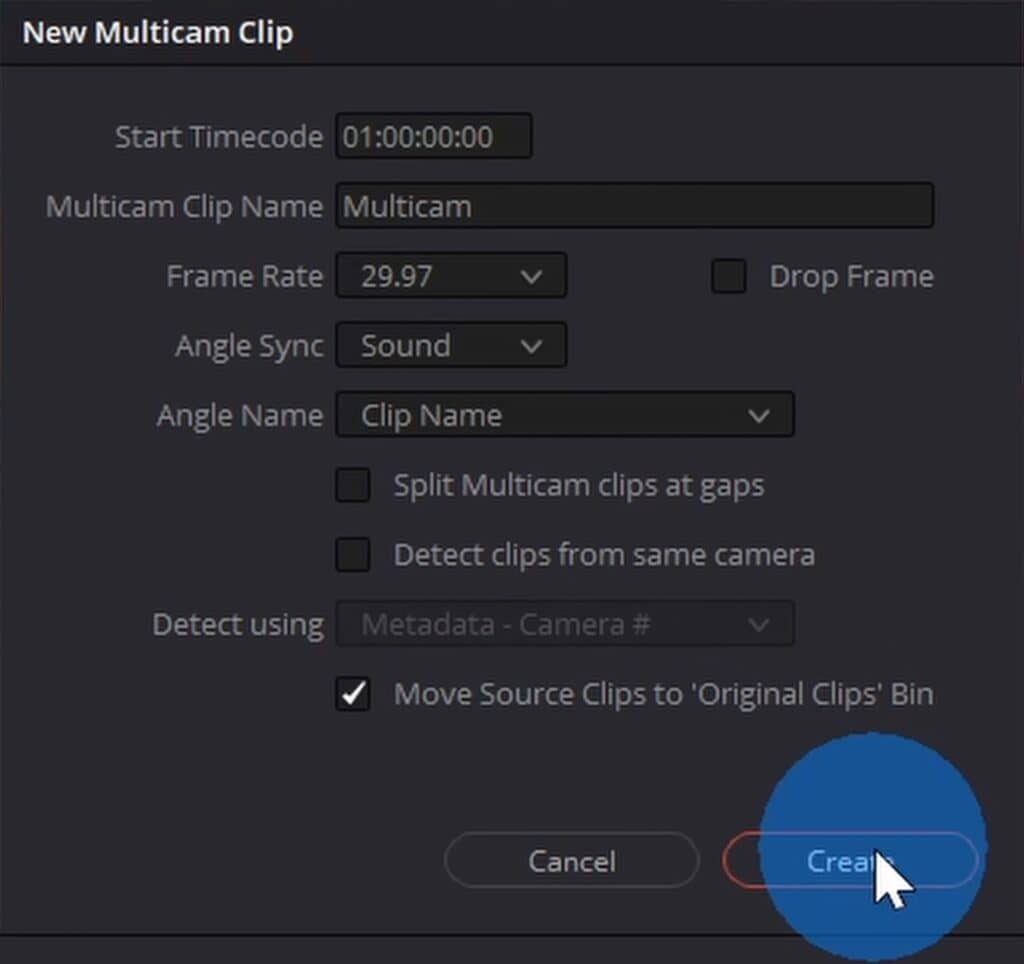
- Configure Multicam Clip Settings: A dialog will appear, allowing you to customize your multi-cam clip settings:
- Start: Set the start point for the multi-cam clip (default is the beginning).
- Name: Give your multi-cam clip a name (e.g., “multicam”).
- Frame Rate: Select the appropriate frame rate (default setting recommended).
- Angle Sync: Choose from various options to synchronize your video files. For simplicity, use DaVinci Resolve’s sound-based synchronization feature.
- Angle Name: Define how your different angles will be named. Choose “Clip Name” if you’ve already named your files.
- Additional Options:
- Split Multi-Cam Clips at Gaps: Leave this unchecked if you don’t want to split the clips.
- Detect Clips from the Same Camera: Useful when one camera was used for multiple recordings (e.g., battery change). Leave this unchecked if you have two clean clips.
- Move Source Clips to Original Clips Bin: Helps to organize your media pool by moving the source files to a separate folder after creating the multi-cam clip.
- Create Your Multi-Cam Clip: Click “Create” to generate your multi-cam clip. In the media pool, you’ll now see your newly created multi-cam clip and the original clips organized in a separate bin.
With your multi-cam clip created and synchronized, you’re now ready to start editing your project using multiple camera angles. In the next section, we’ll provide guidance on how to switch between different angles and make your project shine.
Switching Camera Angles and Editing Multicam Clips in DaVinci Resolve
In this section, we’ll explore how to switch between camera angles and edit your multicam clips in DaVinci Resolve. Following the creation and synchronization of a multicam clip, you can begin editing your project with ease.
1. Set Defaults for Camera and Audio
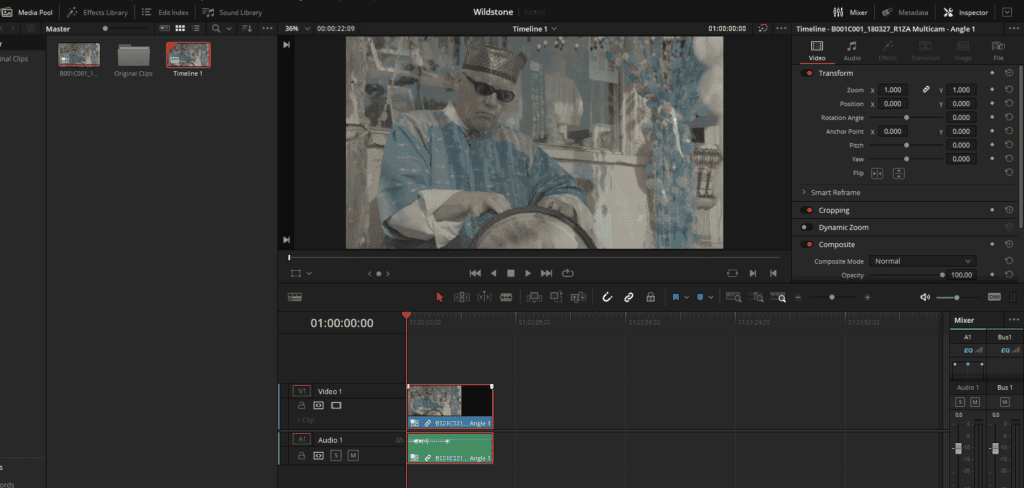
- Click on your multicam timeline you just created and drag it onto your timeline on the Edit page.
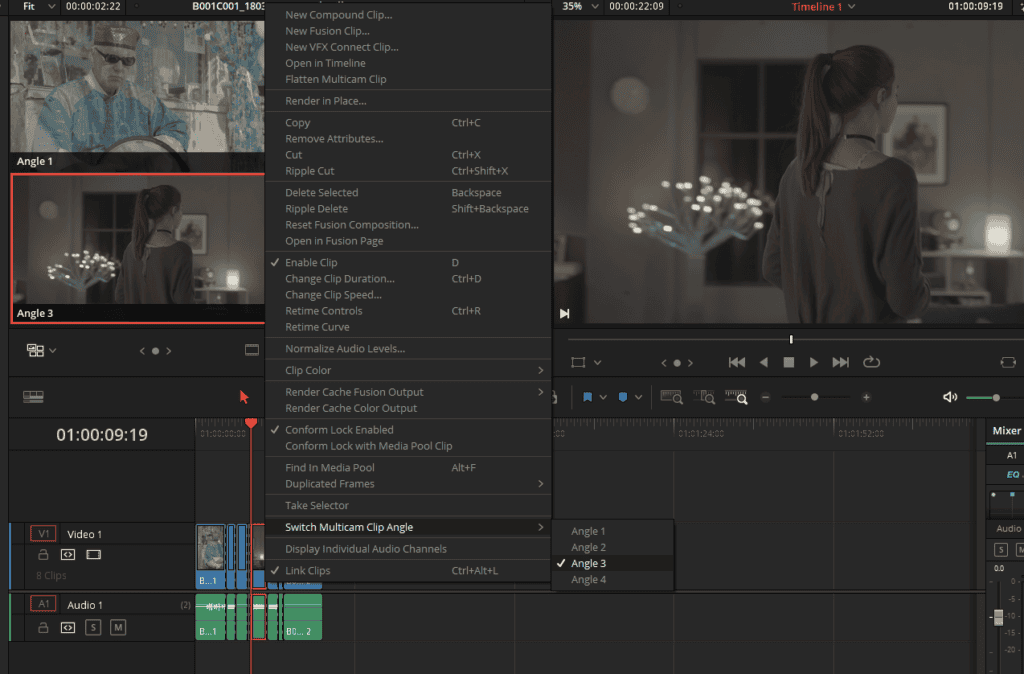
- To set a default camera angle, right-click the video file, and choose “Switch Multicam Clip Angle.” You can switch between different angles as needed.
- To set a default audio track, right-click on the audio file, and choose “Switch Multicam Clip Angle.” In this example, we will use the audio from the main camera, which is connected to a better microphone.
2. Switch Between Camera Angles
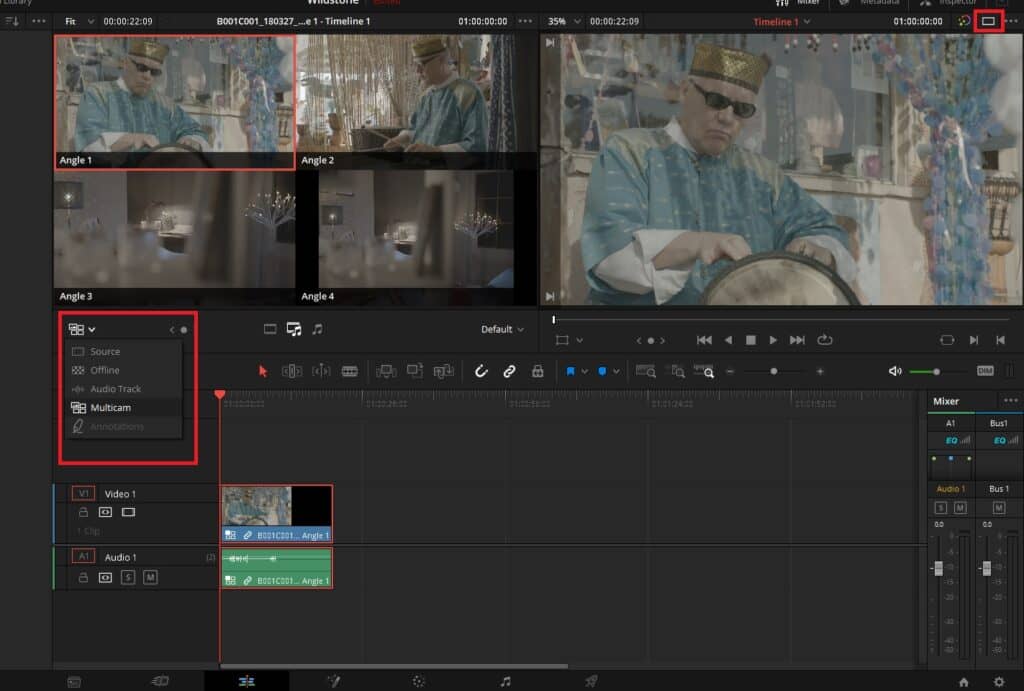
- Ensure you have two viewers turned on in the top right corner.
- If you don’t see an option to switch to two viewers in the top right corner, close your Inspector, Metadata, and Mixer tab from the top right corner.
- In the Source Viewer, click the icon and switch it to “Multicam.”
- Play your timeline using the spacebar and click on the video angle you want to use. You can also use shortcut keys (1 for the first video, 2 for the second video) to switch between angles.
3. Control Video and Audio Inserts
- By default, switching angles will insert the associated audio file. However, if you want to use only the master audio file, you can control this in the Multicam Viewer.
- Click on one of the three icons in the Multicam Viewer: video only, video and audio, or audio only. In this case, we want to insert only the video, so select the video icon.
4. Edit Your Multicam Clips
- As you play the timeline, use your keyboard keys or click on the video to switch between camera angles.
- If you’ve chosen the wrong clip at a certain point, you can modify it by right-clicking and selecting “Switch Multicam Clip Angle” to choose the correct angle.
- Use the editing tools in DaVinci Resolve to make fine adjustments to your clips, such as trimming or extending their duration.
As you can see, multicam editing in DaVinci Resolve is a straightforward process that allows you to create professional-looking videos with multiple camera angles. By setting defaults for your camera angles and audio tracks, switching between different angles during playback, and using the various editing tools available in the software, you can create a polished final product that is sure to impress.
Rendering and Exporting Your Multicam Project From Davinci Resolve
In this section, we will walk you through the final step: rendering and exporting your finished multicam project.
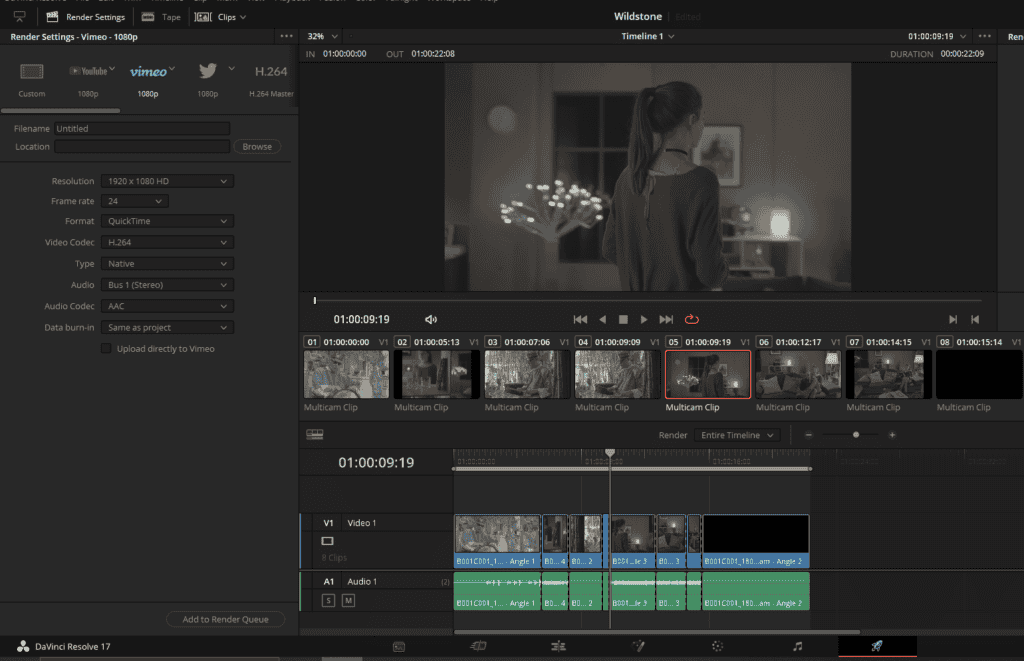
Step 1: Navigate to the Deliver Page
After completing your multicam edits, go to the Deliver page in DaVinci Resolve by clicking on the “Deliver” tab at the bottom of the interface. The Deliver page is where you’ll configure your export settings and render your final video.
Step 2: Choose a Preset or Configure Custom Export Settings
DaVinci Resolve offers a range of presets for popular platforms like YouTube, Vimeo, and others. If you plan to upload your video to one of these platforms, select the appropriate preset to automatically configure the optimal export settings.
ProRes, H.264, and H.265 Masters generate widely-used video files suitable for various applications, ranging from high-quality exports ideal for broadcasting (ProRes) to compressed HD/UHD files intended for client review or online streaming (H.264 and H.265). It’s worth noting that the ProRes Master preset is exclusively available on macOS systems.
YouTube, Vimeo, and Twitter presets in the Render Settings panel are optimized according to the video configurations recommended by user-generated content and social media platforms.
Alternatively, you can configure custom export settings by defining the following parameters:
- File name and location: Give your video a name and choose where to save the rendered file on your computer.
- Resolution: Set the desired resolution for your video, such as 1080p, 4K, or another resolution based on your project’s requirements.
- Format: Choose the format for your exported video, such as QuickTime or MP4.
- Codec, bitrate, and other settings: Configure additional settings as needed, based on your project’s needs and the platform where you’ll be sharing your video.
Step 3: Add Your Project to the Render Queue
Once you’ve configured your export settings, click “Add to Render Queue” to prepare your video for rendering. Your project will appear in the Render Queue panel on the right side of the Deliver page.
When rendering your Multicam edit at a higher resolution than the original footage, it’s advisable to upscale the timeline in the Project Settings, using the Timeline resolution parameter found in the Master Settings tab. This best practice not only enhances the final rendered result but also provides a more accurate representation of the final image in the viewer.
Step 4: Render and Export Your Multicam Video
With your project in the Render Queue, click “Start Render” to begin the rendering process. Depending on your computer’s performance and the complexity of your project, rendering may take some time to complete.
Once the rendering process is finished, your exported video will be saved in the location you specified earlier. You can now share your polished multicam project with your audience, confident that it showcases your editing skills and the power of DaVinci Resolve.
In conclusion, multicam editing in DaVinci Resolve is a versatile technique that can elevate your video projects to new heights. By following the steps outlined in this guide, you can streamline the process of setting up, editing, and exporting multicam projects. With practice, you’ll be able to create dynamic and engaging videos that captivate your audience and showcase your creative vision.