
Hi, I’m Salik, the author of FilmmakingElements.com. I have been a filmmaker for over 10 years. I am also a certified DaVinci Resolve Trainer and I have used DaVinci Resolve for many of my projects. In this one, we are covering, How To Make A Video Transparent In Davinci Resolve.
Make A Video Transparent In Davinci Resolve
In this comprehensive guide, we will delve into the details of making a video transparent in DaVinci Resolve. This skill is essential for overlaying graphics, text, or creating captivating visual effects in your videos. Let’s explore different techniques for making parts of your video transparent or removing specific colors.
Method 1- Composite Mode:
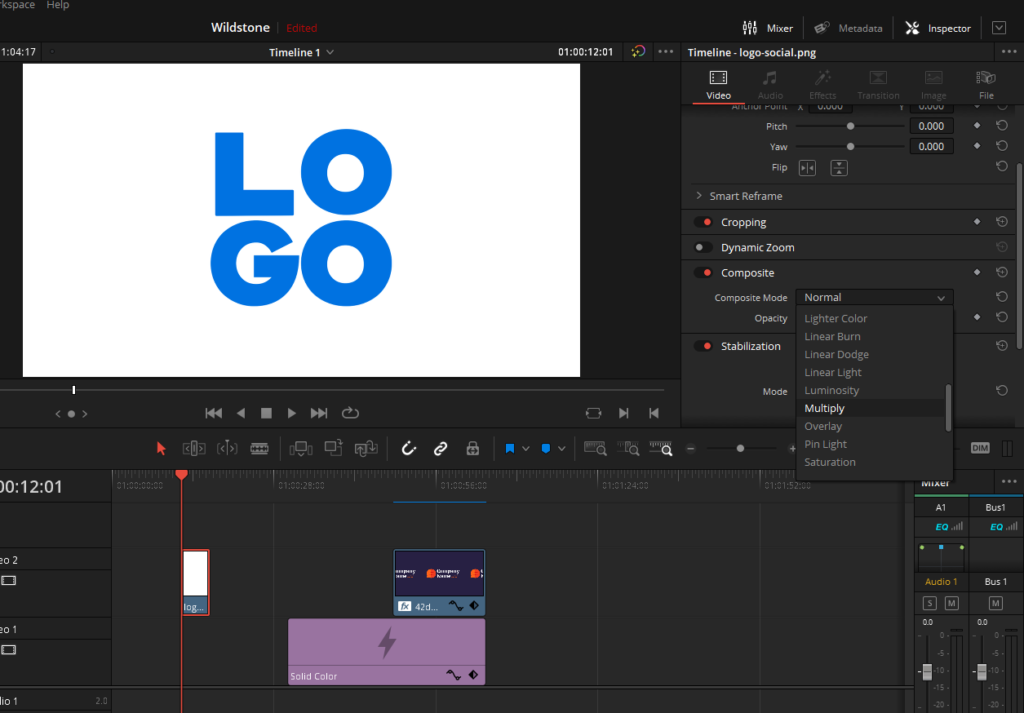
When working with black and white videos and you want to make it transparent, you need to change the composite mode in DaVinci Resolve. Here’s a step-by-step guide:
- Click on the video clip in the timeline to select it.
- In the Inspector panel on the right side, locate the Composite Mode dropdown menu.
- Choose Multiply to remove the white layer or Screen to get rid of the black layer.
Method 2 – HSL Keyer:
If you want to remove a colored area from your video, there are several methods with varying levels of effectiveness. Follow these steps to remove a color using the HSL keyer:
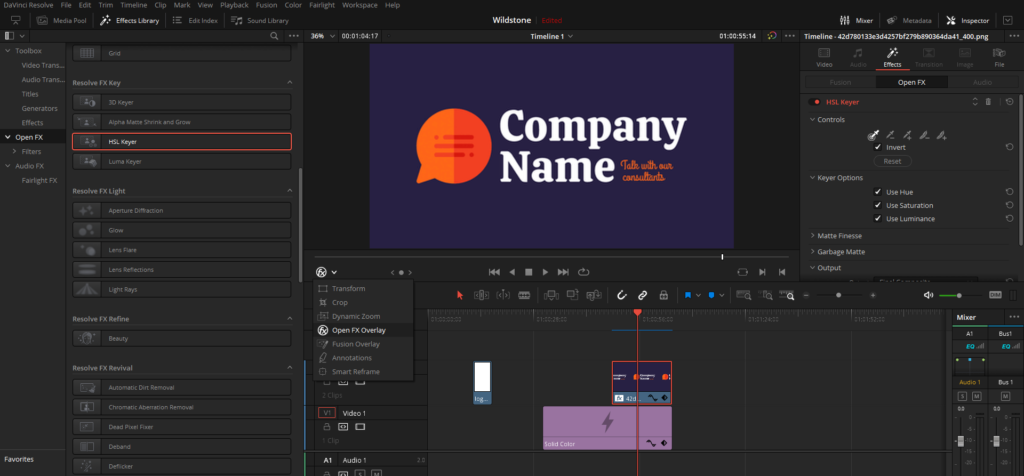
- Go to the Effects Library on the edit page of Davinci Resolve from the top left corner.
- Go to the Open FX menu, locate the HSL keyer, and drag it onto your video clip in the timeline.
- Click on the video clip, go to the Inspector panel, and open the Effects panel from the top right corner.
- Click on the eyedropper tool next to the Key Color parameter.
- If it doesn’t works, make sure the Open FX Overlay is selected in the drop-down menu under the viewer.
- Click on the color in the video that you want to remove.
This method may not provide the best results, as some residual color might remain. To improve the outcome, you can try adjusting the following parameters:
- Increase the Clean Black and Clean White values under the Matte Finesse section.
- Adjust the In-Out Ratio and Blur Radius under the Despill section.
However, keep in mind that results may still vary using this method.
Method 3 – Luma Keyer:

To remove a color using the Luma Keyer, follow these steps:
- Remove the HSL keyer effect from your video clip in the timeline.
- Locate the Luma Keyer effect in the Effects Library under OpenFX.
- Drag the Luma Keyer effect onto your video clip.
- In the Inspector panel, adjust the Low and High threshold sliders to isolate the color you want to remove.
While this method might yield better results, it still depends on your project. Fine-tuning the Low and High threshold sliders can help remove the color more effectively, but again, results may vary.
Method 4 – Chroma Keyer in Fusion (Most Consistent):
For a more reliable approach, use the Chroma Keyer in Fusion by following these steps:
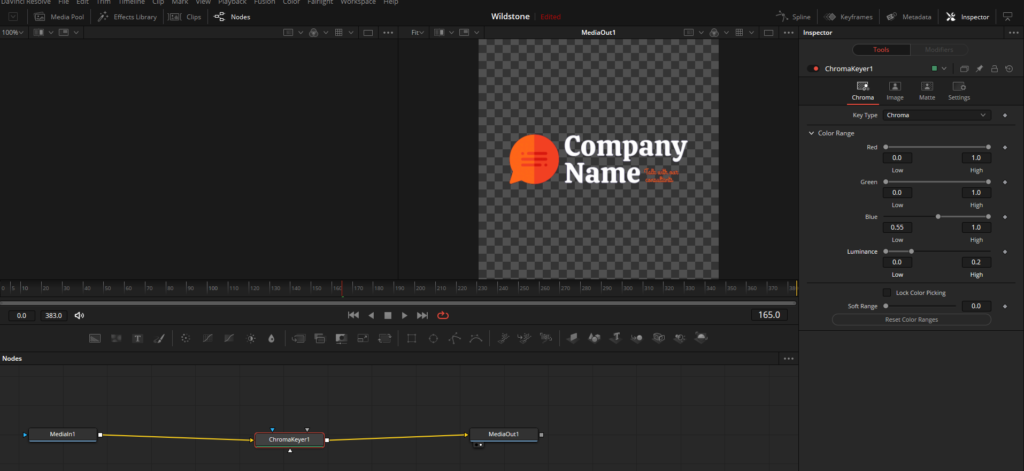
- Click on the video clip and navigate to the Fusion page.
- Ensure your MediaIn1 node is selected in the node editor.
- Press Shift + Space on your keyboard to open the Select Tool menu.
- Type “Keyer” and select the Chroma Keyer effect, then click Add.
- Connect the Chroma Keyer node between MediaIn1 and MediaOut1 nodes.
- In the Chroma Keyer node, expand the Color Range menu and adjust the Red, Green, Blue and Luminance sliders till you properly isolate the color you want to be transparent.
This method is the most consistent way to remove any color from your video to make it transparent in Davinci Resolve. To further refine the effect, you can also tweak and adjust the Gain, Lift, and Gamma sliders in the Color Correction section to improve the keying quality.
In most cases, using the Chroma Keyer in Fusion will provide the best results, making it the go-to method for removing specific colors and achieving transparency.
Exporting a Transparent Video in DaVinci Resolve
In this section, we will demonstrate three methods on how to export a transparent video in DaVinci Resolve. Before exporting a transporting video in Davinci Resolve make sure there is no bother video layer or a background layer on the timeline.
Method 1 – QuickTime H.265 (Not Recommended):
Although this method is available in the DaVinci Resolve Pro version, it is not recommended due to poor quality results. Here’s how to export using this method:
- Go to the Deliver tab and choose QuickTime in Format.
- Set the Codec to H.265.
- Check the Export Alpha option and change the file name
- Add it to the Render Queue and render it out.
Upon reviewing the exported video, you’ll notice that the transparency is present, but the video quality is significantly degraded. Avoid using this option.
Method 2 – DNxHR (Recommended):
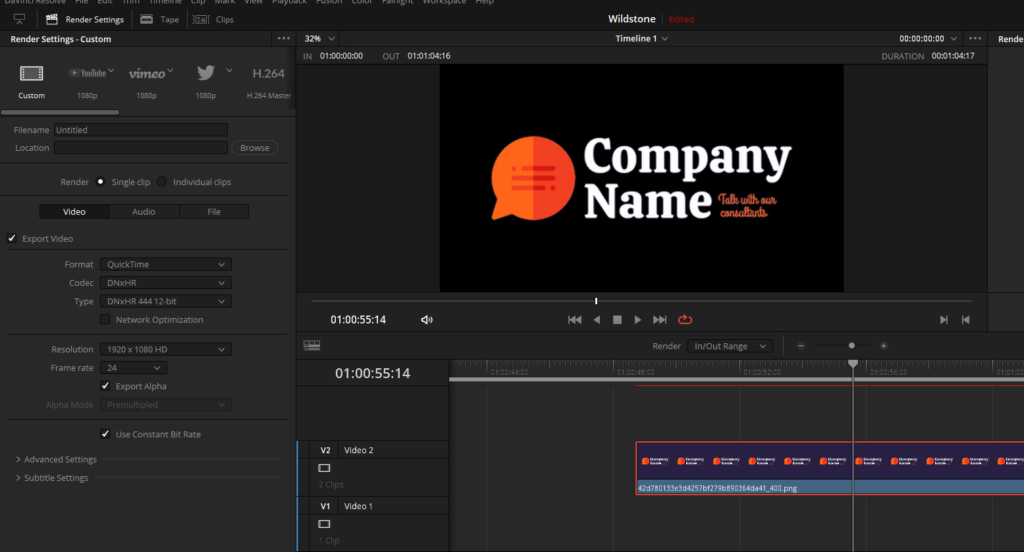
The DNxHR codec offers several options with the Export Alpha feature available. To export using this method:
- Choose DNxHR in Codec drop-down menu a
- Check the Export Alpha option and change the file name .
- Add it to the Render Queue and render it out.
When you review the exported video, you will find that the transparency has been preserved without compromising the video quality.
Method 3 – GoPro Cineform (Recommended):
Another codec that supports transparency is GoPro Cineform. To export using this method:
- Choose the GoPro Cineform codec and select RGB 16-bit in Type option.
- Check the Export Alpha option and change the file name.
- Add it to the Render Queue and render it out.
Upon reviewing the exported video, you will once again see that the transparency is preserved, and the video quality remains excellent.
To export transparent videos in DaVinci Resolve, it is crucial to choose the appropriate codec and enable the Export Alpha option. While QuickTime H.265 is not recommended due to poor quality results, both DNxHR and GoPro Cineform provide excellent transparency and video quality. By following these steps, you can successfully export transparent videos for use in your projects.
Which Format Is Best For Exporting Transparent Video From Davinci Resolve
For Mac users, another excellent codec option that supports transparency is the Apple ProRes codec. This codec also has an option for exporting alpha, which makes it a popular choice among Apple users. Here’s how to export a transparent video using Apple ProRes codec:
- Go to the Deliver tab and choose the QuickTime format.
- Set the Codec to Apple ProRes and select one of the available options (e.g., Apple ProRes 4444).
- Check the Export Alpha option and change the file name as needed.
- Add it to the Render Queue and render it out.
Selecting the Right Codec for Windows Users:
For Windows users, choosing between the GoPro Cineform and DNxHR codecs might be a bit challenging. However, the best choice will depend on your specific needs and preferences. For most users, GoPro Cineform is recommended due to its reasonable file sizes and excellent quality.
While DNxHR, particularly its higher quality variants, can produce nearly lossless or completely lossless results, the file sizes can be significantly larger. For most users, this level of quality is unnecessary and may lead to storage and processing difficulties.
Final Words
When exporting a video with a codec that doesn’t support transparency, such as H.264 (commonly used for MP4 files), you may end up with a black background instead of the desired transparency. To avoid this issue, ensure that you select a codec that supports transparency and enable the Export Alpha option.
However, even when following these steps, you may still encounter issues with playback or black backgrounds in your transparent videos. This is an unfortunate limitation with many software programs that struggle to handle transparency.