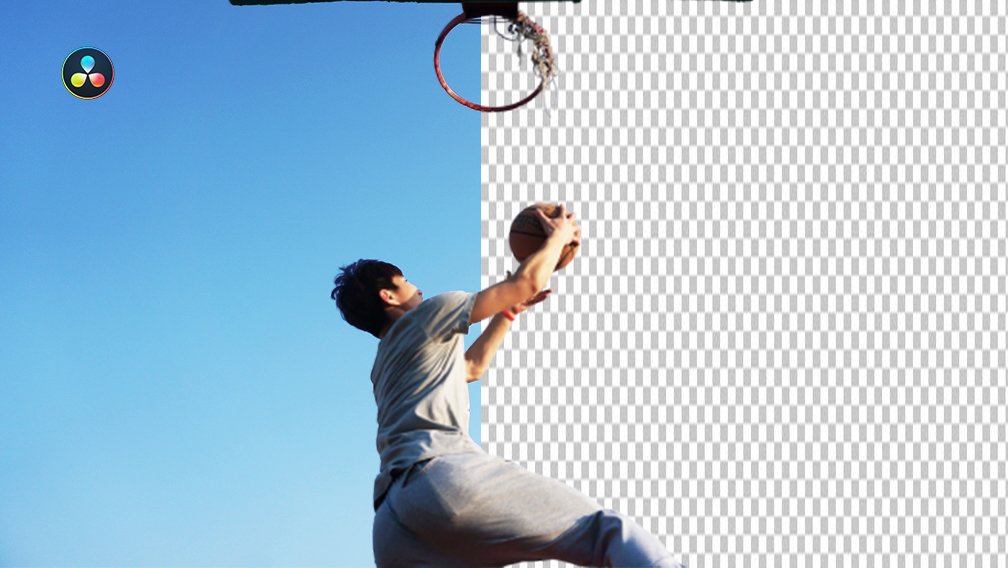
Are you looking to remove the background without the green screen in Davinci Resolve? Look no further than these 3 methods to remove backgrounds in Davinci Resolve. But before diving into the editing process, keep in mind some crucial tips for filming, such as using a tripod and ensuring similar lighting and camera angles when replacing a background with a photo or video.
Although these techniques may not provide the same level of quality as a green screen, they offer a range of creative possibilities, especially for adding CG objects behind your subject. With these tips and tricks, you’ll be able to create stunning videos with a touch of visual flair.
1. Remove Background Without Green Screen Using Contrast and Bitmap In Davinci Resolve
The contrast trick is a useful technique for placing text behind a subject in video editing projects. This method works best when the subject is distinctly contrasted against the background. Here’s how to effectively use the contrast trick in Fusion to add text behind your subject:
Step-by-Step Guide:
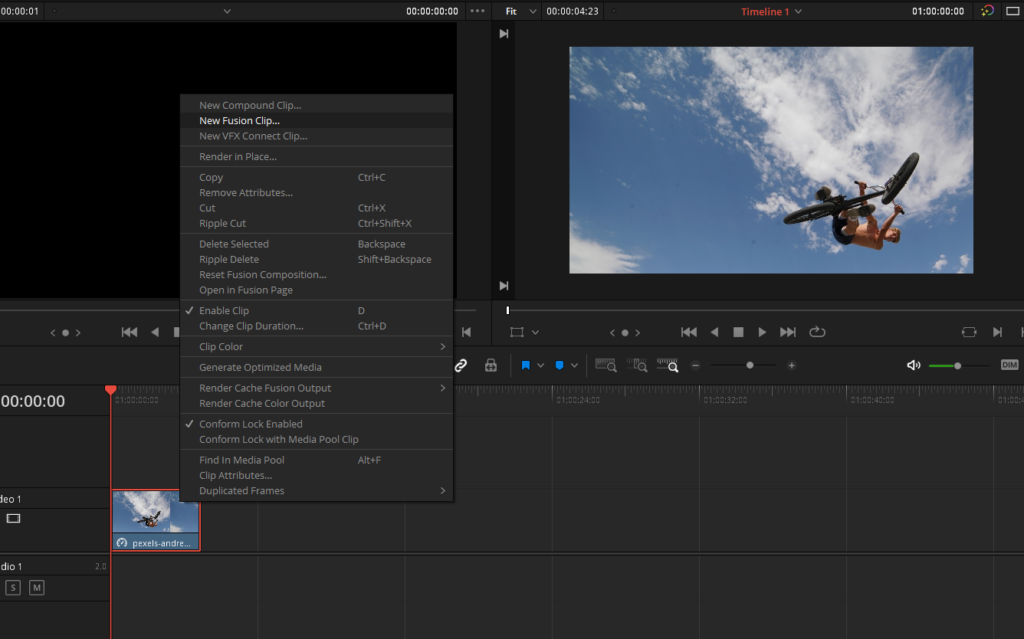
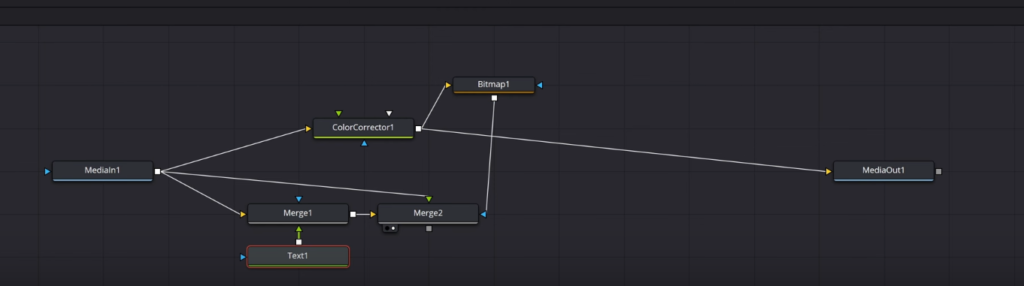
- Create a Fusion Clip: Right-click on your video clip and choose “New Fusion Clip.” This action will open the Fusion interface for further editing.
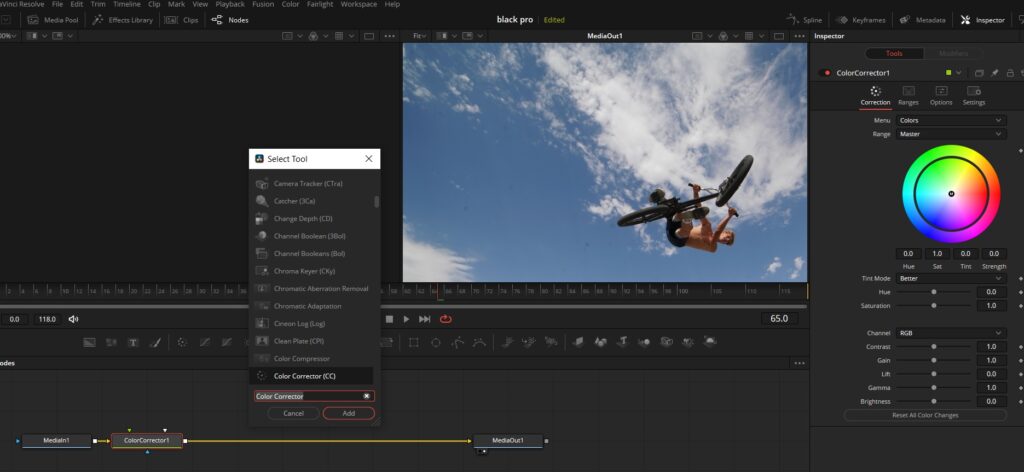
- Add a Color Corrector Node: Press Shift + Space in Fusion and insert a Color Corrector node. This node will help enhance the contrast between your subject and the background.
- Adjust Contrast and Gain Settings: Increase the contrast and tweak the gain settings in the Color Corrector node until the background appears completely white. You can also modify the lift and gamma settings to achieve the desired result.
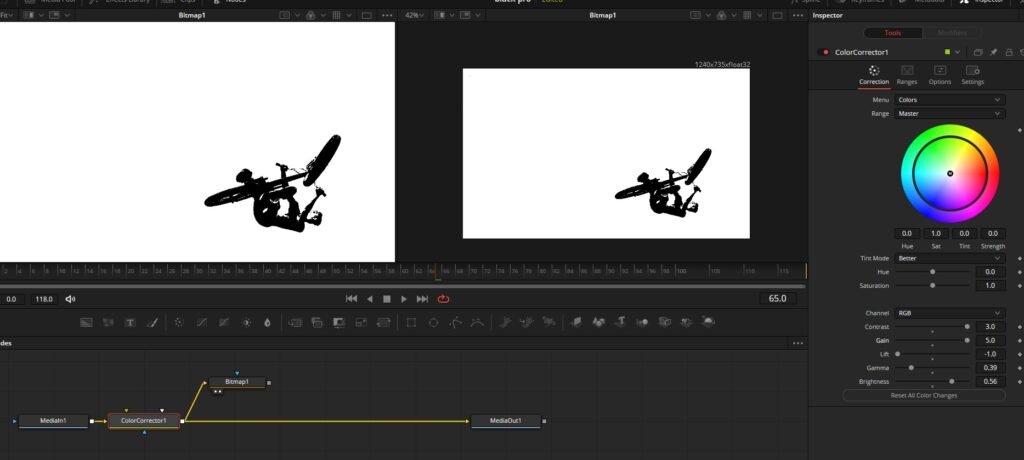
- Introduce a Bitmap Node: After the Color Corrector node, add a Bitmap node by pressing Shift + Space and searching Bitmap. Disconnect the default connection between the Bitmap and Color Corrector nodes, and link the output of the Color Corrector to the input of the Bitmap node.
- Modify the Bitmap Channel: By default, the Bitmap node will display an all-white image. Change the channel from “alpha” to “luminance” to reveal the subject and background contrast.
- Refine the Color Corrector Settings: Return to the Color Corrector node and adjust the settings until your subject is entirely black and the background is completely white.
- Merge Nodes: Add a Merge node and connect your media input to the background input. Then, insert another Merge node and link the output of the first Merge node to the background input of the second Merge node. Connect your media input to the foreground input of the second Merge node and use the Bitmap as a mask on this node. Viewing the second Merge node, the video will appear unchanged, but it is now prepared for the text addition.
- Add a Text Node: Insert a Text node and connect it to the foreground input of the first Merge node. Type your desired text, which will appear only where the subject is present.
- Invert the Bitmap: Since the text is currently visible over the subject instead of behind it, click on the Bitmap node and select “Invert.” The text will now appear behind the subject, creating the desired effect.
- Finalize the Effect: With the text positioned behind the subject, your contrast trick is complete. Preview your video to ensure the text placement and effect are executed seamlessly.

2. Remove Background Without Green Screen Using Luma Keyer In Davinci Resolve
The Luma Keyer node is a powerful tool in video editing that generates an Alpha channel based on the overall luminance of an image. While it is commonly used for creating mattes from luminance, its capabilities extend to various channels, making it an all-purpose channel keyer. We will use Luma Keyer to remove the background without a green screen by analyzing the luma contrast in the video.
Let’s dive deeper into the Luma Keyer node and its primary purpose in extracting Alpha channels.
The Luma Keyer is another valuable technique for isolating a subject with a high-contrast background in video editing projects. Similar to the contrast trick, Luma Keyer is best suited for situations where there is significant contrast between the subject and the background. Let’s explore how to use the Luma Keyer effectively in your video compositions:


Step-by-Step Guide:
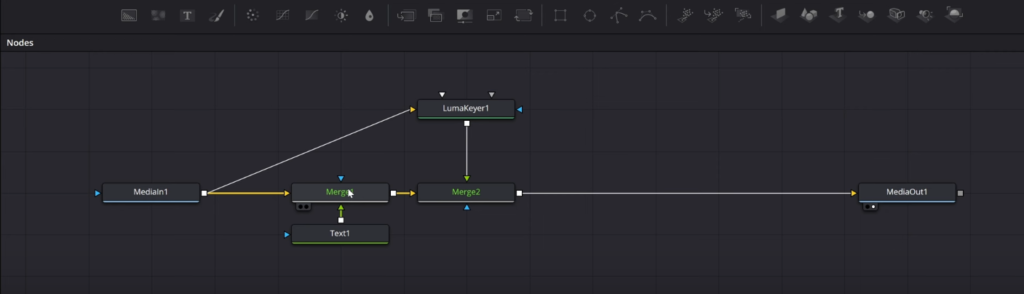
- Prepare Your Composition: Begin with the same composition you used for the contrast trick or any other composition that features a high contrast between the subject and the background.
- Add the Luma Keyer: Insert a Luma Keyer node into your composition by pressing Shift + Space and searching Luma Keyer. This node will help isolate either the subject or the background based on the luminance values present in the image.
- Isolate the Subject: Adjust the Luma Keyer settings to isolate the subject within the composition. You can fine-tune the effect by playing with the blur, contract, expand, and gamma controls.
- Create the Merge Setup: Establish a similar merge setup as in the contrast trick method. This setup will enable you to place text or other elements behind the subject.
- Invert the Luma Keyer Node: Click on the Luma Keyer node and select “Invert.” This step will ensure that only the subject is visible within the composition.
- Connect the Luma Keyer to the Merge Node: Link the Luma Keyer output to the foreground input of the Merge node. This connection will prepare your composition for adding text or other elements behind the subject.
- Insert Text: Add a Text node to your composition and connect it to the appropriate Merge node. As you type, the text will appear behind the subject, creating the desired effect.
- Review and Refine: Preview your composition to ensure that the Luma Keyer has successfully isolated the subject and that the text appears correctly behind it. Make any necessary adjustments to perfect the final result.
3. Remove Background Without Green Screen Using Difference Keyer In Davinci Resolve
Difference Keyer technique in DaVinci Resolve can remove the background without green screen if you have a clean place too. This technique enables you to blend multiple layers for a smooth, professional finish.
A difference keyer is a technique that generates a matte by comparing the differences between two input images. This method is particularly useful for isolating a subject from the background, making it an essential tool for video editors. Let’s take a closer look at how difference keying works and its applications in video editing:

The Process of Difference Keying:
- Two Input Images: Difference keying requires two input images – one featuring the subject against the background, and another displaying only the background without the subject.
- Comparing Differences: The technique analyzes the differences between the two images to create a matte. While this approach may seem straightforward, it can be challenging to achieve clean results due to subtle variations in camera position or lighting between the two shots.
- Creating a Rough Matte: In some cases, such as trying to key smoke against a brick wall, the Difference Keyer may produce an imperfect matte, leaving some elements of the background visible. However, this rough matte can still be useful when combined with other tools to create a more refined matte.
Follow these detailed steps to achieve impressive results:
- Stabilize your shot: The key to a successful Difference Keyer effect lies in shooting with a tripod. This ensures maximum stability and eliminates any potential movement that could disrupt the final result. Stable shots help maintain the accuracy of the Difference Keyer effect, allowing for better blending of the layers.
- Ensure proper lighting: Proper lighting plays a critical role in achieving a clean key. A well-lit shot will minimize the presence of grain and noise in the background, reducing any potential interference with the Difference Keyer effect. Invest time in setting up appropriate lighting for your scene to ensure the best possible outcome.
- Capture a clean plate: After shooting your main footage, record a clean plate—a version of the shot without any subjects. This clean plate serves as a reference point for the Difference Keyer effect. If the shot has minimal noise, a freeze frame of the background will suffice as a clean plate.
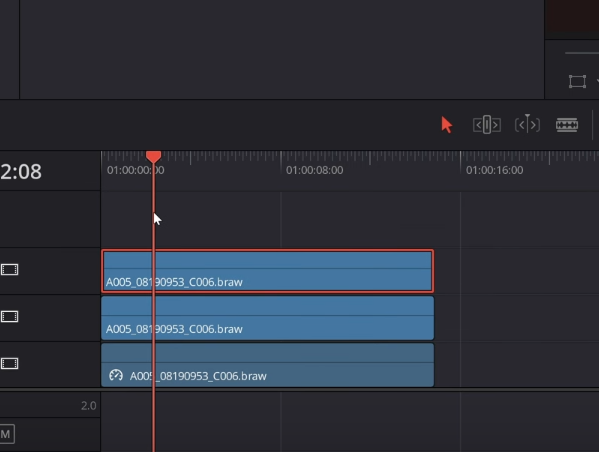
- Organize your shots in DaVinci Resolve: Import your footage into DaVinci Resolve and arrange the layers in the correct order. Place the clean plate at the bottom, followed by the background subject layer, and finally, the main subject layer on top
- Create a Fusion Clip: With the layers in place, select all of them, right-click, and choose “New Fusion Clip.” This action will combine the layers into a single Fusion Clip. Next, navigate to the Fusion tab in DaVinci Resolve to organize and adjust the nodes accordingly. Properly naming the nodes, such as Clean Plate, Background Subject, and Foreground Subject, will help keep your workspace organized and make the editing process more efficient.
- Incorporate the Difference Keyer node: To add the Difference Keyer node, press Shift + Space and search for the node. Once added, connect your clean plate to the background input of the node and the foreground subject to the foreground input. Fine-tune the key’s intensity by adjusting the high and low settings in the Difference Keyer node.
- Refine the key for optimal results: Upon achieving a satisfactory key, you can further enhance the effect by experimenting with the blur, contract, expand, and gamma controls. These adjustments help to fine-tune the edges and blending of the layers, ensuring a more polished final result.
- Optimize the foreground subject visibility: Continue to adjust the Difference Keyer settings until only the foreground subject is visible without any background interference. This step is crucial for creating a seamless blend between the layers and maintaining a professional look.
- Integrate the background subject: To merge the layers, connect the Difference Keyer output to the merge node. When viewing the media output, the background subject should now appear behind the foreground subject, creating the desired visual effect.
- Preview and finalize your sequence: Play the edited sequence to check for a clean, professional-looking key. Keep an eye out for any imperfections or inconsistencies, and make any necessary adjustments to perfect the final result. Ensure that the layers blend seamlessly and that the keying looks natural.
- Following these detailed steps will help you effectively utilize the Difference Keyer technique in DaVinci Resolve to create impressive visual effects for your video projects. As you become more comfortable with the process, you’ll be able to achieve professional-quality results in a short amount of time. This skill will elevate the impact of your creative work and set your projects apart from the competition.
Also Read: How To Remove Green Screen In DaVinci Resolve (3 Methods)
Also Read: Is DaVinci Resolve Safe to Download?
Also Read: How To Create Pro-Mist Filter Effect Davinci Resolve