
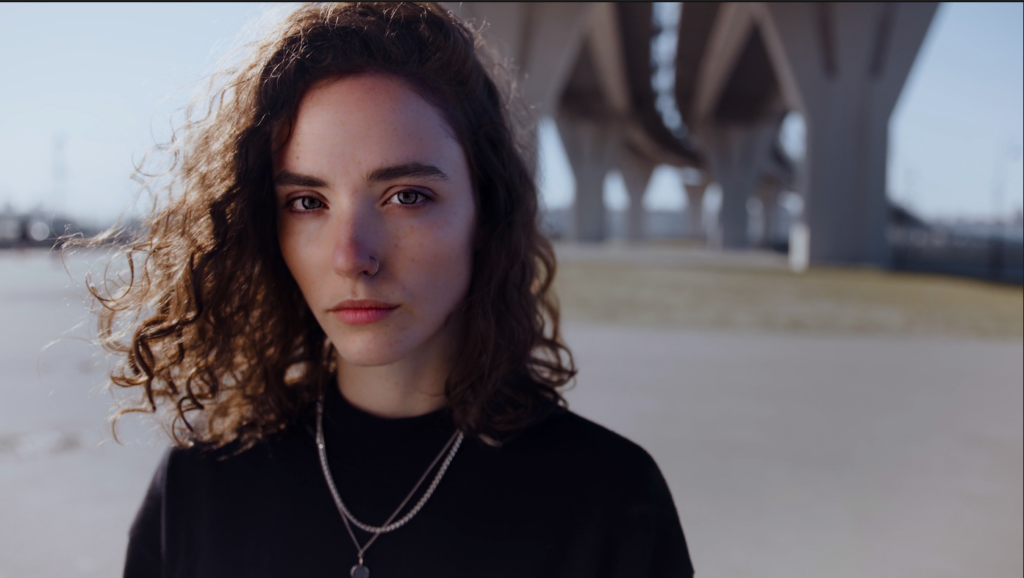
Welcome back to Filmmakingelements.com! Today, we’ll explore the Face Refinement Tool in DaVinci Resolve, a powerful plugin that will revolutionize your color grading process. Perfect for projects with faces at the forefront, this tool offers numerous features to accentuate specific facial and skin details, adding depth and character to your videos.
Please note that the Face Refinement Tool is exclusively available in the Studio version of DaVinci Resolve. However, we encourage users of the free version to follow along and consider upgrading in the future.
What makes the Face Refinement Tool so special?
The Face Refinement Tool is one of our top picks for color grading. It offers a range of options to focus on and enhance specific facial features, helping you bring out the best in your subjects. By using this plugin, you can truly elevate your videos and create a stunning visual experience for your viewers.
Using the Face Refinement Tool in Davinci Resolve
When working with the Face Refinement Tool, it’s essential to find the right spot for it in the node tree. Typically, it should be placed after motion blur and noise reduction, allowing you to apply your grade on top.
However, you may want to experiment with the Face Refinement Tool in conjunction with your color grade, making adjustments as needed to achieve the desired look.
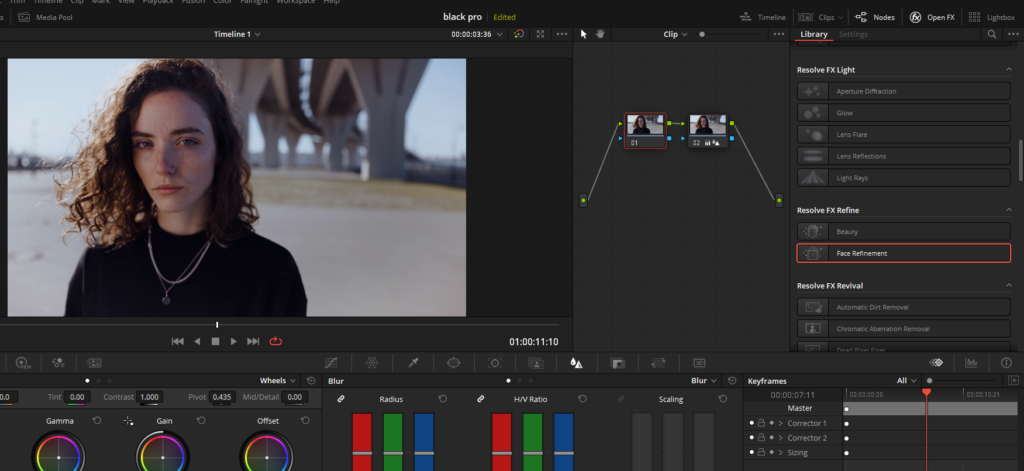
Adding the Face Refinement Tool
- Create a new serial node by holding down Alt (or Option on Mac) and pressing ‘S’.
- Navigate to the Open FX tab on the top right corner on the color page and scroll down to ‘Resolve FX Refine’.
- With the desired node selected, click and drag the Face Refinement Tool onto it.
Keep in mind that the Face Refinement Tool performs best when the subject’s face is clearly visible in a high-resolution, good-quality video clip. This ensures that the face tracker works efficiently and yields the best results.
Analyze And Mask In Face Refinement OFX In Davinici Resolve
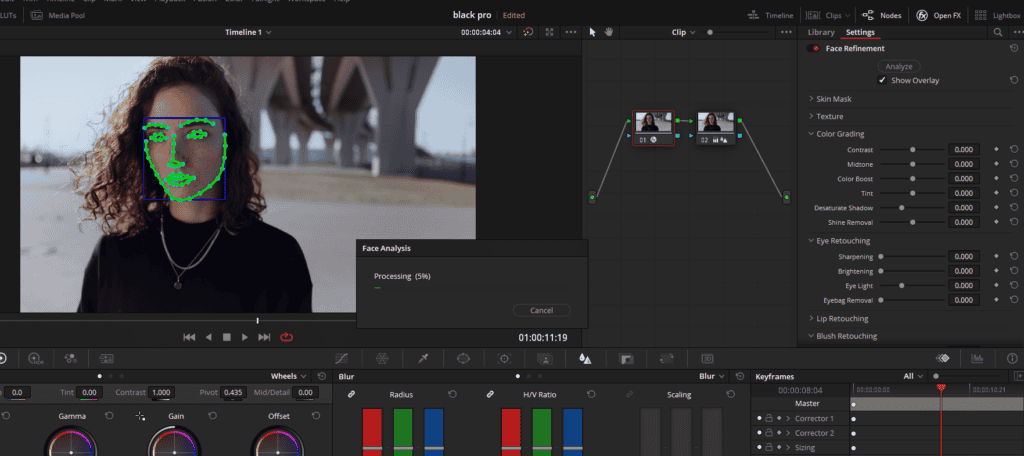
- Analyzing the subject’s face: Locate the ‘Analyze’ button on the right side of the interface and click on it. This action analyzes the subject’s face throughout the entire clip.
- Visualizing the tracking process: To ensure accurate tracking, enable the ‘Show Overlay’ option, which allows you to visualize the tracking process.
- Working with the skin mask: Once the face analysis is complete, you can proceed to the ‘Skin Mask’ tab. This feature allows you to view and adjust the facial tracker’s results.
- Observing the accuracy of the facial tracker: As the clip plays, observe the accuracy of the facial tracker. In most cases, it should produce a satisfactory result. However, if needed, you can make adjustments using the available parameters.
- Adjusting the face mask settings: Fine-tune the “face mask size” to ensure the subject’s features are adequately covered. For instance, verify that the chin is included in the shot.
- Modifying the face mask softness: Adjust the “face mask softness” to create a subtle fade effect, which can be further enhanced by increasing the face mask size.
- Refining the mask with the ‘Refine Mask’ option: This setting functions similarly to a blur effect. Reducing the value can result in artifacts while increasing it softens the edges for a more polished look. Aim to maintain a balanced setting around the midpoint.
Exploring the Texture Tab

- Disabling ‘Show Mask’: Before proceeding, turn off the ‘Show Mask’ option to focus on the texture adjustments.
- Understanding the Texture options: The Texture tab allows you to smooth out the subject’s skin. By increasing the value, the skin will appear smoother.
- Choosing the right operating mode: There are three available options:
- Beauty automatic: This mode offers a simple and effective way to smooth out the skin without delving into more complex settings.
- Smoothing: For more control over the level of detail and smoothing, this advanced mode grants access to additional parameters.
- Beauty advanced: Although not commonly used due to its extensive parameters, this mode offers even greater control over skin texture adjustments.
- Adjusting the texture: Experiment with the texture settings to achieve the desired level of smoothness. Be mindful not to overdo it, as excessively high values can make the subject appear unnatural. Conversely, reducing the values too much can accentuate imperfections and aging effects. Aim for a subtle enhancement that retains the subject’s natural features.
Mastering The Color Grading Tab In The Face Refinement Tool
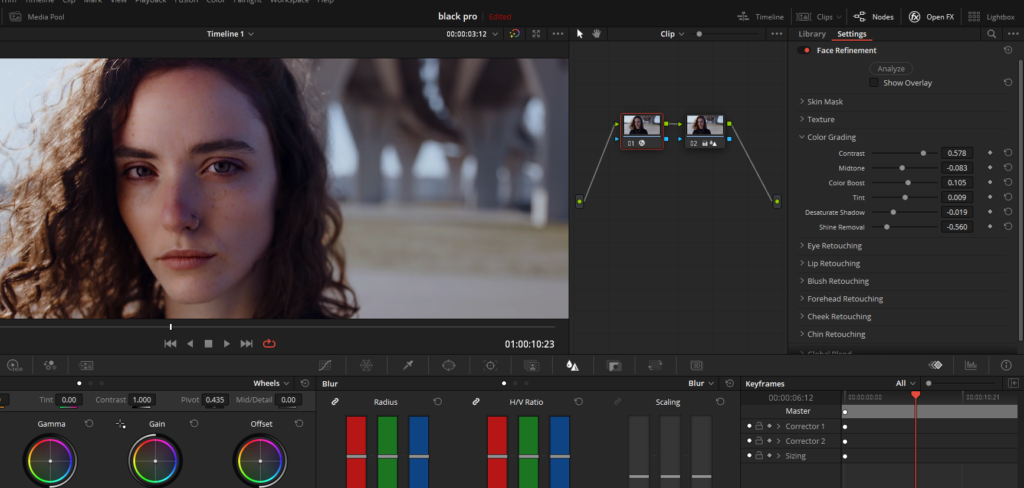
This section delves into the ‘Color Grading’ tab, a crucial component of the Face Refinement Tool. Learn how to make subtle adjustments to various facial elements, striking the right balance between color, exposure, and other attributes.
- Contrast: Add brightness to the face while keeping shadows darker. Make small adjustments, as the tools are potent. Use the slider or click on the number for more precise increments.
- Mid-tone: Push luminance into the skin tones, particularly in the mid-tone range (Gamma). Adjust the values carefully to balance the exposure and luminance of the face and neck.
- Color Boost: Similar to saturation, Color Boost adds color to less saturated areas. Use it sparingly to avoid unnatural-looking results, particularly in shadows.
- Tint: This setting is rarely used unless there’s a specific need to alter the subject’s skin tone. Refrain from drastic changes, as they can create an unrealistic appearance.
- Desaturate Shadow: Use this setting to counteract any color boost, particularly in the shadows. A subtle touch of desaturation can help maintain a natural look.
- Shine Removal: This feature helps manage shine and sweat on the subject’s face. Increase the value to reduce shine and flatten the appearance, or decrease it for a more dynamic and contrasty look. Adjust according to the lighting conditions and the subject’s facial features.
Fine-tuning Eye Retouching Adjustments

- Sharpening: To draw attention to the subject’s eyes, add a touch of sharpening. Be cautious not to overdo it, as excessive sharpening can create an unnatural look. Even a minor adjustment, like 0.02, can effectively enhance the eyes and eyelashes.
- Brightening: This setting adjusts the brightness and whiteness of the subject’s eyes. Avoid extreme values that can make the subject appear ghostly or unnaturally enhanced. Instead, apply a moderate amount of brightening to make the eyes appear more vivid.
- Eye Light: Concentrating on the area around the eyes, the eye light setting adjusts the illumination. Subtle changes can draw more attention to the subject’s eyes without making them overly bright or dark.
- Eye Bag Removal: This feature is particularly useful for subjects with tired eyes or prominent shadows underneath them. Adjust the setting to reduce the appearance of eye bags without erasing them entirely, as this would result in an unrealistic appearance. A moderate value, like 0.1, can help smooth out the area under the eyes.
Fine-tuning Lip Retouching Adjustments
In this section, we will discuss how to use DaVinci Resolve’s Face Refinement Tool to retouch and adjust the subject’s lips for a more polished and visually appealing result. This versatile tool enables you to add color, smooth the upper lip, and even adjust the hue to convey different emotions or conditions.

- Lip Retouching: With the lip retouching feature, you can add a subtle pop of color to the subject’s lips. It’s essential to maintain a natural appearance by avoiding overly saturated or unrealistic colors. By making slight adjustments to the saturation slider, you can enhance the subject’s lips without overpowering the overall look.
- Upper Lip Smooth: This setting allows you to soften the appearance of the subject’s upper lip, which can be especially useful for smoothing out wrinkles, mustaches, or other imperfections. Depending on the subject’s facial features, you may need to make minor or more significant adjustments. The goal is to achieve a natural-looking smoothness without making the subject appear too retouched.
- Saturation Slider: The saturation slider controls the intensity of color in the subject’s lips. Cranking it up all the way can result in an unnatural look, so it’s best to use this slider with caution. A moderate increase in saturation can help to bring out the natural color of the lips, making them appear more vibrant and healthy.
- Hue Adjustment: With the hue adjustment feature, you can change the color of the subject’s lips to convey different emotions or conditions. For example, if the subject is supposed to be cold, you can make their lips appear slightly blue. Alternatively, if the subject is sick, you can give their lips a paler hue. This feature provides an opportunity for creative post-production effects, allowing you to enhance the narrative of your video without relying on makeup or on-set adjustments.
Don’t forget to read- How To Smooth Skin In Davinci Resolve (Full Guide!)
Enhancing Facial Features With Davinci Resolve’s Face Refinement Tool
In this section, we’ll explore more advanced features of DaVinci Resolve’s Face Refinement Tool, allowing you to further customize the look of your subject’s facial features, including blush, forehead, cheek, and chin retouching.
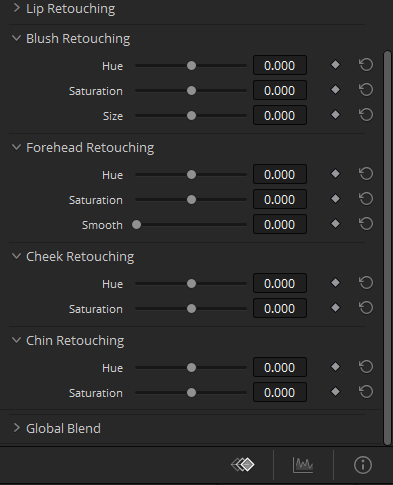
Blush Retouching
- To adjust the blush on your subject’s cheeks, first increase the saturation to see the area where adjustments will be made. The facial tracker should accurately track the subject’s cheeks.
- Adjust the hue slider to change the color of the blush. Leaving the saturation slider at zero and only changing the hue will introduce a subtle hint of color without making the effect look unnatural.
- Once you’ve found the desired hue, you can decrease the saturation if needed.
Forehead Retouching
- With the forehead retouching tab, you can add color to the subject’s forehead and smooth out any wrinkles or imperfections.
- Adjust the smooth slider to achieve the desired level of smoothness. Be careful not to over-smooth the skin, as this can make it appear unnatural.
Cheek Retouching
- The cheek retouching tab allows you to add color and highlights to the entire cheek area. This can be useful for creating a more defined and sculpted look.
- However, use this feature sparingly and only when necessary, as it can sometimes appear unnatural.
Chin Retouching
- The chin retouching tab allows you to add color to the subject’s chin. However, be cautious with this feature, as the facial tracking may not always be accurate.
- In most cases, it’s best to stick with the basic features and make minor adjustments for the best results.
Working with Multiple Faces in DaVinci Resolve’s Face Refinement Tool
When you have multiple people in your shot. By following these simple steps, you can easily apply the face refinement effect to each person in the frame.

Applying Face Refinement to Multiple Faces
- Start with your basic corrections and add a node at the beginning of your node tree.
- Drag the Face Refinement Tool onto the node and click “Analyze.” DaVinci Resolve will automatically detect the faces in the shot.
- To select a person’s face for refinement, click on the blue box surrounding their face. The selected face will be highlighted in blue, indicating that you can apply the face refinement effect to that individual.
- To refine another person’s face, add another node to your node tree and drag the Face Refinement Tool onto it.
- Click “Analyze” again, and this time select the other person’s face. Then click “Analyze” once more to apply the face refinement effect to the second individual.