Sound editing is a critical aspect of producing high-quality videos, especially when filming in locations with room echo or minimal sound treatment. As video creators, we often find ourselves filming in less-than-ideal environments, such as a makeshift home studio or a room with hard surfaces that cause sound to reverberate. In this article, we’ll explore how to remove room echo from your videos using DaVinci Resolve’s powerful audio editing tools. By improving the audio quality of your videos, you’ll elevate the overall viewing experience for your audience.
I. Understanding Room Echo
A. Definition and causes of room echo
Room echo is the result of sound waves bouncing off hard surfaces and reverberating back into the microphone, causing a hollow or distant sound. This phenomenon occurs when sound waves reflect off walls, floors, ceilings, and other objects in the room, creating multiple, delayed sound reflections that reach the listener’s ear. These reflections can interfere with the original, direct sound, making it difficult for the listener to hear and understand dialogue.
B. Impact on audio quality
The presence of room echo can significantly impact the audio quality of your videos. The hollow, distant sound created by room echo can detract from the overall video quality and lower viewer satisfaction and engagement. By addressing room echo in your videos, you enhance audio clarity and quality, creating a more professional-sounding video that retains viewer interest and increases watch time.
C. Importance of addressing room echo
Removing room echo is essential for improving the audio quality of your videos. By addressing this issue, you can create clearer, more polished audio that complements your video content and keeps your audience engaged. Additionally, high-quality audio helps your videos stand out in a crowded marketplace and can contribute to the overall success of your online presence.
II. Setting up the workspace in DaVinci Resolve
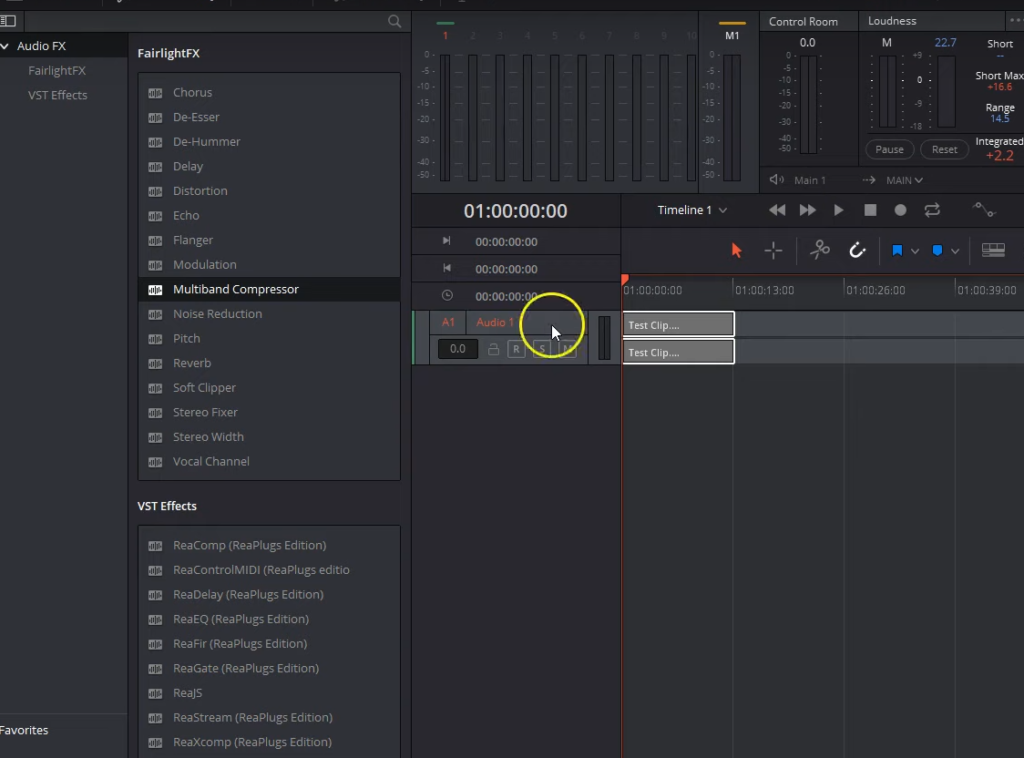
A. Navigating to the Fairlight Audio tab
To begin addressing room echo in your videos, open DaVinci Resolve and navigate to the Fairlight Audio tab. This tab provides access to a range of audio editing tools and features designed to help you achieve professional-sounding audio. Familiarize yourself with the Fairlight interface to ensure you can efficiently utilize its features and tools.
B. Preparing the test clip
Import the video clip you’d like to edit into the timeline within the Fairlight Audio tab. Identify the sections of the clip with noticeable room echo, as these will be your primary focus during the editing process.
III. Identifying room echo
A. Listening for room echo in the test clip
To effectively address room echo, it’s essential to recognize its characteristics and determine the severity of the issue. Play the test clip and listen carefully for any instances of room echo. These will typically manifest as hollow or distant-sounding audio that may be difficult to hear and understand.
B. Considering factors that contribute to room echo
Several factors can contribute to the presence of room echo in your videos, including the filming location and environment, microphone type and placement, and the absence of sound treatment or insulation. By identifying these factors, you can take steps to mitigate their impact on your audio quality and reduce room echo.
C. Assessing the need for equalization
Analyze the audio quality of the test clip to determine whether equalization is necessary to remove room echo. Listen for problematic frequencies that may be contributing to the issue and make a note of them for future reference.
IV. Using equalization tools in DaVinci Resolve to remove echo
A. Overview of equalization methods
DaVinci Resolve offers several methods for equalizing audio, each with its own advantages and disadvantages. These methods include equalizing the entire track as a whole, equalizing individual clips within the track, and applying the vocal channel effect to any clip or track. Understanding these methods will help you select the most appropriate approach for your specific needs.
B. Choosing the appropriate equalization method for the task
Compare the advantages and disadvantages of each equalization method to determine the best approach for your specific project. Factors to consider include the severity of the room echo issue, the complexity of the audio track, and your desired level of control over the equalization process. Follow the steps below to understand it better.
V. Editing the audio track

A. Converting the audio track to mono
Before you begin equalizing, convert the audio track to mono by right-clicking on the track and selecting “Change Track Type to Mono.” This step focuses and simplifies the audio signal, making it easier to identify and remove room echo.
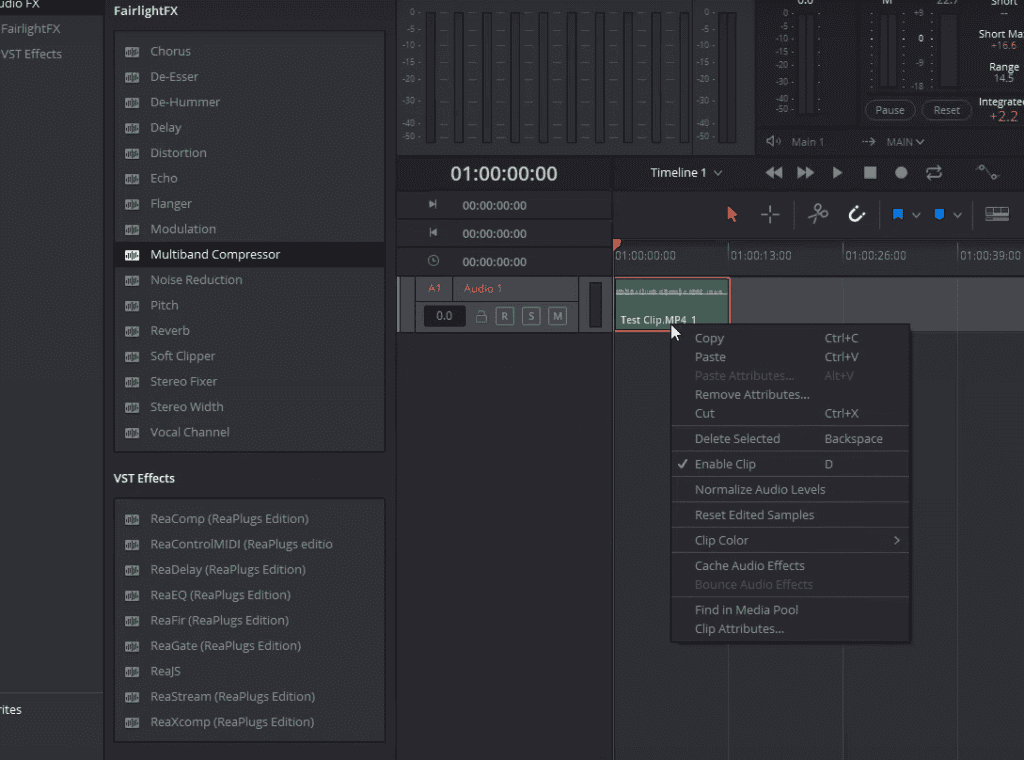
B. Normalizing audio levels
Normalize the audio levels of your clip to ensure all frequencies are clearly audible. This process increases the volume of the clip without causing clipping or distortion, allowing you to hear and address problematic frequencies more effectively. To normalize audio levels in DaVinci Resolve, right-click on the clip, select “Normalize Audio Levels,” and choose the appropriate setting (e.g., -3 dB).
VI. Utilizing the equalizer
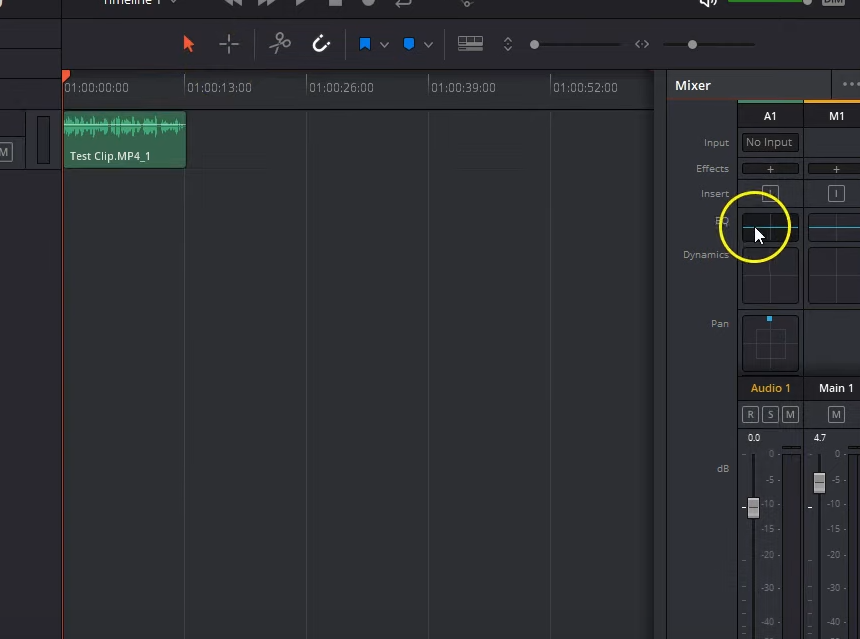
A. Accessing the equalizer in DaVinci Resolve
To access the equalizer in DaVinci Resolve, locate the EQ button within the mixer panel on the right side and double-click it to open the equalizer interface. Familiarize yourself with the various controls and settings available within the equalizer to ensure you can effectively adjust the audio frequencies.
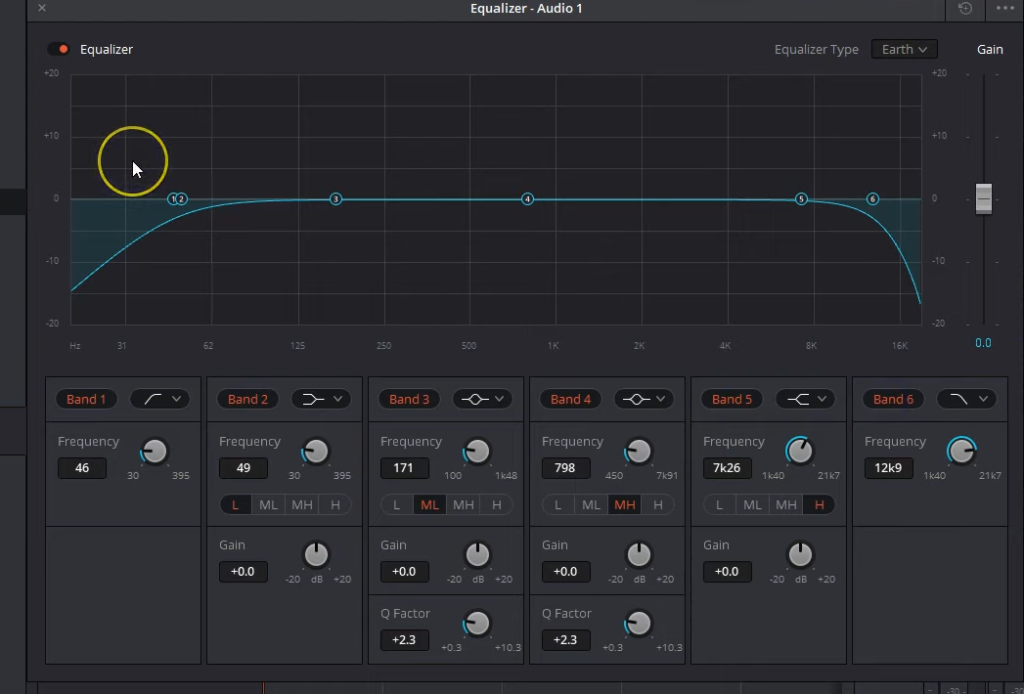
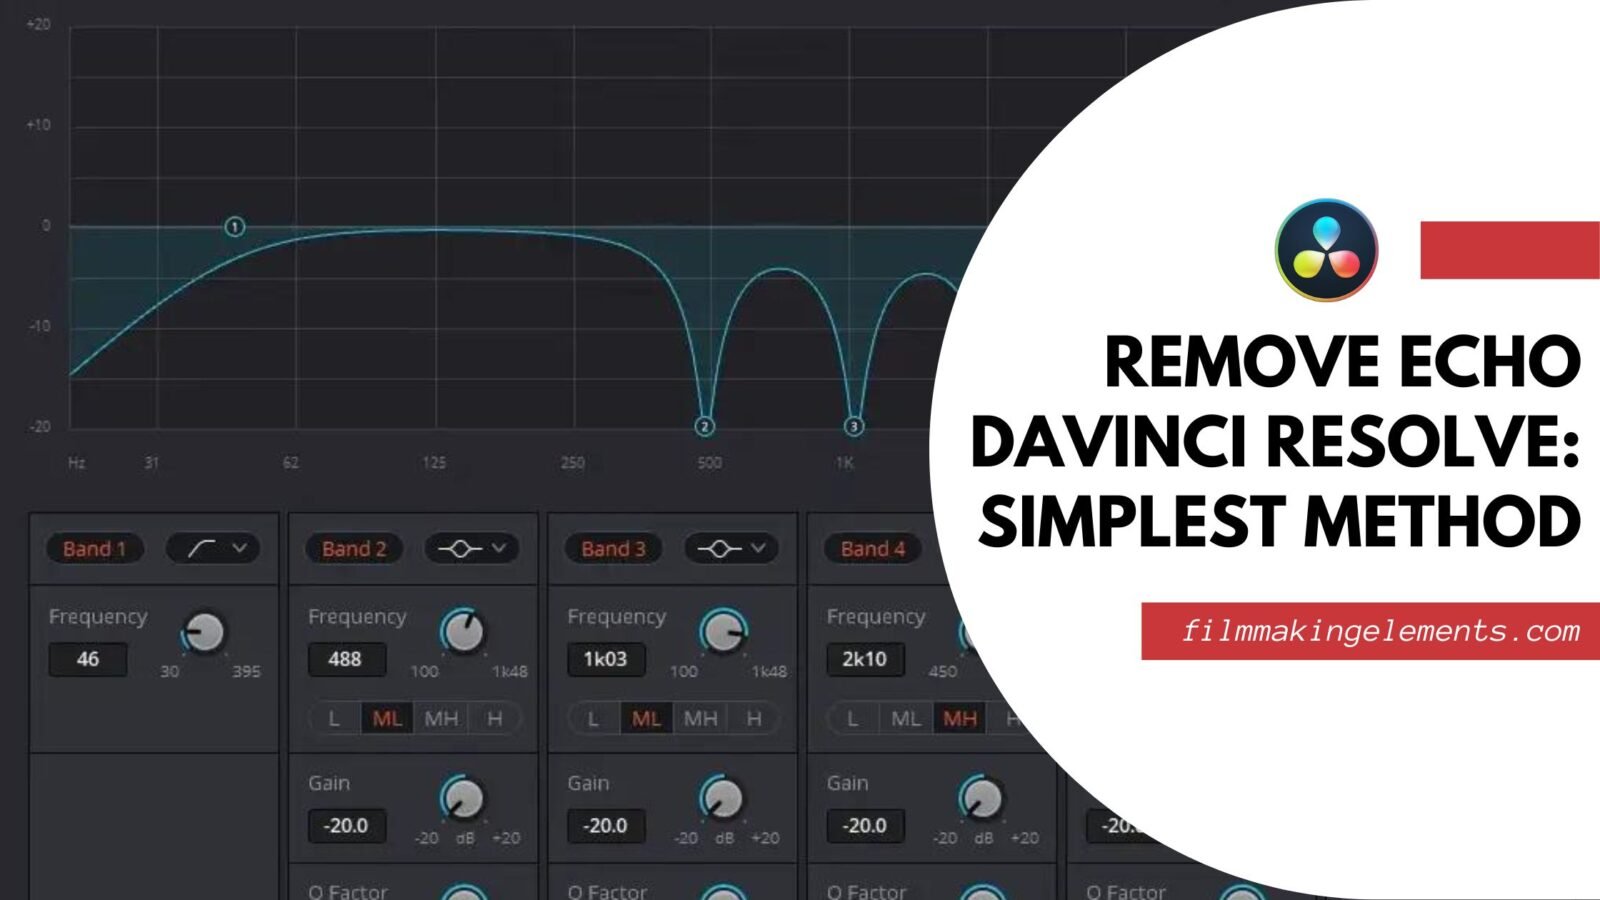
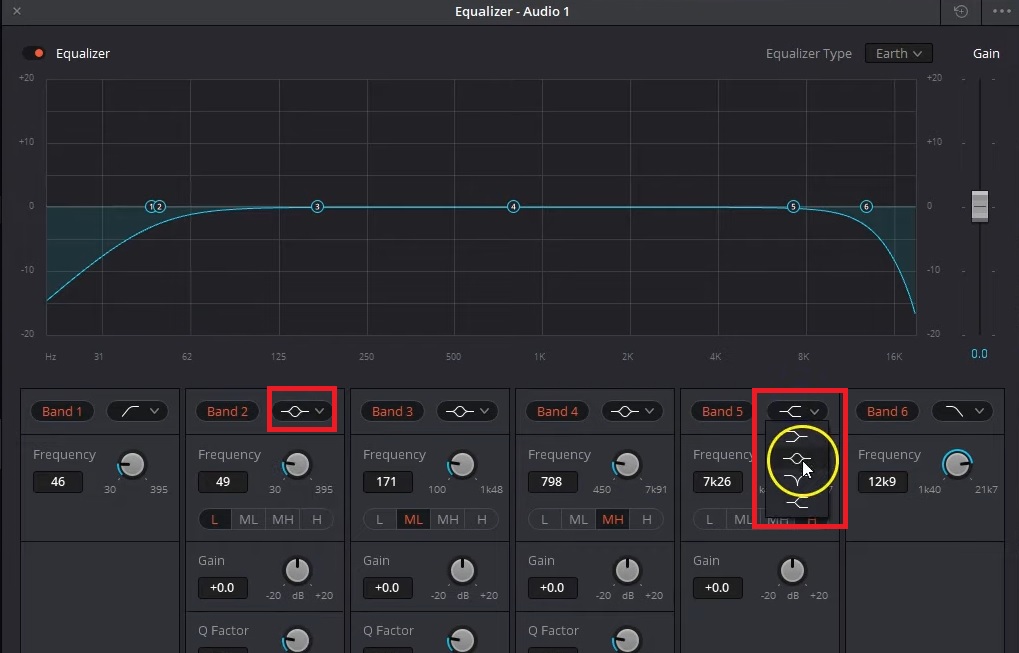
B. Activating and adjusting bands for the equalizer
Begin by clicking and activating the high-pass and low-pass filters in the equalizer (bands 1 and 6) to focus on the frequencies responsible for room echo. Next, adjust the filter types of bands 2 and 5 to a Q pattern by going into the drop-down menu on the side of it and selecting the one which has a circle in between. Raise the Q factor for bands 2,3,4 and 5 as high as possible for more precise frequency targeting.
C. Using the Q pattern and Q factor
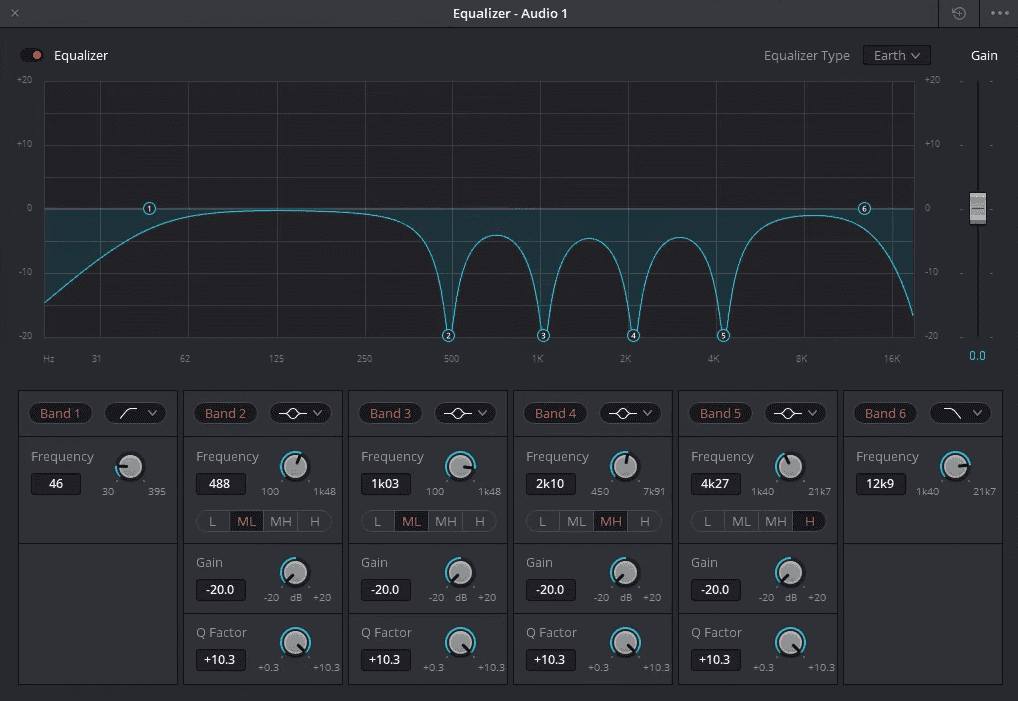
With the Q pattern and Q factor adjustments in place, raise the gain on each band in the equalizer one by one to catch the frequencies causing the most unpleasant sounds. Start with the higher-pitched sounds (band 5) and work your way down to the lower frequencies (band 2). Also, drag and hold the number written in the blue circle and move it around by clicking and dragging it while your audio is playing to listen and recognize the echo. As you raise the gain, listen to the test clip for any unpleasant noises or distortions.
D. Reducing unwanted frequencies
Once you’ve identified the problematic frequencies, turn the gain down for each band to -20db at the specific frequency. For example, when you raise the gain on band 5 to +20db and you listen to a lot of room echo, turn the Gain down to -20db. This process will help to eliminate room echo and create a cleaner, more professional-sounding audio track.
VII. Fine-tuning the edited audio
After reducing the unwanted frequencies, play the test clip to assess the improvements in audio quality. If necessary, further adjust the equalizer settings to fine-tune the audio and achieve the desired result. This iterative process may require some trial and error, but it will ultimately lead to a significant reduction in room echo and a more polished final product.
VIII. Additional audio editing tips
A. Using the right microphone
Ensure you’re using the most suitable microphone for your filming situation to minimize room echo. Different microphones have varying pickup patterns and sensitivities, which can affect the amount of room echo they capture.
B. Optimal microphone placement
Position your microphone as close to the sound source as possible while maintaining appropriate framing for your video. This technique can help reduce the amount of room echo captured by the microphone.
C. Sound treatment and insulation
If possible, implement sound treatment and insulation solutions in your filming environment to minimize room echo. This might include adding acoustic foam panels, bass traps, or even hanging thick blankets on walls to absorb sound and reduce reflections.
We hope you found this tutorial on Removing Echo in Davinci Resolve helpful. Thank you for reading, and we hope you’ll continue to explore the many creative possibilities DaVinci Resolve has to offer. Happy editing!