Hi, I’m Salik, the author of FilmmakingElements.com. I have been a filmmaker for over 10 years. I am also a certified DaVinci Resolve Trainer and I have used DaVinci Resolve for many of my projects. How to Use Dual Screens in DaVinci Resolve? This question must have popped into your head while using DaVinci Resolve. Today are going to discuss all about dual-screen workflows and single-screen workflows. I’m going to tell you how to optimize your DaVinci resolve for laptop workflows, dual-screen workflows, and maybe even triple screens. So, without further ado, let’s get started.
Single Screen Workflow in DaVinci Resolve
Before discussing how to use Dual Screens in DaVinci Resolve, we’re going to start with single-screen workflows or laptop workflows. Maybe you’re on a laptop now; first things first, you’re going to notice that the workspace doesn’t look like we’ve got a lot of space. It seems pretty cramped and claustrophobic, as shown in the screenshot. I will show you how to optimize your device resolve for single-screen workflows or laptop workflows.
Optimizing Editing Space in DaVinci Resolve

Right now, you can see that our timeline is pretty tiny. We don’t have room to work. I will show you precisely what you can do to fix it and optimize your editing space in DaVinci Resolve.
- On both sides at top corners, you can see something like a little phone with a tripod or a TV with a stand, depending on how you want to look at it. It is shown in the screenshot below.
- If you click on these, you will see that our timeline has expanded. It shrunk it down to the size shown in the screenshot.

We’ve gone from this being extraordinarily claustrophobic and difficult to navigate through, to this which is a way better workflow.

- Also Read- How To Put GIFs in Davinci Resolve
- Also Read- Video Vs Full Data Levels In Davinci Resolve
- Also Read- Move Premiere Pro Timeline to Davinci Resolve
Optimizing Timeline in DaVinci Resolve
If you’re working on a laptop or a single screen, you might want to optimize and change the size of your clips. Say, for example, I could zoom in, but I don’t want my clips to be huge. All my clips might be tiny.

- To affect how your timeline is viewed, you can navigate to the timeline view option on the left side of your timeline, as shown in the above screenshot. Here you have your video track height. You can adjust the size of it.
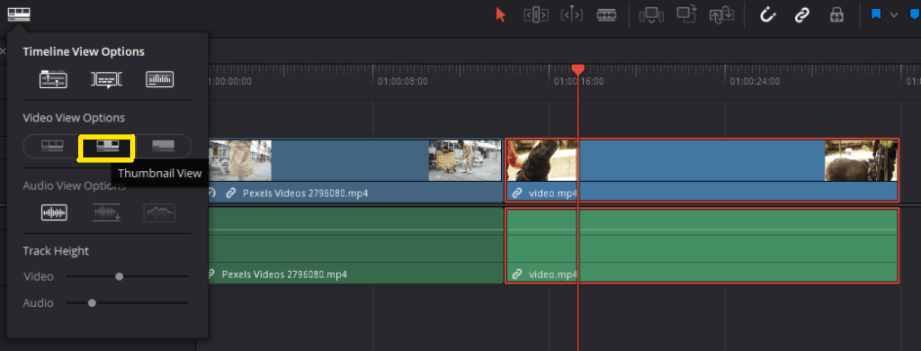
- You can also have a film strip view, thumbnail view, or simple view. The simple view won’t give you a preview of your video clips. This is great if you’re going to have a small video track.
- The Thumbnail view will only give you a single image of what the video will be like. You can see we have a preview thumbnail for the video, but it doesn’t show you where it looks in the clip, as shown in the screenshot below.
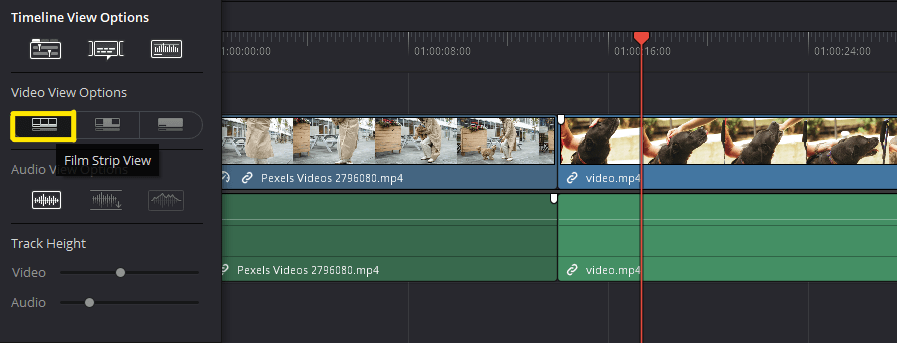
- That’s when the film strip view comes into place. So, if I zoom in, you can see that it’s giving me more of a preview of what the video will look like, which is important.
- To optimize your timeline settings, play with this and adjust your video view options. You can also change your video track height.
If you want to have stacked timelines, you can also have that.
- Click on the stacked timeline option as shown in the screenshot. It will enable you to have different timelines.
- You can add multiple timelines by clicking on add timeline option on the right corner of the timeline, as shown in the screenshot.

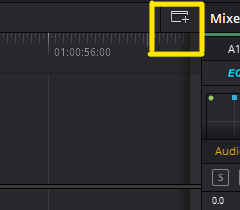
You can stack timelines together; for example, if I go to the right-hand side, then click on add multiple timelines icon. You can see that I have a timeline at the bottom to pick any timeline. You might want to use this workflow. I know premiere pro users use this workflow for stuff like selects. I typically don’t use it, so I’m going to get rid of this for now.

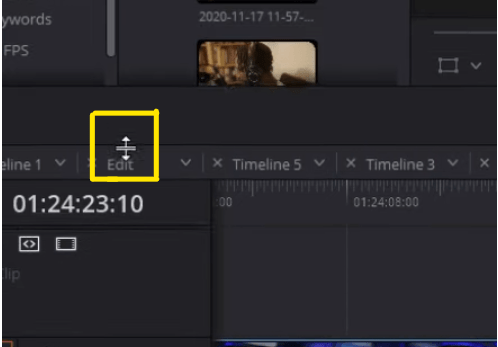
- You can also adjust the size of your window by dragging it down, as shown in the below screenshot. Now that we’ve got that out of the way let’s talk about dual-screen or two-screen workflows. Let’s discuss how to use Dual Screens in DaVinci Resolve?
How to Use Dual Screens in DaVinci Resolve?
Using workflow of two screens or Dual screens in DaVinci Resolve is really simple. You just need to follow the below-mentioned steps.
- To enable the dual screens in DaVinci Resolve, you must go to the workspace on the top navigation menu.
- Go to the dual screen.
- Click “On.”
That’s how you enable dual screens in DaVinci Resolve!
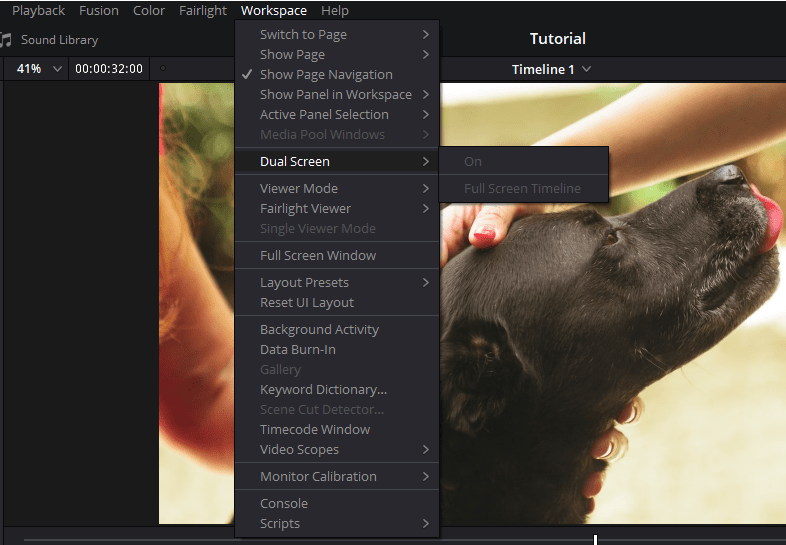
It will be difficult to show you but bear with me. Once you do that, you will be presented with the screen as shown in the screenshot. You can see at the moment, I have my timeline on the left-hand side with my viewer, and on my right monitor, you can see that I have a mixer right here. I also have all of my folders all of the clips. It is a simple dual-screen workflow, and this is pretty useful.

It is enabled for the edit page and the color page, as shown in the screenshot. I have all of my scopes here. You can see I’ve got my gallery on the left-hand side. I’ve got my clips; I’ve got my timeline. It’s insane, the screen is insane, and again I have a larger window for my nodes. I’ve got my preview.

You also have a dual-screen in the fusion tab, as shown in the screenshot. You can see I’ve got my keyframes for my spline editor, my nodes are here, and my preview tab is on the left-hand side.
Even Fairlight audio has dual-screen compatibility. You can see I have huge audio waveforms and timelines right on the right-hand side. I have my huge mixer as well.

Full Screen Timeline as Dual Screens in DaVinci Resolve
This is not the only option you have for Dual Screens in DaVinci Resolve. You can actually do a few more exciting things; for example, you wanted to have your timeline full screen on one window. All you need to do is-
- Go to the workspace.
- Go back to dual-screen.
- Click full-screen timeline.
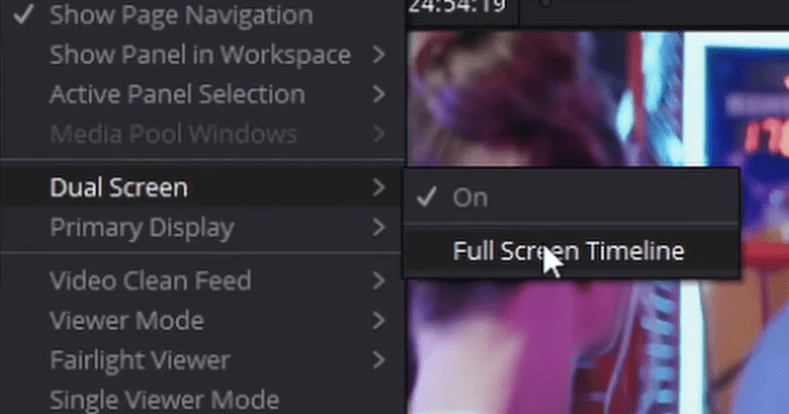
I’ll show you exactly what it does. You can see, now I have a full-screen window, as shown in the screenshot. One monitor here is a full screen of my timeline; I still have my inspector and my meters. But on my right screen, I have everything else. We have the preview windows right here; I can have a single preview window or a dual one. I have my clips and folders below the preview window.

It is pretty handy, not only this, but you also have one more thing, which is my favorite.
- If we go to the Dual Screen option and we click off. You will see the desktop on the second screen, as shown in the screenshot.
- Now, we go back to the workspace.

- Click on the video clean feed option. This enables you to have a full-screen preview of your timeline.
- So, if I click on the video clean feeds option, and I click generic PNP monitor 2, as shown in the screenshot.

You can now see that I have my timeline as usual. This is how normally my DaVinci Resolve would look on a single screen, and on my second screen, I have a full-screen preview, as shown in the screenshot.

It is crazy, imagine if you’re color grading, and you have one color-accurate monitor. You can adjust on the left-hand side, go to your grades, and adjust the parameters on the right-hand side, or whatever monitor you have, you can see a full-screen preview.
If you wanted to swap these around, all you need to do is-
- Go to the workspace.
- Go to primary display and change your primary display. Right now, my primary display is my first monitor. I can change it to my second monitor.
- Go back to the workspace.
- Go to the video clean feed option.
- Click generic monitor one.
You can see we’ve swapped them around. Now I have my full-screen preview on my first monitor and my timeline on my second monitor. I hope you got the answer to your question – How to Use Dual Screens in DaVinci Resolve? Let’s move to the next part.
How to Use Three Screens in DaVinci Resolve?
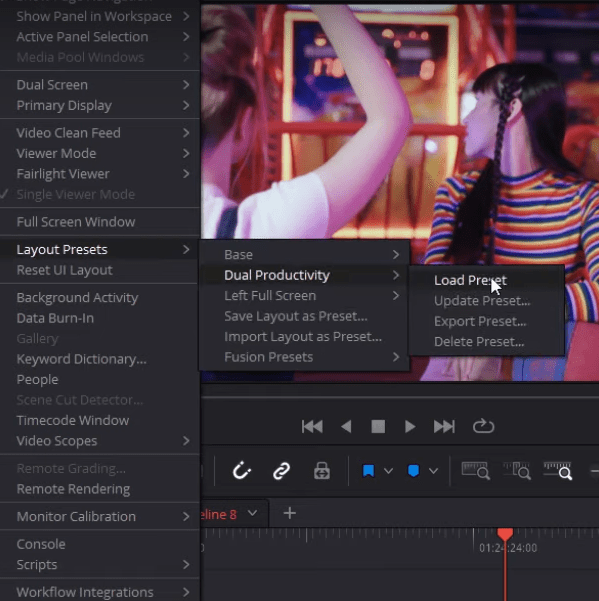
It would work the same way if you had a triple monitor setup. Now, what’s interesting about this is you can actually save visual presets. Say, for example, you want to be working in dual-screen productivity, so you wanted to have both a left screen and a right screen to edit DaVinci resolve instead of having a full-screen preview. All you need to do is-
- Go to the workspace.
- Go back to dual-screen, and turn it on.
- It will automatically bring you back to where we were before.
- Then go back to the workspace.
- Click layout presets, and click save the layout as preset, as shown in the screenshot.

Right now, I have three presets. I’ve got my base preset if I just want to be working on a single monitor. I also have dual productivity, as shown in the screenshot. Lastly, I have a preset for having a full-screen viewer on my left side and my editor timeline as usual. So, that’s how you work with the Dual Screens in Davinci resolve. It is not just for dual screens in DaVinci Resolve, also a triple-screen workflow because of everything I’ve shown you can do with three screens.
So, I hope you were able to find the answer to all of your questions regarding DaVinci Resolve, like How to Use Dual Screens in DaVinci Resolve? and How to optimize two-screen workflow in DaVinci Resolve? And if you have any more doubt regarding DaVinci Resolve, make sure to check out our other articles. If you have any suggestions feel free to contact us





Got a Question?
Find us on Socials or Contact us and we’ll get back to you as soon as possible.