Hi, I’m Salik, the author of FilmmakingElements.com. I have been a filmmaker for over 10 years. I am also a certified DaVinci Resolve Trainer and I have used DaVinci Resolve for many of my projects. DaVinci Resolve is a popular video editing software used by filmmakers and content creators. However, the Windows version of DaVinci Resolve lacks the ability to export projects in the ProRes format. This can be a problem, especially when working with collaborators who require this format for their part of the project. In this blog post, we’ll explore a solution that allows you to export ProRes in DaVinci Resolve for Windows, but keep in mind that this workaround is only applicable for the Studio version of the software.
DaVinci Resolve Studio users can access a free solution to export ProRes files on Windows. Although it’s possible to support the project and its creators through donations or Patreon, the basic functionality is available for free. Let’s dive into the easy process that unlocks additional export options in DaVinci Resolve Studio for Windows.
Overcoming the ProRes Export Limitation with Voukoder
In this section of the post, we’ll dive deep into the solution that allows you to export ProRes in DaVinci Resolve for Windows using Voukoder. Please note that this method is only applicable for DaVinci Resolve Studio version.
To begin, you need to download the Voukoder software from its official website. Voukoder is a plugin that enables additional codecs and formats, such as ProRes, in DaVinci Resolve Studio for Windows.
Step 1: Download Voukoder and DaVinci Resolve Studio Files
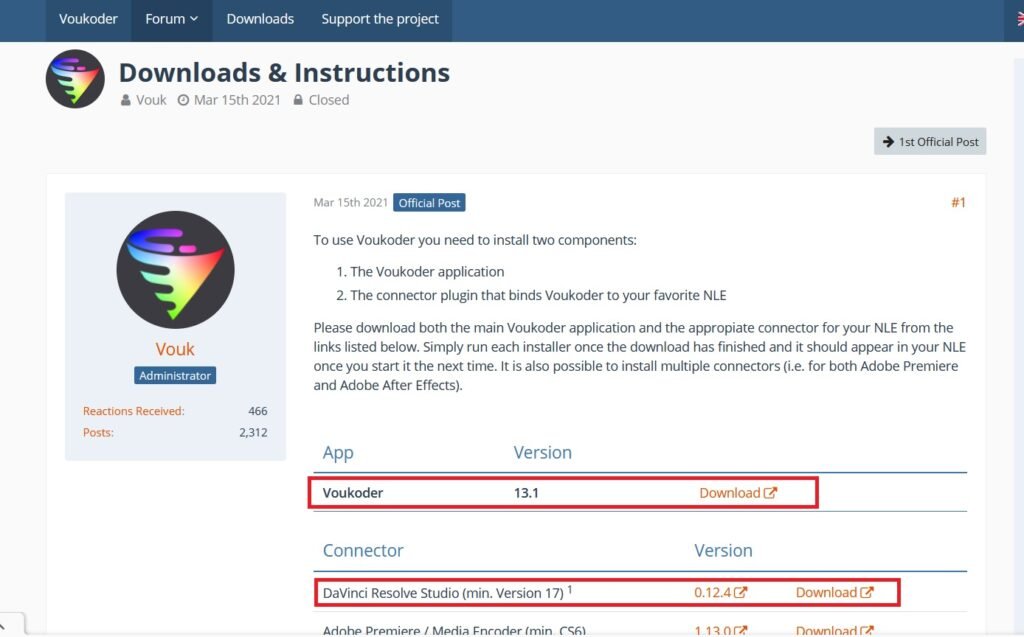
- Go to the official Voukoder website and navigate to the ‘Downloads’ section.
- Download two files:
- Voukoder App Latest Version
- DaVinci Resolve Studio Connector
Once you have downloaded both the Voukoder MSI file and the DaVinci Resolve Studio Connector ZIP file, you can proceed to install Voukoder on your computer.
Step 2: Install Voukoder
- Locate the downloaded Voukoder MSI file in your downloads folder or the location where you saved it.
- Run the Voukoder MSI file and follow the installation process. This process should be straightforward and typical of most Windows software installations.
With Voukoder installed on your computer, you can now proceed to integrate it with DaVinci Resolve Studio. This will enable you to export your projects in the ProRes format.
Integrating Voukoder with DaVinci Resolve Studio
Integrating Voukoder with DaVinci Resolve Studio involves extracting the downloaded DaVinci Resolve Studio Connector ZIP file and following the installation instructions provided in the included readme file.
Step 1: Extract the DaVinci Resolve Studio ZIP File
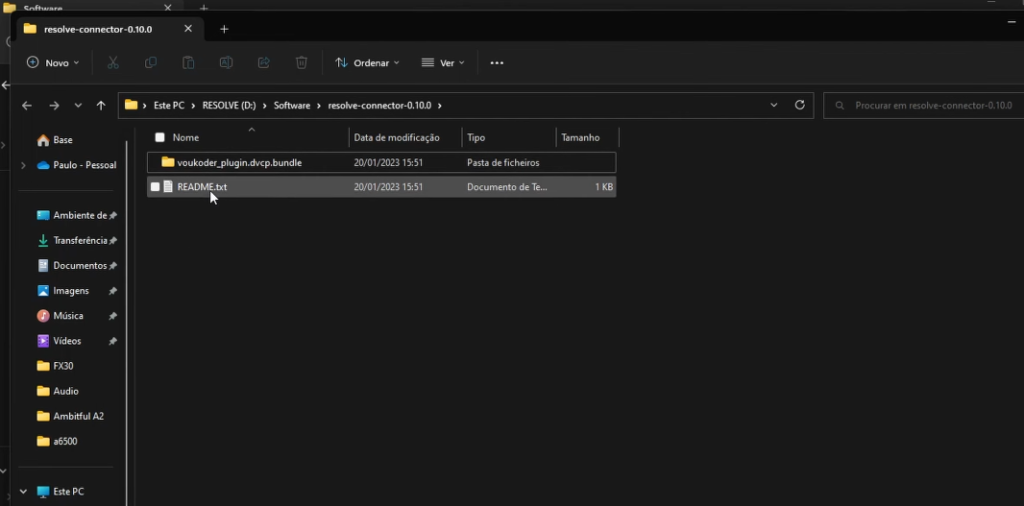
- Locate the downloaded DaVinci Resolve Studio Connector ZIP file in your downloads folder or the location where you saved it.
- Extract the ZIP file, which will create a new folder containing a readme file and a subfolder.
Step 2: Follow the Installation Instructions in the Readme File
- Open the readme file included in the extracted DaVinci Resolve Studio Connector folder. This file contains instructions on how to integrate Voukoder with DaVinci Resolve Studio.
- The readme file will provide you with a path to copy the extracted folder. However, you may encounter an issue if the path doesn’t exist on your computer.
Step 3: Copy the Folder to the Correct Path
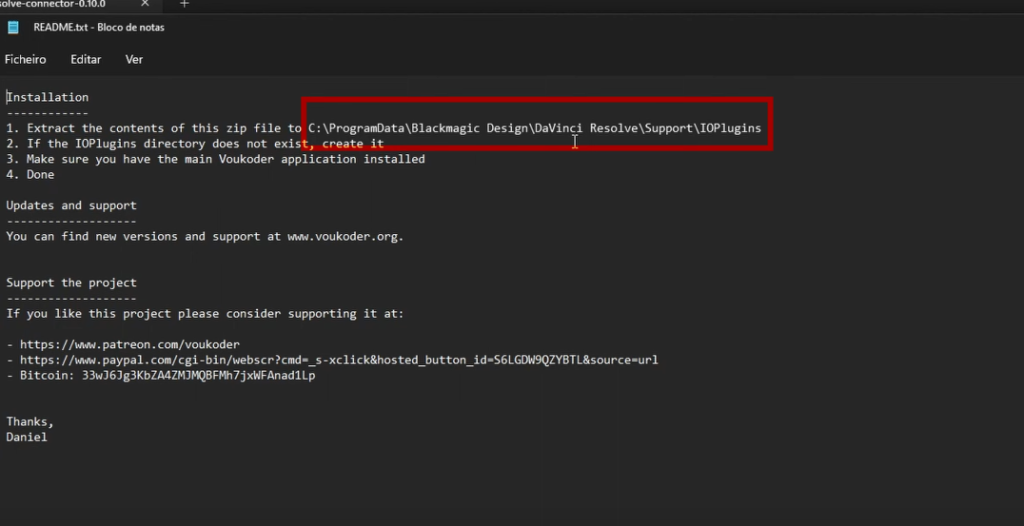

- Copy the path provided in the readme file, starting from ‘C’ and ending at ‘Support.’
- Paste the path into your file explorer and check if there is an ‘IOPlugins’ folder.
- If the ‘IOPlugins’ folder exists, open it and paste the extracted folder inside.
- If the ‘IOPlugins’ folder doesn’t exist, create it and then paste the extracted folder inside.
Once you have completed these steps, the integration process is complete, and you can now use Voukoder to export ProRes files in DaVinci Resolve Studio for Windows.
Setting Up and Exporting ProRes in DaVinci Resolve Using Voukoder
In this section of the blog post, we’ll walk you through the process of setting up and exporting a ProRes file in DaVinci Resolve for Windows using the Voukoder plugin. With this step-by-step guide, you’ll be able to export your projects in the ProRes format with ease.
Step 1: Open DaVinci Resolve and Load Your Project
- Launch DaVinci Resolve on your computer.
- Open an existing project or create a new one.
- Import a video file into the project by dragging and dropping it into the Media Pool, or by using the Import Media option from the File menu.
- Switch to the Edit page and drag the imported file onto the timeline to complete the editing process.
Step 2: Configure Export Settings in the Deliver Page
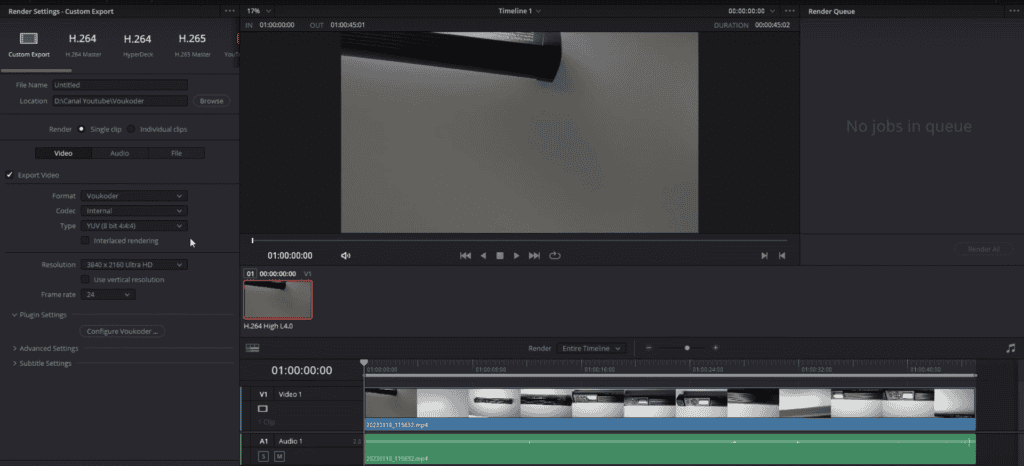
- Go to the Deliver page by clicking on the ‘Deliver’ tab at the bottom of the DaVinci Resolve interface.
- In the Render Settings panel on the left side of the screen, open the Format drop-down menu.
- Scroll down until you find the ‘Voukoder’ option. Select it.
Step 3: Configure Voukoder Settings
- Scroll down further in the Render Settings panel until you see the ‘Configure Voukoder’ button. Click on it to open the Voukoder settings window.
- In the Voukoder settings window, you will find: Video Options, Audio Options, Output Settings, and About.
Video Options
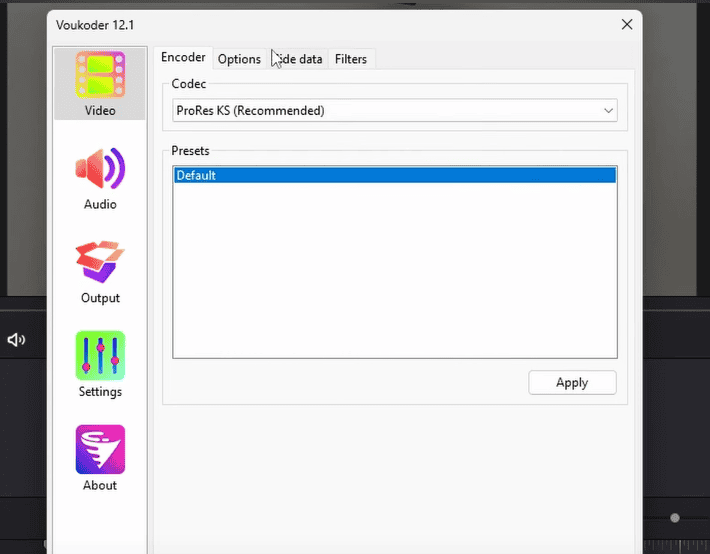
- In the Video Options tab, locate the ‘Codec’ dropdown menu.
- Select ‘ProRes’ from the list of available codecs.
- Click on the ‘Options’ button on the top of the codec dropdown menu to access additional settings, such as color format and profile.
Audio Options
- Switch to the Audio Options tab.
- Choose your desired audio codec from the ‘Codec’ dropdown menu.
- Adjust additional audio settings, such as bit rate and profile, as needed in the Options settings of Audio Tab.
Output Settings
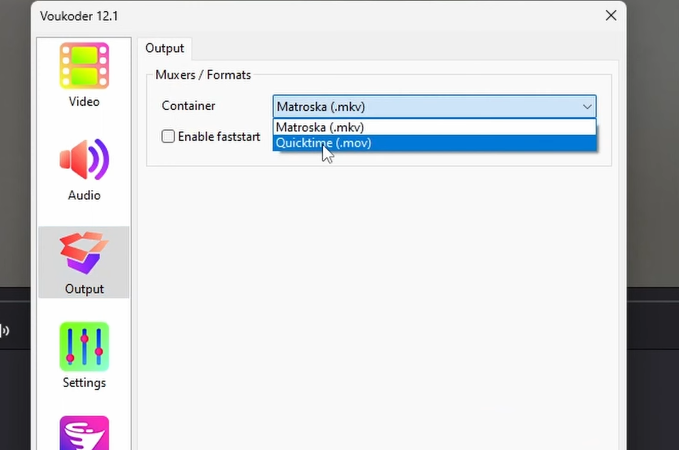
- Go to the Output Settings tab.
- Choose the desired container format for your exported file, such as ‘QuickTime .MOV.’
- Click ‘OK’ to close the Voukoder settings window and return to the Render Settings panel in DaVinci Resolve.
Step 4: Name Your Exported File and Start Rendering
- In the Render Settings panel, enter a name for your exported file in the ‘File Name’ field.
- Choose a location to save the exported file by clicking the ‘Browse’ button next to the ‘Location’ field.
- Click ‘Add to Render Queue’ to add the export job to the Render Queue panel on the right side of the screen.
- In the Render Queue panel, click ‘Start Render’ or ‘Render All’ to begin exporting your project in the ProRes format.
Step 5: Verify the Exported File Format
- Once the render is complete, navigate to the location where you saved the exported file using your computer’s file explorer.
- Import the exported file back into DaVinci Resolve by dragging and dropping it into the Media Pool, or by using the Import Media option from the File menu.
- With the file selected in the Media Pool, check the file’s properties in the Metadata panel to confirm that the exported file is in the ProRes format.
By following these steps, you can easily export your projects in the ProRes format using DaVinci Resolve for Windows and the Voukoder plugin. The plugin is free to use, but supporting the developer through donations or contributions is encouraged, as they have done a great job in making this valuable tool available to the DaVinci Resolve community.
Now that you’re familiar with the process of exporting ProRes files in DaVinci Resolve using Voukoder, you can take advantage of this powerful codec in your video editing and post-production workflow. ProRes offers high quality, excellent performance, and is widely compatible, making it an ideal choice for professionals and enthusiasts alike.
Keep in mind that while this method allows you to export ProRes files in DaVinci Resolve for Windows, there may be limitations in color grading or visual effects processing that could potentially affect the final output. Always review your exported files to ensure they meet your desired quality standards and make any necessary adjustments in your project settings.