Hi, I’m Salik, the author of FilmmakingElements.com. I have been a filmmaker for over 10 years. I am also a certified DaVinci Resolve Trainer and I have used DaVinci Resolve for many of my projects. In this article, I will be helping you understand what Davinci Resolve Archive or “.dra” is and how can you import or export them. This article is gonna be a problem solver for you and you can use it anytime as a reference.
From where can one export or import Davinci Resolve Archive (.dra)?
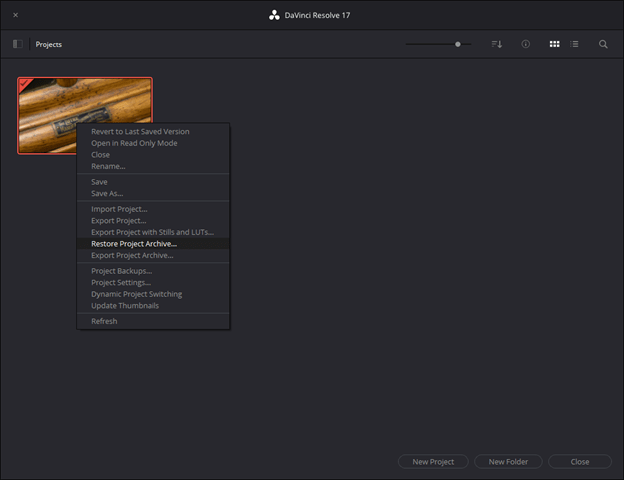
To export or open a .dra file, you need to be on the project manager window of Davinci Resolve.
Typically, the Project Manager is the first window you’ll encounter when launching DaVinci Resolve. If you’ve already opened a project and wish to access the Project Manager, simply click the Home button located at the bottom right-hand corner of the window in the Page Navigation bar. If the Page Navigation bar is hidden, you can open the Project Manager by going to File > Project Manager.
Project Management Features:
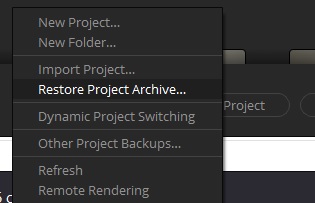
The Project Manager offers an array of features and commands, easily accessible through its contextual menu by right-clicking on the background of the Project Manager window. Below is a list of key project management functions and how to use them:
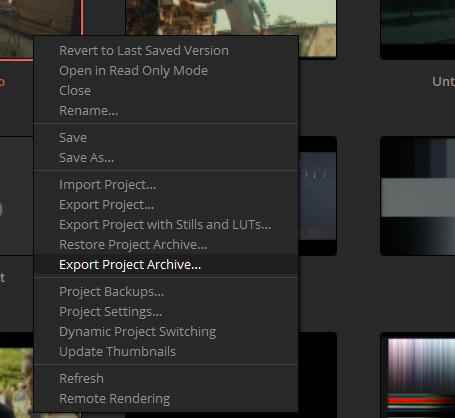
- Exporting Project Archive: To save a project and export it as an archive (.dra).
- Restoring Project Archive: If you need to open an archived project, use the restore project archive function.
- Creating a New Project: To start a new project, simply click on the “New Project” button.
- Opening a Previously Saved Project: To access a saved project, double-click its thumbnail or select it and click the “Open” button.
- Opening a Project in Read-Only Mode: To review a project without risking any unintended changes, right-click the project icon or item and choose “Open in Read Only Mode”. If you do make changes, you can save them as a new project using the “Save As” command.
- Renaming a Project: To change a project’s name, right-click the project icon or item, select “Rename”, enter the new name, and click “OK”.
- Loading Project Settings from Another Project: If you need to apply the settings from another project to your current project, right-click the desired project icon or item and choose “Load Project Settings to Current Project”.
- Updating Project Thumbnails: To refresh a project’s thumbnail image in the Project Manager, right-click the project and select “Update Thumbnails”.
- Deleting a Project: To remove a project, select it, press the “Backspace” key or right-click and choose “Delete”. Confirm the deletion when prompted.
Exporting Davinci Resolve Archive (.dra)
DaVinci Resolve offers a practical archiving feature that allows you to bundle every media file associated with a project, including subtitle files, into a single location. This is particularly useful when handing a project off to another DaVinci Resolve user or when storing your project for short- or long-term archiving. We will guide you through the process of archiving your DaVinci Resolve project, ensuring that you have a secure backup of your work.
Step-by-Step Guide to Archiving a Project:
Archiving a project in DaVinci Resolve is a straightforward process that can be completed in just a few steps:
- Open the Project Manager: Access the Project Manager by clicking the Home button at the bottom right-hand corner of the DaVinci Resolve window or by selecting File > Project Manager from the menu.
- Locate and Export Project Archive: Find the project you wish to archive, right-click it, and choose “Export Project Archive” from the contextual menu.
- Select a Save Location: In the Archive Project window that appears, choose a location to save the archive. Ensure that the selected volume has enough storage capacity to accommodate all the media files associated with your project. Click “Save” to proceed.
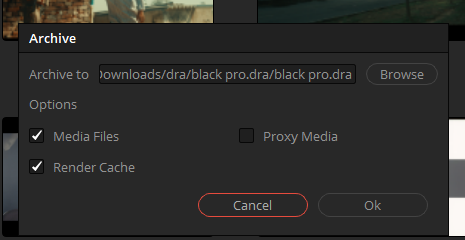
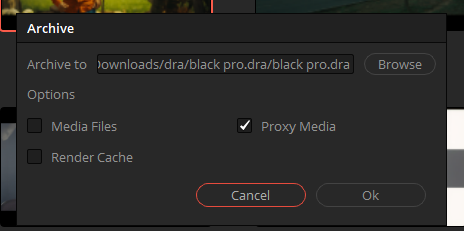
- Customize Archive Options: In the Archive dialog, verify the save location and select any optional media you want to include within the archive. You have the option to save optimized media and/or render cache media related to the project.
- Begin Archiving Process: Click “OK” to start the archiving process. A progress bar will appear, indicating the estimated time for completion. If any errors occur due to missing or offline media, they will be displayed at the end of the process.
Understanding the Archive Structure:
The resulting archive is a directory with a .dra file extension. Within this folder, you’ll find a series of subdirectories containing all the media used by the archived project. The media files are saved in directory paths that mirror their original location, providing you with a reference for where each clip was initially sourced from.:
Archiving your DaVinci Resolve projects is an essential step in preserving your work and ensuring that you have a reliable backup. The straightforward process of exporting project archives allows you to easily share projects with other DaVinci Resolve users or securely store your work for future reference. By following the steps outlined in this guide, you can be confident that your projects are safely archived and accessible whenever needed.
Importing or Restoring Davinci Resolve Archive (.dra)
Whether you are collaborating with other DaVinci Resolve users or accessing archived projects for future use, it’s crucial to understand how to import or restore a DaVinci Resolve Archive (.dra) effectively. In this blog post, we’ll guide you through the process of restoring an archived project, ensuring that your media files and project data remain intact and accessible.
Step-by-Step Guide to Restoring an Archived Project:
Restoring a DaVinci Resolve archived project is a simple process that can be completed in just a few steps:
- Prepare the Archive Directory: First, copy the .dra archive directory you want to restore to a storage volume with suitable performance for your workflow. Since restoring does not move the directory, it is essential to ensure that the .dra archive directory is located on a volume that can handle your project’s demands.
- Open the Project Manager: Access the Project Manager by clicking the Home button at the bottom right-hand corner of the DaVinci Resolve window or by selecting File > Project Manager from the menu.
- Initiate the Restore Process: Right-click within the Project Manager and choose “Restore Project Archive” from the contextual menu. Locate the .dra archive directory you copied earlier, and click “Open.”
- Enter a Unique Project Name: At the prompt, provide a unique project name for the restored project, and click “OK.” The project will be restored to the Project Manager and remain linked to the media files located inside the .dra archive.
- Alternatively, Drag and Drop the .dra Folder: As an alternative to steps 2-4, you can simply drag the .dra folder from your file system directly into the Project Manager. This method is a quick and convenient way to import your archived project.
Restoring and importing DaVinci Resolve Archive (.dra) projects is a vital skill for video editors, particularly when collaborating with others or revisiting archived work. By following the steps outlined in this guide, you can easily restore your archived projects while maintaining the integrity of your media files and project data. This process ensures that your projects remain organized, accessible, and ready for further editing or review.
Exporting and moving proxies with “.dra”
When transferring projects between different DaVinci Resolve systems, manually copying individual assets, such as proxies, graphics, and source files, can be time-consuming and challenging. To simplify this process, DaVinci Resolve offers the option to create a DaVinci Resolve Archive (.dra), which stores your project and all its media, while preserving the original file paths and organization. In this blog post, we’ll explore how to create and use a proxy-only archive and discuss various remote editing workflows enabled by the proxy feature in DaVinci Resolve.
Creating a Proxy-Only Archive for Easy Sharing:
DaVinci Resolve’s Archive Options dialog allows you to create an archive using only proxy media, making it compact and portable for sharing with other editors or transferring to another computer. Here’s how to create a proxy-only archive:
- Right-click on a project in the Project Manager and choose “Export Project Archive” from the drop-down menu.
- In the Archive Options dialog, check “Proxy Media” and uncheck “Media Files” and “Render Cache.”
If proxy media is unavailable for a clip, DaVinci Resolve will automatically export the original media to prevent it from going offline. The resulting .dra folder is a self-contained version of your project and proxy media that can be easily transferred between drives or sent over the internet.
- Also Read: Move Premiere Pro Timeline to Davinci Resolve (XML Workflow)
- Also Read: How To Make Scrolling End Credits In Davinci Resolve (2 Methods)
- Also Read: How To Use Scene Cut Detection In Davinci Resolve (2 Methods)
If you haven’t created proxies already follow these steps:
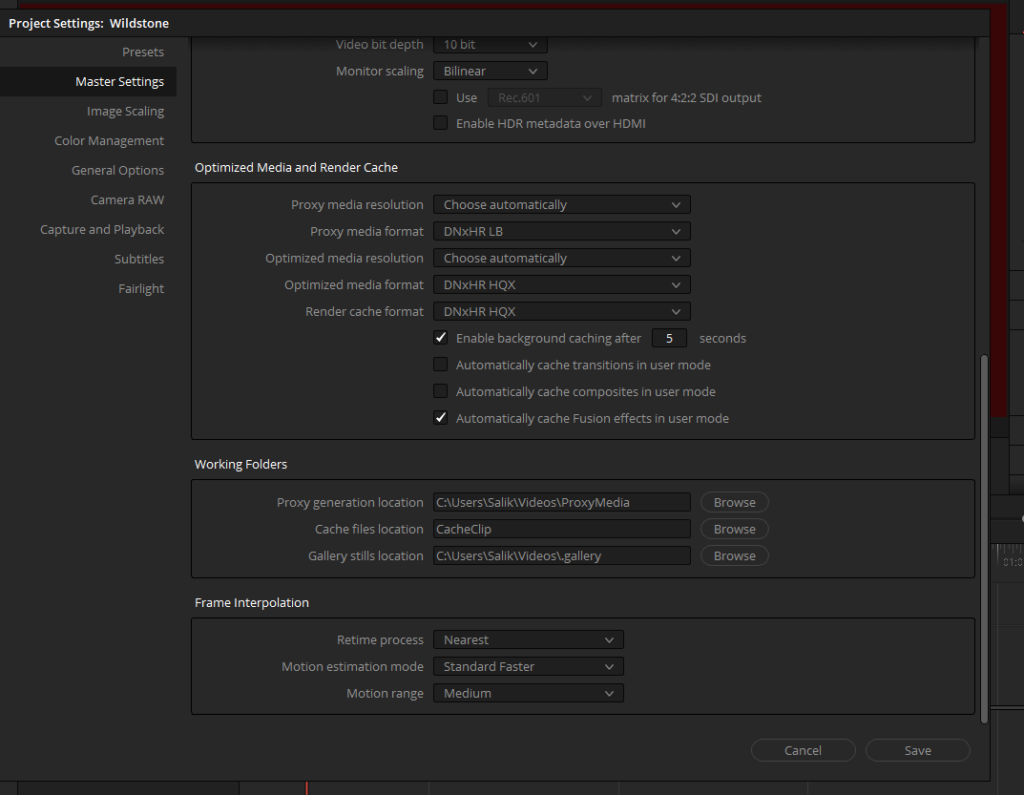
- Set up the Resolution and Format settings for the proxies in the Project Settings by clicking the gear icon in the bottom right corner. In the Master Settings, scroll down to “Optimize Media and Render Cache.” Choose “Automatically” for the proxy media resolution and a low-bandwidth, easily editable codec like ProRes LT or DNxHR LB for the proxy media format.
- Select all source media in the Media Pool and click “Generate Proxy.”
- Export a DaVinci Resolve Archive (.dra) onto an external drive, ensuring that only “Proxy Media” is checked.
- Use the “Restore Project Archive” command in the Project Manager to import the archive.