Welcome to FilmmakingElements.com! In the realm of videography, equipment plays a crucial role in capturing high-quality footage. Today, we’re diving into the specifics of optimizing video settings for one of the popular cameras in the market – the Nikon Z50.
In this article, we’ll explore the firsthand experience of a filmmaker who has spent two months with the Nikon Z50, meticulously experimenting with various settings to achieve the best video quality possible.
Optimizing Your Z50 for Stunning Video: Frame Rate, Resolution, and Quality
Achieving optimal video quality on your Nikon Z50 involves more than just pressing the record button. In this guide, we’ll walk you through the step-by-step process of fine-tuning your camera settings for top-notch video production.


- File Naming for Organization: Start by navigating to the movie shooting menu. Consider renaming your video files using the ‘File naming’ option. This simple step ensures easy differentiation between your photos and videos, streamlining your post-production workflow.
- Frame Rate and Frame Size Selection: Delve into the ‘frame size/frame rate’ settings. For crisp 4K footage, opt for a frame rate of 24 frames per second (fps) at a resolution of 3840 by 2160. However, if you prefer shooting in 1080p, the Nikon Z50 offers flexibility ranging from 24 fps to 120 fps. While tempting, refrain from using in-camera slow-motion options; instead, shoot at 120 fps and manipulate the speed in post-production for greater control.
- Movie Quality Optimization: Ensure your ‘movie quality’ option in the ‘movie shooting menu’ is set to ‘High’ for optimal results, regardless of the resolution and frame rate selected. While Nikon provides lower quality options, such as ‘Normal,’ sticking with ‘High’ guarantees superior video output, especially when capturing footage in 4K.
Mastering ISO Sensitivity for Superior Video Quality on the Nikon Z50
In the pursuit of impeccable video quality with your Nikon Z50, understanding and optimizing ISO sensitivity is paramount. Let’s delve into the intricacies of this vital setting to elevate your videography game.
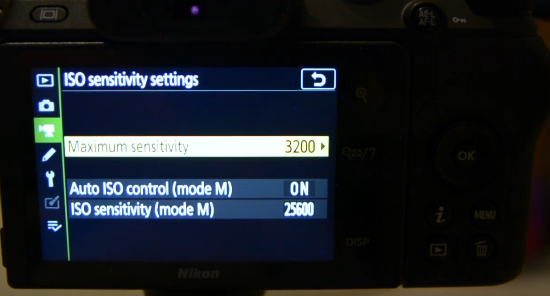
- Accessing ISO Sensitivity Settings: Begin by accessing the ISO sensitivity settings within the movie shooting menu of your Nikon Z50. This step lays the foundation for customizing ISO to suit your filming environment and preferences.
- Optimal ISO for Various Shooting Scenarios: Just as in photography, the goal in videography is to utilize the lowest ISO possible while maintaining adequate exposure. If you’re vlogging or shooting in dynamically changing light conditions, consider utilizing the ‘Auto ISO’ function for convenience. However, for controlled indoor environments or talking head shots, manual control is recommended.
- Striking the Balance: When shooting in manual mode, aim to keep ISO sensitivity below 1600 to ensure optimal video quality. In scenarios where additional light sources are available, such as external lights, refrain from exceeding this threshold to prevent excessive noise and preserve clarity.
- Maximizing Sensitivity: While you can set the maximum sensitivity to 3200, exercising caution is advised. Striking a balance between sensitivity and image quality is crucial to avoid introducing unwanted noise or compromising the integrity of your footage.
Mastering White Balance for Enhanced Color Accuracy on the Nikon Z50
White balance is a critical aspect of achieving accurate and natural-looking colors in your videos. Let’s explore how to optimize this setting on your Nikon Z50 to elevate the quality of your footage.
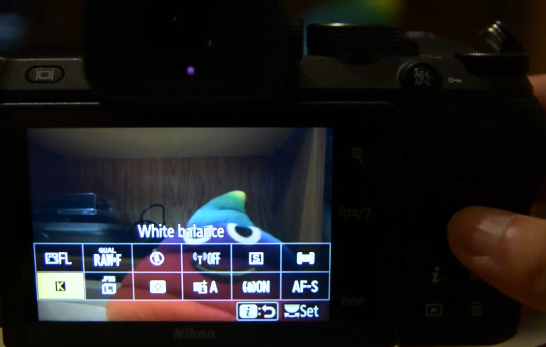

- Accessing White Balance Settings: Begin by navigating to the white balance options within the movie shooting menu of your Nikon Z50. While the auto white balance setting typically performs well in many situations, the camera offers more advanced options for fine-tuning color balance to suit your needs.
- Manual Kelvin Adjustment: One of the standout features of the Nikon Z50 is the ability to manually adjust the white balance using Kelvin values. You can precisely dial in the desired color temperature by accessing the live view mode and pressing ‘i’. Lower Kelvin values result in cooler tones, while higher values produce warmer tones. Experimenting with different Kelvin settings allows you to achieve the perfect color balance for your particular shooting conditions.
- Auto White Balance with Advanced Options: If you prefer the convenience of auto white balance, the Nikon Z50 offers additional customization options to refine color accuracy further. These advanced features include options for reducing warm colors or maintaining the overall atmosphere of the scene. Adjusting these settings can help fine-tune the white balance to match your creative vision.
- Personalized Preference: Ultimately, whether you opt for auto white balance or manual Kelvin adjustment depends on your personal preference and the specific requirements of your video project. Experimenting with different settings and understanding their impact on color reproduction will empower you to achieve the desired aesthetic in your footage.
Unlocking Creative Potential with Picture Control Profiles on the Nikon Z50
Picture control, also known as picture profiles, plays a pivotal role in shaping the look and feel of your videos on the Nikon Z50. Let’s explore how to leverage this feature to unleash your creative vision and achieve professional-grade results.

- Accessing Picture Control Settings: Navigate to the picture control options within the movie shooting menu of your Nikon Z50. Here, you’ll find a range of preset profiles as well as the option to customize your picture control settings according to your preferences.
- Choosing the Right Profile: While the auto and standard profiles offer convenience, they may limit your flexibility in post-production. For greater control over color grading and editing, consider switching to a neutral or flat picture profile. By the way, to contact us for our color grading service head to Color Culture. These profiles preserve more dynamic range and allow for more nuanced adjustments during post-processing.
- Exploring the Flat Picture Profile: One standout feature of the Nikon Z50 is the ability to use a flat picture profile, which retains more detail in the highlights and shadows, providing greater latitude for color grading and correction. By adjusting settings such as sharpening to zero and leaving other parameters unchanged, you can achieve a neutral starting point for your footage, ideal for fine-tuning in post-production.
- Customization and Experimentation: Don’t hesitate to experiment with different picture control settings to find the look that best suits your style and project requirements. Whether you prefer a punchy, high-contrast look or a more subdued and cinematic aesthetic, the Nikon Z50 offers the versatility to accommodate your creative vision.
Mastering Focus Modes for Sharp and Crisp Video Footage with the Nikon Z50
Achieving sharp and precise focus is essential for capturing professional-quality video with your Nikon Z50. Let’s explore how to navigate the focus mode settings to ensure your footage remains consistently in focus, regardless of your shooting scenario.
- Accessing Focus Mode Settings: Dive into the movie shooting menu of your Nikon Z50 to access the focus mode options. Here, you’ll find a variety of settings to tailor the autofocus system to your specific needs and shooting style.
- Full-Time AF for Continuous Focus: For scenarios where your subject remains relatively stationary, such as interviews or stationary shots, consider utilizing full-time AF. This setting ensures continuous autofocus throughout your recording, maintaining sharpness and clarity without the need for manual intervention.
- Choosing the Right Focus Mode: Depending on the nature of your video project and your movement requirements, you may opt for different focus modes. AFS (Single AF) is ideal for situations where you want to lock focus on a specific subject before recording, ensuring precision and accuracy. On the other hand, AFF (Full-Time Continuous AF) is suitable for dynamic shooting environments, such as run-and-gun scenarios, where continuous autofocus is essential to keep up with moving subjects.
- Exploring Area Mode Options: The area mode setting determines how the camera selects and tracks focus points. Auto area mode is a versatile option that automatically detects and focuses on subjects within the frame, making it suitable for a wide range of shooting conditions. Alternatively, you can opt for single-point mode for precise control over focus placement or wide area mode for broader coverage.
Optimizing Optical VR for Stable Video Footage on the Nikon Z50
Ensuring stable footage is crucial for professional-looking videos, especially when using lenses without in-body image stabilization (IBIS). Let’s delve into the optical vibration reduction (VR) settings within the movie shooting menu of the Nikon Z50 to maximize the stability of your video recordings.
- Accessing Optical VR Settings: Navigate to the movie shooting menu on your Nikon Z50 to access the optical VR options. Here, you’ll find settings to enable or disable optical VR, a feature designed to minimize camera shake and maintain sharpness in your footage.
- Enabling Optical VR: If you’re using a lens equipped with vibration reduction, it’s advisable to keep optical VR activated at all times. This feature compensates for minor movements and vibrations, resulting in smoother and more stable video footage, particularly when shooting handheld or in less-than-ideal conditions.
- Avoiding Electronic VR: While the Nikon Z50 offers electronic VR as an additional stabilization option, it’s important to note its drawbacks. Electronic VR achieves stabilization by cropping the video frame, potentially compromising the composition and field of view. For this reason, it’s recommended to keep electronic VR disabled to preserve the integrity of your footage.
Optimizing Microphone Settings for Superior Audio Quality on the Nikon Z50
Capturing clear and pristine audio is essential for creating professional-grade videos. Let’s explore the microphone sensitivity settings within the Nikon Z50 and how to tailor them to achieve the best results for your specific recording setup.
- Microphone Sensitivity Adjustment: Depending on the type of microphone you’re using, adjusting the sensitivity can significantly impact the quality of your audio. For lavaliere microphones, which are often used for close-up interviews or discreet recording, setting the sensitivity to six or seven is recommended, adjusting as needed based on the volume of the talent’s voice. Conversely, for shotgun microphones, commonly used for capturing ambient sound or dialogue in outdoor settings, a higher sensitivity setting of 10 or 11 may be preferable to ensure optimal audio pickup.
- Avoiding Auto Sensitivity: While the Nikon Z50 offers an auto sensitivity option for convenience, it’s generally advisable to manually set the microphone sensitivity to achieve more consistent and predictable results, particularly in varying recording environments.
- Utilizing Attenuator for Peak Management: The attenuator function serves as a safeguard against loud peaks and inconsistent audio levels by acting as a compressor. Enabling the attenuator can help maintain a more balanced and controlled audio signal, especially in situations where the volume may fluctuate unexpectedly.
- Customizing Frequency Response: The frequency response setting allows you to tailor the microphone’s sensitivity to specific audio ranges. For dialogue-focused recordings, such as talking head videos or interviews, selecting the vocal range option ensures optimal clarity and intelligibility of speech.
- Opting for Minimal Noise Reduction: While the Nikon Z50 offers noise reduction capabilities, it’s important to exercise caution when using this feature, as it can sometimes introduce artifacts or compromise audio quality, particularly in outdoor or windy conditions. Consider leaving noise reduction disabled to preserve the natural sound quality of your recordings, making adjustments as necessary in post-production.
- Also Read: LUTs For Nikon Z50: Free Download
- Also Read: Nikon Z50 Autofocus Not Working: Causes and How to Fix It