
Hi, I’m Salik, the author of FilmmakingElements.com. I have been a filmmaker for over 10 years. I am also a certified DaVinci Resolve Trainer and I have used DaVinci Resolve for many of my projects. In the world of video editing, achieving the perfect color harmony between different shots is an essential element of storytelling. One tool that has been a game-changer for editors and colorists alike is DaVinci Resolve.
In this comprehensive article, we’ll explore three practical methods to master the art of color matching in DaVinci Resolve.
Whether you’re a seasoned professional or a budding enthusiast, these techniques will elevate your projects to new heights, creating seamless transitions between shots and evoking powerful emotions in your audience. So, buckle up and prepare to dive into the colorful world of DaVinci Resolve, as we unravel the secrets of color matching that will transform your editing skills forever.
3 Methods To Color Match In Davinci Resolve
Method 1: Automatic Color Match Feature in DaVinci Resolve
The Automatic Color Match feature in DaVinci Resolve is a powerful and time-saving tool that enables video editors to replicate any color grading with just a few clicks. This efficient method of color matching can enhance your video projects and elevate your storytelling capabilities. In this in-depth guide, we’ll explore the steps to effectively use the Automatic Color Match feature and share tips for achieving optimal results.
Step 1: Import still images or footage
Begin by importing the still images or footage that showcase the desired color grading you want to apply to your working clips. This can be your camera B footage or a film that you want the color grade to copy from. These reference clips will serve as a benchmark for the color match feature. Place the reference clips on your timeline alongside the working clips, ensuring that they are easily accessible when you switch to the color page.

Step 2: Navigate to the color page
Once you have your reference clips on the timeline, navigate to the color page in DaVinci Resolve. The color page is where you’ll perform the color matching process and make any necessary adjustments to your working clips. This dedicated workspace offers a plethora of powerful tools and features to help you achieve professional-grade color grading.
Step 3: Select the reference clip
With your reference clips and working clips in the color page, right-click on the still image or footage with the desired color grade in the thumbnail clip viewer area on the color page. This selection will serve as the basis for the color matching algorithm, allowing DaVinci Resolve to analyze the color information and apply a similar grade to your working clip.
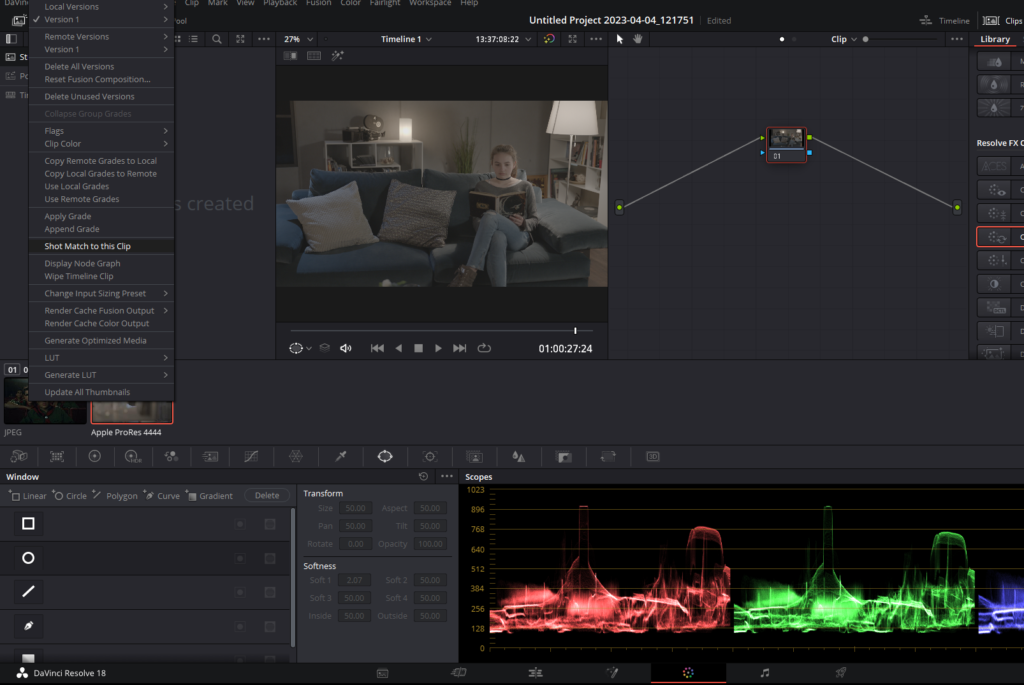
Step 4: Apply the color match
After selecting the reference clip, right-click on it and choose “shot match to this clip” from the context menu. DaVinci Resolve will then calculate the color differences between the reference and working clips and apply a color grade that closely matches the reference. This process may take a few moments, depending on the complexity of the color grading and the processing power of your computer.
Step 5: Adjust nodes for further customization

Once the color match has been applied, you may want to fine-tune the color grade or make additional adjustments. To do this, create a new node before this node by pressing Shift + S on your keyboard.
By rearranging the nodes in this manner, you create a “clean” node before the color match node, allowing for further adjustments or corrections to the original footage. Additionally, you can add more nodes after the match clip node to continue color grading and make more specific adjustments to the matched grade.
Keep in mind that the Automatic Color Match feature works best when the content of your working clip is similar to the reference clip. While the algorithm is powerful, it may not produce perfect results in every scenario. However, it serves as an excellent starting point for your color grading process, providing a solid foundation for further refinement and customization.
Additional Tips for Optimal Results
- When selecting a reference clip, choose one with similar lighting conditions, composition, and subject matter as your working clip. This similarity will help the color match algorithm produce more accurate results.
- Experiment with different reference clips and color grades to find the perfect match for your project. Don’t be afraid to test various combinations and adjust nodes to achieve the desired look.
Method 2: Manually Color Matching Different Cameras in DaVinci Resolve
In this section, we’ll explore a manual approach to color matching different cameras in DaVinci Resolve. While it might seem overwhelming initially, mastering this technique will enable you to seamlessly match different camera footage like Arri, Sony, Black Magic, Panasonic, and others.
Step 1: Shoot in log or raw format
To get the most out of DaVinci Resolve, shoot in log or raw format, as it provides more information for the software to work with. Although it’s possible to match shots without shooting in log or raw, it’s highly recommended for better results.
Step 2: Import and organize your footage
Import your footage into DaVinci Resolve and organize it by creating a multicam timeline with multiple angles. This makes it easier to color grade and edit your shots later on.
Step 3: Color grade your main hero shot
Before matching other shots to your main hero shot, ensure that it has the desired color grade. Apply LUTs, adjust white balance, contrast, and other settings to achieve the desired look.
Step 4: Use Color Space Transform to match the secondary camera

Now, select the clip which needs to be matched to the hero clip. To match the secondary camera to the main hero shot, create new nodes and apply a Color Space Transform effect. This tool helps in converting one camera’s color science into another, making it easier to match different cameras. Follow these detailed steps-
- Create new nodes: To start, select the secondary camera shot and create new nodes by pressing ‘Alt+S’ for each new node you want to create. It’s a good practice to have separate nodes for different adjustments, such as one for the Color Space Transform effect and another for applying LUTs or making additional adjustments.
- Apply the Color Space Transform effect: Locate the Color Space Transform effect in the ‘OpenFX’ panel on the right side of the screen. Drag and drop the effect onto the first node you created for the secondary camera shot. This effect is essential for converting the color space and gamma settings of one camera to another, allowing you to match different cameras effectively.
- Set the input color space and gamma: In the Color Space Transform settings panel, select the correct input color space and gamma for your secondary camera. For example, if you shot the footage with a Panasonic camera in V-log, you would choose ‘Panasonic V-Gamut’ as the input color space and ‘Panasonic V-Log’ as the input gamma. DaVinci Resolve offers a wide range of options for different camera brands and models, ensuring compatibility with various cameras.
- Set the output color space and gamma: Next, you need to specify the output color space and gamma you want to match the secondary camera to. These settings should match the main hero shot’s color space and gamma. For instance, if your main hero shot was shot on a Black Magic camera with Gen 5 color science, you would select ‘Blackmagic Design Wide Gamut Gen 5’ as the output color space and ‘Blackmagic Design Film Gen 5’ as the output gamma.
Step 5: Adjust settings to match the shots
Now that you have successfully changed the color space of the secondary to that of the hero camera, make more nodes as you did with the hero shot and apply the same LUT or contrast and saturation on the last node.
Fine-tune the settings of the secondary camera shot, such as contrast, warmth, and tint, to match the main hero shot closely. Switch back and forth and use use the side-by-side comparison feature and scopes in DaVinci Resolve to visually compare the shots and ensure a perfect match. You can do the side-by-side comparison by right-clicking on the hero shot and selecting “Wipe Timeline Clip”. To turn this off click on the rectangle icon with a line in between which is situated on the top of the viewer.

Step 6: Further adjustments and refinements
Make any additional adjustments and refinements to the shots as needed, such as adjusting highlights and shadows and using lift gamma and gain wheels, to achieve a seamless match between the different camera footage.

In conclusion, manually color matching different cameras in DaVinci Resolve is a valuable skill for video editors, allowing them to create a cohesive and professional look across their projects. By following the steps outlined in this guide, you can master this technique and match various camera footage with ease.
Method 3: Color Matching Using Custom Curves in DaVinci Resolve
In this section, we’ll dive deeper into the third method of color matching in DaVinci Resolve, which involves using custom curves. The goal of using custom curves is not to make the traces of each channel match exactly but to analyze and replicate the relationships between the channels, resulting in a seamless and natural color match.
Step 1: Analyze the shots
Before you begin color matching, carefully analyze the two shots you want to match. Observe the distribution of luminance in the shadows, midtones, and highlights of each shot. Take note of the relationships between the red, green, and blue channels and any differences between the two shots, such as how the shadows are compressed or how the channels are staggered. You can do so by using the scopes Waveform and Parade Scroes.
Also, make the basic adjustments or apply a technical transform LUT if you have shot in log space.

Step 2: Set up the reference shot
Select the first clip you want to correct, add a node with Option or Alt + S, and name it b right-clicking and selecting Node Label, and typing a name. This will allow you to keep track of the adjustments you make throughout the process. Right-click on the second shot (the reference shot) and choose ‘Wipe Timeline Clip’. This engages the image wipe with the timeline clip. You can swap the wipe with Option or Alt + W and toggle it on and off with Command or Ctrl + W.

Step 3: Adjust custom curves
To begin making adjustments, use the custom curves feature to adjust the red, green, and blue channels independently. By default, Resolve maintains luminance as you make adjustments, which can be counterproductive when trying to match the color channels. To prevent this, turn the Luma Mix setting down to 0 which is bellow the Offset wheel, allowing you to manipulate each channel without affecting the others.

Compress the shadows in each channel to match the reference shot. Shift-click to add a control point on the curve and pull down to compress the shadows. Do this for each channel, making sure to isolate the channel you’re working on.

Step 4: Tweak the adjustments
After compressing the shadows, you may need to make additional tweaks to achieve a closer match. Use the primary wheels’ offset setting to adjust the overall color balance of the shot. Keep an eye on the viewer to match the color as closely as possible. Toggle the correction on and off with Command or Ctrl + D to see the progress and make further adjustments if necessary.
Step 5: Match colors using complementary colors
To match colors more accurately, consider using complementary colors in the highlights or midtones. For example, if the reference shot has more cyan in the highlights, you can remove red from the highlights of the first shot to introduce more cyan. Create control points in the curve and adjust them accordingly. Be mindful of any color changes in other areas of the shot and make adjustments using additional control points if needed.
Step 6: Compare the shots
Once you’ve made your adjustments, turn off the wipe and use the split-screen feature to see both clips in their entirety in the viewer. Shift-click to select both clips, then right-click in the viewer and choose ‘Split Screen’ and ‘Selected Clips’. This allows you to see all of each clip at the same time and continue making adjustments while looking at both clips simultaneously. Comparing the shots in this manner helps you achieve the best match possible.
Last Words
We hope that you found this guide informative and helpful in your journey to mastering color matching techniques in this powerful video editing software. Your support is invaluable, and we are dedicated to continually providing you with high-quality content that enhances your video editing skills.