
Welcome back to FilmmakingElements.com. If you are a filmmaker or video editor, you have probably encountered footage with dust spots or other unwanted particles that can be distracting to the viewer.
These imperfections can occur due to a variety of reasons, such as shooting in a dusty environment or having a dirty camera sensor. However, with the help of advanced video editing software like Davinci Resolve, removing dirt and dust from your footage has become easier than ever before.
In this article, we will explore three methods for removing dirt and dust in Davinci Resolve so that you can achieve a cleaner and more professional look for your videos.
Method 1: Automatic Dirt Removal in DaVinci Resolve
One of the most efficient ways to remove dust and dirt particles from your footage is by using DaVinci Resolve’s Automatic Dirt Removal plugin. This powerful tool leverages optical flow technology to identify and eliminate temporary imperfections, such as dust, dirt, hair, or tape hits, while preserving the original frame’s structural details. Follow these simple steps to clean up your footage:

- Select the affected clip: Begin by selecting the clip containing dust or dirt particles and navigate to the Color page in DaVinci Resolve.
- Apply the plugin: Click on the Effects button located in the top right corner and search for the Automatic Dirt Removal plugin. Drag and drop it onto a node.
- Adjust main controls: Customize the plugin’s settings to achieve the best results for your footage. Some of the main controls include:
- Motion Estimation Type: Choose between None, Faster, Normal, and Better to balance performance and quality.
- Neighbor Frames: Determine how many frames to compare for dirt detection. More frames yield better results but increase processing time.
- Repair Strength: Adjust the aggressiveness of dirt and artifact repairs using this slider.
- Dirt Size Threshold: Define the minimum dirt size to be removed, allowing you to exclude elements like film grain.
- Show Repair Mask: Enable this checkbox to visualize the detected dirt and artifacts, helping you fine-tune the filter’s effectiveness.
- Fine-tune controls: Further refine the effect by adjusting the fine controls, such as:
- Motion Threshold: Set the threshold for pixels in motion to be considered as dirt and artifacts. Lower values may miss some dirt, while higher values can cause motion artifacts.
- Edge Ignore: Exclude hard edges from the dirt removal process by adjusting this slider, preventing unwanted effects on sharp edges.
If this plugin is not able to automatically find the dirt spot in your case you can head on to the next method.
Method 2: Dust Buster in DaVinci Resolve
The Dust Buster plugin is another powerful solution to eliminate dust, dirt, and other imperfections from your clips in DaVinci Resolve. Unlike Automatic Dirt Removal, this plugin requires user guidance, allowing for manual control over the cleanup process. Dust Buster is particularly useful for handling larger stains and blotches or when Automatic Dirt Removal yields unsatisfactory results.

To get started with the Dust Buster plugin, follow these steps:
- Select the affected clip: Choose the clip with dust or dirt particles and navigate to the Color page in DaVinci Resolve.
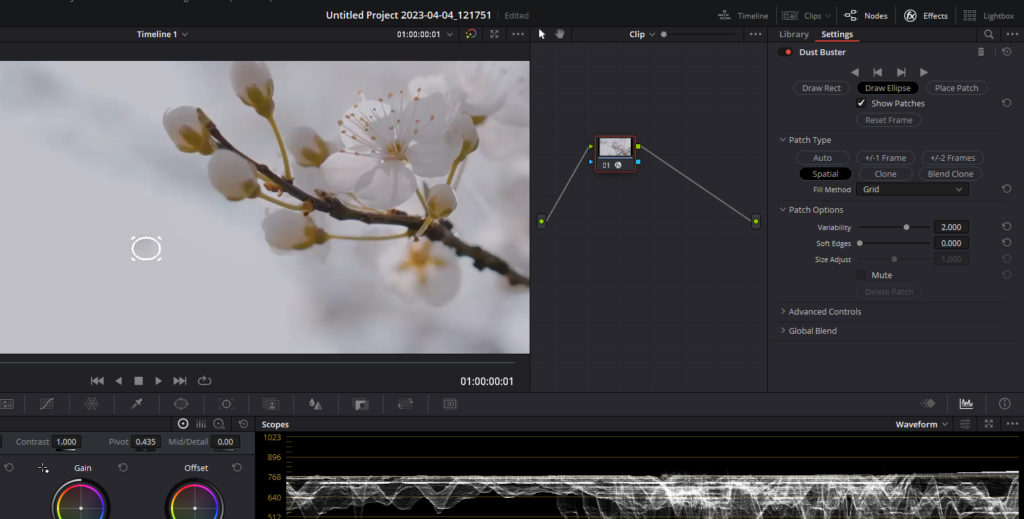
- Apply the plugin: Click the Effects button in the top right corner, find the Dust Buster plugin, and drag and drop it onto a node. Choose Spatial in the patch type option as the starting point.
- Navigate through the clip: Make sure you have Open FX Overlay selected in the drop-down menu below the viewer. Zoom in the clip and move through the clip frame by frame, drawing boxes around the imperfections you want to eliminate in the viewer. Make sure you keep drawing boxes frame by frame. You can go to the next frame by using right and left arrow keys. Once you’ve drawn a box, the imperfection will be automatically removed in the most seamless way possible.
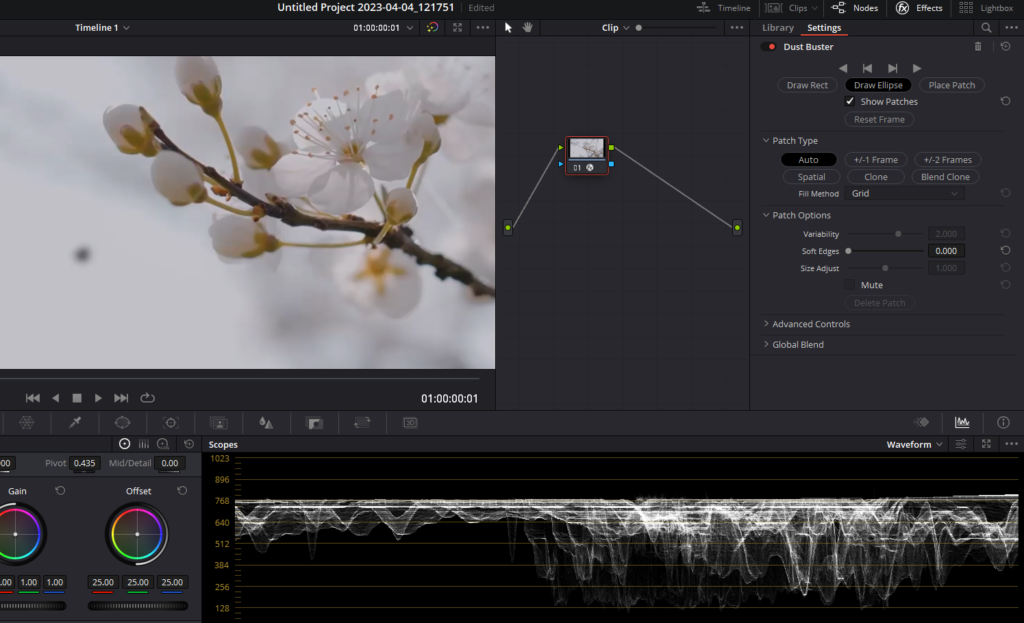
- Use general controls: On the right side you will see the controls of the Dust Buster plugins. The top-level controls allow you to draw patches for repairing temporally unstable dust and dirt in the frame and choose whether or not to show their on-screen controls. Some general controls include Navigation Controls, Patch Style, New Patch Size, Show Patches, and Hide During Interaction.
- Choose a patch type: There are six methods you can use to fix the contents of a selected patch, including Auto, +/- 1 Frame, +/- 2 Frames, Spatial, Clone, and Blend Clone. Each patch type offers a different approach to removing imperfections from your footage. Refer below to understand different patch types in detail.
- Select a fill method (for Spatial Patch Type): If you’re using the Spatial Patch Type, the fill method determines how the blemish in the image is repaired. Options include Grid, Horizontal, Vertical, Patchy, and Smooth.
- Customize patch options: These options allow you to tailor the effect of a patch filling over a blemish, such as Mute, Variability, Soft Edges, and Size Adjust.
- Configure advanced controls: Additional controls let you customize the plugin’s user interface, including Clone Sticks to Mouse, New Patches Stay Selected, UI Line Thickness, and Output Mode.
By carefully implementing the Dust Buster plugin and adjusting its settings to suit your footage, you can manually remove dirt and dust from your videos while preserving their overall quality. This level of control makes the Dust Buster plugin a valuable addition to your toolkit when dealing with persistent or large imperfections in your footage.
Understanding Patch Types in DaVinci Resolve’s Dust Buster
When using the Dust Buster plugin in DaVinci Resolve, selecting the appropriate patch type is essential for achieving the desired results. Each patch type offers a unique approach to removing imperfections from your footage. Here, we’ll discuss the six available patch types in detail to help you make an informed decision based on your specific needs:
- Auto: This default method analyzes the two frames prior to and the two frames after the current clip. It samples the best of these five frames to remove the imperfection in the current frame. Auto prioritizes images two frames away to avoid the appearance of frozen grain, but only if they’re a suitable match to the content of the current frame.
- +/- 1 Frame: In this mode, drawing a bounding box from left to right uses the next frame to remove the imperfection, while drawing from right to left uses the previous frame. This approach is useful when you know that a suitable reference frame is immediately before or after the current frame.
- +/- 2 Frames: Similar to the +/- 1 Frame method, if you draw a bounding box from left to right, the image two frames forward is used to remove the imperfection. Conversely, drawing from right to left uses the image two frames back. This method is helpful when you need to reference frames further away from the current one.
- Spatial: This patch type automatically fills the interior of the selected patch with pixels drawn from the surroundings of the patch using the Fill Method. It works well for small blemishes, but for larger blemishes, a pattern might be discernible, which gives away the effect. When using Spatial, you can choose from various Fill Methods, including Grid, Horizontal, Vertical, Patchy, and Smooth.
- Clone: Clone mode copies a part of the image to fill a shape or patch placed over the imperfection you want to remove. After placing a Rect, Ellipse, or Patch over an imperfection, a second click is required to place the sample region you want to clone. The sample region is indicated by a dotted shape connected to the original shape. This method is ideal for cases where you need to replace the imperfection with a specific part of the frame.
- Blend Clone: Similar to Clone mode, Blend Clone fills the Rect, Ellipse, or Patch with a copied part of the image. However, the copied portion is blended with the image to integrate it more softly. This method is useful when you need a smoother transition between the cloned area and the surrounding pixels.
Method 3: Object Removal for Dust and Dirt Elimination in DaVinci Resolve


- Create a Power Window: First, navigate to DaVinci Resolve’s Color page. In this page, you’ll find the Power Window icon, which you’ll need to click to create a power window around the unwanted dirt or dust particle in your footage. Make sure to closely follow the shape, hugging its curves as tightly as possible while leaving a little bit of feathering on the edge. This feathering will help the dirt blend back into the environment when it is replaced.
- Apply Object Removal OFX: Once you have set up the power window around the unwanted dirt, you’ll need to apply the Object Removal OpenFX plugin. To do this, drag and drop the plugin onto your color node. Double-check to ensure that the power window fully covers the object using the mask overlay feature. Click on the checkbox “Show Mask Overlay”.
- Analyze the Scene: After applying the Object Removal OFX plugin, click on the “Scene Analysis” button. This will prompt DaVinci Resolve to analyze the scene and determine the best way to remove the unwanted object. Keep in mind that this process may put some strain on your computer’s CPU and GPU, but it is essential for achieving the desired results.
- Adjust the Settings: To improve the removal result, adjust the settings within the Object Removal OFX plugin. Additionally, choose the “Object” mode in the Scene Mode settings, which is specifically designed for removing objects from your footage.
- Set the Analysis Boundary: The analysis boundary setting determines the number of frames before and after each processed frame that DaVinci Resolve should analyze for suitable object replacements. It is important to choose the smallest range that still produces acceptable results. This will ensure that the removal process is as efficient as possible.
- Choose the Render Mode: Changing the render blend mode to “Adaptive Blend” can greatly improve the removal result without necessitating additional scene analysis. This mode adapts the blending process to better match the surrounding environment, making the removal more seamless and convincing.
- Review and Adjust: Finally, play back your footage to assess the effectiveness of the object removal. If you notice any issues or inconsistencies, make the necessary adjustments to achieve the desired result. This may involve fine-tuning the power window, modifying the settings within the Object Removal OFX plugin, or re-analyzing the scene to ensure the best possible outcome.
Conclusion
Thank you for reading our article on removing dirt and dust from your footage in DaVinci Resolve. We hope you found these methods helpful and that they enable you to achieve cleaner, more professional-looking videos. By following the step-by-step instructions provided for each method, you should be able to effectively eliminate unwanted particles and imperfections from your footage, regardless of the specific challenges they present.
Remember that practice makes perfect, and the more you familiarize yourself with these techniques, the better your results will be. Don’t hesitate to experiment with different settings and approaches to find the optimal solution for your specific needs.
We appreciate your time and interest in our content here at FilmmakingElements.com, and we look forward to providing you with more valuable insights, tips, and tutorials in the future. If you have any questions or feedback, feel free to leave a comment or reach out to us directly. Happy editing!