
Hi! Welcome back to Filmmaking Elements. In this awesome article, we’re talking about video stabilization in DaVinci resolve because we don’t want shaky video, it not only makes the video look obnoxious but becomes terrible to watch for longer periods.
In a lot of common instances, while shooting a film or documentary or even just a youtube video, the camera and the lens we use for shooting does not have in-built stabilization. In that case, the only way to get rid of shaky footage is during the editing. So, let’s jump into Davinci Resolve and let’s see the easiest and the quickest way to stabilize your footage.
Easy Video Stabilization in DaVinci Resolve Technique!
If you refer to my workflow, my plan is very simple. I personally decide to edit my videos fully and mark the shaky videos on the way which need to be stabilized and come back to them again once I am done editing. This way I am able to maintain my pace and flow of editing and it makes my job less stressful.
So we’ve got a few different ways that we can apply our stabilization to our clips.
Stabilizing Video In Davinci Resolve On Edit Tab

Let’s take a look at the first way that you can do it i.e in the edit tab.
- In the edit tab, it is super easy. Highlight your clip which needs to be stabilized.
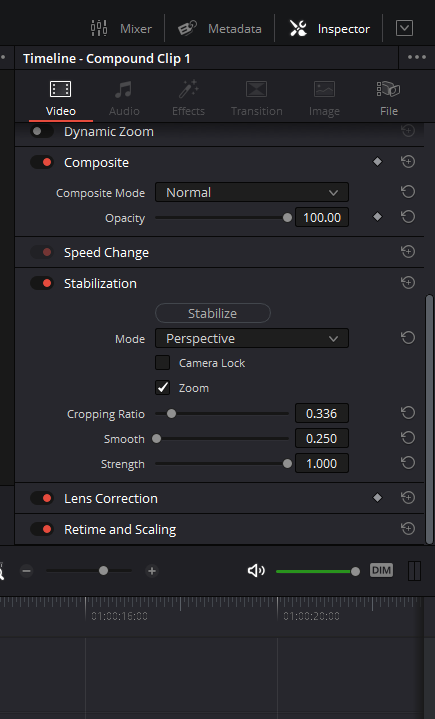
- On the top right corner click on the “Inspector” tool. You will then see multiple options ‘Video, Audio, Effects, Transition, Image, and File. Make sure you’re under the Video section.
- If you scroll down, you’ve got a stabilization option, go ahead and click on that guy. Open it up and scroll down a little bit.
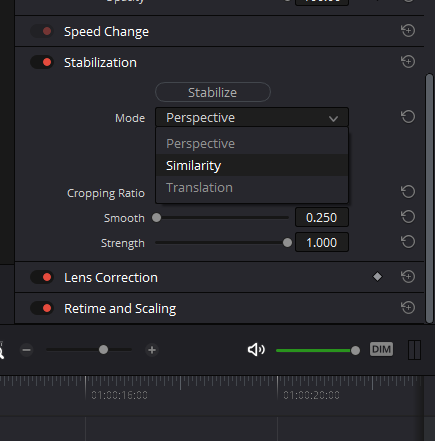
- Now there are a couple of different stabilization modes that you can use here. You’ve got perspective, similarity, and translation. I’m not going to go over all now what they do, how they’re a little different. What I’m going to tell you now is to try each one. Start with the first one, that is perspective. If it works, you’re good to go. Don’t worry about it. If it doesn’t work, try the next one. See if that one works.
- Sometimes it will distort the picture a little bit or make it a little wonky and make it a little weird. So just try the different ones and hit stabilize and then see which one works for you.
- Most of the time Perspective works the best for me.
- After selecting the Stabilization Mode between perspective, similarity, and translation, there are a few more options that are sliders to fiddle and finesse your footage.
- If you ever change any of these, if something doesn’t look good, you can try adjusting them. And if you get things all out of whack, you don’t remember where they were, all you have to do is double click on the name and it’s going to reset it to the default settings.
- So once you have your clip selected, you select the method you want. Just hit stabilize. It’s going to go ahead and think it’s going to stabilize that clip.
- It is going to Zoom in just a little bit on your clip to help stabilize it a little bit. You can change the amount of it by using the ‘Cropping Ratio’ slider.
- While shooting always keep in mind that if you are going to stabilize your footage you will lose some area around the sides and corners of the frame and shoot accordingly.
- The wider you shoot in such cases the better the result will be. It’s better to keep this in mind from the start of the shooting.
Understanding all the stabilizing controls in detail
Within a clip, these controls allow you to smooth out or even stabilize undesirable camera motion. The analysis is carried out in such a way that specific subjects inside the frame, as well as the overall direction of ideal camera motion, are preserved while jerking movements are corrected.
Three options are available from a pop-up menu for how the selected footage is evaluated and altered during stabilization. Before selecting the Stabilize button, you must first select an option since the option you select affects how the image analysis is performed. If you choose another choice, you’ll have to re-analyze the footage by clicking the Stabilize button.
- Perspective– This allows for the examination and stabilization of perspective, pan, tilt, zoom, and rotation.
- Similarity– This allows for the analysis and stabilization of pan, tilt, zoom, and rotation in cases when perspective analysis produces undesired motion distortions.
- Translation– Only allows for pan and tilt analysis and stabilization, which is useful when only X and Y stabilization yields satisfactory results.
Explaining other controls that are present in the Stabilization section of Davinci Resolve:
- Zoom– When this checkbox is selected, the image is scaled by a large enough percentage to remove the blanking (black edges) caused by warping and distorting the image to remove undesirable camera motion.
- Camera Lock– When this checkbox is enabled, the stabilizer disables Cropping Ratio and Smooth and focuses on removing all camera motion from the frame in order to achieve a fixed shot.
- Cropping Ratio– This number restricts how hard the stabilizer attempts to steady by specifying how much blanking or zooming you’re ready to accept in exchange for removing undesired motion.
- Smooth– This allows you to add mathematical smoothing to the studied data used to stabilize the footage, allowing camera movements while removing undesirable jittering.
- Strength– This is a multiplier that enables you to specify how strongly you want to apply the stabilization track to remove motion from a shot using the present analysis.
Stabilizing Video In Davinci Resolve On Color Tab

The second method here is to jump over into the color tab and we can essentially do the same thing. Let’s check that out.
- For the people who are not familiar. The color tab can be accessed through the dotted wheel-looking icon present at the bottom menu.
- Don’t get intimidated, I know a lot is going on in this section of Davinci Resolve.
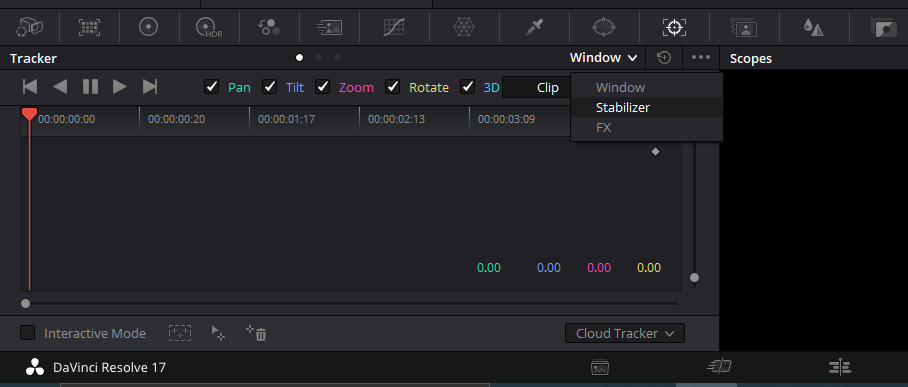
- After selecting the clip, you can do this by clicking on the thumbnail of whichever clip you want to stabilize, what you want to do is come to your middle area here and click on the small target-looking icon.
- A tracker window will appear.
- By clicking on the bottom looking arrow beside where ‘Window’ is written you will get a drop-down menu and select ‘stabilizer’ from there.
- Once you click on the stabilizer, you will get the same options that you had over on the edit page in the ‘Inspector’ area. It will look slightly different but does the same thing.
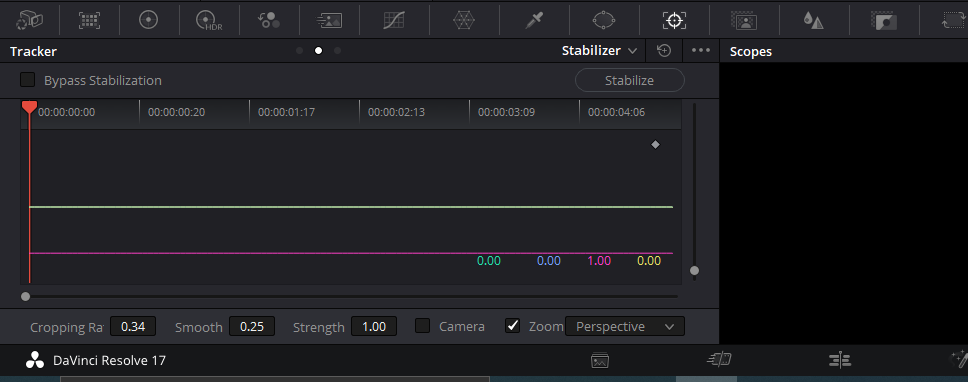
- Take a look, You’ve got a little graph that’s going to show you the progress of the stabilizer in a graphical way. You’ve got your cropping ratio, smooth, and strength options.
- You can lock the camera, you can Zoom in and you have those same three methods. You’ve got perspective, similarity, and translation in the drop-down menu that you can try depending on which one works best for your particular clip.
- Sometimes I find one works better than the other. It’s just different ways and algorithms that Davinci Resolve processes the clip and tries to stabilize it for you.
- The other nice feature is that you can bypass the stabilization by clicking on the checkbox which says ‘Bypass Stabilization’.
Back in the day, you didn’t have the option to do it in the ‘Inspector’ over in the edit tab, you had to come here to the color tab to get the job done. But now you can do it in either place.
You must note that it’s essentially the same tool and it works fine, either way, you want to do it. So that are essentially the two ways that you can stabilize your clips right here in DaVinci Resolve. It’s pretty easy, pretty quick, and sometimes depending on the length of a clip and how powerful your computer is, it can take a little while to process it.
Pro Tip!
A few other things I wanted to touch upon before ending this article. When you’re trying to stabilize your footage, make sure if your camera has an in-body image stabilization option or not.
Some of the cameras have a very good built-in image stabilizer which does a very good job in the camera itself. By turning these options on in the camera itself you will need not have to worry about the hassle and focus on the shooting.
By turning the in-body image stabilization option in the camera you will see there is a slight crop and zoom, so it’s better to shoot as wide as possible.
Also, make sure if the lens that you are using to shoot has any image stabilization option or not. The best practice is to use all of these in combination to get the best and smoothest motion.
You can use the built-in stabilization options present in your camera and the lens together and shoot as steady as possible on set and utilize the Stabilization option present in the Davinci Resolve for best results.
But do keep in mind that you will get a small crop from the edges while stabilizing your footage so try and make sure your subject does not gets cropped.
One last but most important thing to keep in mind is always try to completely edit your project first and then stabilize the footage. This way you would not have to stabilize your footage from start to end rather till the point where there is a cut on the clip.
This way you will save a lot of time depending on how powerful and how fast your computer can process.
- Also Read- Best Samsung T5 SSD Alternative For BMPCC 4k & 6k
- Also Read- 7 Tips For Making The Best Colorist Showreel
- Also Read- Day For Night Color Grading In Davinci Resolve
- Also Read- How Good Are Xeen Cine Lenses ?
- Also Read- Full Frame Vs Super 35 | In-Depth Comparison