Hi! Welcome back; in this article, we cover How To Color Grade RED RAW(R3D).
If you happen to own or have access to a RED Cinema Camera, I want you to pat yourself on the back. If you don’t have the funds or you can’t afford a RED Cinema Camera, that’s fine, too. You can pat yourself on the back because, ultimately, it is the person, not the tool, that makes the ultimate difference in the outcome.
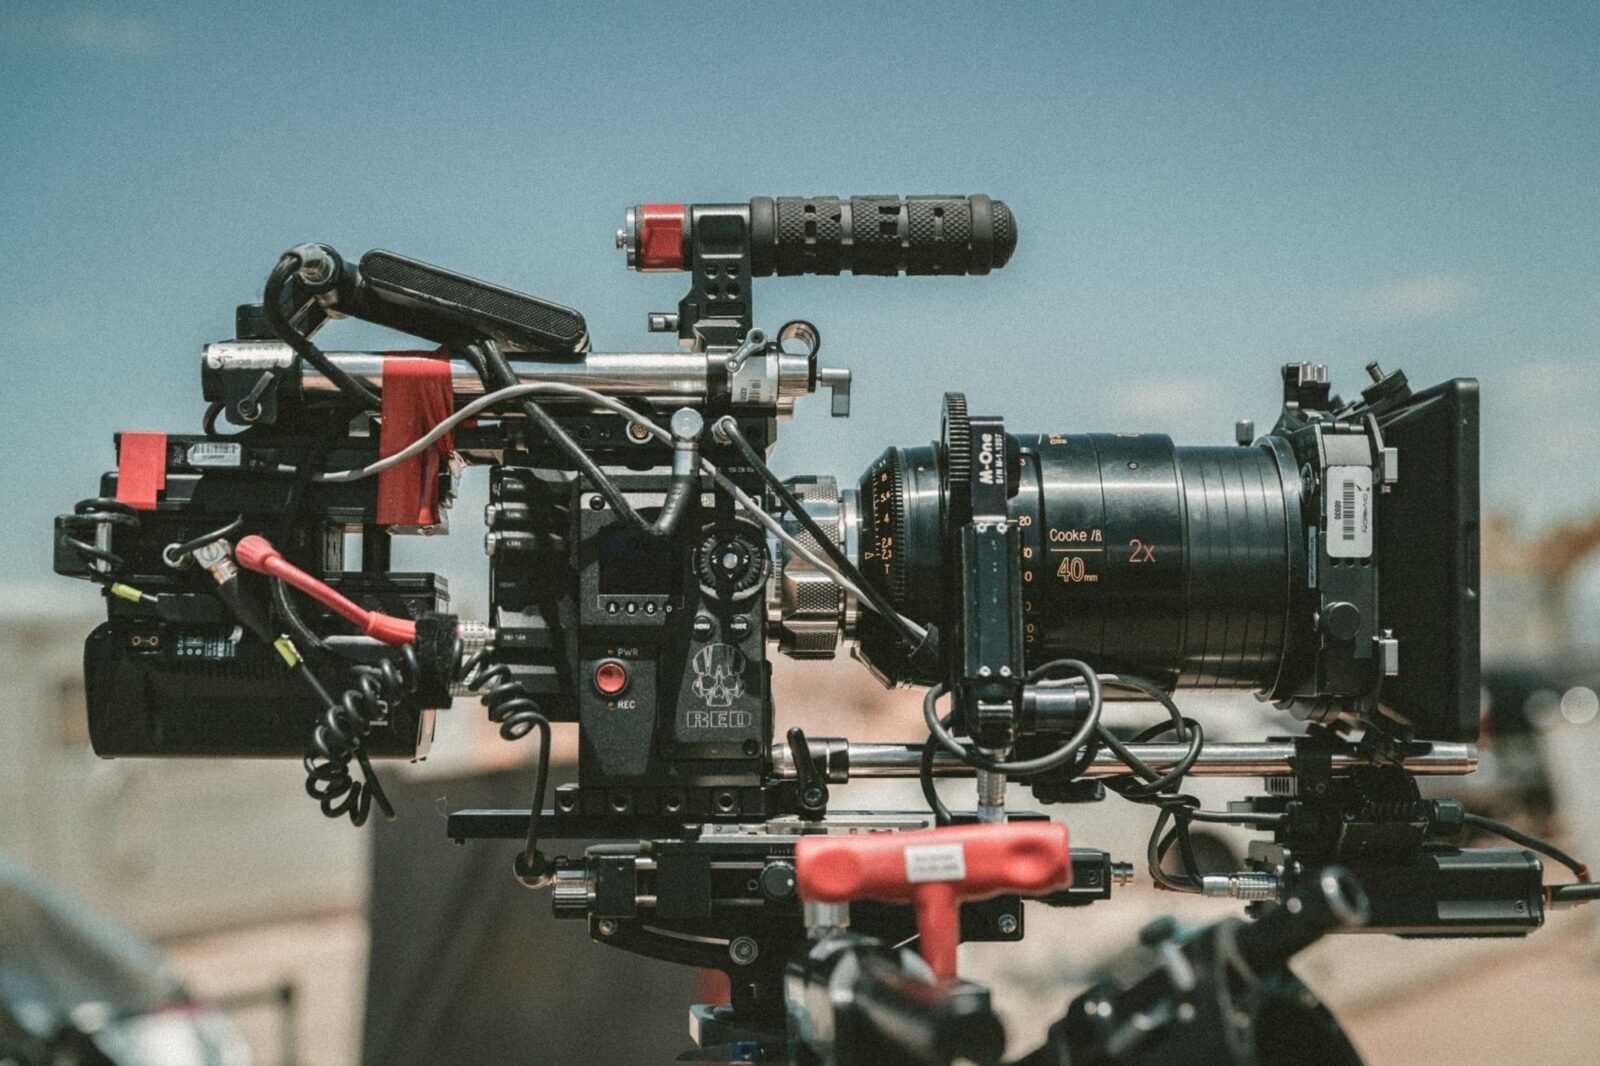
That being said, the RED Cinema Camera Lineup is a phenomenal camera, and it produces some pleasing images that look incredible. I mean, they look film-like.
So in this article, we’re going to look at how to get the most out of the images shot on the Red camera in DaVinci resolve. The Red is unique because it utilizes RAW recording to capture unprocessed images. The RED-RAW is also known as RED R3D.
In Davinci Resolve, we can dig into the original negative or RAW data to adjust the ISO, color, gain, and contrast parameters. So let’s take a look.
In Resolve, there are two places where you can access the raw image data for the Red camera. The first is the Project Settings panel, where you can make global adjustments as a starting point. The second is in the Camera Raw palette located on the color page, where we can follow up with individual clip adjustments.
Although the controls in the Project Settings panel and the Camera Raw palette are similar, one allows you to make global changes to the entire project. In contrast, the other will enable you to make adjustments on a per clip basis. Let’s look at each option in more detail.
1. Color Grade RED RAW (R3D) Using Project Settings Panel
- Click on the Gear icon to bring up the project settings or go to File>Project settings.
- Select “Camera Raw” from the menu on the left
- Any changes you make in this area will affect all the RAW footage throughout your project.
- Select RED in the RAW profile drop-down menu.
I will explain everything from top to bottom so that you have no questions left after reading this article.
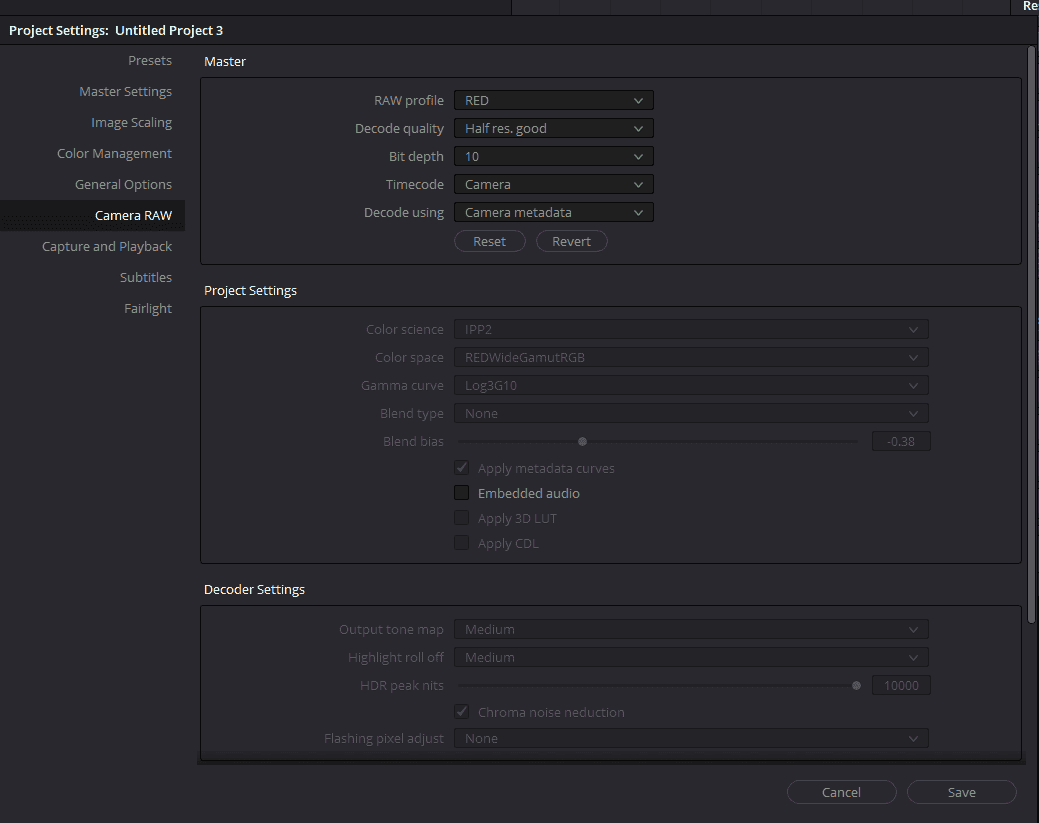
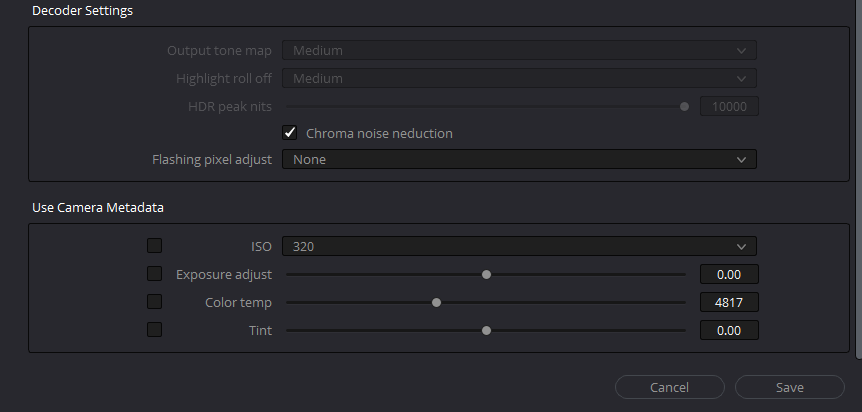
We have the master settings, which include the decode quality, bit depth time code, and whether to decode the images using the RED default settings, camera metadata, or custom settings for the project, which you can find in the “Decode Using” menu.
You’ll notice that selecting either the RED default or camera metadata from the “Decode Using” drop-down menu will result in the options below being grayed out.
The “RED default” is a generic setting for Red Raw files, while the “camera metadata” is the settings that the DP or camera operator chose on set. But if you want to control all the Raw settings in the post-production environment, then use the “Project” decode option to specify how the Red Raw images will be debayered.

Now, one thing to point out is that working with Red RAW files can take a lot of processing power, and depending on your particular setup; you may need to adjust the decode quality.
What I have learned from my personal experience is to never go above the “Half res. good” option unless you have a very powerful computer.
It’s a good idea to test these settings out to find which one gives you optimal playback.
Next, in the Color Science menu, you can choose between three different options, “Orignal,” “Legacy,” and “IPP2”. Because IPP2 is Red’s latest color science, I recommend choosing that option.
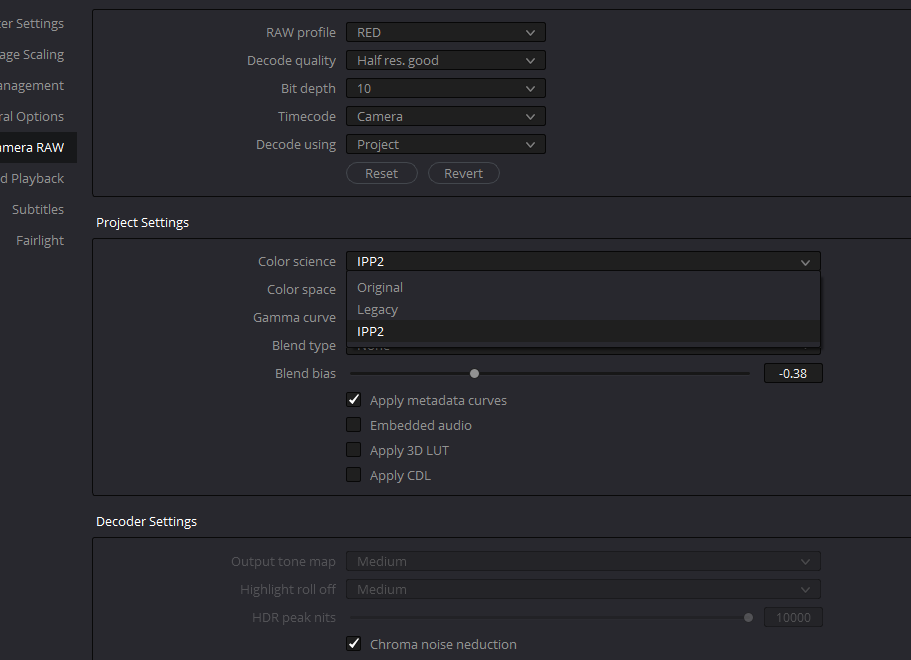
Then, in the “Color Space” and “Gamma Curve” menu, there is a wide range of options to choose from. In the color space menu, “Rec.709” is most often used and is the color space for high-definition delivery.
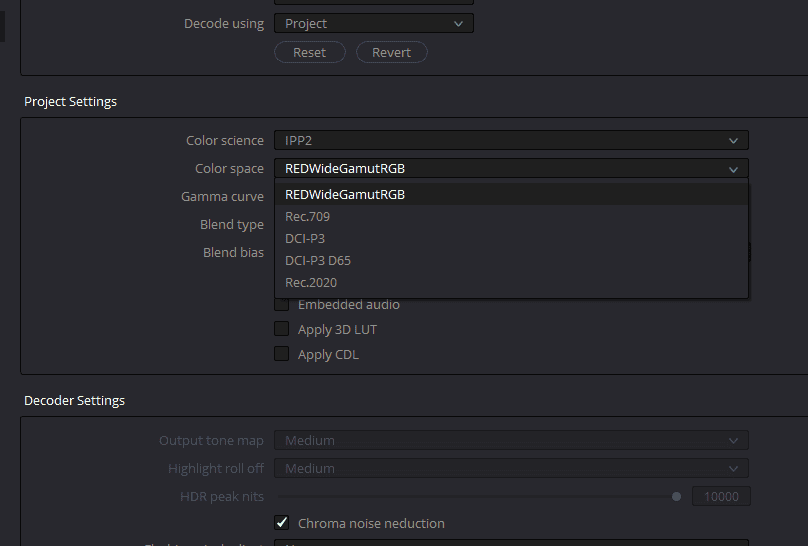
Rec.709 is the color space that is used in broadcast media. DCI-P3 is used to deliver projects which will be projected in a theatre. DCI-P3 D65 is used for OTT platforms, and Rec.2020 is used for HDR deliverables. “REDWideGamutRGB” is the RED LOG color science.
Now, the question, which setting should I choose? Well, this all comes down to personal preference and what combination of settings gives you the best starting point to reach the intended look for your project.
Moving to the “Gamma curve” options. “Log3G10” offers LOG gamma with a gentle roll-off in the highlights. The linear option makes no gamma adjustment. “Gamma 2.2” and “Gamma 2.6” are for web deliveries. “Hybrid Log-Gamma” and “HDR ST.2084” are for HDR deliveries.
The only thing I can offer by way of suggestion is when deciding on these is to understand that some combinations like REDWideGamutRGB and Log3G10 will offer a larger color gamut and dynamic range to work from, but may take more time to get your image to where you want it to be.
Because your starting point will then shift to LOG color space, either you might need to use a LUT made by the manufacturer, or you might need to might some creative LUTs. You can also use your Primary Color Wheels, Contrast and Pivot, but it will increase your time on each shot.
So, depending upon your budget and the amount of time you have to color grade a project will help determine the settings you choose. Do you want a more flexible option, with higher quality, or something quick and easy that quickly gets you to the finish line?
Controlling the Camera Metadata of RED RAW in Davinci Resolve
Supposedly we want a project to use the Color Space of Rec.709 and the Gamma Curve setting of Gamma 2.2. As soon as we hit Save, the settings are applied to every clip in our timeline.
Now coming to one of the main USPs of using RED RAW in your projects. You can also change and access the camera metadata like ISO, Color Temperature, and Tint in the post-production stage. When you scroll down to the same “Camera RAW” section in the project settings, you find the “Camera Metadata” options.
In addition, let’s say our entire timeline was shot under the same lighting conditions with consistent exposure. Depending on what Creative Direct calls for, we may want to cool things off by adjusting the color temperature and increasing the exposure using the “Exposure adjust” slider.
These controls are great because you can make global changes that are non-destructive and speed up the process.
2. Color Grade RED RAW (R3D) using the “Camera Raw” palette on the Color Tab
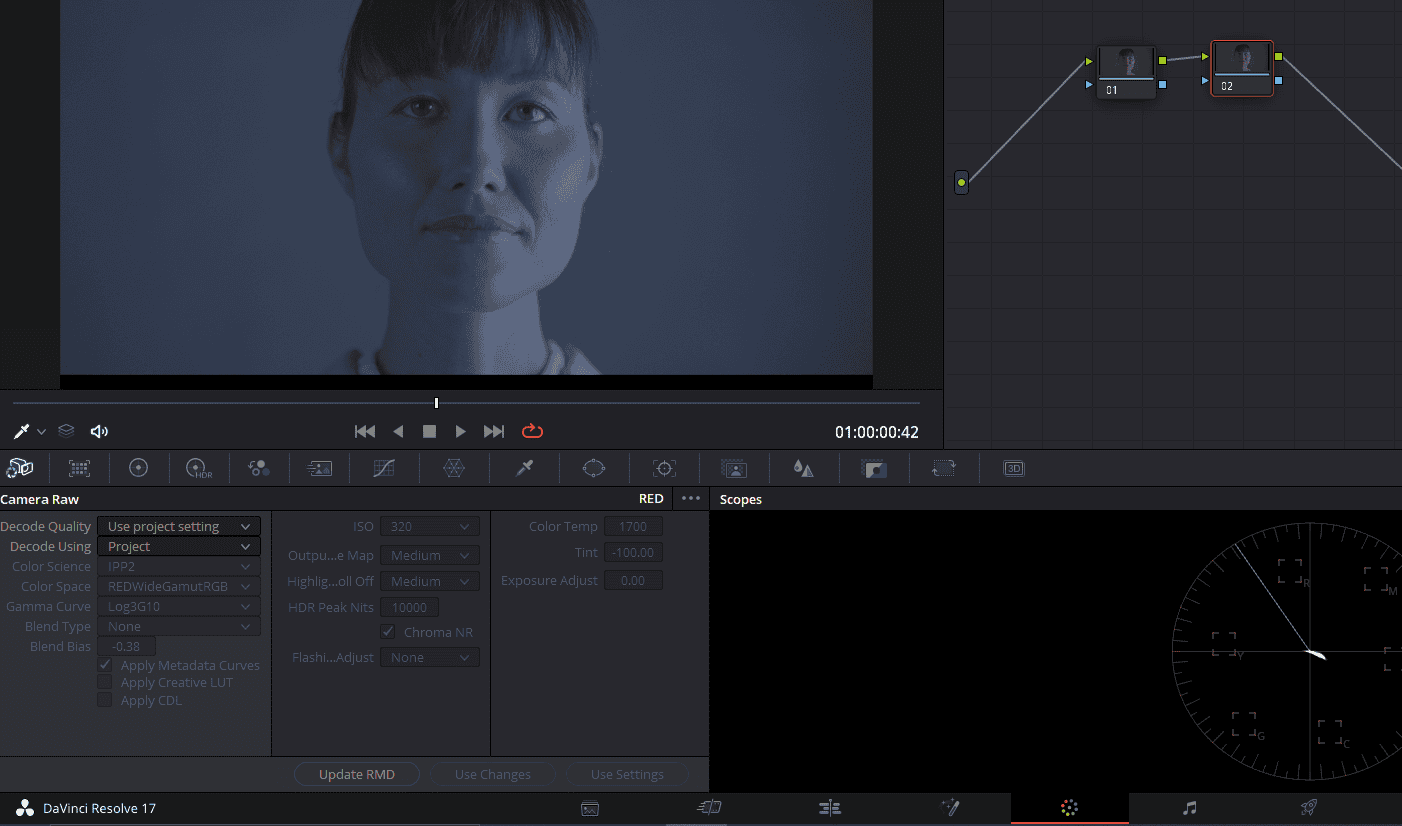
You can find the Camera Raw palette on the color tab with all the color grading tools. Using this method, you have manual control on every clip in your project. So if you are color grading a film that has a camera B and is shot on Blackmagic RAW, in that case, this can be super helpful.
By default, decode is set to project, and all the other controls are grayed out. We could go with that and start grading but set the decode mode to clip.
It’s worth noting that when you change the decode setting to clip, it acts as a springboard using the project settings as a starting point. So if you’ve already set those, that can significantly speed things up.
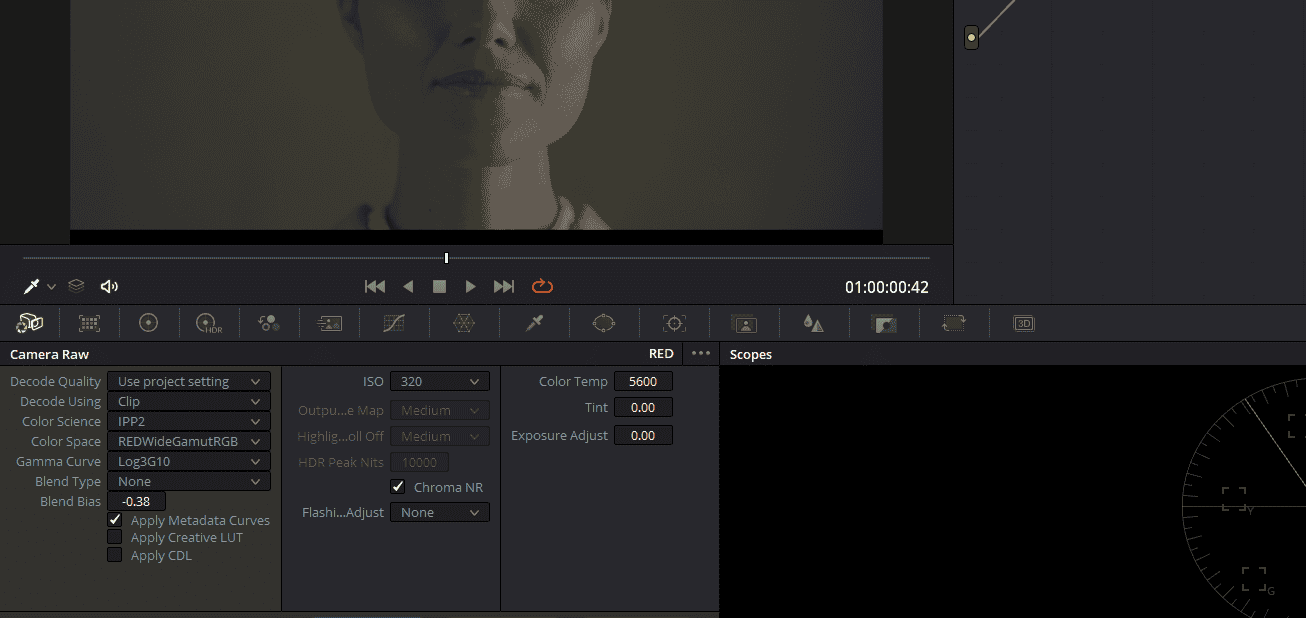
When you select the clip, you get all the same options that you had in Project Settings on a clip-by-clip basis in your color tab.
A lot more deciding between the different raw settings can depend largely on where your project will be viewed and, of course, what your personal preference is.
Again the purpose of using the raw settings is to get your images to a good starting point so you can maximize the quality of your grades and creativity using the raw settings.
During this first correction stage, as part of our base correction, we’ll result in much cleaner images, and it’s non-destructive as well; I hope you found this article helpful. You can download some RED RAW R3D sample footage from their official website.
3.Best Color Space and Gamma Curve Setting to Color Grade R3D Footage

The first and foremost goal of every article I write is to give the best information available all over the internet.
After reading till this point, if you doubt what Color Space and Gamma Curve Setting to choose, I am more than happy to make this an effortless job.
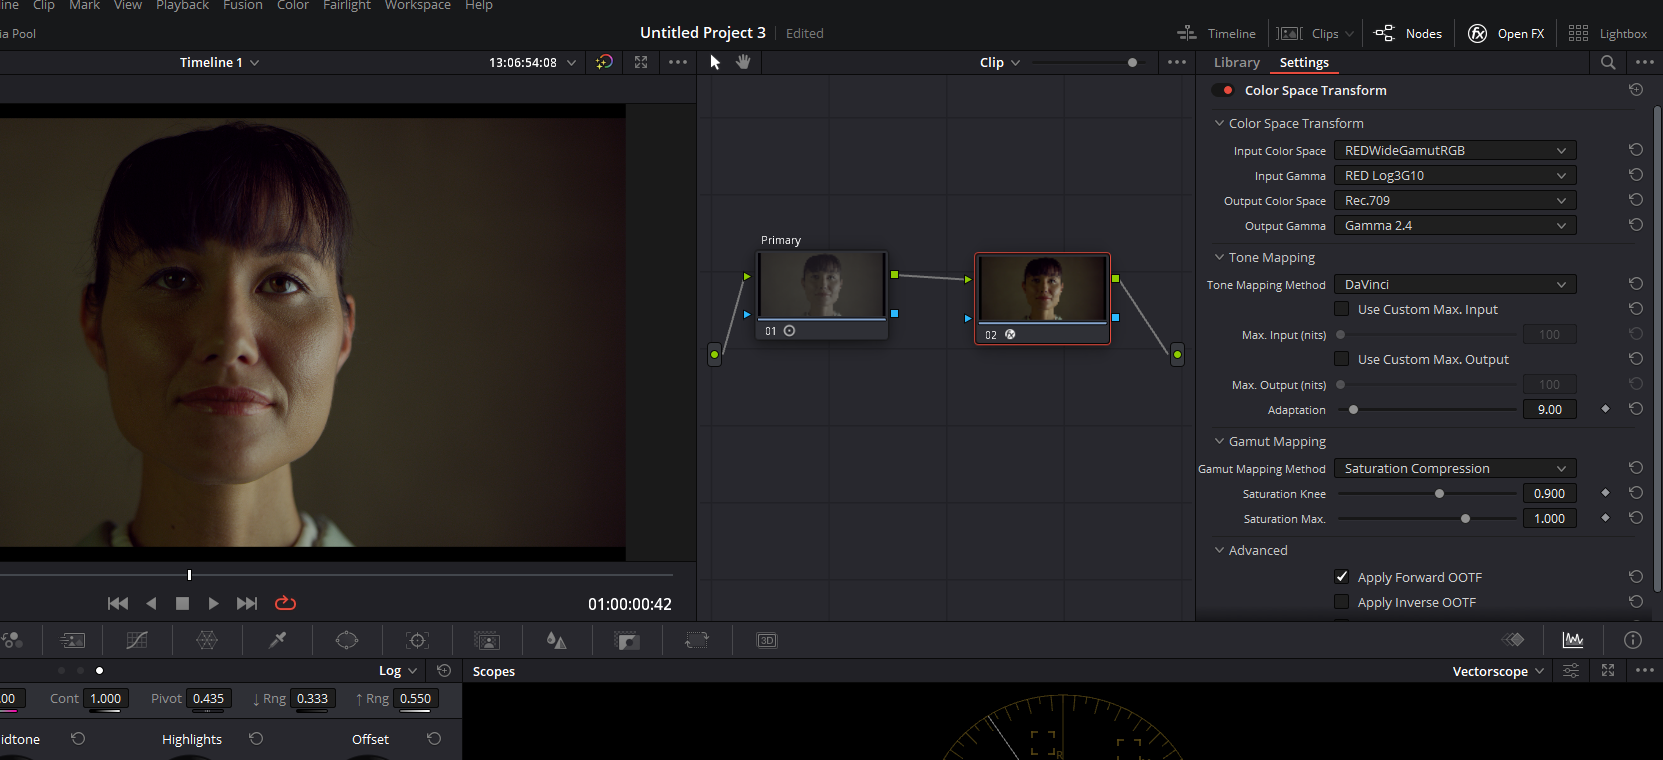
- Set your Color Space to REDWideGamutRGB
- Set Your Gamma Curve to Log3G10
- You will see that your footage has started looking flat
- Select “OpenFX” from the top right corner on the color tab
- Drag “Color Space Transform” ofx on a node.
- Select “REDWideGamutRGB” in Input Color Space
- Select “RED Log3G10” in Input Gamma
- Select “Rec.709” in Output Color Space
- Select “Gamma 2.4” in Output Gamma
- You can change the output color space and gamma according to what you deliver.
- Select “Saturation Compression” in Gamut Mapping Method.
- If you want to use a LUT, instead of using color space transform, just select a LUT.
- If you have a lut that works on Rec.709 footage, keep the Color Space Transform node and make a node after it.
- Put your Rec.709 LUT after the Color Space Transform Node.
- Make a node before this node and start grading.
4.Color Grade RED RAW(R3D) Using ACES In Davinci Resolve
ACES color management workflow is getting famous among filmmakers, and it is necessary to know how to color grade RED R3D footage in an ACES workflow. Try and experiment with all the methods you learned out here and see which works the best for you.
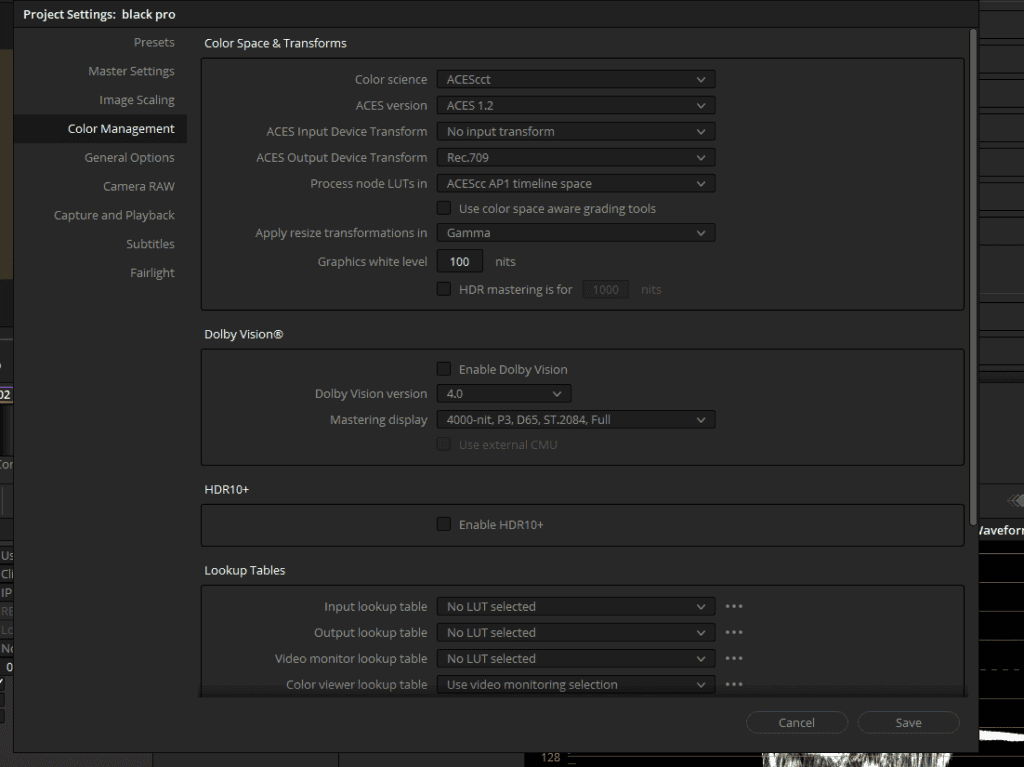
- Go to File>Project Settings.
- Keep this in mind that when using ACES workflow, Davinci Resolve automatically detects the RED R3D footage.
- Go to “Color Management” settings.
- Select “ACEScct” from the Color Science drop-down menu.
- Select the latest version of ACES from the menu.
- Make sure “No Input Transform” is selected in the “ACES Input Transform.”
- Select “Rec.709” in “ACES Output Transform.”
- Hit Save
The reason why we did keep ACES input transform blank is because it is an advanced color management system and automatically detects and selects the correct color space and gamma for RAW media files. This is also one of the reasons why filmmakers choose ACES.
5.Color Grade RED RAW(R3D) using Davinci Resolve Color Management Workflow
Hands down the most efficient color grading workflow to color grade RED RAW footage. Just like ACES, Davinci Resolve YRGB Color Managed workflow automatically recognizes the RAW footage and color grades it. To use it follow the steps given below:
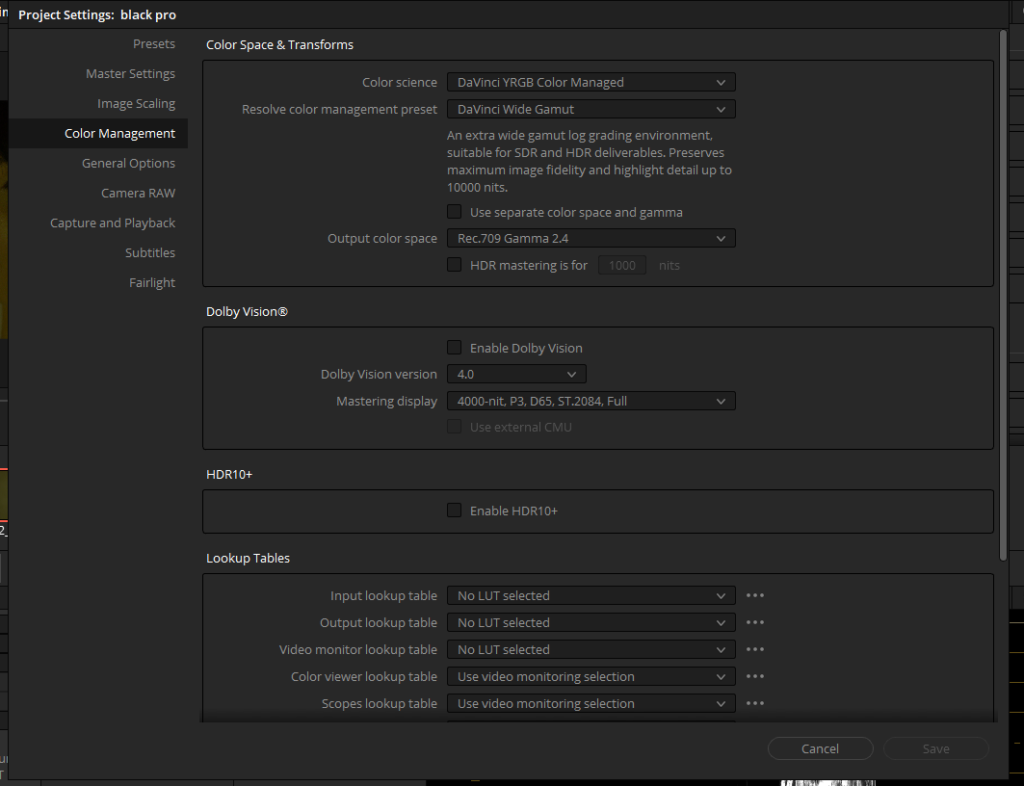
- Click on the gear-looking icon in the bottom right corner to open “Project Settings”
- Head to the “Color Management” tab.
- In the “Color Science” dropdown menu, select “Davinci YRGB Color Managed”
- In “Resolve Color Management Preset”, select “Davinci Wide Gamut”
- In “Output Color Space” select “Rec.709 Gamma 2.4”
- You can change your “Output Color Space” according to your needs.
- Hit Save
When you hit Save, Davinci Resolve will automatically recognize RED RAW R3D footage in your timeline and color grade all of them. You can now use tools like Lift Gamma and Gain to stylize your project.
Which is the best way to color grade RED RAW R3D footage in Davinci Resolve?
Now that you have learned how to give your RED RAW footage a very good starting point and do creative Primary and Secondary color corrections. The benefit of the doubt remains as to which is the best way.
Suppose you are working on a very short project like a commercial that uses the same lighting and just one camera that is a RED cinema camera. I will suggest you go for the Project Settings option.
If the project you are color grading is a short film or a feature film. The best way is to identify a scene, and by using the Camera RAW options in the Color tab, copy-paste the same settings throughout all the clips in a scene.
By doing this, you will be consistent with the RAW settings on a scene-by-scene basis. One last thing I desperately want to add up is. To keep your Davinci Resolve updated.
By keeping your Davinci Resolve updated, you make sure that you are using the latest color science and imaging technology while decoding or debayering your camera RAW footage to get the most out of it.
Go ahead and take some time and mess around with these and I really hope you enjoy grading RED RAW R3D.