Hi! Welcome back; in this article, we learn How To Color Grade Blackmagic RAW (.braw) In Davinci Resolve.
This article will look at working with the family of Blackmagic cameras in post-production. In the more recent models of the Blackmagic cameras, from the Ursa to the Blackmagic Pocket Cinema Camera. They can shoot in the Blackmagic Raw codec, and what this does is give us the ability to gain access to the digital negative and make changes to the image as though we were working with the Camera on set.
Before exploring Blackmagic Raw, I want to point out that before this codec came out, Blackmagic cameras used the Cinema DNG as their standard Raw recording codec.
The problem with that is it yielded gigantic piles of size as every frame needed to be recorded as its own DNG still. What this means is it can be incredibly cumbersome on some projects.
The new Blackmagic Raw codec lets us have the same quality, bit depth, dynamic range, and controls as other Raw formats, but with better performance and smaller file sizes. All Blackmagic cameras shoot in Apple ProRes, so it’s great to have this kind of flexibility as not every ProjectProject requires Raw image capture. Still, it’s also important to understand that you won’t have access to the Raw image processing controls if you choose to shoot in ProRes.
The reason you would shoot in ProRes is because of the file size. Also, ProRes QuickTime files are much easier to work with when editing, especially if you’re working in Davinci Resolve.
If you choose to shoot in ProRes, I’d recommend using the ProRes 422(HQ), ProRes 4444, or ProRes 4444 XQ settings. These formats use high bitrate encoding, so you’ll be able to get the most out of your image in post.
I find that 422 HQ is adequate for most projects. Still, the 4444 or 4444 XQ formats don’t use chroma subsampling, which, simply put, means you’re able to get the most out of the color information, and this can be especially beneficial anytime you’re doing any kind of green screen work.
Now that you understand the different shooting options let’s look at color grading Blackmagic’s Raw format in Davinci Resolve. When shooting Raw, each clip will have its own folder, and within each folder, you’ll find the “.braw” File and a sidecar file containing metadata.
When working with the Raw images, you can create settings across the entire ProjectProject, or you can make adjustments on a clip-by-clip basis.
1. Color Grading Blackmagic RAW On A Project Basis
Let’s first look at how to change the settings for an entire project. We’ll click the gear icon in the bottom right-hand corner, or you can select a file from the top left corner and go to Project Settings, and select “Camera Raw” from the left menu.
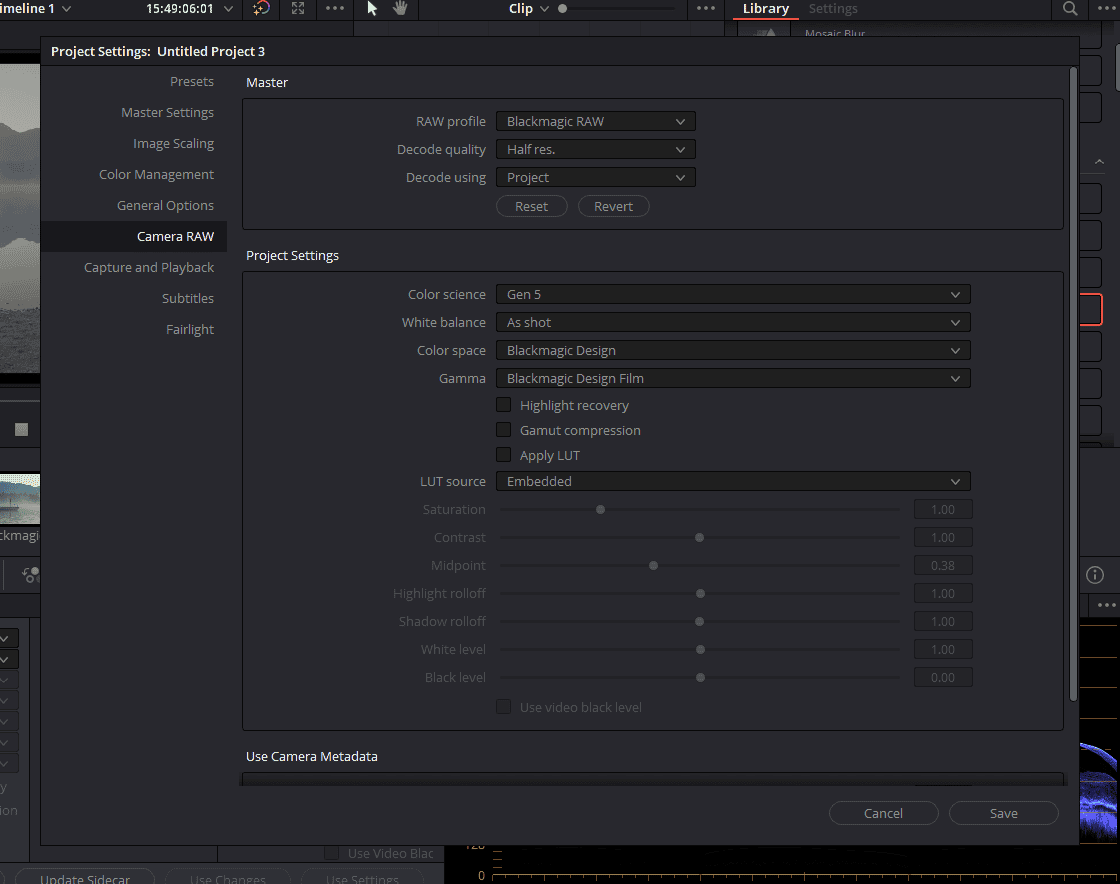
Change the Raw Profile to Blackmagic Raw. If you experience a lot of slowdowns, you may want to change the decode quality to a lower resolution, making working with these images easier on your system.
Next, you can tell resolve to decode using “Blackmagic Raw default” settings, use the “Camera metadata,” or “project.” Suppose you choose ProjectProject for the “Decode Using” option. You’ll be able to customize several parameters like White Balance, Color Space, and Gamma.
However, the issue with experimenting with different settings here is that the images won’t update until you click Save. A better way to work would be to make adjustments from the Color page using the “Camera Raw” palette. Once you find something that you accomplished globally for the entire project, then you want to make those adjustments here to save you so much time in the Project settings.
2. Color Grading Blackmagic RAW On the Color Page
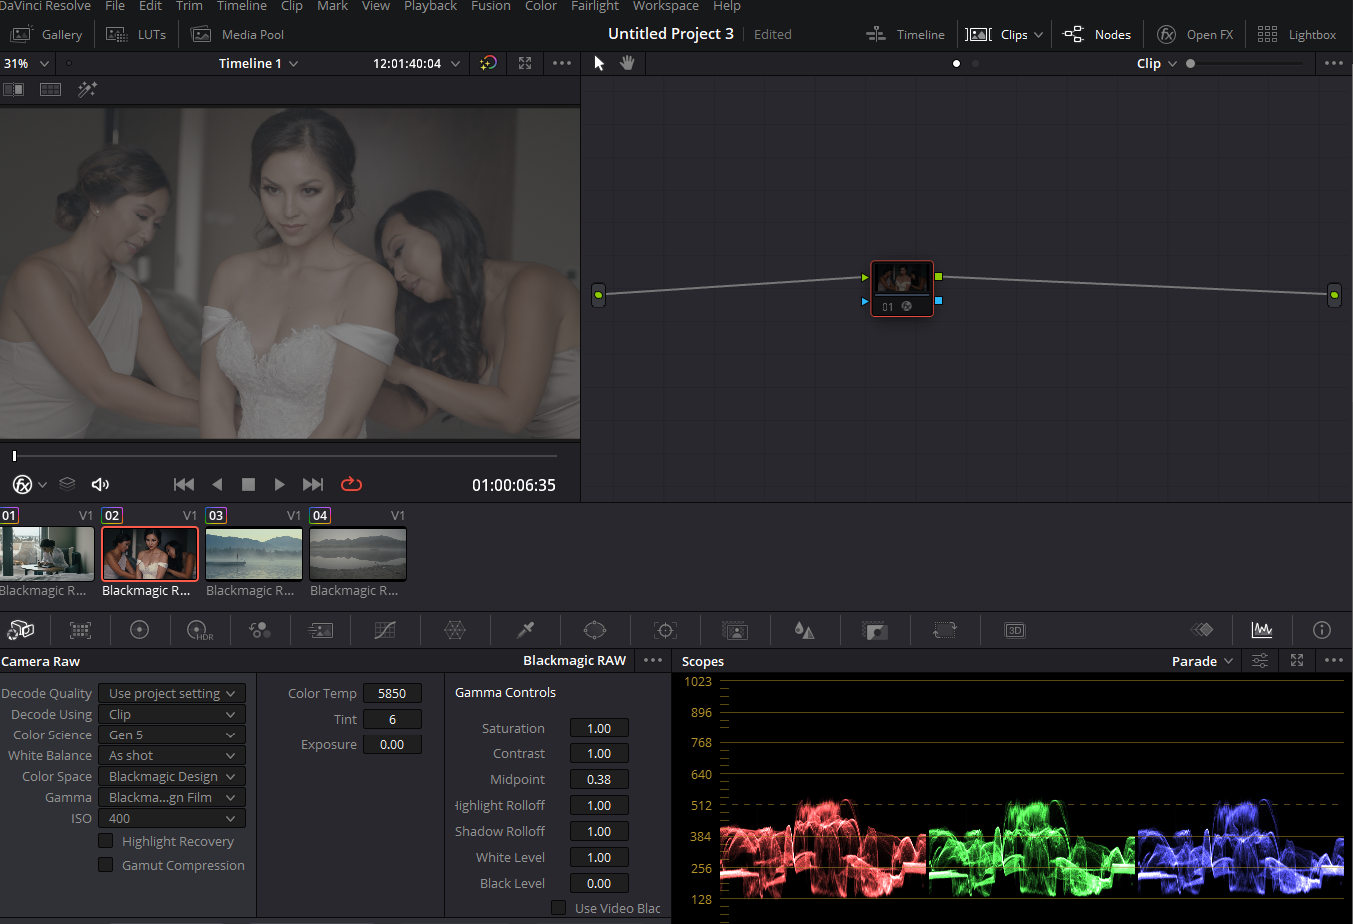
So let’s go to the Color page so we can experiment. On the Color Page, click on the Camera Raw settings. Camera Raw settings is the icon looking like a camera on the left side of all the color grading tools.
Then, to make adjustments, we’ll change the “decode using” option to “Clip” so that we can make adjustments on a clip by clip basis. The Color Science can be selected as Gen 4 or 5 depending upon the version of Davinci Resolve you are using. My recommendation is to use the latest one.
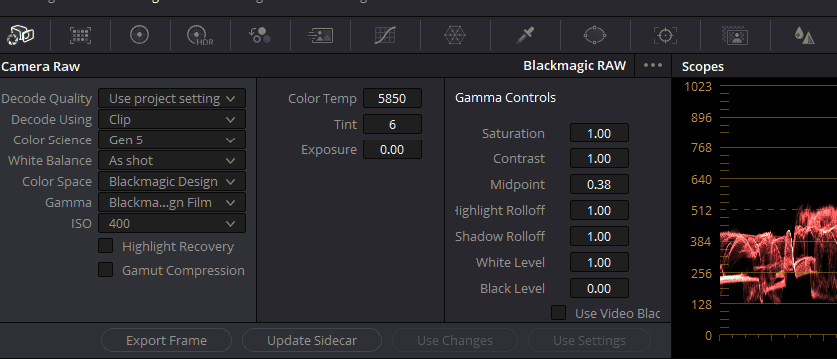
We can change the White Balance, Color Space, and Gamma, as I mentioned before. We even have access to ISO to change the camera sensitivity to light retroactively.
Let me explain the color space options you have to grade Blackmagic RAW in Davinci Resolve. We have Blackmagic Design’s own color Space that remaps your footage to a Log C Standard; the color space is called “Blackmagic Design.”
We then have Rec.709, which is the HD color space that many video cameras shoot by default and is also used in broadcast media. We also have P3 D65 Decodes RGB encoded image data with a D 65 white point intended for monitoring with a P3 compatible display or projector.
Always use “Blackmagic Design” Color Space when working with Blackmagic RAW and jump into the Gamma settings.
The Gamma is set to Blackmagic Design Film by default, but we can change it to Blackmagic Design Video. If you want to work with a Log Image, use “Blackmagic Design Film.”
I always suggest that my students grade their projects from a LOG format. It increases the purpose of creativity and color grading.
Now there are other options like Linear and even ACEScct. So which setting then should you choose? Well, this will vary depending upon your ProjectProject, the amount of time that you have allotted for color grading, and your skills as a colorist.
The short answer is whatever setting you feel the most comfortable with as a starting point will work the best for you.
You can also change the Color Temp, Tint, and Exposure. These are the camera metadata options you get when working with the RAW footage.
Applying Same Settings Throughout the Timeline
To apply these settings to the other clip in the Timeline, shift-click the second clip and click on “Use Settings” from the same “Camera Raw” palette.
We can go back to the Project settings and apply these Raw settings for a timeline with a lot more Blackmagic RAW clips. Then, as long as the clips in the Color page are all set to decode using Project settings, these changes will be applied uniformly or globally.
So you can think of the project settings is where we can make global adjustments, and when we decode using a clip, then we can make changes to individual clips on the color page.
As a final note, we can choose to click on the “update sidecar” file from the Camera RAW palette. So what that means is the next time someone uses the same clip, the raw settings will be replaced by the changes we’ve made.
3. My Favourite Workflow to Color Grade Blackmagic RAW(.braw)
- Go to File>Project Settings>Camera RAW
- Change the “Raw profile” to “Blackmagic RAW.”
- Change the “Decode Quality” according to the processing power of your computer, “Half res.” works best
- Select “Project” in the “Decode Using” option.
- Change “Color Science” to “Gen 5”
- Change “White Balance” to “As Shot”
- Select “Blackmagic Design” in “Color Space”
- Select “Blackmagic Design Film” in Gamma.
- You can do the same on a clip-by-clip basis.
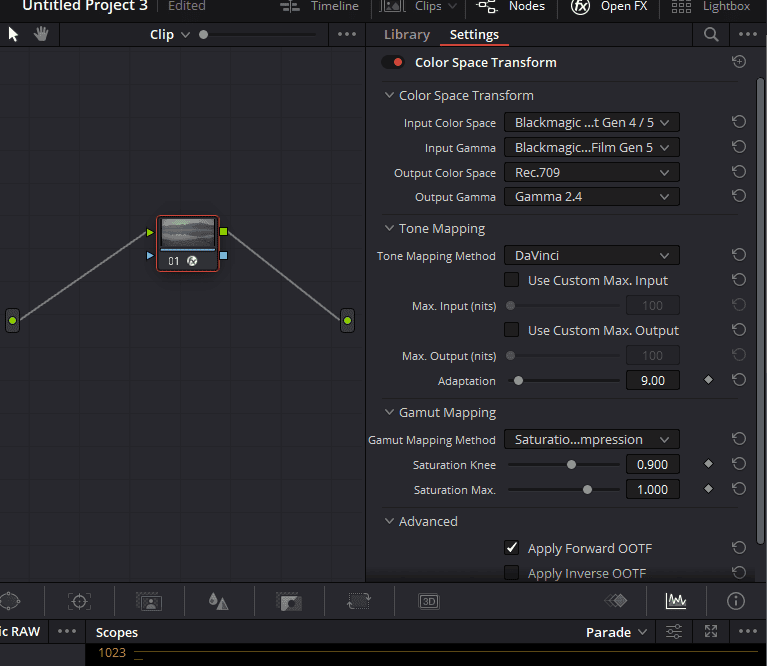
- Now select “OpenFX” from the top right corner.
- Drag “Color Space Transform” on a node
- In “Input Color Space,” choose “Blackmagic Design Wide Gamut Gen 4/5”
- In “Input Gamma,” select “Blackmagic Design Film Gen 5.”
- In “Output Color Space” select “Rec.709”
- In “Output Gamma” select “Gamma 2.4.”
- Select “Saturation Compression” from the “Gamut Mapping Method”
- Just create a node before or after this node and start building a look according to the project.
4. ACES Workflow to color grade Blackmagic RAW
Many people are now shifting to ACES workflow to streamline their color grading workflow irrespective of the VFX and editing department. The awesome part about using ACES for color grading Blackmagic RAW is that it detects the Input color space and Gamma and applies the required conversion.
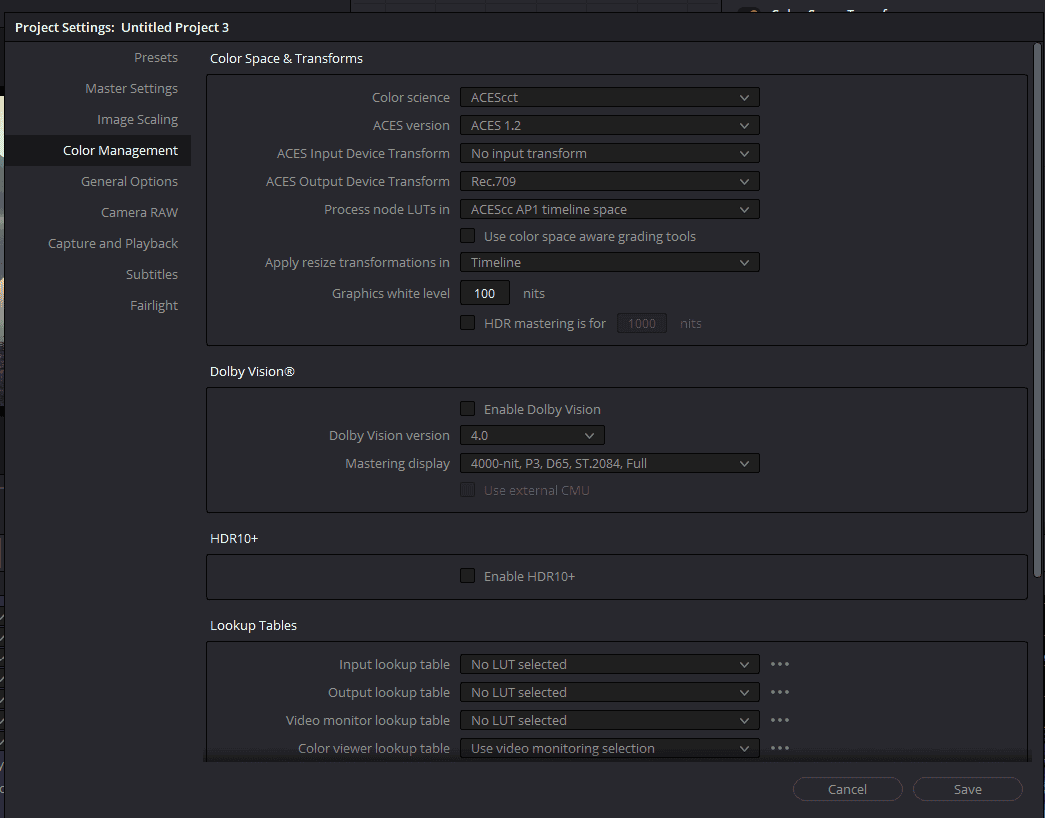
- Go to File>Project Settings>Color Management
- Change Color Science to ACEScct
- Select the latest ACES version
- Leave the ACES Input Device Transform empty
- Change ACES Output Device Transform to Rec.709
- Click on Save
5. Color Grade Blackmagic RAW (.braw) using Davinci Resolve Color Management Workflow
When working with Blackmagic RAW (.braw) footage in Davinci Resolve, it’s important to use an efficient color grading workflow that makes the most of the footage’s high dynamic range and color depth. Just like ACES, the Davinci Resolve YRGB Color Managed workflow is a popular choice for color grading Blackmagic raw (.braw) footage.
To use this workflow, you’ll first need to open the “Project Settings” panel in Davinci Resolve. You can do this by clicking on the gear icon in the bottom right corner of the interface. In the Project Settings panel, you’ll want to navigate to the “Color Management” tab.
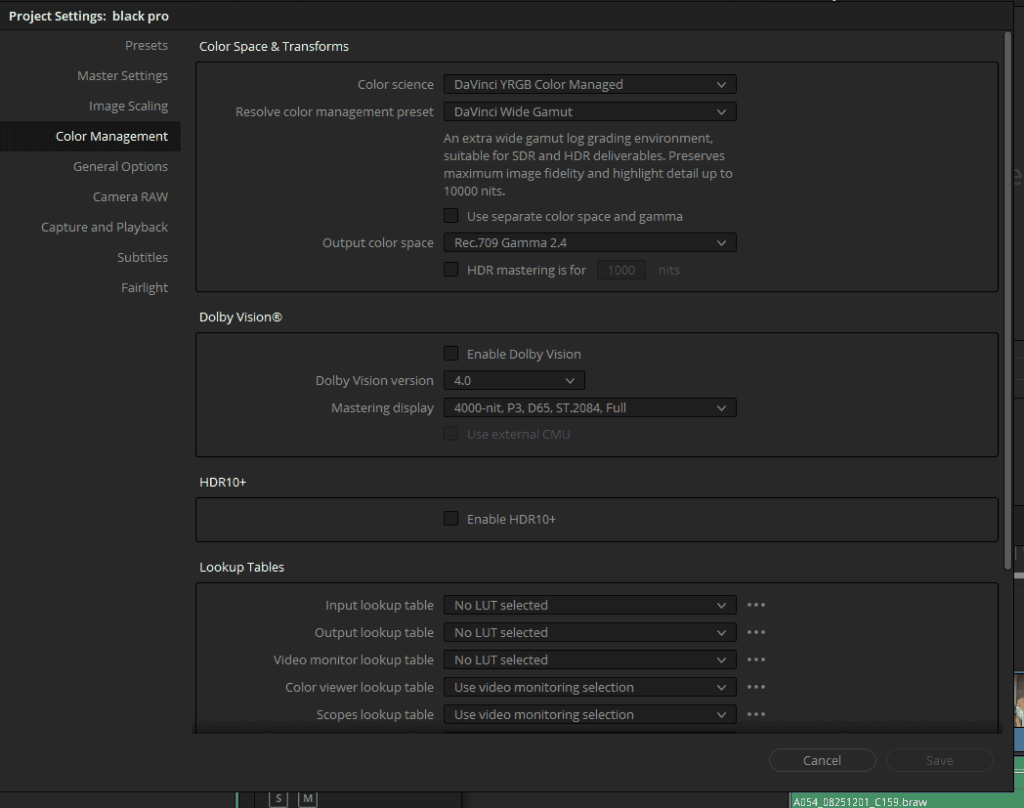
In the “Color Management” tab, you’ll see several options for configuring your color grading workflow. The first setting to pay attention to is the “Color Science” dropdown menu. This determines the color science that Davinci Resolve uses to manage your footage’s color data. Select “Davinci YRGB Color Managed” from the dropdown menu.
Next, you’ll want to choose a “Resolve Color Management Preset”. This determines how Davinci Resolve will interpret your footage’s color data. The recommended preset is “Davinci Wide Gamut.” This provides a wide color gamut that can accommodate the full range of colors in your footage.
Once you’ve selected your Color Management preset, you’ll need to choose an “Output Color Space.” This determines the color space that Davinci Resolve will use to output your graded footage. For most projects, “Rec.709 Gamma 2.4” is a good choice. This is a common color space used for broadcast and web content. However, if you have specific output requirements, you can choose a different Output Color Space to suit your needs.
After you’ve chosen your Output Color Space, you can hit “Save” to save your Project Settings. Once you’ve done this, Davinci Resolve will automatically recognize the Blackmagic raw (.braw) footage in your timeline and apply the appropriate color grading settings. You can now use tools like Lift, Gamma, and Gain to adjust your footage’s color and create the look you want for your project.
Conclusion
All right, does that make sense? All right, let’s summarize:
- The Camera raw settings found in the project settings are for setting up your initial grade.
- Then once that’s complete, the camera raw palette in the color page is for making fine-tune adjustments for each clip.
- Choosing the color space and the gamma curve are largely based on personal preference.
- The overarching objective with raw color grading is to get your image as close to where you’d like it to be, then move on to making additional color corrections or creating your look.
- So, where raw camera editing takes place in the color grading workflow is in the base correction stage.
- An advantage of using raw is that it’s non-destructive, so you can get much cleaner results than just the normal color correction tools.
All right, so I hope this has helped familiarize working with footage from the black magic cinema cameras, especially in the black magic raw format, which is exciting. Thank you for reading.