
Welcome back to FilmmakingElements.com, I am Salik Waquas and in this article, I am going to show you How To Use FUJIFILM INSTAX MINI 12. If you’re venturing into the world of instant photography, the FUJIFILM INSTAX MINI 12 is an excellent starting point. In this segment, we’ll delve into the basics of this camera, from setting it up to capturing those perfect moments. The INSTAX MINI 12, part of Fujifilm’s renowned Instax Mini series, offers a blend of simplicity and fun, ideal for instant photography enthusiasts.
The INSTAX MINI 12 stands out with its ease of use, making it a perfect entry-level choice. It’s important to note that this camera solely produces instant film images, so digital photography isn’t an option.
How To Use FUJIFILM INSTAX MINI 12
Accessories of the FUJIFILM INSTAX MINI 12

When you open the box of your new FUJIFILM INSTAX MINI 12, don’t expect a plethora of accessories. The package is straightforward yet functional. It includes:
- The Camera: Naturally, the star of the box is the INSTAX MINI 12 camera itself.
- Wrist Strap: A new addition to this model, the wrist strap enhances portability and safety. We’ll provide a quick guide on attaching it to your camera.
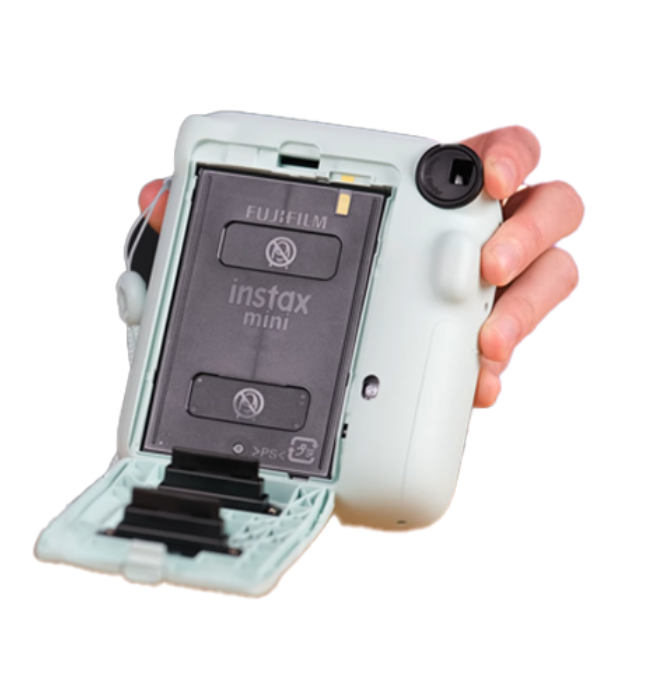
Battery Installation and Powering On the FUJIFILM INSTAX MINI 12
Inserting Batteries in Your INSTAX MINI 12
One of the convenient aspects of the FUJIFILM INSTAX MINI 12 is that it comes with batteries, sparing you the hassle of purchasing them separately. Here’s how to get your camera powered up:
- Locating the Battery Compartment: Find the battery door on your camera, indicated by a small battery symbol.
- Inserting the Batteries: The INSTAX MINI 12 uses AA batteries. Open the battery door and insert the batteries following the diagram inside for correct orientation.
- Batteries Included: The camera includes the necessary AA batteries, so you can start using it right out of the box.
Powering On the Camera
Turning on the INSTAX MINI 12 is straightforward:
- On/Off: Turn on the camera by rotating the lens ring to ON.
- Activating the Camera: Press the button. The lens will pop out, and an indicator light will turn on, signifying that the camera is powered up.
Understanding the Flash Function
The INSTAX MINI 12 features an automatic flash, which means:
- Automatic Flash: The camera determines when to use the flash based on the lighting conditions. There’s no manual control to turn the flash on or off.
- Flash Charge Indicator: A light on the camera will illuminate to show that the flash is charged and ready. This is especially important in low-light situations to ensure proper exposure.
Turning Off the Camera
To turn off the camera:
- Deactivating the Camera: Turn off the camera by rotating the lens ring to OFF.
Attaching the Wrist Strap to the FUJIFILM INSTAX MINI 12
Attaching the Wrist Strap
The FUJIFILM INSTAX MINI 12 includes a handy wrist strap, which is essential for added security while handling the camera. Here’s a quick guide on attaching it:
- Choose the Side: The strap can be attached to either side of the camera. Select the side that feels most comfortable for you.
- Inserting the Strap: Slide the thin end of the strap through the small loop on the camera’s side.
- Securing the Strap: Pull the strap through the loop until it’s fully extended. Then, thread the larger part of the strap through the small loop at the end of the thin section and pull to secure it in place.
- Final Setup: Once attached, the strap will provide extra security and ease of handling as you carry and use your camera.
Loading Film into the FUJIFILM INSTAX MINI 12
Choosing the Right Film for INSTAX MINI 12
Before diving into the loading process, it’s crucial to select the appropriate film for your INSTAX MINI 12. Here are some key points:

- Film Type: Ensure you purchase Instax Mini film, as this is the only compatible type with the INSTAX MINI 12. Instax Square and Instax Wide films will not work with this camera.
- Variety in Film: The Instax Mini film comes in various patterns, colors, and even black and white options. Some have colored borders, such as black, adding a creative flair to your photos.
Preparing to Load the Film
Handling and storing the film correctly is essential for maintaining its quality:
- Storage Tips: Avoid leaving the film in extreme temperatures, like a hot car or freezing conditions. Room temperature is ideal for film storage.
- Handling the Film Pack: Be gentle when handling the film pack. Avoid squishing or crushing it, as this can damage the film, although it’s generally quite resilient.
Loading the Film into the Camera
Now, let’s load the film into your camera:
- Opening the Film Pack: Open the film pack carefully, holding it from the sides.
- Aligning the Marks: Look for the yellow mark on the film pack. You’ll find a corresponding yellow mark inside the film compartment of the camera.
- Inserting the Film: Align the yellow marks on the film pack and the camera, and insert the film pack gently until it fits snugly.
- Closing the Compartment: Once the film is correctly positioned, close the film compartment door.
- Film Confirmation Window: A yellow indicator will appear in the film confirmation window on the camera, showing that the film is loaded correctly.
- Film Counter: The camera includes a counter displaying the number of shots remaining in the film pack.
First Shot and Film Management in the FUJIFILM INSTAX MINI 12
Understanding the First Shot: The Dark Slide
When you start using your freshly loaded FUJIFILM INSTAX MINI 12, it’s important to understand the function of the first shot:
- Dark Slide Ejection: The first shot you take with a new film pack won’t be a photograph. Instead, it ejects the dark slide, a protective layer that shields the film from light exposure.
- Not a Photo: Remember, your first press of the shutter button will only dispose of this dark slide. It’s not the time for your best pose or scene.
- Dark Slide Removal: Upon pressing the shutter button, the dark slide, resembling a piece of black cardboard, will be ejected from the camera.
Monitoring Your Shots
After the dark slide is removed, your camera is ready for actual photography:
- Shot Counter: The camera features a shot counter, which starts at 10 after the dark slide is removed. This indicates the number of shots available in the film pack.
- Countdown with Each Shot: With each photo you take, the counter will decrease, keeping track of how many shots you have left.
Handling Film with Care
Proper film management is crucial for preventing damage and wastage:
- Avoid Opening the Film Compartment: Once the film is loaded, do not open the film door. Exposing the film to light can ruin it, often affecting one or two shots in the pack.
- Use the Entire Pack: It’s advisable to use the entire film pack before replacing it with a new one. Switching film packs mid-use is not recommended, as it can lead to wasted film and potential damage.
Guide to Taking a Photo with the FUJIFILM INSTAX MINI 12
Turning On the Camera and Preparing to Shoot
To begin taking a photo with your INSTAX MINI 12, follow these initial steps:
- Powering On: Turn on the camera by rotating the lens ring to ON.
- Flash Indicator: Wait for the flash indicator light to signal that the flash is ready.
Choosing the Orientation and Stabilizing the Camera
The INSTAX MINI 12 offers flexibility in how you take your photos:
- Vertical vs. Horizontal Orientation: You can choose to take photos vertically (with the extra strip at the bottom) or horizontally (with the strip on the side). Both orientations are equally valid.
- Stability is Key: When holding the camera, keep it steady, especially indoors where the shutter speed may be slower to accommodate lower light. Rest your thumb on the camera to stabilize it.
Taking the Photo
The process of capturing an image is straightforward but requires attention to detail:
- Taking the Shot: Look through the viewfinder and press the shutter button to take your photo.
- Handling the Film: As the film ejects from the top, handle it carefully by the edges without touching the actual film surface.
- Developing Time: Allow about 90 seconds for the photo to develop fully. Avoid shaking the film; it doesn’t speed up the process.
Flash and Exposure
Understanding the camera’s limitations and features helps in achieving the best results:
- Automatic Flash: The flash on the INSTAX MINI 12 is automatic; you cannot manually turn it off.
- Exposure Control: While you can’t control exposure settings on the camera, the automatic exposure generally does a good job in various lighting conditions.
How to use Close-Up Mode
- Turn the lens ring to the “CLOSE-UP” position. The lens barrel will automatically pop out, and the viewfinder’s field of view will switch to the close-up shooting setting.
- Ensure your face is roughly 11.8 inches to 19.7 inches (30 cm to 50 cm) away from the end of the lens.
- Confirm your composition using the selfie mirror at the front of the lens.
- Hold the camera so that the mark in the viewfinder is centered on the subject.
- Press the shutter button to take the photo.
Tips for Better Shots
To enhance your photography experience, consider these tips:
- Natural Light: Whenever possible, shoot in natural light for better contrast and less reliance on flash.
- Composition and Location: Since the camera’s settings are fixed, focus on choosing good locations and composing your shots well.
- Labeling Photos: Use a Sharpie Fine tip to label or decorate the extra strip on your photo.