DaVinci Resolve is a powerful video editing software that offers a range of innovative tools and techniques for filmmakers. One of them is the reverse clip effect, which can create a dramatic impact on your viewers by reversing the direction of your footage. This effect can be used to create suspense, humor, surprise, or simply to add some flair to your video.
But how can you achieve this effect on your iPad, a device that gives you the freedom and flexibility to edit your videos anywhere you want? And how can you trust the quality and accuracy of the information you are getting?
That’s where Salik comes in. Salik is the founder of FilmmakingElements.com, a website dedicated to helping filmmakers of all levels master the art and craft of filmmaking. He is also a certified DaVinci Resolve Trainer, with over 10 years of experience in the industry. He has used DaVinci Resolve in various projects, from short films to documentaries, and knows how to get the most out of this software.
In this article, Salik will share his expertise and experience with you, and show you how to create stunning reverse clips in DaVinci Resolve on iPad. He will walk you through two simple methods, one for the cut page and one for the edit page, and explain the pros and cons of each. He will also provide you with tips and tricks to make your reverse clips look smooth and natural.
By the end of this article, you will have learned how to create reverse clips in DaVinci Resolve on iPad like a pro, and impress your audience with your creative skills.
Reversing Clip in the Cut Page of Davinci Resolve on iPad
DaVinci Resolve, renowned for its advanced color grading and editing capabilities, is an editor’s dream. But as with all software, the magic lies in knowing how to harness its power. One of its intriguing features is the ability to reverse a clip, a technique that can add a unique flavor to your projects. Especially when working on the iPad version of DaVinci Resolve, understanding this feature can be a game-changer. Here’s a step-by-step breakdown of how to reverse a clip using the cut page:
1. Launching the Program and Selecting the Cut Page:
- Start DaVinci Resolve on your iPad.
- At the bottom of the interface, you’ll find various tabs. Tap on the ‘Cut’ tab to switch to the cut page. This page is specifically designed for quick edits and trims.
2. Importing the Clip:
- Tap on the ‘Media Pool’ button, usually located on the top left corner.
- Choose the clip you wish to reverse from your media library and drag it into your timeline.
3. Accessing the Speed Controls:
Method to access the speed controls:
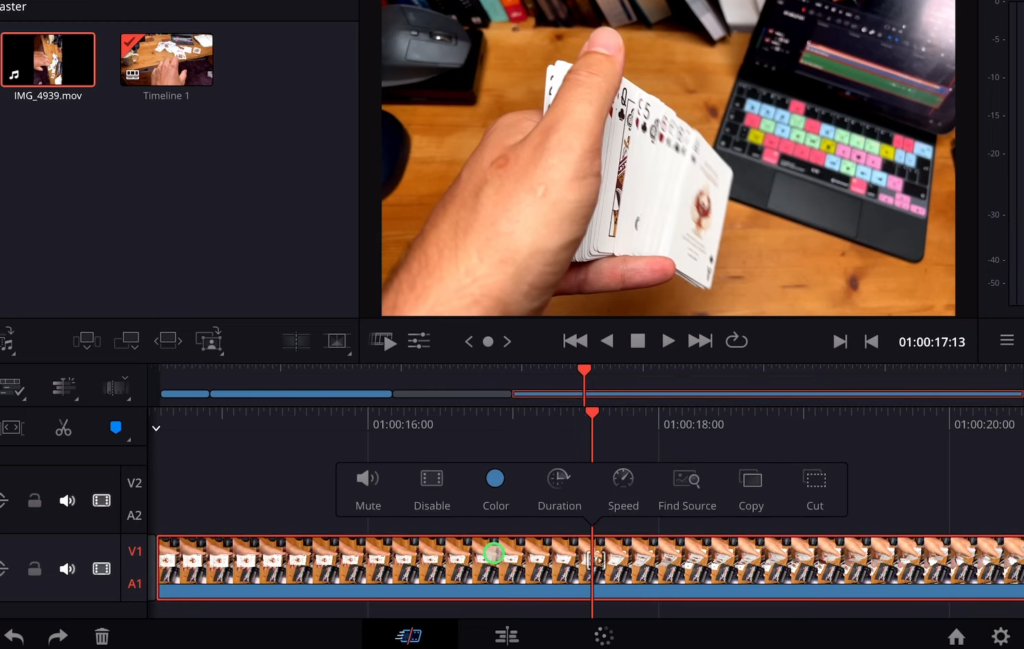
- Using Long Press
- Hold and press on the clip in your timeline until a contextual menu pops up.
- Look for the ‘Speed’ option in this menu and tap on it.
4. Reversing the Clip:
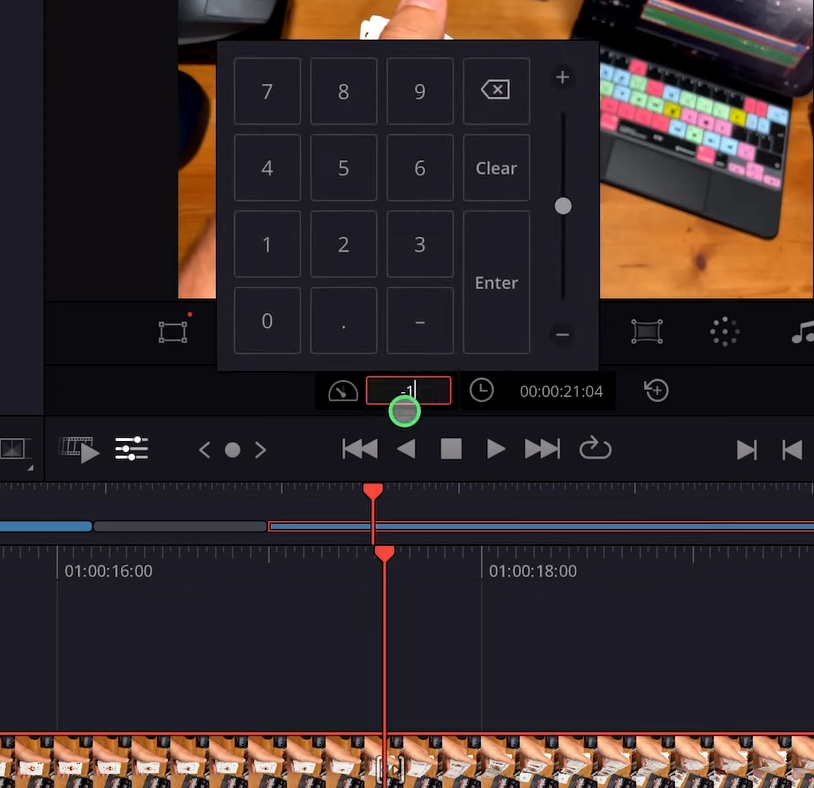
- Once inside the speed controls, you’ll find a field with a numerical value representing the clip’s speed.
- To reverse the clip, simply input a negative value. For example, entering “-1” will play the clip backward at its normal speed.
- After setting the desired speed, tap anywhere outside the speed control box to close it.
5. Previewing the Effect:
- Play the clip in the timeline to ensure it’s reversed as per your preference.
- The scene will now unfold backward, lending a unique touch to your narrative.
Quick Tip: Remember, while reversing a clip can be an exciting effect, its placement and context in the storyline are crucial. It should enhance the narrative, not confuse the viewer.
Reversing Clip in the Edit Page of Davinci Resolve on iPad
DaVinci Resolve’s versatility is evident in its multiple editing environments. While the cut page is designed for swift trims and edits, the edit page provides a deeper dive, granting users access to a plethora of advanced editing tools. One of these tools is the capability to reverse a clip, adding a dramatic flair to your storytelling. For those utilizing DaVinci Resolve on the iPad, here’s a comprehensive guide to mastering the reverse clip technique in the edit page:
1. Transitioning to the Edit Page:
- Launch DaVinci Resolve on your iPad if you haven’t already.
- On the interface’s bottom section, you will notice various editing environments represented as tabs. Simply tap on the ‘Edit’ tab to move into the edit page. This environment is optimized for intricate editing tasks.
2. Placing Your Clip on the Timeline:
- If you haven’t already added the clip to your timeline, tap on the ‘Media Pool’ icon, usually situated at the top left.
- From your media collection, drag and drop the desired clip onto your timeline.
3. Accessing the Clip Speed Options:
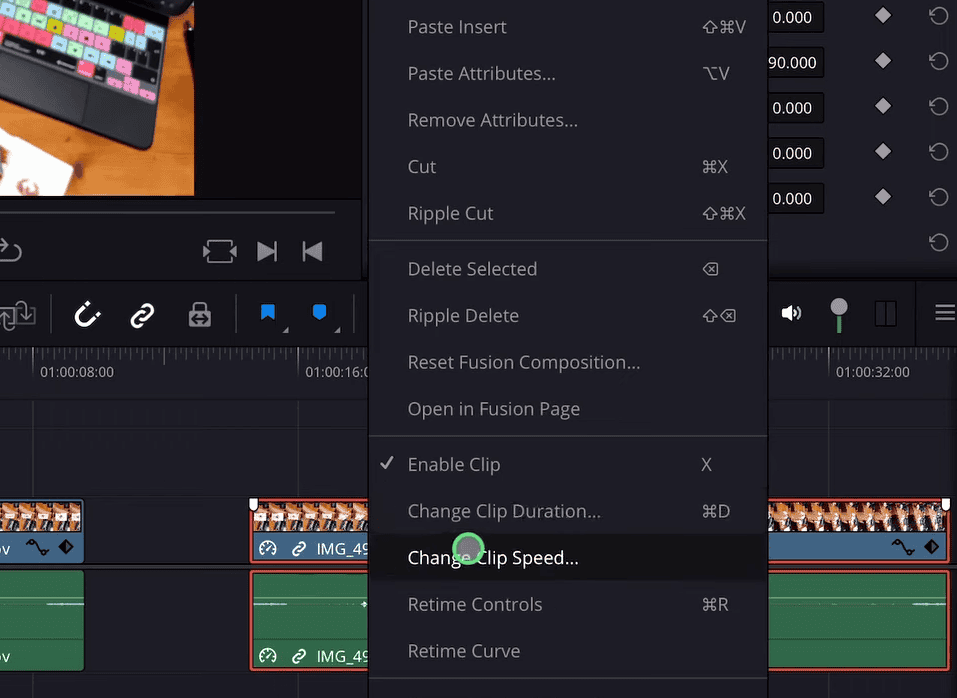
- With the clip placed in your timeline, give it a tap to select it.
- Execute a long press to unveil a contextual menu.
- From this menu, select the ‘Change Clip Speed’ option. This will launch a dedicated window filled with various speed control settings.
4. Initiating the Reverse Clip Effect:
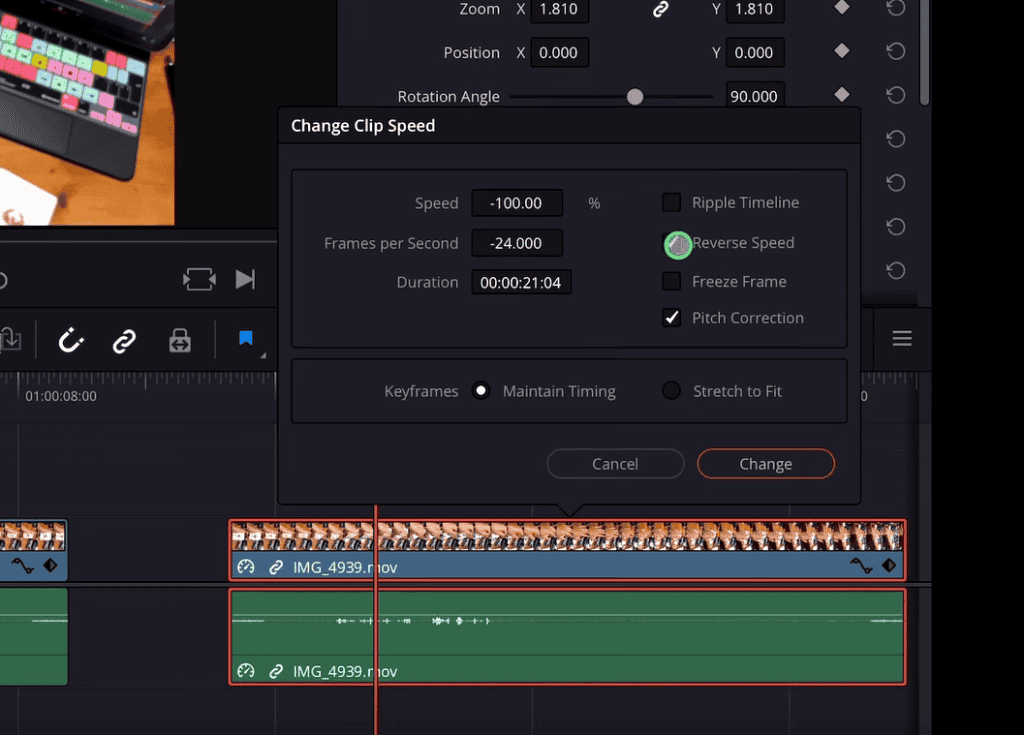
- Within the ‘Change Clip Speed’ window, you’ll find a myriad of settings related to the clip’s playback speed.
- Look for the ‘Reverse Speed’ checkbox or toggle. Tap on it to activate the reverse effect for your clip.
5. Additional Speed Adjustments (Optional):
- In the same window, there’s an opportunity to modify the speed percentage. This can be handy if you wish to not only reverse the clip but also slow it down or speed it up.
- Adjust the percentage as needed. For instance, setting it to 50% will play the reversed clip at half its original speed, resulting in a slow-motion reverse effect.
6. Finalizing the Effect:
- After adjusting the settings to your liking, tap outside the ‘Change Clip Speed’ window or on the confirmation button to close it and apply the changes.
- Scrub through or play the clip on your timeline to review the reverse effect. It should play the events of the clip in a backward sequence.