Welcome to FilmmakingElements.com, your ultimate resource for all things related to filmmaking. In today’s blog post, we’ll be discussing how to work with iPhone Dolby Vision HDR footage in DaVinci Resolve. With the introduction of XDR displays in newer Apple devices, Dolby Vision has become increasingly popular for its vibrant colors and contrast. We’ll guide you through the process of editing this footage in both HDR and SDR workflows, and teach you how to export it in Dolby Vision for optimal playback on Apple devices.
Setting Up Your Project for iPhone Dolby Vision HDR Footage
In this section of our comprehensive blog post on working with iPhone Dolby Vision HDR footage in DaVinci Resolve, we will provide an in-depth step-by-step guide on configuring your project settings for the best HDR editing experience. Follow these instructions to set up your DaVinci Resolve project for seamless HDR editing.
Step 1: Accessing Davinci Resolve Preferences
Open your DaVinci Resolve project, and from the menu bar at the top, click on “Davinci Resolve.” From the dropdown menu, select “Preferences” to open the Preferences window.
Step 2: Configuring General Preferences for HDR Editing
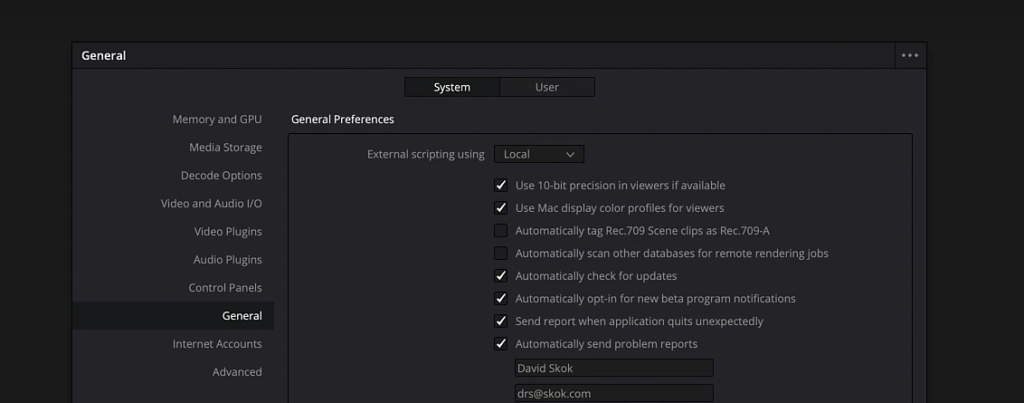
In the Preferences window, ensure you are on the “General” pane. Locate the settings for “Use 10-bit precision in viewers if available” and “Use Mac display color profiles for viewers.” Check both of these boxes to ensure optimal HDR editing performance. Once you’ve checked these settings, click “Save” to apply the preferences and close the window.
Step 3: Opening Project Settings
With your blank project open in DaVinci Resolve, look for the gear icon in the bottom right-hand corner of the interface. Click on this icon to open the Project Settings window.
Step 4: Navigating to the Color Management Pane
In the Project Settings window, you will see a left-hand menu with several options. Click on “Color Management” to access the relevant settings for HDR editing.
Step 5: Adjusting Color Science Settings for Optimal Color Conversion
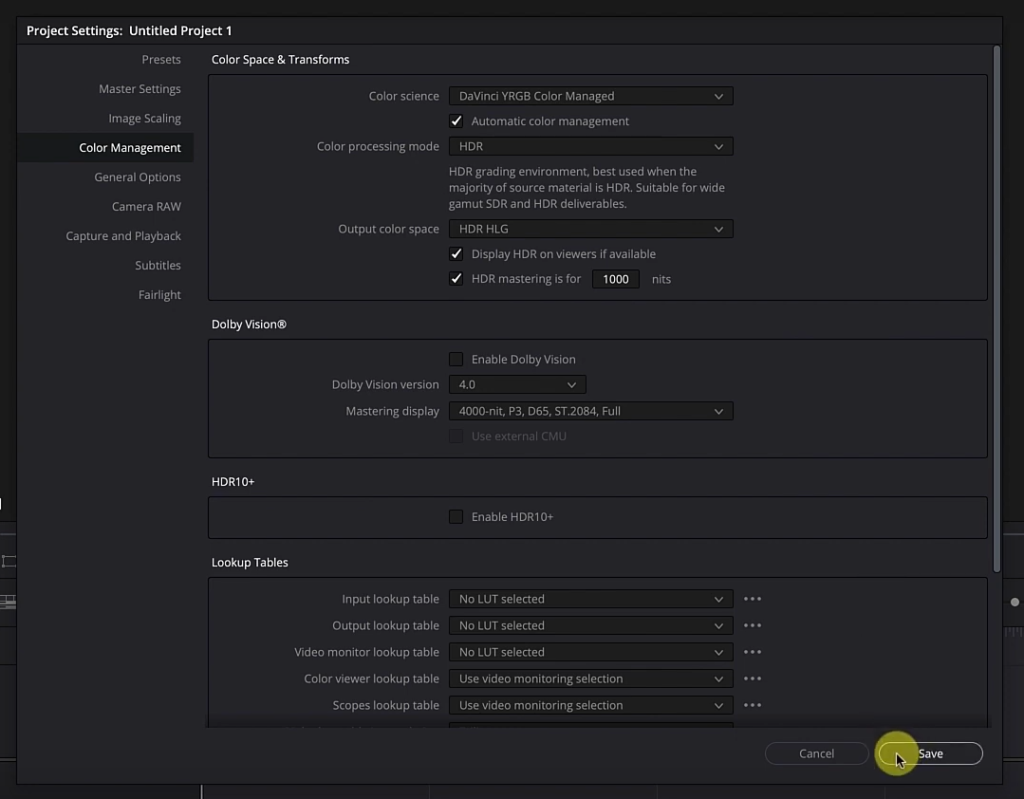
In the Color Management pane, find the “Color Science” dropdown menu. Change the selection from “DaVinci YRGB” to “DaVinci YRGB color managed.” This enables DaVinci Resolve to automatically convert your clips from their native color space to the project’s color space, ensuring accurate color representation during the editing process.
Step 6: Enabling Automatic Color Management for HDR Workflow
Look for the “Automatic color management” checkbox in the Color Management pane. Check this box to allow DaVinci Resolve to handle color management automatically, streamlining your HDR workflow.
Step 7: Setting Output Space to HDR for Enhanced Visuals
Find the “Color Processing Mode” dropdown menu in the Color Management pane. Change the selection from “SDR” to “HDR.” Then, choose “HDR HLG” as your desired output color space, which is ideal for editing iPhone Dolby Vision HDR footage.
Step 8: Configuring HDR Display Settings for Accurate Previewing
Locate the “Display HDR in views if available” checkbox and ensure it is checked. This setting allows you to preview HDR content in the viewer if your display supports HDR. Also, set HDR mastering for 1000 nits, which is a common brightness level for HDR content.
Step 9: Bypassing Dolby Vision Checkbox for Recommended Workflow
In the Color Management pane, you will see a Dolby Vision option. Do not check this box, as Dolby Labs recommends processing Dolby Vision in a post-processing step specifically for Apple footage. This ensures optimal results when working with iPhone Dolby Vision HDR content.
Step 10: Saving Your Project Settings for HDR Editing
After configuring your project settings to accommodate HDR editing, click “Save” in the Project Settings window. This action will apply the settings and return you to the edit page, where your project is now optimized for editing iPhone Dolby Vision HDR footage in DaVinci Resolve.
Importing and Previewing iPhone Dolby Vision HDR Footage
In this section of our comprehensive blog post on working with iPhone Dolby Vision HDR footage in DaVinci Resolve, we will guide you through importing HDR media and previewing it correctly on different displays. Follow these steps to ensure proper handling of HDR footage in your project.
Step 1: Importing iPhone Dolby Vision HDR Media
With your project set up for HDR editing, navigate to the Edit page in DaVinci Resolve. Locate the iPhone Dolby Vision HDR files you’ve exported from your Photos app and drag them into the Media Pool. If prompted, change the frame rate. You should now have a series of HDR clips ready for use in your project in your media pool.
Step 2: Creating a New Timeline with HDR Clips
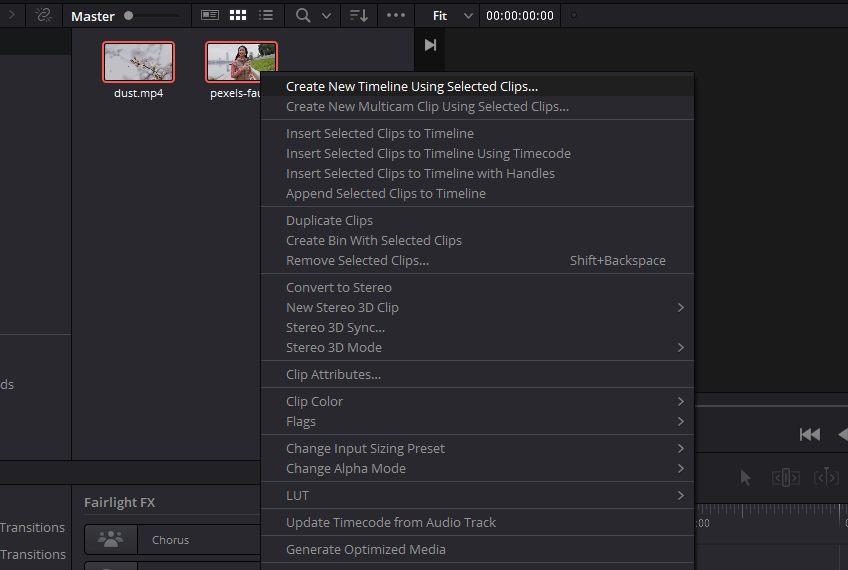
Select all the imported clips in the Media Pool on the left on the edit page of Davinci Resolve, right-click, and choose “Create New Timeline Using Selected Clips.” Leave the timeline name as “Timeline 1” or rename it as desired. You should now see a high-contrast, high-dynamic-range image in the viewer.
Step 3: Addressing HDR Preview Limitations on Non-HDR Displays
If you’re using a non-HDR display the viewer may show inaccurate colors and contrast. However, there is a workaround for this issue using a Lookup Table (LUT).
Step 4: Applying a LUT for Accurate HDR Preview on Non-HDR Displays
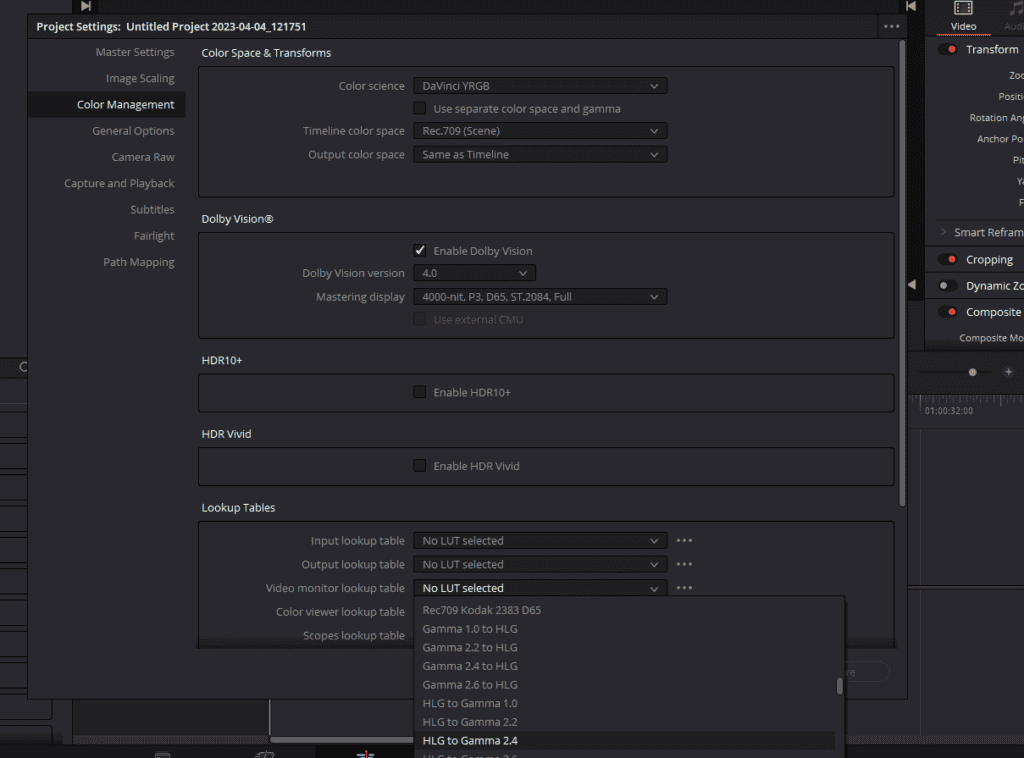
To use a LUT for previewing HDR footage on non-HDR displays, click on the Project Settings gear icon at the bottom right. In the “Color Management” tab, under Lookup Tables section, locate the “Video Monitor Lookup Table” section. Change the selection from “No LUT Selected” to the appropriate LUT for converting the viewer display from HLG to Gamma 2.4. Click “Save” to apply the LUT.
Step 5: Previewing HDR Footage with the Applied LUT
With the LUT applied, the viewer should now display a more accurate representation of your HDR footage on a non-HDR display. Although not perfect, this method allows you to work on an HDR project without requiring an Apple XDR display or another HDR-compatible monitor.
Working with Multiple Color Spaces in a Single Project
In this section of our comprehensive blog post on working with iPhone Dolby Vision HDR footage in DaVinci Resolve, we will delve into Resolve Color Management and how it simplifies the process of working with different media formats and color spaces in a single project. Follow these steps to ensure seamless integration of multiple formats within your HDR project.
Step 1: Viewing Input Color Space in the Media Page
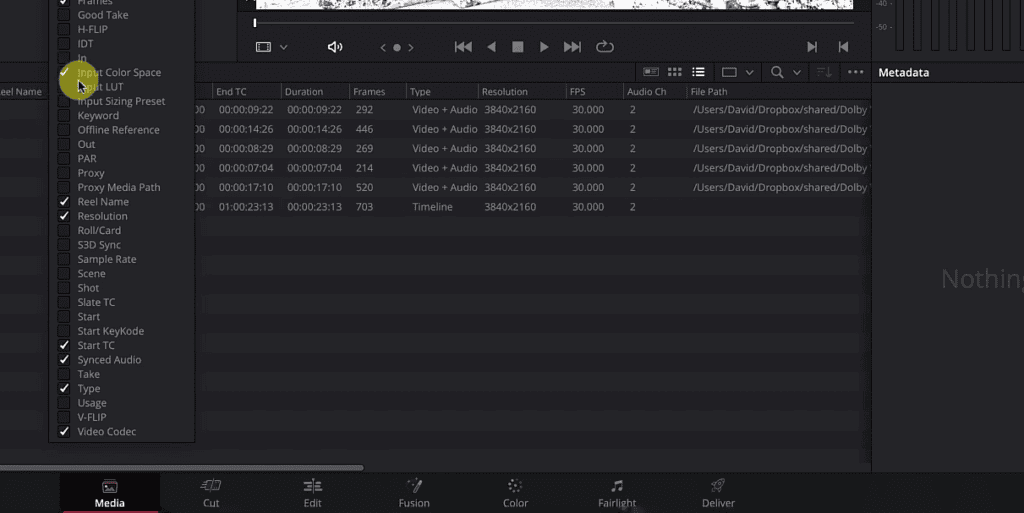
Switch to the Media page in DaVinci Resolve and change the view from icons to List View. To display the input color space for each clip, right-click on any of the column headers and check the “Input Color Space” option. DaVinci Resolve automatically associates the correct color space, such as Rec. 2100 HLG, with imported iPhone Dolby Vision HDR clips, streamlining the editing process.

Step 2: Importing Clips with Different Color Spaces
To demonstrate Resolve Color Management’s versatility, import clips with different color spaces, such as those from Sony cameras. For example, import clips in S-Cinetone, S-Log3 formats. Drag these clips into your media folder.
Step 3: Checking Color Space Recognition
Observe how DaVinci Resolve automatically recognizes the color space for S-Cinetone as Rec. 709 (scene) clips. However, the S-Log3 clip may appear washed out because Davinci Resolve cannot determine the input color space for this format.
Step 4: Manually Setting Input Color Space for Unrecognized Formats
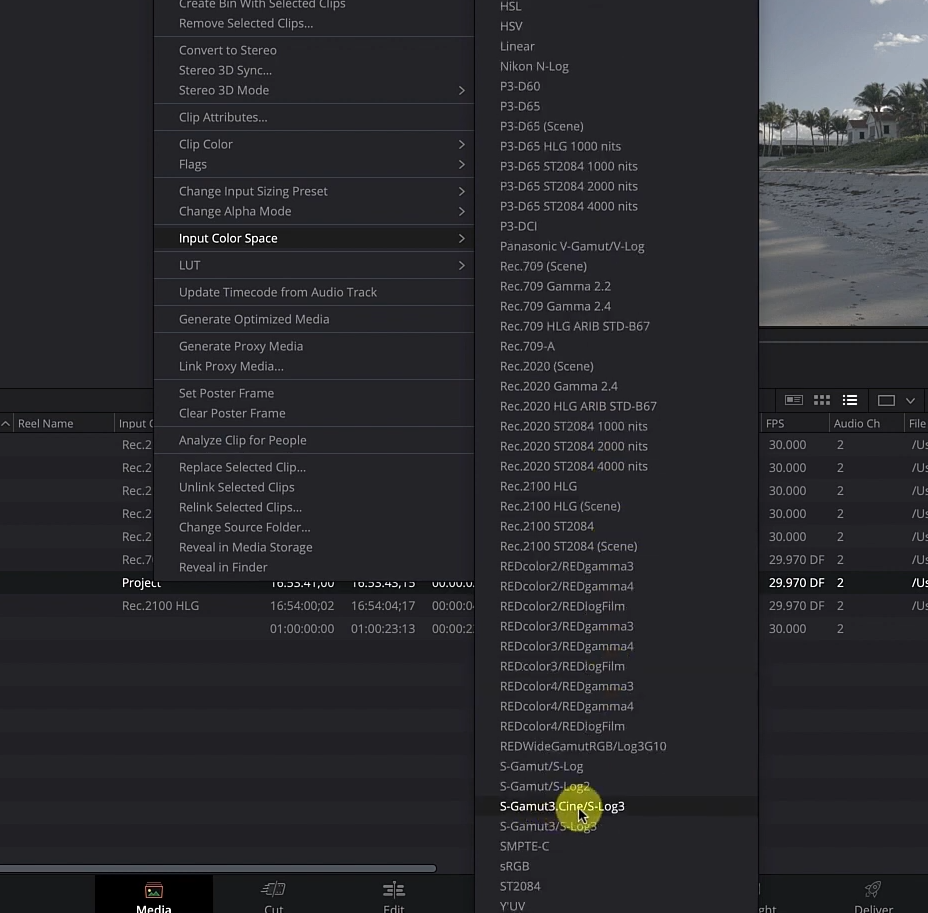
For the S-Log3 clip, right-click on the file, go to “Input Color Space,” and select “S-Gamut3.Cine/S-Log3.” The clip should now display correctly, with proper exposure.
Basic Editing and Preparing Your iPhone Dolby Vision HDR Project for Export
Step 1: Trimming Clips for a Streamlined Project
With your iPhone Dolby Vision HDR clips imported and arranged in a timeline, begin trimming the clips to create a more concise project according to the context of the project, it can be a film, a vlog or even a music video. Use DaVinci Resolve’s editing tools to shorten clips, remove unwanted portions, or rearrange the order of your footage as needed.
Step 2: Finalizing Your Project for Export
Once you’ve trimmed and arranged your clips to create a polished project, double-check your work to ensure that all elements are in place, and that the visual quality of your HDR footage remains intact. With your project now ready, you can proceed to export your iPhone Dolby Vision HDR footage.
Exporting iPhone Dolby Vision HDR Footage
Step 1: Exporting
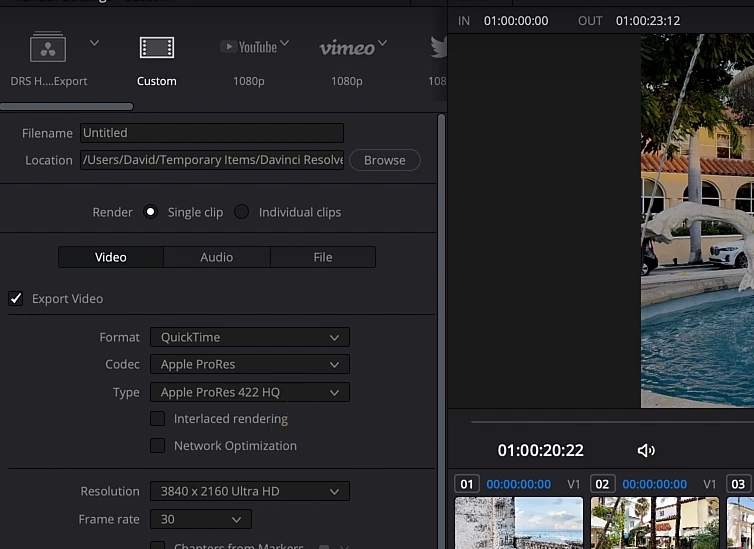
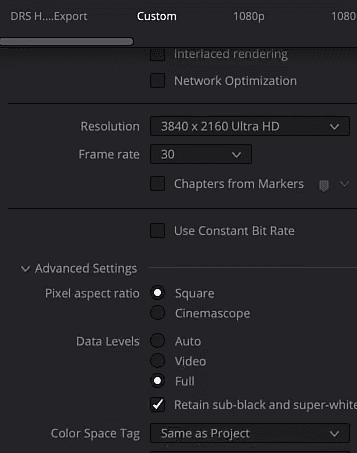
Navigate to the Deliver page in DaVinci Resolve, and in Format drop-down menu, select Quicktime. Choose Apple ProRes as the Codec. Choose Apple ProRes 422 HQ as your Type. To avoid clipped highlights, change the data levels from “Full” to “Video” before exporting. Save your intermediate file with a suitable name, click on Add To Render Queue, and click on the Render All button.
Step 2: Opening the File in QuickTime
Once the export is complete, open the file in QuickTime. At this stage, you should see a high-quality, high dynamic range image.
Optimizing HDR Uploads and Playback for YouTube and Vimeo
In this section of our blog post on working with iPhone Dolby Vision HDR footage, we’ll discuss the challenges and best practices for uploading and viewing HDR content on popular video platforms, specifically YouTube. We’ll guide you through the necessary steps to ensure your HDR videos look great and play smoothly on these platforms.
Uploading HDR Content to YouTube:
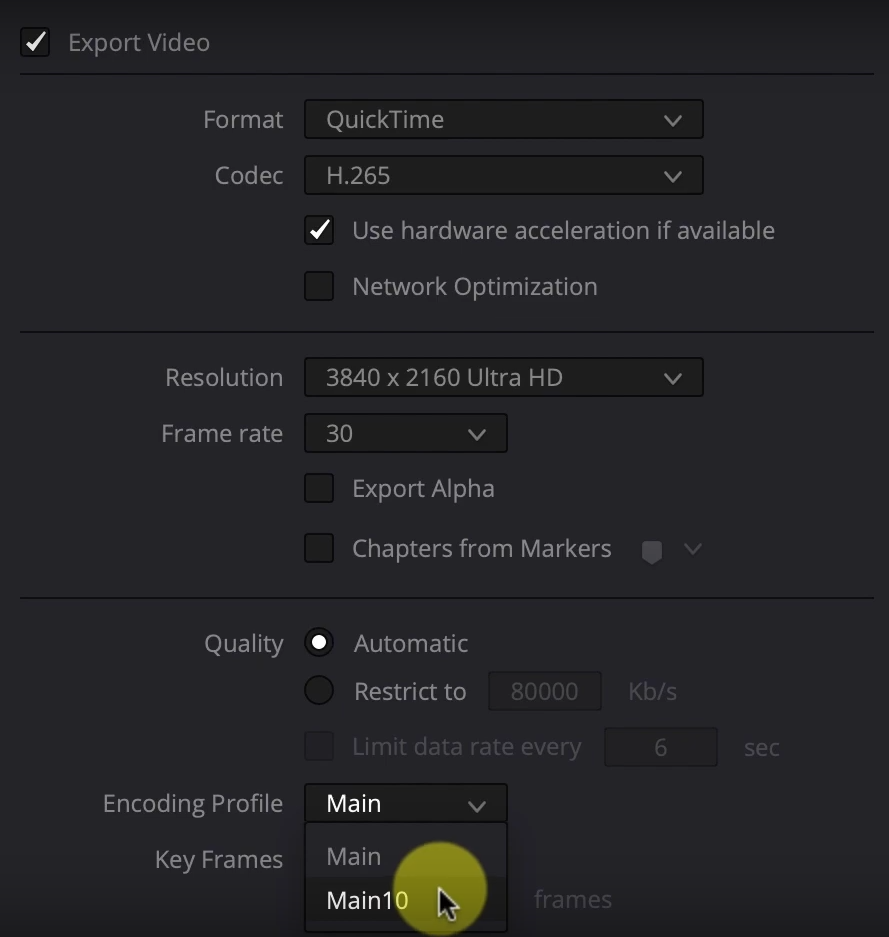
- Export a 10-bit H.265 file: Since YouTube doesn’t support Dolby Vision, you’ll need to export a 10-bit HDR file that the platform can recognize. The ProRes file generated earlier is too large for uploading, so opt for a 10-bit H.265 file instead. In Davinci Resolve’s Deliver page, select H.265 in the Codec drop-down menu and change the encoding profile from “main” to “main10” to ensure proper HDR recognition.
- Use Safari or supported apps for HDR playback: For Mac users, we recommend using Safari for optimal HDR viewing.
Converting iPhone Dolby Vision HDR Footage to SDR (Rec.709)
In this section of our comprehensive blog post on working with iPhone Dolby Vision HDR footage in DaVinci Resolve, we’ll explain how to convert your HDR footage to the SDR Rec.709 color space, making it suitable for uploading to platforms like YouTube or for viewing on non-HDR displays.
Step 1: Adjust Project Settings for SDR Conversion
In DaVinci Resolve, navigate to the Edit tab and open your Project Settings. Head to the Color Management section and reset the Video Monitor lookup table to “No LUT selected.” Change the Color Processing mode to SDR and set the Output Color Space to SDR Rec.709. This will adjust the appearance of your footage, but the contrast curve may need some tweaking.
Step 2: Fixing Contrast on the Color Page

Switch to the Color page in DaVinci Resolve to adjust the contrast curve of your clips. Select a clip and add a curve adjustment, dragging down the upper part of the curve to improve the image’s contrast. This will result in a more natural-looking image, better suited for standard dynamic range displays.
Step 3: Finalize and Export Your Rec.709 Project
With your contrast adjustments complete and your footage looking great, you can now export your project in the Rec.709 color space. This version of your video will be suitable for uploading to platforms like YouTube and for viewing on devices without HDR capabilities.
Thank you for taking the time to read our blog post on working with iPhone Dolby Vision HDR footage in Davinci Resolve. We hope that you found the information valuable and that it helps you create stunning HDR content for your viewers. Don’t hesitate to explore the rest of our blog for more filmmaking and video editing tips and insights. Happy editing, and we look forward to seeing your incredible HDR videos!