Welcome back to FilmmakingElements.com, your one-stop destination for everything related to filmmaking. In this comprehensive guide, we’ll be diving into the world of High Dynamic Range (HDR) workflows in DaVinci Resolve, one of the most powerful and widely-used color grading and editing tools in the industry. As filmmakers continue to push the boundaries of visual storytelling, HDR has emerged as a key component in creating stunning, immersive content that captivates audiences like never before.
From understanding the basics of HDR and its benefits, to setting up your DaVinci Resolve project for HDR grading, and even exploring advanced techniques to achieve breathtaking results, this guide will equip you with the knowledge and confidence you need to harness the full potential of HDR in your projects.
Understanding High Dynamic Range (HDR) Video
High Dynamic Range (HDR) video is transforming the way we enjoy visual content by offering a richer and more vibrant range of colors, brightness, and saturation compared to traditional displays. This new generation of video technologies allows TV screens to display incredibly bright highlights and more saturated colors, resulting in more lifelike and vivid imagery.
Typically, most of an HDR image is graded in a way similar to a Standard Dynamic Range (SDR) image, with shadows and midtones remaining relatively unchanged. This consistency ensures a comfortable viewing experience and makes it easier to switch between SDR and HDR versions of a program.
What sets HDR apart is its ability to provide extra room for much brighter highlights and enhanced color saturation, surpassing the limitations of SDR television and cinema. This allows colorists to create more realistic and striking highlights in images, such as sunsets, clouds, firelight, explosions, and other intensely bright and colorful scenes.
In a nutshell, HDR lets you “open up” the highlights in an image, just as you’ve always been able to reveal more detail in the shadows. This not only offers more lifelike lighting intensity and saturation but also significantly expands the available contrast in a scene. For example, while a calibrated SDR display has a peak luminance level of 100 nits (cd/m²), HDR displays can reach peak luminance levels of 500, 1000, or even up to 4000 nits. This substantial increase in luminance levels creates a more dynamic, immersive, and true-to-life viewing experience.
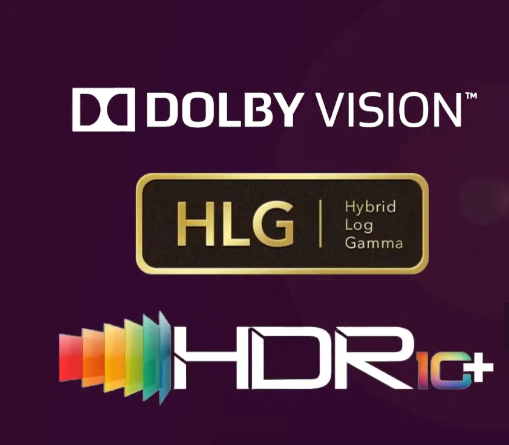
Exploring HDR Standards: Dolby Vision, Hybrid Log Gamma, and HDR10
High Dynamic Range (HDR) video comes in several standards, with Dolby Vision, Hybrid Log Gamma (HLG), and HDR10 being the most common. Each standard offers its own unique features and benefits, making them suitable for different use cases.
Dolby Vision
Dolby Vision utilizes the SMPTE 2084 PQ (Perceptual Quantizer) EOTF (Electro-Optical Transfer Function), which describes how digital images are converted into visible light, similar to a gamma curve. This standard incorporates colorist control metadata to ensure consistent artistic intent across various display devices, supporting a wide range of luminance from 0 to 10,000 nits. To maintain backward compatibility with SDR displays, Dolby has developed a dual-layered output option, allowing both SDR and HDR monitors to display the appropriate image.
Hybrid Log Gamma (HLG)
Developed by the BBC and NHK, HLG is another HDR video encoding method. It functions similarly to the current broadcast standard gamma curve, starting off linearly and transitioning smoothly into logarithmic encoding for highlights. With HLG, an SDR display would display most of the image exactly as it appears on an HDR display, with only the highlights being compressed.
HDR10 and HDR10+
HDR10 and its more advanced counterpart, HDR10+, both use the ST 2084 PQ curve and have been adopted by the Blu-ray Disc Association. The primary difference between these two variants lies in their use of metadata. HDR10 uses static metadata, resulting in fixed brightness values that do not change over time, which can lead to a loss of gradient in the image’s highlights. On the other hand, HDR10+ uses dynamic metadata like Dolby Vision, adjusting values on a frame-by-frame basis to optimize the viewing experience for each display.
HDR video is graded similarly to SDR images but offers more headroom for highlights and color saturation. HDR monitors provide an impressive viewing experience, making them ideal for post-production workflows. To demonstrate the basics of HDR workflow, we’ll be using an HDR monitor that supports 4K UHD, HDR10, and HLG up to 1000 nits.
Setting Up DaVinci Resolve HDR Workflow with an HDR Display
In this section, we will walk you through the process of setting up DaVinci Resolve for an HDR workflow, ensuring that you have an HDR display properly connected and configured.
Connecting a Capture and Playback Device
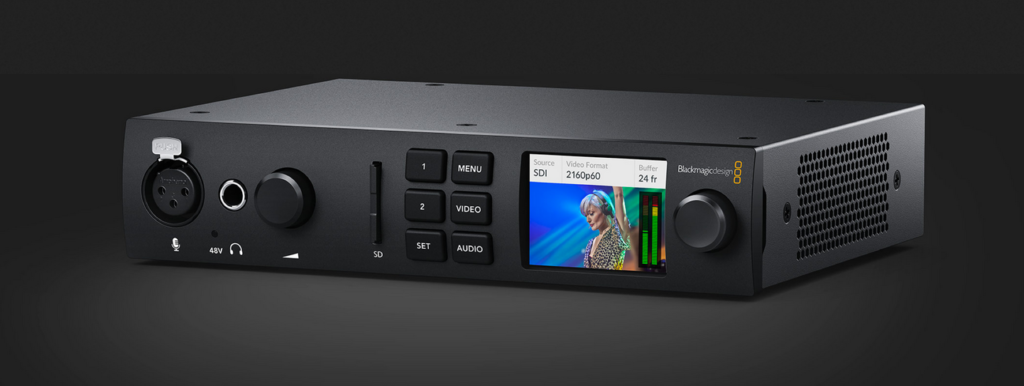
First, you will need a capture and playback device from Blackmagic, such as an UltraStudio 4K Mini or a DeckLink PCIe card, to send a clean video signal from DaVinci Resolve to your HDR monitor. The monitor should display the actual video output, not just the full-screen display of the graphical user interface (GUI). This is crucial because the image you see on the monitor and the image you see in the GUI interface will differ when working in HDR.
For the UltraStudio devices, connect the monitor to the device via HDMI, and then connect the device to your computer using Thunderbolt. If you are using a desktop PC, you can use a DeckLink PCIe card with HDMI and SDI outputs that slot into your PCIe slot.
To work in HDR, you will need a device that supports HDMI 2.0, as HDR requires a wider color space and sends more information to the monitor.
Configuring HDR Display with DaVinci Resolve
Once your capture and playback device is connected, follow these steps to configure DaVinci Resolve for HDR grading:
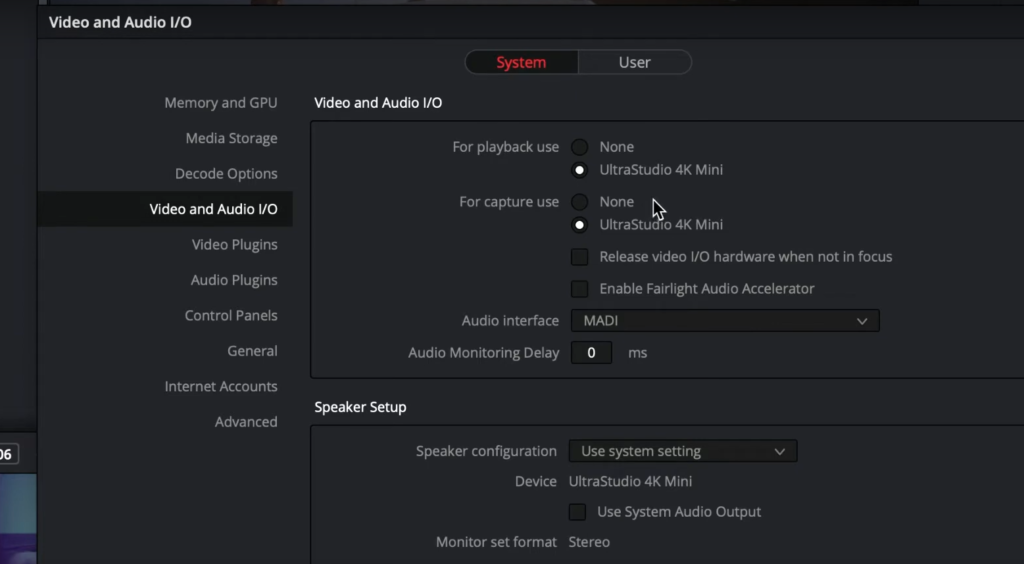
- Open DaVinci Resolve and from the top left corner go to Davinci Resolve > Preferences.
- Under the Video and Audio I/O settings, make sure DaVinci Resolve recognizes your UltraStudio or DeckLink device in the “Monitor Device” options. If not, you may need to install the Desktop Video application that comes with your device to enable compatibility with Mac, Windows, or Linux systems.
Now that your HDR monitor is connected and DaVinci Resolve is configured to work with your capture and playback device, you are ready to begin grading HDR content. In the following sections, we will dive deeper into the specific tools and techniques for HDR grading in DaVinci Resolve.
Monitoring in Different Resolutions with DaVinci Resolve
DaVinci Resolve allows you to work with different timeline and monitoring resolutions, providing flexibility and reducing the strain on your graphics card for HDR workflow. For example, you can work in an HD timeline while monitoring your output in 4K. In this section, we will demonstrate how to change your monitoring resolution in DaVinci Resolve.
Changing the Monitoring Resolution
- Open your project in DaVinci Resolve.
- From the menu bar on top, go to File > Project Settings.
- In the Master Settings tab, you will see that the timeline resolution is set to 1920×1080 (HD). Leave it as is.
- Navigate to the Video Monitoring section and change the video format resolution to UHD 2160p 23.976 (or the frame rate of your project).
- Next, go to the Image Scaling section and uncheck the “Match Timeline Settings” box.
- Change the output resolution from HD to “Custom” and set it to 3840×2160 (4K).
After saving these settings, the monitor will flick off and then back on, indicating that the changes have been applied. Now, you are working in an HD timeline while monitoring in Ultra HD, allowing DaVinci Resolve to process the timeline in HD while you view the output in 4K. This feature is particularly useful for projects involving high-resolution footage, as it reduces the workload on your graphics card while still allowing you to view your work at a higher resolution.
Setting Up DaVinci Resolve Color Management for HDR Workflow
High Dynamic Range (HDR) content has become increasingly popular, providing more life-like colors and an expanded range of brightness levels. To ensure that you get the best possible output for your HDR grading, it’s essential to set up DaVinci Resolve Color Management correctly.
Configuring Color Management for HDR
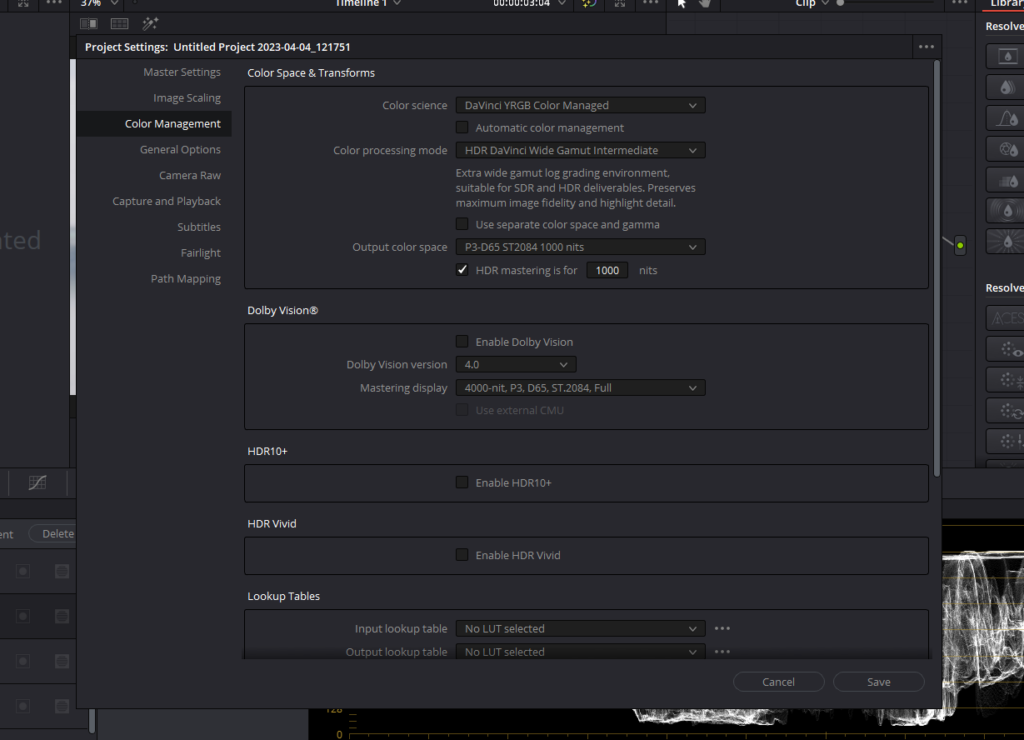
- Open your project in DaVinci Resolve: Launch the DaVinci Resolve application and open the project you want to work on.
- Access Project Settings: Click on File > Project Settings located in the top menu. This will open the Project Settings window, where you can configure various settings for your project.
- Navigate to the Color Management tab: In the Project Settings window, click on the Color Management tab on the left side.
- Change the color science: By default, the color science will be set to DaVinci YRGB. To properly work with HDR, you need to change this to DaVinci YRGB Color Managed. This will enable more advanced color processing options tailored for HDR content.
- Disable Automatic Color Management: Uncheck the box labeled “Automatic Color Management.” This gives you more control over the color processing settings.
- Select the HDR DaVinci Wide Gamut Intermediate: In the Color Processing Mode drop-down menu, choose HDR DaVinci Wide Gamut Intermediate. This preset is specifically designed for log grading environments and is suitable for both SDR and HDR deliverables while preserving image fidelity.
Setting Output Color Space for HDR Monitoring
- Locate the Output Color Space section: In the Color Management tab of the Project Settings window, scroll down to the Output Color Space section.
- Change the default output color space: The default setting is Rec 709 (Scene), which is the standard for SDR delivery. For HDR grading, change the output color space to P3-D65 ST2084 1000 nits. P3-D65 is a color space commonly used for HDR content, and ST2084 is the EOTF (Electro-Optical Transfer Function) mode for HDR.
- Enable HDR mastering: Check the box labeled “HDR mastering is for 1000 nits.” This ensures that DaVinci Resolve is correctly set up for HDR mastering at the specified nit level.
- Save the settings: Click the Save button at the bottom right corner of the Project Settings window. The image on your HDR monitor should now change, indicating that DaVinci Resolve is properly set up for HDR grading.
Understanding the Differences Between the HDR Monitor and the Interface Preview
When working in HDR, it’s important to be aware of the differences between the image displayed on your HDR monitor and the one shown within the DaVinci Resolve interface. The interface preview does not provide an accurate representation of the HDR content, while the HDR monitor displays the true HDR image.
Grading with an HDR Monitor
As you work on your project, you’ll notice a significant difference between the image displayed in the DaVinci Resolve interface and the one shown on your HDR monitor. The interface preview offers an estimate of what the HDR image looks like, but it lacks the expanded range of brightness levels and color accuracy that the HDR monitor can provide.
When grading in HDR, it’s essential to rely on the output monitor for an accurate representation of the final image. This is because the HDR monitor can display the full range of colors and luminance levels that are characteristic of HDR content. Using the HDR monitor as your primary reference during grading ensures that your work is optimized for HDR deliverables, resulting in a higher quality output.
Fine-tuning Your HDR Grading with DaVinci Resolve and HDR Monitors
When grading HDR footage using DaVinci Resolve and an HDR monitor, you can optimize your workflow to ensure accurate color representation and achieve impressive results.
Adjusting Video Scopes for HDR
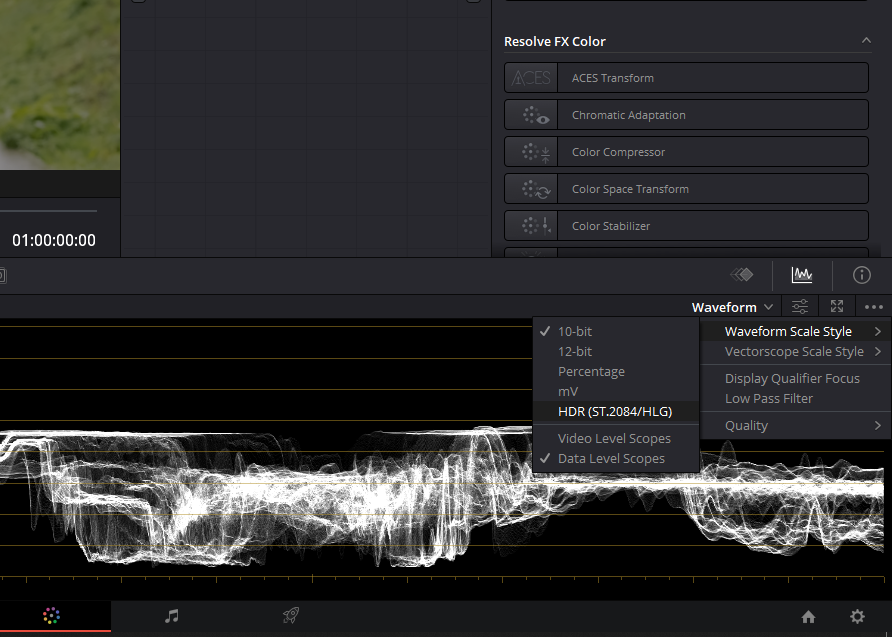
As you work on your HDR project, you might want to adjust the video scopes within DaVinci Resolve’s Color Page. To do this, click on the three horizontal dots above the scopes and change the Waveform Scale Style to HDR (ST.2084/HLG). This will update your scopes to reflect HDR values, including the thousand-nit level for highlights.
Grading the Image
With your HDR monitor and DaVinci Resolve set up correctly, you can begin grading your footage. Adjust light levels, shadows, and contrast ratios to fine-tune your image and create a visually stunning result. Keep in mind the differences between the image displayed in Davinci Resolve and the one shown on your HDR monitor, as the latter will provide a more accurate representation of the final output.
Exploring Different HDR Profiles
There are various HDR profiles available for use with both the HDR monitor and DaVinci Resolve. If you prefer using a different version of HDR, such as Hybrid Log-Gamma (HLG), you can easily set up your monitor and software to accommodate this format.
Conclusion
In conclusion, High Dynamic Range (HDR) video has revolutionized the way we create and consume visual content, offering filmmakers an expanded range of colors, brightness, and saturation to bring their visions to life. DaVinci Resolve, as a powerful color grading and editing tool, is perfectly suited to help you master HDR workflows and create stunning, immersive content for your audiences.
By understanding the different HDR standards, configuring your HDR display, and using DaVinci Resolve to optimize your workflow, you can harness the full potential of HDR in your projects. With this comprehensive guide, we hope to have equipped you with the knowledge and confidence necessary to excel in your HDR endeavors and elevate your visual storytelling to new heights.