
Hi, welcome back to FilmmakingElements.com. In this article, we cover 4 ways to color grade Panasonic V-Log in DaVinci Resolve
V-Log is a setting for shooting videos with Panasonic cameras that creates a flat, low-color image. This is useful because it allows us to adjust the color and contrast later on when editing the video in a program like Davinci Resolve. It’s like taking a plain canvas and then adding color and depth to it with paint later on. V-Log gives us the flexibility to create the look we want in post-production.
However, working with V-Log footage can be challenging, especially for those who are new to color grading. Fortunately, there are different methods to color-grade Panasonic V-Log footage in Davinci Resolve, one of the leading video editing software in the industry. In this article, we will explore four different methods for color grading Panasonic V-Log footage in Davinci Resolve, including using a color space transform, using the official technical LUT, using ACES, and using Davinci Resolve’s color management tools. Whether you’re a beginner or a seasoned pro, these methods will help you achieve the desired look for your V-Log footage.
Color Grade Panasonic V-Log In Davinci Resolve (4 Ways)
1. Color Grade Panasonic V-Log With Color Space Transform In Davinci Resolve
Davinci Resolve is a powerful video editing software that offers a range of tools for color grading and correction. One technique for color grading Panasonic V-Log in Davinci Resolve and improving the overall look of your footage is to use the Color Space Transform Open Fx.
This tool allows you to transform the color space and gamma of your footage to achieve a more natural and balanced appearance. To use it, navigate to the Color page in Davinci Resolve and select “Open Fx.” Scroll down until you find “Color Space Transform” and drag it onto a node. For best results, place it on the last node of the node tree.

In the settings for Color Space Transform Open Fx, set “Input Color Space” to “Panasonic V-Gamut” and “Input Gamma” to “Panasonic V-Log.” Set “Output Color Space” to “Rec.709” and “Output Gamma” to “Gamma 2.4.” For tone mapping, choose either Davinci or Luminance Mapping based on your preference. Finally, select “Saturation Compression” for “Gamut Mapping Method.”
After setting up the Color Space Transform Open Fx node according to these steps, you should see a noticeable improvement in your footage. The colors will appear more natural and the contrast will be better balanced.
However, if you want to achieve a specific look or feel for your footage, you may need to make further adjustments using other color grading tools available on the Color page in Davinci Resolve. These tools include lift gamma gain color wheels curves qualifier power window tracking etc.
Using these tools in combination with the Color Space Transform Open Fx node can help you achieve a professional-grade color grade for your footage.
2. Color Grade Panasonic V-Log With Official Technical LUT
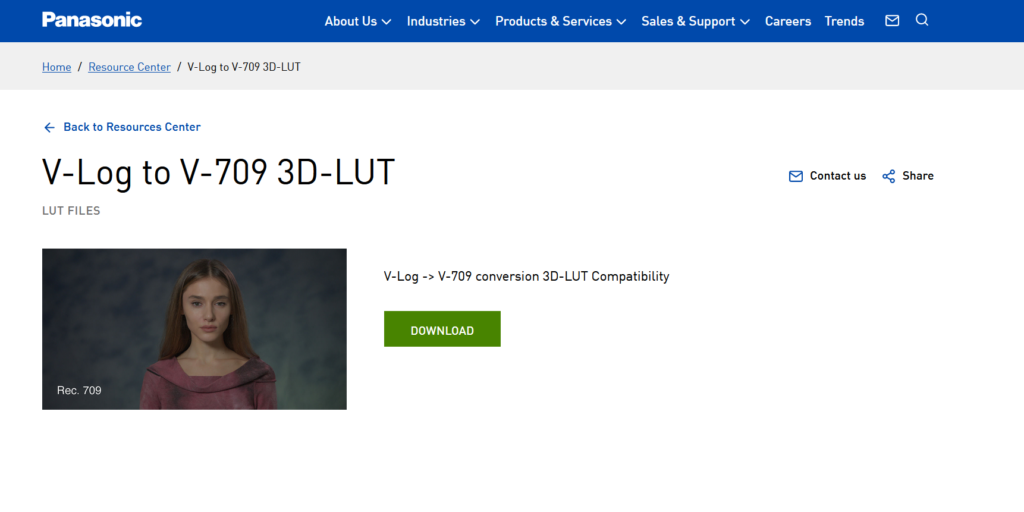
Transform your Panasonic V-Log footage into a cinematic masterpiece in Davinci Resolve with the technical transform LUT from Panasonic’s official website! Follow these simple steps to get started:
- Click here to visit the download page and grab the LUT package.
- Inside you’ll find 3 LUTs, but all you need is the one with the “.cube” extension – this little gem converts your footage into Rec.709 for a perfect starting point.
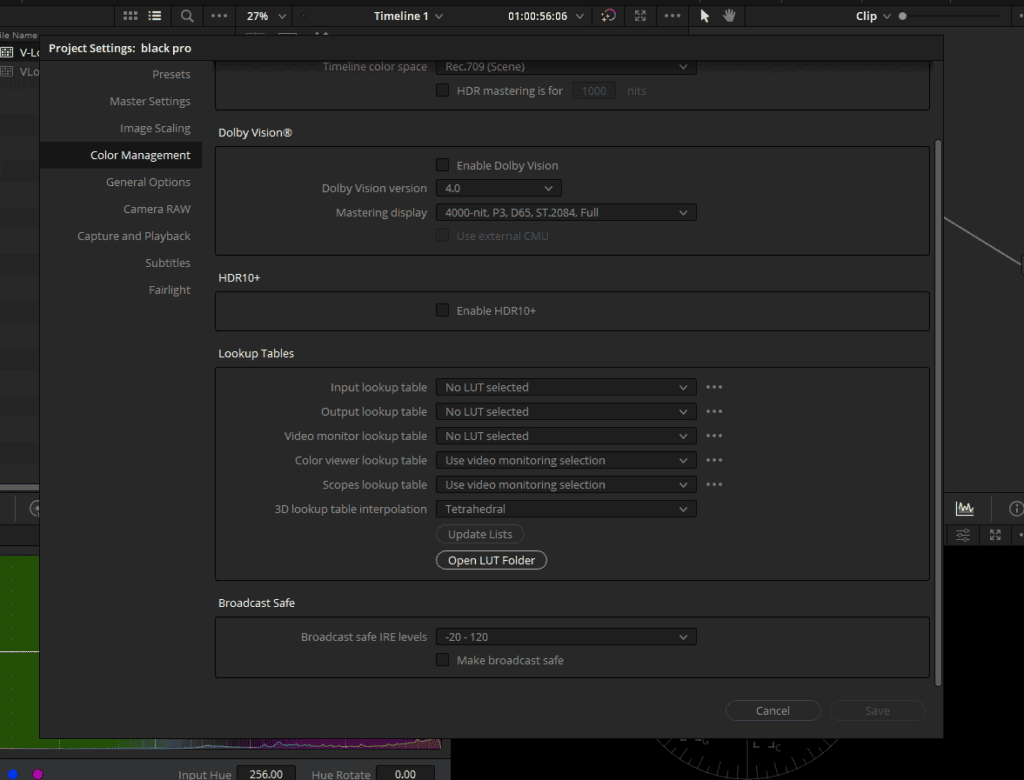
- Ready to get started? Click on the gear icon in the bottom right corner to open “Project Settings” and head over to the “Color Management” tab.
- Under “Lookup Tables”, select “Open LUT Folder” and create a new folder named “V-Log”.
- Drag and drop that shiny new LUT into this folder, close the file browser and click on “Update Lists” to import it into Davinci Resolve.
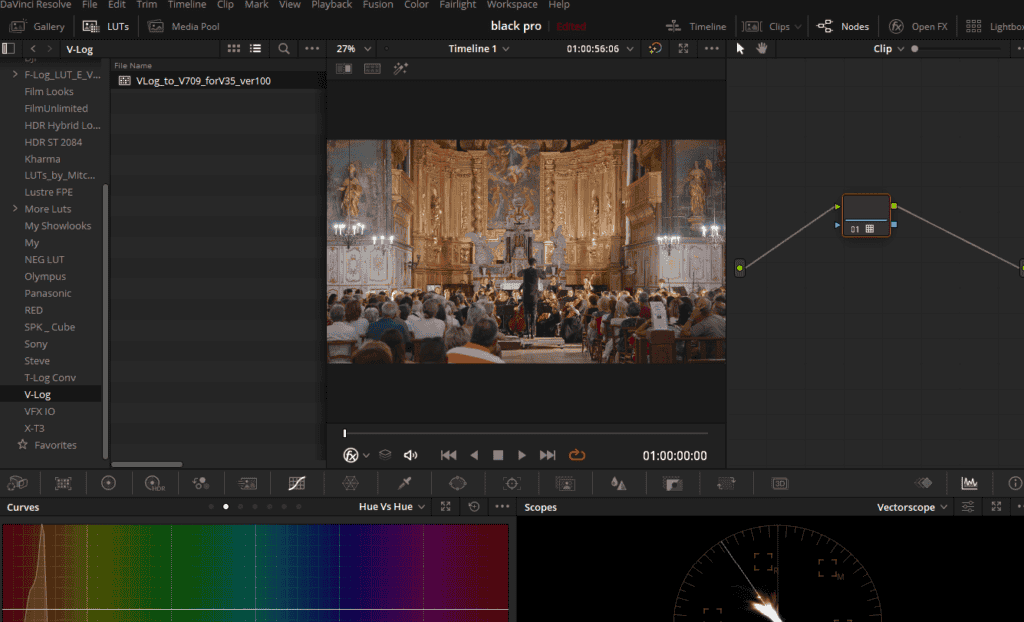
- Head over to the color page and click on the “LUTs” button in the top left corner – voila! A menu with all available LUTs will appear!
- Find your newly created “V-log” folder and double-click or drag and drop the LUT onto a node from within it to apply that sweet LUT goodness as a starting point for look development and compressing overall contrast in highlights.
- Keep this LUT at end of your node tree for best results and unleash your creativity using tools like Lift, Gamma, Gain to create your desired look.
3. Color Grade Panasonic V-Log With ACES In Davinci Resolve
When it comes to color grading Panasonic V-LOG footage, using the Academy Color Encoding System (ACES) in Davinci Resolve, can be a game-changer. ACES is a free and open color management system that standardizes color space between different input sources such as cameras and VFX. This means that you can achieve more consistent and photorealistic results when working with multiple sources.
But that’s not all – ACES also features a high dynamic range, an RGB-based workflow, and an ultra-wide color gamut that encompasses the entire spectral locus. This gives you more flexibility and control over your colors, allowing you to create stunning visuals that truly capture your vision.
And the best part? ACES is not tied to any specific platform or program, so you can use it with your favorite tools and workflows. It’s also designed to work with current technology as well as future workflows, so you can be confident that your work will stand the test of time.
To Color Grade, Panasonic V-Log Using ACES In Davinci Resolve, follow these steps:
- Click on the “File” dropdown menu from the top.
- Select “Project Settings”, this will open up a dialogue box.
- Select “Color Management” from the menu on the left.
- Now you will see a plethora of Color Science wisdom. But don’t get overwhelmed.
- We are here to rescue you.
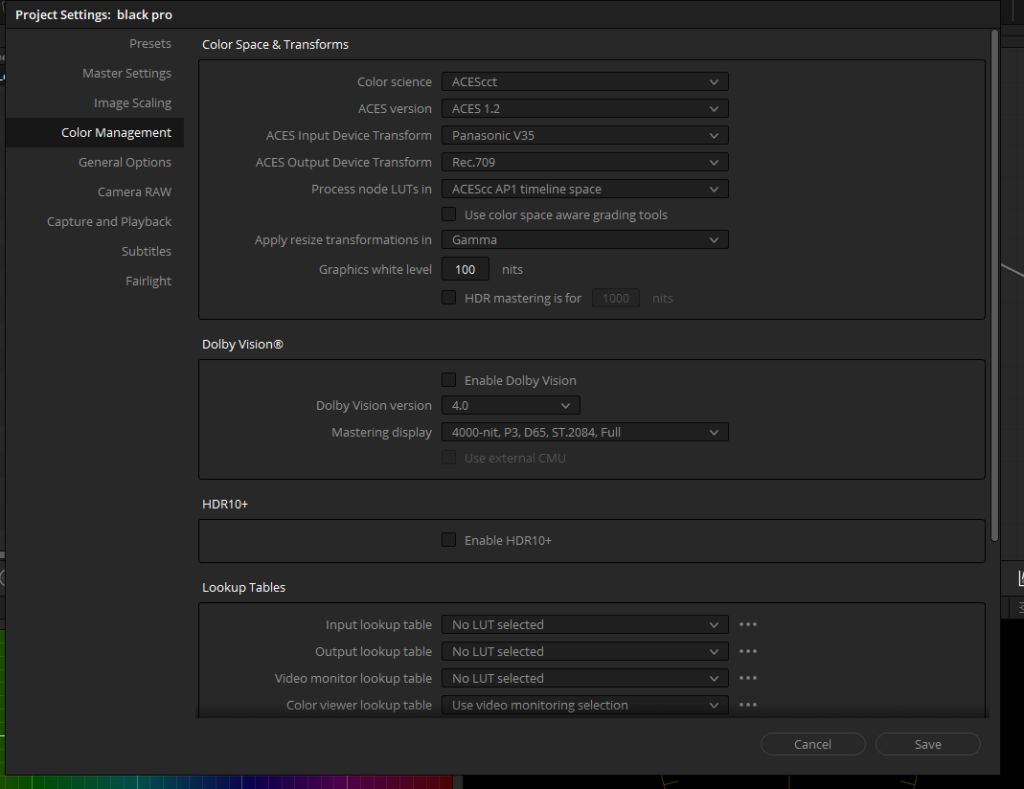
- In the “Color Science” drop-down menu, select “ACEScct”
- You can also use “ACEScc”, but we find the ACEScct better and gives better results in terms of tonal range.
- In the “ACES version”, choose the latest one.
- In the “ACES Input Device Transform” choose, “Panasonic V35”
- In the “ACES Output Device Transform” choose, “Rec.709”
- Hit “Save”
- You will see all the footage in your timeline will be color graded.
- You can use color grading tools in Davinci Resolve to further create the look of your project.
4. Color Grade With Davinci Resolve Color Management
Color grading is an essential part of any video production workflow. It’s where the magic happens – where you can transform your raw footage into a visually stunning masterpiece. And when it comes to color grading Panasonic V-Log footage, Davinci Resolve has got you covered with its powerful color management tools.
Imagine this: You’ve just finished shooting your latest project on your Panasonic camera and you’re ready to start the post-production process. You open up Davinci Resolve and import your V-Log footage. But where do you start? How do you bring out the best in your footage?
One technique that many users swear by involves using Davinci Resolve’s built-in color management features. This technique is a personal favorite for many because it provides a great starting point for color grading and offers more flexibility than other methods such as ACES.
Here’s how it works: First, open up the “File” dropdown menu and select “Project Settings.” From there, navigate to the “Color Management” section and choose “Davinci YRGB Color Managed” from the “Color Science” dropdown menu. Next, select “Custom” from the “Resolve color management preset” dropdown menu.
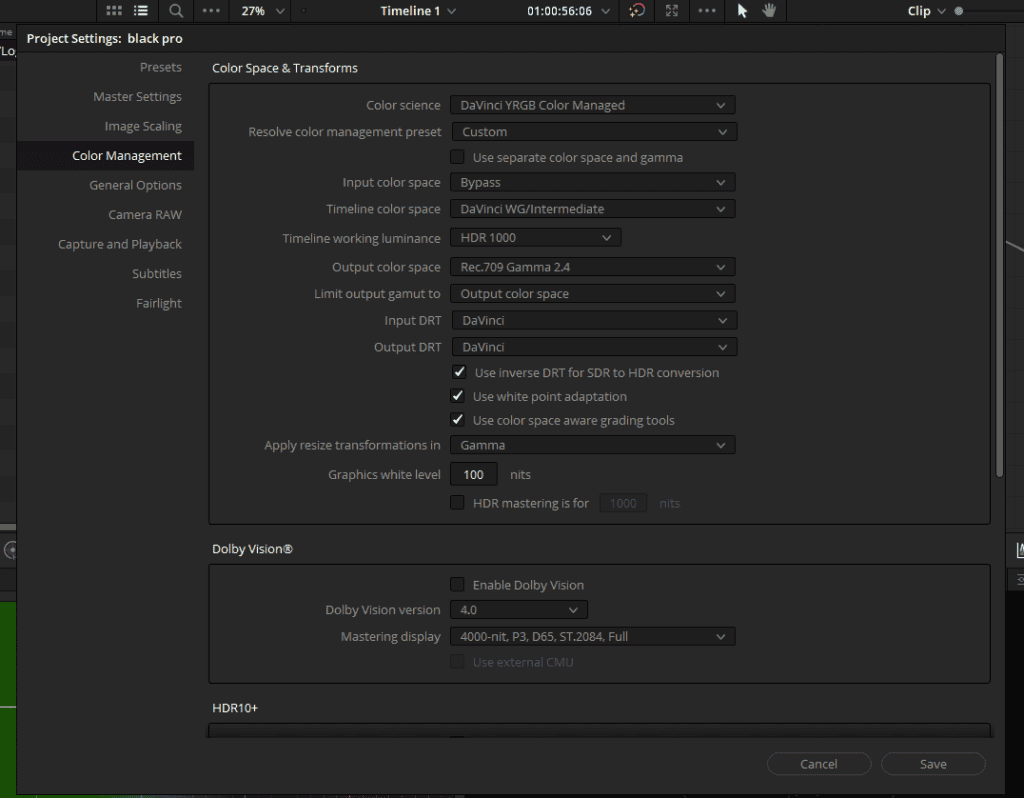
In the “Input Color Space,” choose “Bypass,” as we will set this later in the color page. For the “Timeline Color Space,” select “Davinci WG/Intermediate,” and for the “Output Color Space,” choose “Rec.709 Gamma 2.4.” After making these changes, click on “Save” to apply them.
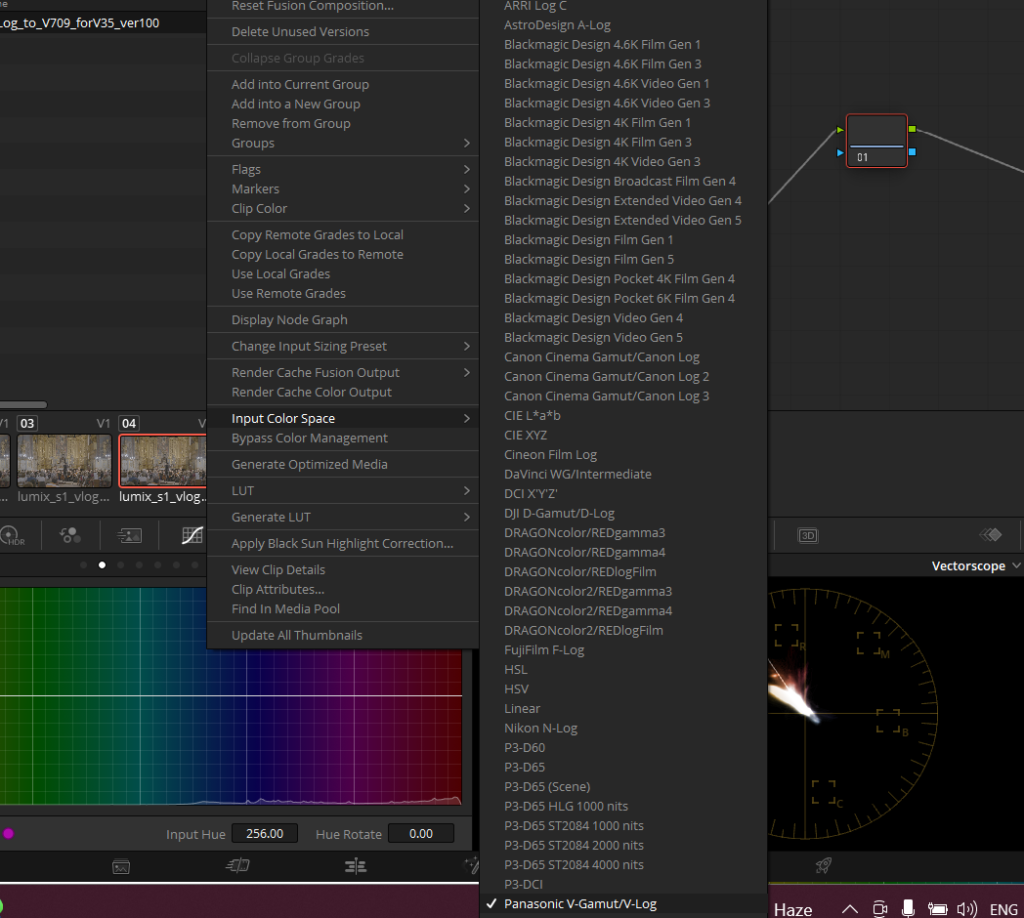
At this point, you won’t see any visual changes to your footage yet – but don’t worry! The magic is about to happen. Click on the “Clips” button in the top right corner to view all of your clips in thumbnail mode below the viewer. Select your V-Log clip and right-click on it to access the “Input Color Space” menu. From there, choose “Panasonic V-Gamut/V-Log” to apply the new settings.
And voila! With these settings applied, you can now proceed with color grading your Panasonic V-Log footage using Davinci Resolve’s powerful suite of tools. This technique gives you greater control over your final result by allowing you to fine-tune your color management settings according to your specific needs.
So go ahead – unleash your creativity and bring out the best in your Panasonic V-Log footage with Davinci Resolve’s powerful color management tools!
Which Technique for Color Grading Panasonic V-Log in Davinci Resolve is Best?
Well, well, well, looks like we have a color-grading enthusiast over here! If you’re like me, you take your color grading seriously. I mean, what’s the point of shooting in V-Log if you’re not going to make your footage look like it was shot on a Hollywood set, am I right?
So, if you’re trying to add some pizzazz to your Panasonic V-Log footage in Davinci Resolve, you’ve got some great options. Do you want to transform your footage to look more natural? Try the Color Space Transform Open Fx technique. Want a quick starting point using a pre-made LUT? Go for the Official Technical LUT technique. Looking for consistent and photorealistic results? ACES is your friend. And if you want to take full advantage of Davinci Resolve’s color management tools, the Davinci Resolve Color Management technique is the way to go.
Just remember, at the end of the day, the choice of technique is up to you and your specific needs and preferences. So, go forth and color grade with confidence!