Color grading is a critical aspect of video production, responsible for setting the mood, drawing attention to specific elements, and giving your footage a professional finish. DaVinci Resolve, a powerful post-production software, offers various color correction and grading tools that can elevate your project to new heights.
One such tool is the RGB Mixer, which enables you to control and manipulate color channels with precision and ease. In this step-by-step guide, we will walk you through the process of using DaVinci Resolve’s RGB Mixer to achieve stunning results, whether you are a beginner or a seasoned professional. Follow along as we demystify this essential tool, and unlock the full potential of your video’s color palette.
Exploring the RGB Mixer in Resolve
Introduction to the RGB Mixer
The RGB mixer is an often-overlooked tool in Davinci Resolve due to its seemingly confusing functionality. However, it offers users the ability to achieve various stylistic looks, correct unnatural colors, and perform a host of other practical tasks. Similar to Photoshop’s channel mixer tool, the RGB mixer allows users to add or subtract specific color amounts from one channel to one of the main RGB channels interactively. This comprehensive guide will delve into the functionality of the RGB mixer and explore various ways to utilize it effectively.
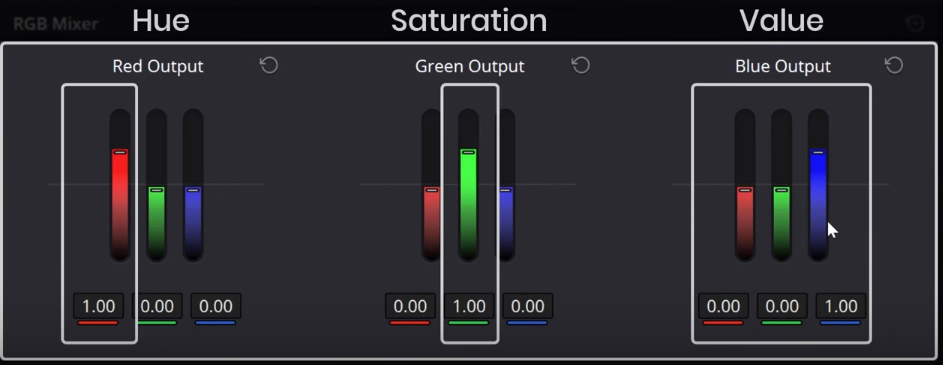
RGB Mixer Interface
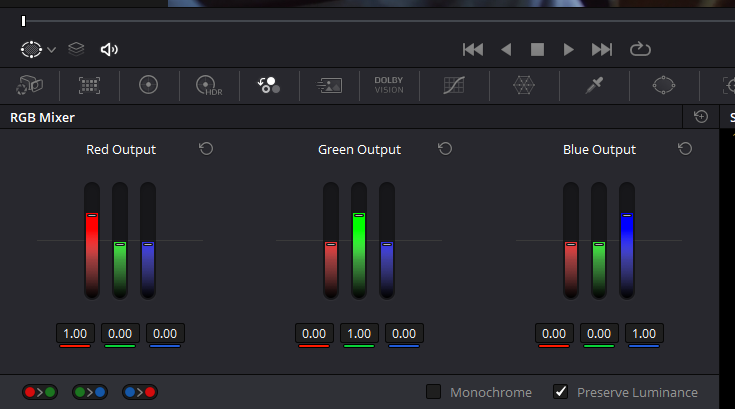
In DaVinci Resolve, access the RGB Mixer in the Color tab by clicking the “RGB Mixer” button (icon with three small circles). The RGB mixer interface consists of three groups corresponding to each channel: red, green, and blue. Each group has an output slider set at a default value of one, similar to the printer lights where you control the gain for each channel. The other two sliders per group control the contributions of that channel’s group output, which is mixed into the other two colors. This can be thought of as one color channel borrowing from another channel.
Practical Applications of the RGB Mixer
The RGB mixer offers numerous practical applications for color correction and creative looks in video post-production. Let’s dive deeper into the various ways to utilize the RGB mixer to enhance your footage.
Fixing White Balance
Incorrect white balance can lead to color casts and an unnatural appearance in your footage. The RGB mixer can effectively correct clips shot with the wrong white balance by adding or subtracting color values from the main RGB channels.
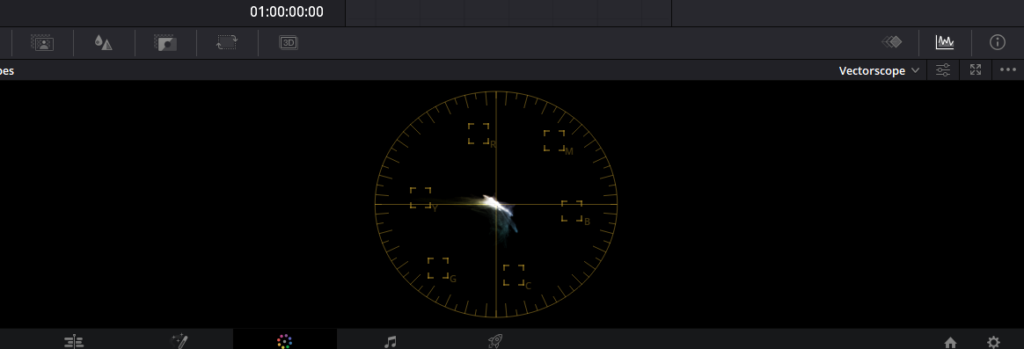
- Analyze the color balance of your footage using tools like Vectorscope.
- Adjust the main RGB outputs to correct the overall color balance.
- For finer tuning, use the borrowing sliders to balance the channel’s output. For instance, borrow some blue and add it to the red areas of the image to counterbalance excessive redness.
This method allows for precise control over color balance, helping you achieve a natural-looking result.
Fixing Neon Greens
Overly saturated colors, such as neon greens, can make your footage look unnatural and overly digital. The RGB mixer can help you reduce the brightness and saturation of these colors and add density to create a more organic look.
- Create a node, right-click on it and set the color space to Hue Saturation and Value (HSV). This changes the main output sliders of the RGB mixer to control hue, saturation, and value (luminance).
- Use the green slider of the blue output to reduce the brightness and saturation of greens and yellows.
- Compensate for the overall exposure reduction by increasing the blue in the blue output until your image looks balanced.
Skin Tone Brightness
Adjusting skin tone brightness can help draw attention to the subject and create a more pleasing image. The RGB mixer in monochrome mode offers precise control over skin tone exposure.
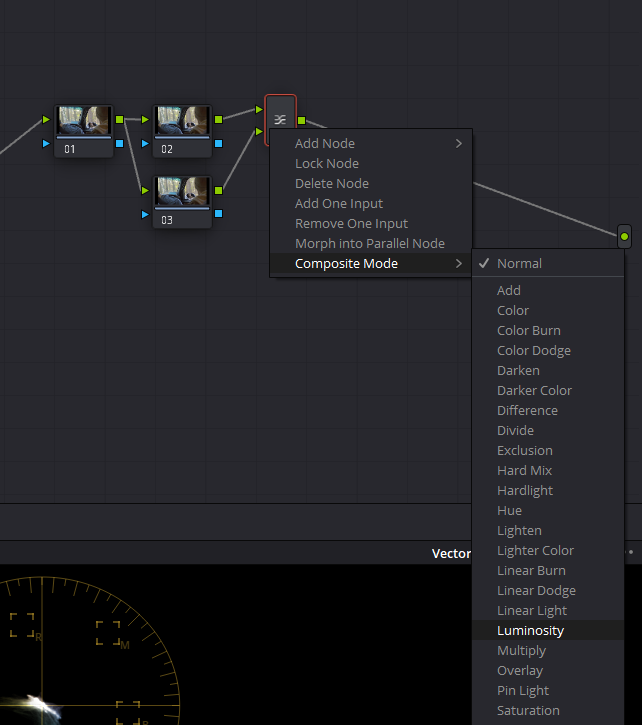

- Complete primary adjustments, such as overall exposure and contrast.
- Create a serial node by using the shortcut Alt + S, then add a layer node by using the shortcut Alt + L. Right-click on the layer mixer and change the composite mode to luminosity.
- Select the bottom layer node and check the monochrome box in the RGB mixer.
- Bring up the red output to increase exposure to skin tones.
- Lower the green output to add density to the foliage, creating a more balanced image.
Day-to-Night Conversion
Transforming day-lit footage into a convincing night-time scene can be achieved using the RGB mixer.
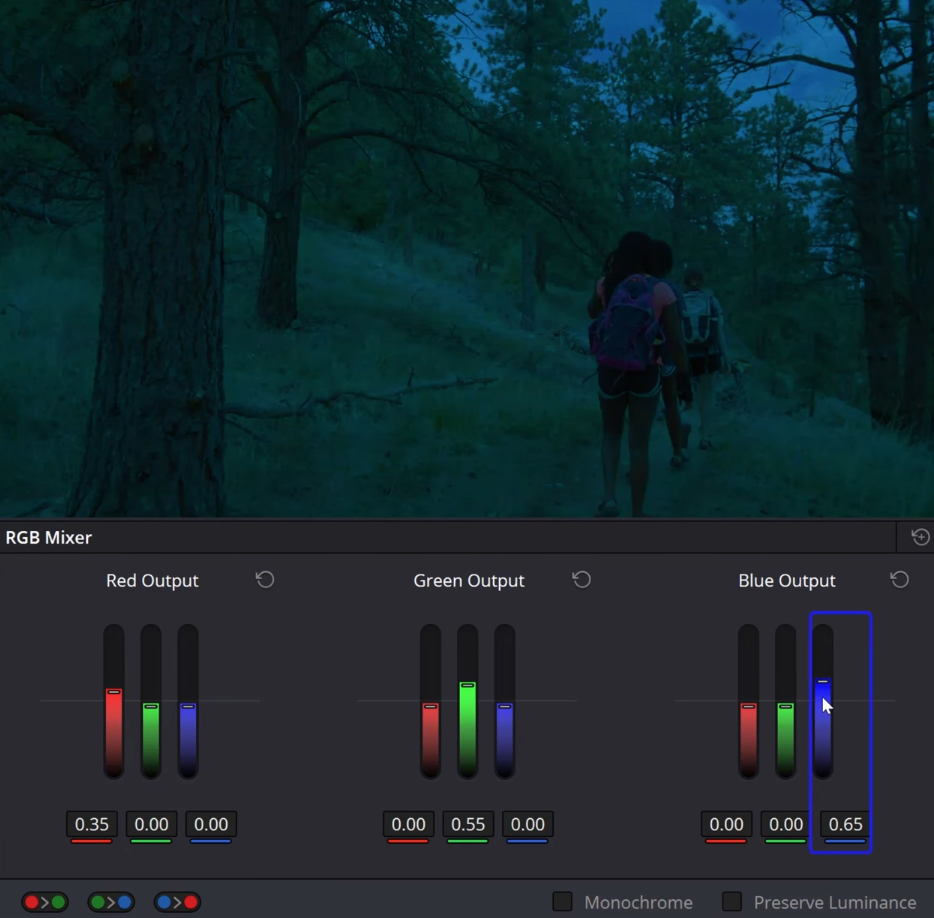
- Add a serial node (Alt + S) after completing primary adjustments like exposure and contrast.
- Head to the RGB Mixer and uncheck the “preserve luminance” option.
- Reduce the channel’s output until your scene starts resembling night-time, which usually appears bluish and underexposed.
- Return to your primary adjustments node and fine-tune the exposure and contrast to create a believable night-time scene.
Be cautious not to overdo the adjustments, as this can lead to an unnatural appearance.
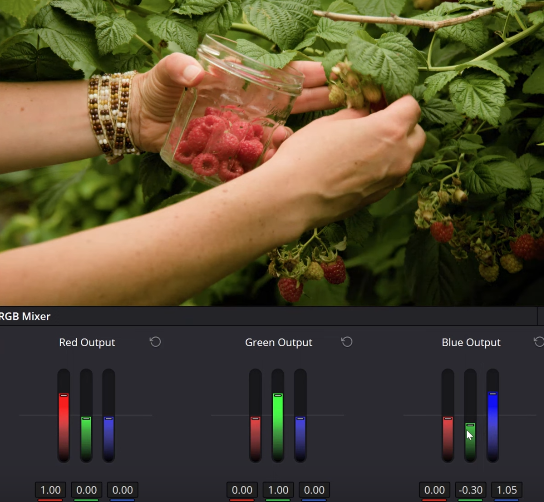
Underwater Footage Correction
Underwater footage often lacks color information in the red channel, making color correction challenging. The RGB mixer can help balance the color by borrowing luminance data from other channels.
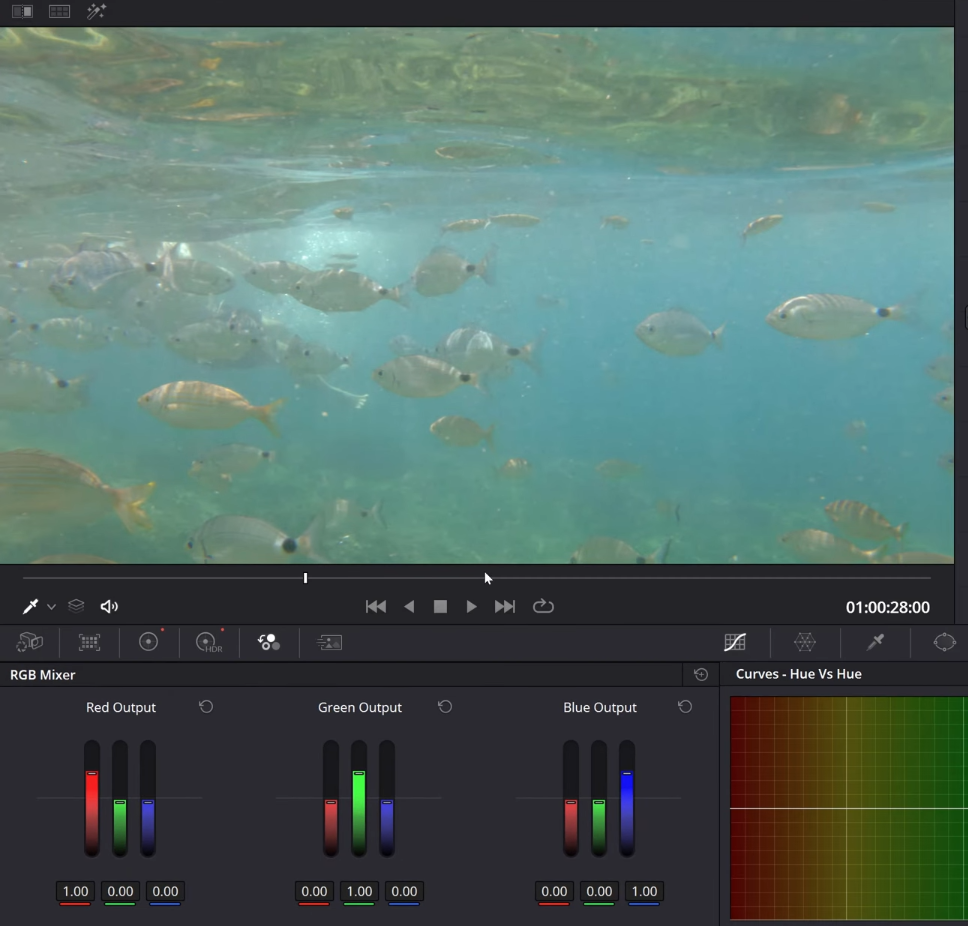
- Complete primary adjustments, such as basic exposure and contrast.
- Use the RGB mixer to borrow luminance data from the blue channel and send it into the red channel to balance the shot.
- Fine-tune the green output if needed to achieve the desired color balance.
- Adjust exposure and contrast on the primary node as needed to create a natural-looking underwater scene.
The RGB mixer provides precise control over color adjustments, making it a valuable tool for various applications in color grading and correction. Practice and experimentation are key to mastering its capabilities and enhancing your footage effectively.
Mastering the RGB Mixer with Practice
The RGB mixer is a powerful tool that may require trial and error to fully understand and control. The more you experiment with this tool, the more you will understand its behavior and learn how to use it to your advantage. While this guide provides a solid foundation for exploring the RGB mixer’s capabilities, practicing and experimenting with different adjustments will ultimately help you achieve the desired results for your footage.
Creating Stunning Looks with the RGB Mixer in DaVinci Resolve
In this section, we will explore how to quickly create looks using the RGB Mixer and discuss some practical applications for your video projects.
Preparing the Footage
- Choose a well-exposed, color-corrected shot to start with. Proper color correction is essential for achieving great-looking results.
Creating a Brownish Look with Teal Shadows
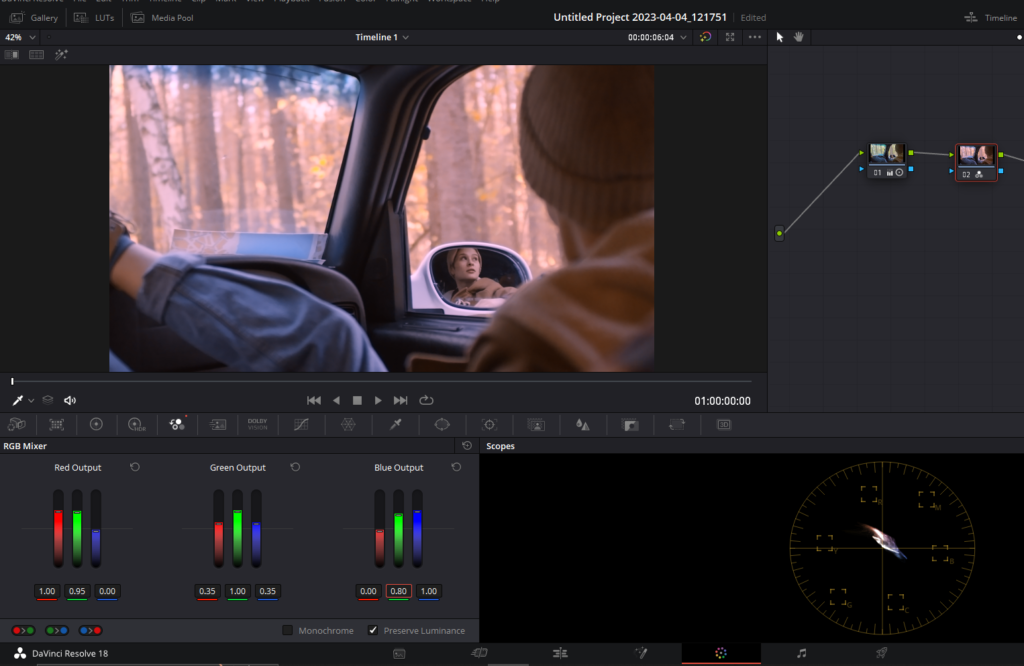
- Add a serial node (Alt + S) after the color correction node in DaVinci Resolve.
- Open the RGB Mixer tab and make the following adjustments:
- In the Red output channel, increase the Green value to around 0.95.
- In the Green output channel, decrease the Red and Blue values to around 0.35.
- In the Blue output channel, increase the Green value to around 0.8.
- Toggle the node on and off to see the significant change in the look achieved using only the RGB mixer. You can also use the temperature and tint slider to further improve the look.
Creating a Fresh, Neutral Look with Intense Blues
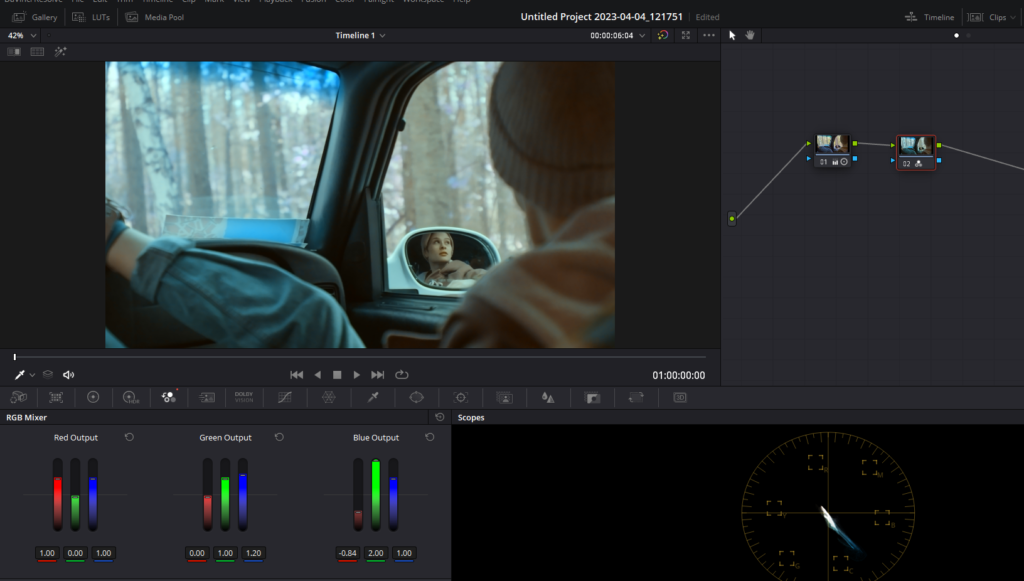
- Disable the previous look’s node and add another serial node (Alt + S).
- In the RGB Mixer, make the following changes:
- In the Red output channel, set the Blue value to 1.
- In the Green output channel, set the Blue value to 1.2.
- In the Blue output channel, increase the Green value to the max (2.0) and decrease the Red value to around -0.7 to -0.9, depending on your footage.
- To give this look more punch, use the Primary Color Wheels tool to make further adjustments.
Tips for Maximizing the RGB Mixer
- Remember that the RGB Mixer can be applied to any exposure and color-corrected clip. You may need to make minor adjustments to suit your specific footage, but the overall process remains the same.
- If the look created with the RGB Mixer isn’t working well with your footage, double-check the color balance in your source image and make necessary adjustments before applying the RGB Mixer.
- Experiment with the saturation levels in your looks. For example, in the first look (brownish with teal shadows), try not to overdo the saturation to achieve a bronze, golden touch for the skin.
Conclusion
Color grading is an essential aspect of video production, responsible for setting the mood, drawing attention to specific elements, and giving your footage a professional finish. The RGB Mixer in DaVinci Resolve is a powerful and versatile tool that can significantly enhance your color grading process, whether you are a beginner or a seasoned professional.
In this comprehensive guide, we have explored various practical applications of the RGB Mixer, from creating stunning looks to correcting color balance and enhancing skin tones. By following these step-by-step instructions and experimenting with the tool, you can unlock the full potential of your video’s color palette and elevate your projects to new heights.
Mastering the RGB Mixer in DaVinci Resolve requires practice and patience, but with time and experience, you will be able to confidently utilize this essential tool to create visually stunning and professional-quality video content.