Hi, I’m Salik, the author of FilmmakingElements.com. I have been a filmmaker for over 10 years. I am also a certified DaVinci Resolve Trainer and I have used DaVinci Resolve for many of my projects. A 3×3 Matrix in our color grading world is based on an image’s RGB (Red, Green, and Blue) channel. A 3×3 Matrix multiplies the RGB colors. Most of the time, this is used to convert between color spaces and transform them. The underlying math calculates (multiplies, to be precise) the output values of each color channel (R, G & B) based on the values you’re putting in the Matrix from all three channels.
A “matrix” is a 3×3 math that moves the primaries around randomly. It is used to achieve a better photometric match between two color spaces; however, it ignores color space deformations at different luminances.
Color space translations and color space transform employ the exact arithmetic.
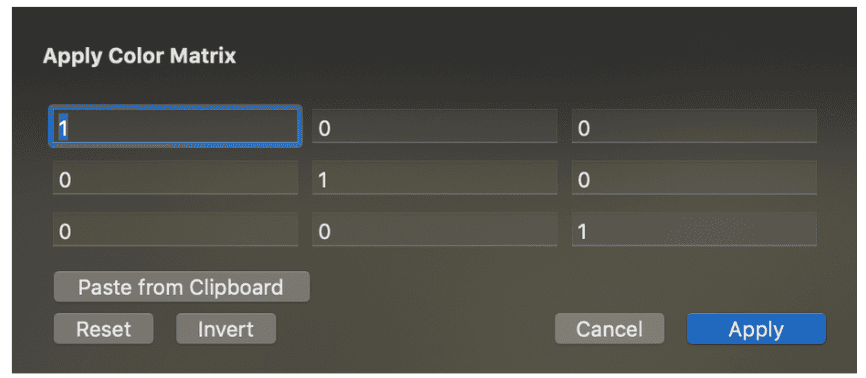
Usually, a 3×3 Matrix looks like this and is more or less a simple table of numbers:
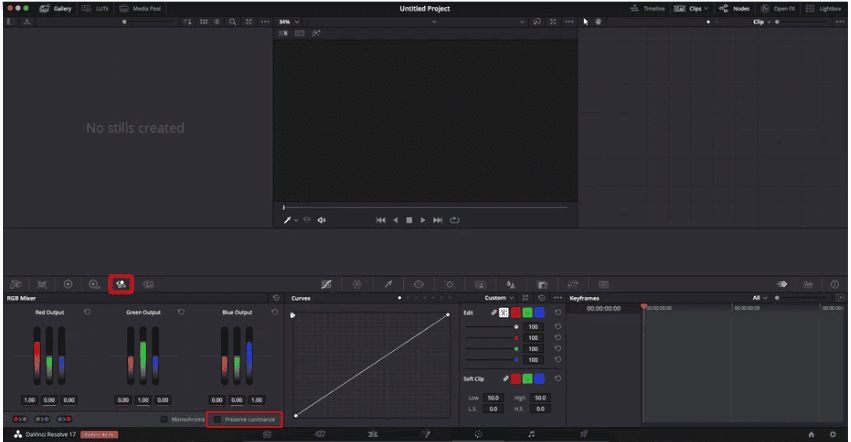
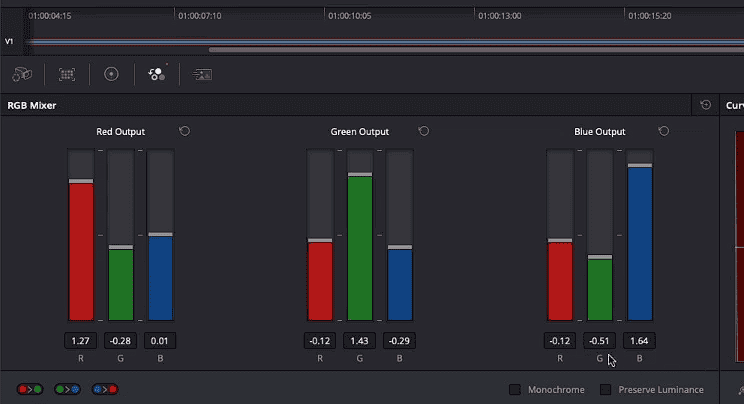
Within Davinci Resolve, you do not have a tool called 3×3 Matrix or similar to other programs like Nuke (there it’s called ColorMatrix), but you have the RGB Mixer tool, which can be used to feed in a 3×3 matrix.
Also, it looks a bit different than the matrix tool in other programs. But you have to imagine that all the rows are one below the other, starting with Red Output. The convenient thing within Resolve is that you’re able not just to type in values but adjust the values with the help of the up and down sliders. In my opinion, that’s awesome for doing creative looks.
The other main difference is that you just have 2 decimals instead of 8 like in Nuke. This results in less precision. I’d personally say that’s still fair enough if you do not use it for workflow purposes where you need the exact mathematical precision, but use it as a creative tool for creating looks and grading your footage.
Using the RGB mixer as a 3×3 Matrix tool is very easy. The vital part here is to untick “preserve luminance” in the RGB mixer tool of Davinci Resolve if you want to use it correctly or even port values over from other programs or similar.
Furthermore, if the 2 decimals are not enough for you, you can create matrixes within Nuke or Lattice and save them as a 3D LUT, export this one, and load it into Davinci Resolve.
HOW TO USE A 3×3 MATRIX
So but now let’s start with some basics on how to use the Matrix. As a default, the Matrix looks like this:
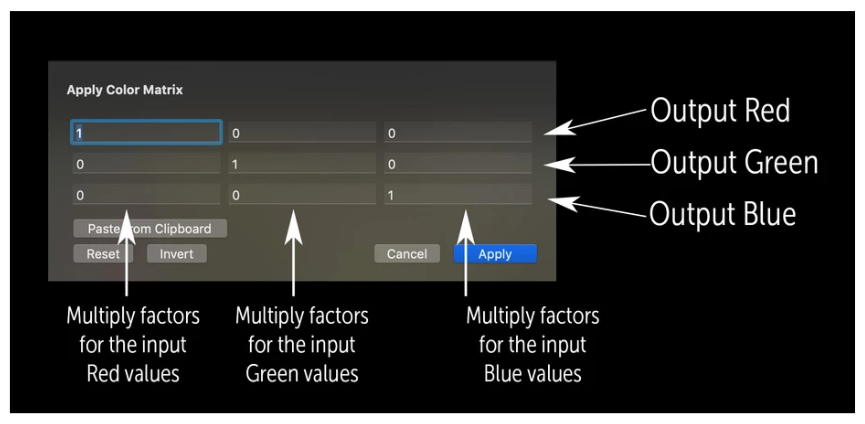
The first row is Red Output, the second is Green Output, the third is Blue Output. The first column stands for Red too, but it’s the input value, second for Green and third for Blue again. So as a default, you see a “1” in the Red column in the Red row. Same for Green and Blue in the respective rows and columns. In this default setting, your input is the same as your output.
You can start experimenting if you want to go for a creative look. You can add Green into the Red channel and subtract Blue from the Red channel by entering a value like 0.123 in the second column (Green Input) in the first row (Red Output). Next, enter a negative value in the third column (Blue Input) in the first row (Red Output).
Also, you can change the intensity of Red Input in the first row in the first column if you want to. Now you’re having the first row filled with values. All these values affect the Red Output. You can now fill the second (Green) and third (Blue) row with values to affect the Green and Blue Output.
You do not just use the 3×3 Matrix to convert between colorspaces and transform them, but you can use the RGB Mixer for balancing shots that are hard to balance (for example, when shot with colored light or in mixed lighting, etc.) too.
And of course, you can use it for designing looks too. It’s a potent tool once you get your head wrapped around it. With a bit of practice, you should know which value to adjust to move the image in the direction you want it. Even though I admit, it’s a bit hard to figure it out initially.
USING A 3×3 MATRIX FOR TECHNICAL TRANSFORMATIONS
If you like to do technical transforms, you can add the “ARRI Film Matrix” to your Alexa Log-C footage to get started with an easy one. You’ll get the values for this Matrix on the ARRI website. They are hard to find as it’s already discontinued. Here’s a screenshot and some additional info below if you do not find them.
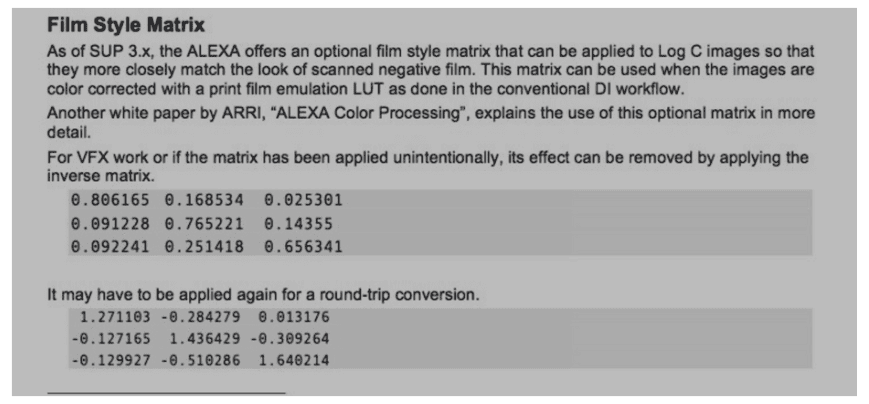
ARRI introduced a film-style matrix that could be applied to the Log C output, starting with ALEXA SUP 3.0 and ending with SUP 7.0. The same transform was also accessible as a 3D-LUT for post-production of Log C footage.
The film style matrix makes the Log C image’s color properties look like negative film scanned with an ARRISCAN. The Matrix is most beneficial when data is previewed or converted using a print film simulation (PFE).
This used to be a standard Digital Intermediate workflow in which the PFE was used as a 3D LUT in the display pipeline. In some cases, the film matrix can produce a greater color separation, making keying particular shots easier. The film style matrix has been eliminated due to new improvements in color grading and digital processing.
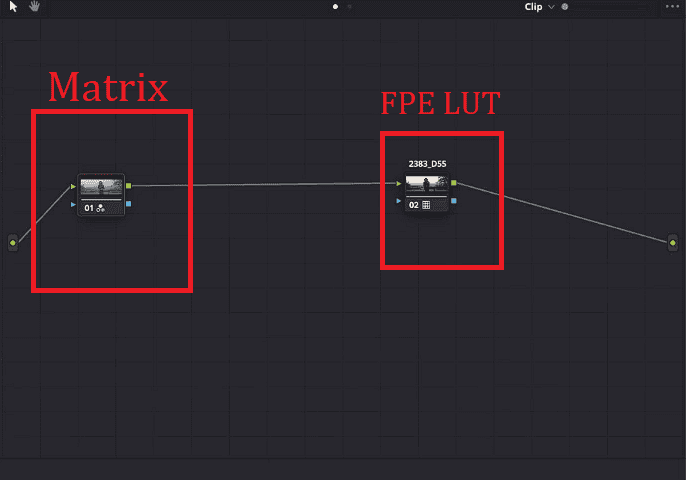
Now you can simply add the Matrix to your footage by putting the values into the “RGB Mixer” in the first node of the node tree. Just add one of the Film Print Emulation LUTs preinstalled with Resolve in a serial node afterward. That’s the technically correct way of using this Matrix.
Remember to store just the matrix node into a PowerGrade so you can easily use it whenever you want to, and you do not need to type in all the values all the time. Or you can type in the values into Lattice or Nuke for a more precise result and save a 3D LUT which you can import and use in Resolve.
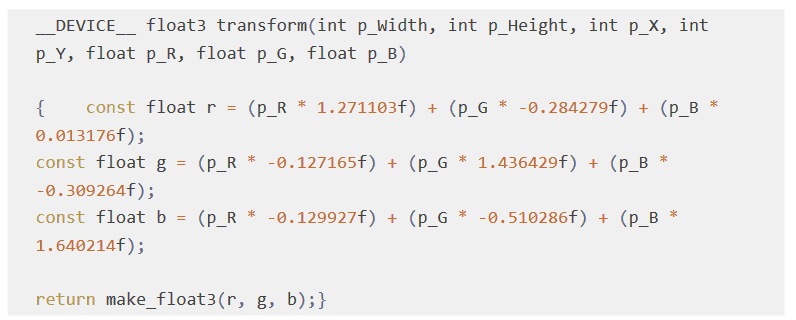
To give you another method and that you’re seeing the math behind a 3×3 Matrix more clearly (remember – the values get multiplied), here’s the code for adding the ARRI Film Matrix via DCTL. Paul Dore made it; you can download it for free here.
Just use Google, and you’ll find some matrices for converting to and from different colorspaces. But most of the things you’ll ever need are built-in within Resolve already now. So you won’t need them anyway. Just in case you’re interested or doing some developing or building things.
MATCHING DIGITAL TO FILM WITH A 3×3 MATRIX
A more advanced approach would be to use a matrix to match digital shot footage (for example, Log-C again) to scanned negative film (for example Kodak Vision3 500T/5219).
Many color scientists in Hollywood manually match and calculate matrix values to change colors of Arri color science into that of any film negative.
So there you go, now you know how it’s so difficult to color grade like Hollywood films.