Hey fellow filmmakers, welcome back again to Filmmaking Elements. In this article, we are going to articulate the DCP aka Digital Cinema Package and show you how to export it inside of Premiere Pro.
Making DCPs in Premiere Pro is fairly very easy. It comes with a pre-installed DCP exporter known as Wraptor DCP.
But wait! What is a DCP?
So at first, you do need to know a few things about the Digital Cinema Package(DCP) because you are going to enter a contest, a film festival, or want to show your movie inside of a theater. You do need to supply a DCP or Digital Cinema Package for them to play.
The DCP (or Digital Cinema Package) is the entire collection of files required to project (by the means of a projector) your project in a Digital Cinema. It includes all of the sound formats, subtitles, and closed captions that can be chosen by the projectionist at each venue before the film is shown.
Preparing for the DCP entails multiple intermediary processes, each of which must be saved and kept to avoid having to redo the work afterward. Assuming the film is being graded for theatrical release.
However, some needs must be met for it to be compatible and play in the majority of theaters without incident.
Almost every cinema in the world has gone digital. While some theaters provide BluRay or other consumer formats for playback, only one file format is guaranteed to work: the Digital Cinema Package, or DCP.
You must create a DCP if you want your film, trailer, or advertisement to play with the least amount of work and the highest quality.
Making DCP In Premiere Pro
Important Sequence Settings when making a DCP
So first of all, I am making a new sequence and showing you from scratch to make it easy to understand. Starting off by making a new sequence:
- After opening up your project, click on the half-turned page looking icon at the left bottom corner and select “Sequence”
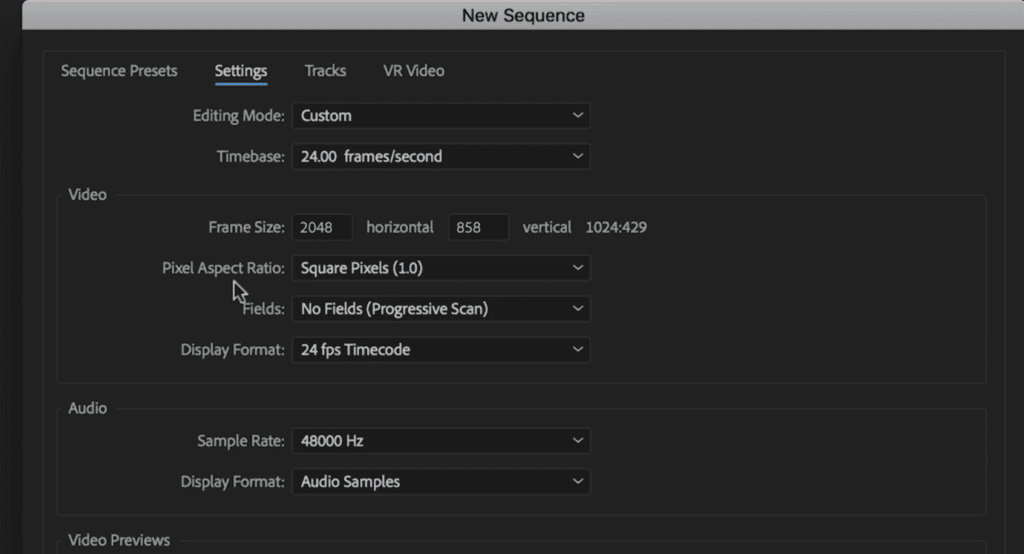
- Go to the New Sequence window and select “Settings”.
- I am going to show you a few things you do need to follow. First, go to Editing Mode and click on the drop-down menu and choose “custom” so you can choose the correct options or change the whole sequence to the correct settings.
- For the “Timebase” drop-down menu, we’re going to choose 24 frames per second because this is universally compatible as almost every theater actually plays 24 frames per second. And yeah, there are of course features that can play 25 frames per second. But if you’re going to enter into the film festivals happening in America and certain regions, they won’t be able to play PAL.
- Also often requirements do state that they don’t accept 25 frames per second version of DCP. Do make sure you read through the requirements.
- Then we go down to “frame size”. So basically we have two aspect ratios we can choose from, which are “flat” and “scope”. You have to manually enter the resolution in the boxes.
- If you want to choose “flat (1.85:1)”, the resolution is 1998 x 1080.
- The aspect ratio “flat” and “scope” is basically the aspect ratio of the theater screen. So you do need to know beforehand what kind of screens they have in the theater and ask them which one they have so that you know which aspect ratio works the best.
- Sometimes when submitting for film festivals it isn’t clearly mentioned what aspect ratio they are looking for. In such cases choose the one which suits you best. They usually adjust their projection according to the film.
- The other one of course is “scope (2.39:1)” which is 2048 x 858.
- So those are the two aspect ratios.
- In the case of “Scope,” it doesn’t need to have the full 2k resolution which is 2048 x 1080. But yeah, you do need to know to choose between those two, which are the most important. But most people often nowadays film in “scope” anyway because it just looks nicer.
- In the “Pixel Aspect Ratio” option just have it at Square Pixels (1.0).
- “Fields” and “Display Format” options can be left in the default settings.
- Coming to the audio section, it is 48,000 Hz by default which you change according to your project.
- You can set the “Video Preview” section according to how you like to work with your projects.
- Of course, then you can choose the button “save preset” and save this as a preset for future usage.
Exporting a DCP from Premiere Pro
So now that you have chosen the correct Sequence settings for your DCP to make it universally compatible with all the theaters around the globe. It’s time to export your project.
- Go to File>Export> Select Media.
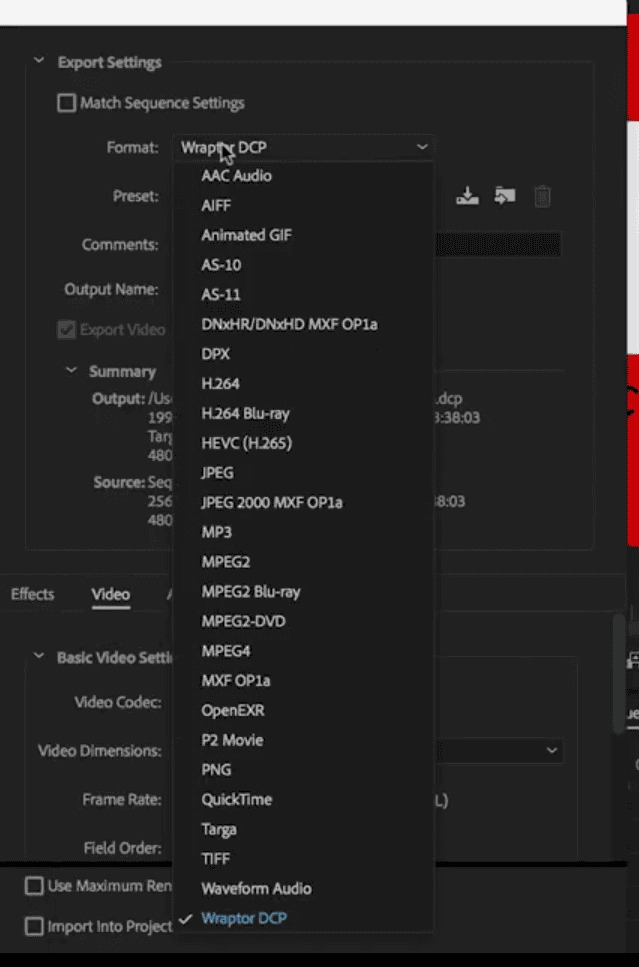
- An Export Settings window will pop up. Under the “Format” we go all the way to the bottom of the drop-down menu and choose “Wraptor DCP”, this is like a free DCP exporter inside of Premiere Pro
- Under the “Preset” drop-down menu we have two choices which is the 24 FPS or the 25 FPS (PAL). So, of course, we choose the 24 frames per second that most theaters can play.
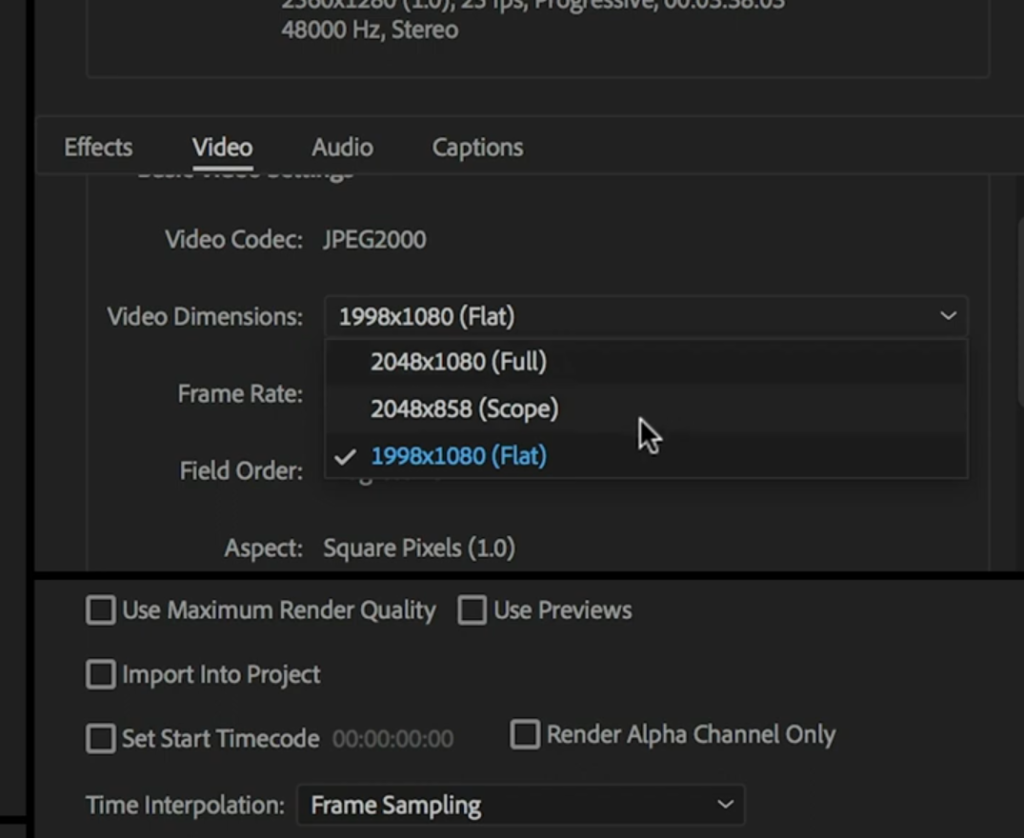
- Go to the bottom in the “Video” section and make sure the “Video Codec” is JPEG2000.
- Then in the “video dimensions” drop-down menu, you have three options, 2048 x 1080 (Full), 2048 x 858 (Scope), and 1998 x 1080 (Flat). I’ve already explained all the three versions but mostly what you should be looking at is the “scope” or “flat”.
- Then the frame rate of course needs to be at 24.
- In the additional DCP tools, if you have a theater that can play 4K for example and you want to show a 4K movie inside that theater you can go to the QuVIS website and rent or pay for the full DCP package to have a 4k DCP or even higher resolutions
- For most cases, the free version is enough.
- In the “audio” section, there are only two options to choose from i.e, between “stereo” or “5.1”. It depends on the mixing of your audio.
- Of course, the 5.1 would be nice if you have somebody who can mix that for you.
You can now export your project seamlessly. Do keep in mind that DCP is much higher in terms of file size. Make sure you are exporting your project in an external drive. Congratulations, you have successfully made a DCP in Premiere Pro.
Now either you can send the External Drive to the given address to the Film Festival or just upload it to their server.
Thanks For Reading!
- Also Read- 6 Tips When Color Grading 8 Bit Footage In Davinci Resolve
- Also Read- Full Frame Vs Super 35 | In-Depth Comparison
- Also Read- How Good Are Xeen Cine Lenses, worth it in 2022?
- Also Read- Day For Night Color Grading In Davinci Resolve
- Also Read- How To Decide The Best Aspect Ratio For Your Film: Filmmaking 101