Welcome back to FilmmakingElements.com, your trusted source for creative filmmaking insights. We’re delving into an exciting, ethereal realm of post-production: The Davinci Resolve Ghost Effect.
This supernatural technique has been employed in numerous films and video projects, igniting intrigue and fascination. Whether it’s a chilling horror movie or a whimsical fantasy piece, the ghost effect adds an intriguing layer of depth and mystery to your visual storytelling.
In this comprehensive guide, we will unpack four distinct methods to master the Davinci Resolve Ghost Effect. From simple techniques perfect for beginners, to more advanced strategies for seasoned editors, we’ve got you covered.
Creating the Ghost Effect in DaVinci Resolve (Method 1)
1. Preparing for the Ghost Effect
To get started, launch the DaVinci Resolve program. Once it’s up and running, you’ll need to import your chosen video clip into the media pool.
As you review your footage, take careful note of the sections where you’d like the Ghost Effect to feature. Being methodical from the start will make the editing process smoother and more efficient.
2. Building the Basic Ghost Effect
With your footage organized and your game plan in mind, it’s time to start creating the Ghost Effect. Head to the Edit page of Davinci Resolve. First, you’ll need to duplicate your clip. Here’s how to do it:
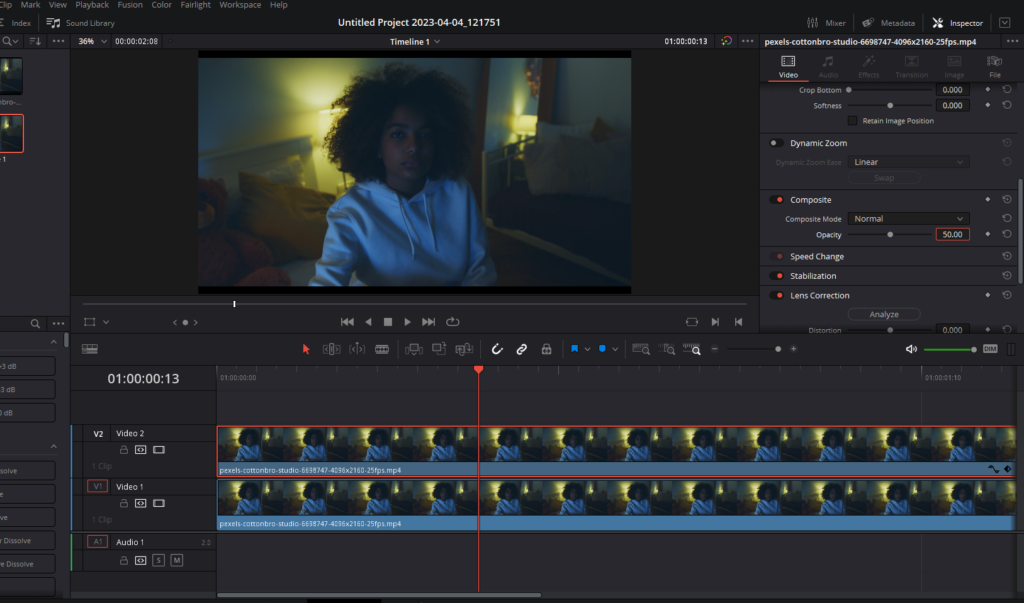
- Select your video clip in the timeline.
- Hold down the ‘Alt’ key.
- Click and drag your selected clip to create a duplicate layer on Video Layer 2.
This newly minted duplicate layer is the foundation for your Ghost Effect. It’s a safety net that ensures your original footage remains unaffected.
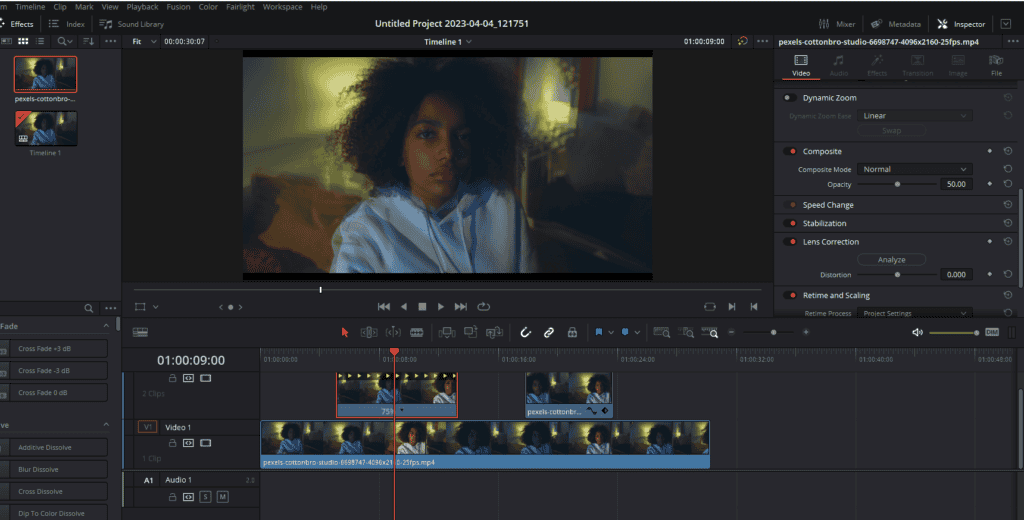
Now, adjust the opacity of your duplicate layer. Click on the Inspector tab in the top right corner, find and change the opacity setting from its original 100% setting to 50%. This is the first step in transforming your duplicate layer into a spectral, ghost-like version of your original footage.
3. Fine-Tuning the Effect
Now that you’ve laid the groundwork, it’s time to define the exact moments when the Ghost Effect will take place. This step requires strategic, precise cuts on your timeline. Here’s how to do it:
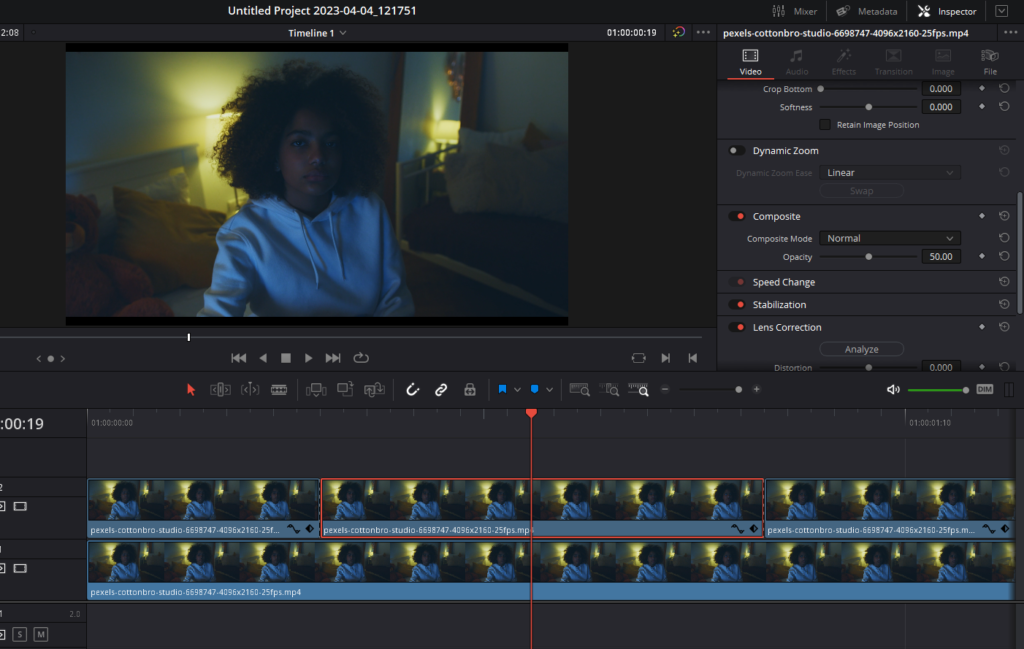
- Identify the point on the timeline where you want the Ghost Effect to begin.
- Move a few frames back from this point by using the left arrow key.
- Make your first cut at this spot (Ctrl + B).
- Then, fast-forward to the point where you want the Ghost Effect to end.
- Make your second cut here (Ctrl + B).
The Ghost Effect will take place between these two cuts. Repeat this process for each instance where you want the Ghost Effect to appear. After making cuts and deciding on the segments where you want the ghost effect, remove the unwanted section of the duplicate clip by pressing ‘Backspace.’
4. Activating the Ghost Effect
You’ve got your footage and your points of effect. Now, it’s time to bring the Ghost Effect to life. Here’s how:
- Right-click on the first segment where you want the effect to occur.
- Select ‘retime controls’.
- A drop-down arrow will appear, click on it.
- Go to the Change Speed sub-menu and change the speed to 75%.
- Right-click again on the duplicate clip and select ‘retime controls’ to close it.
Extending the duration of your clip slows down its speed. This slowed-down footage is key to achieving the Ghost Effect. Generally, reducing the speed to 75% will yield a satisfactory Ghost Effect. However, adjust the speed as needed for your video’s specific requirements.
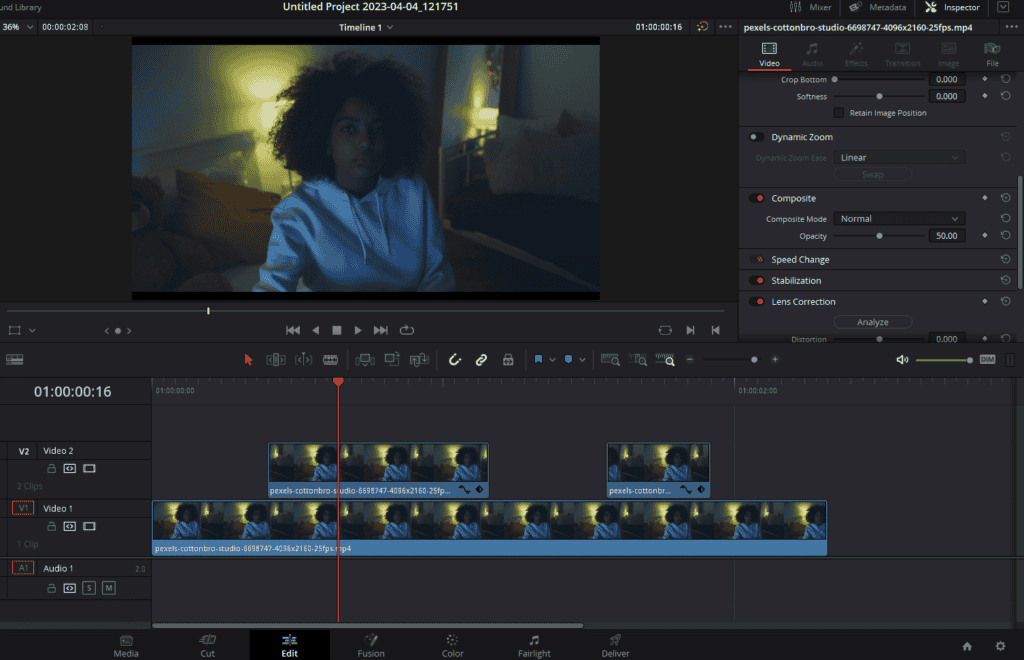
5. Blending It All Together
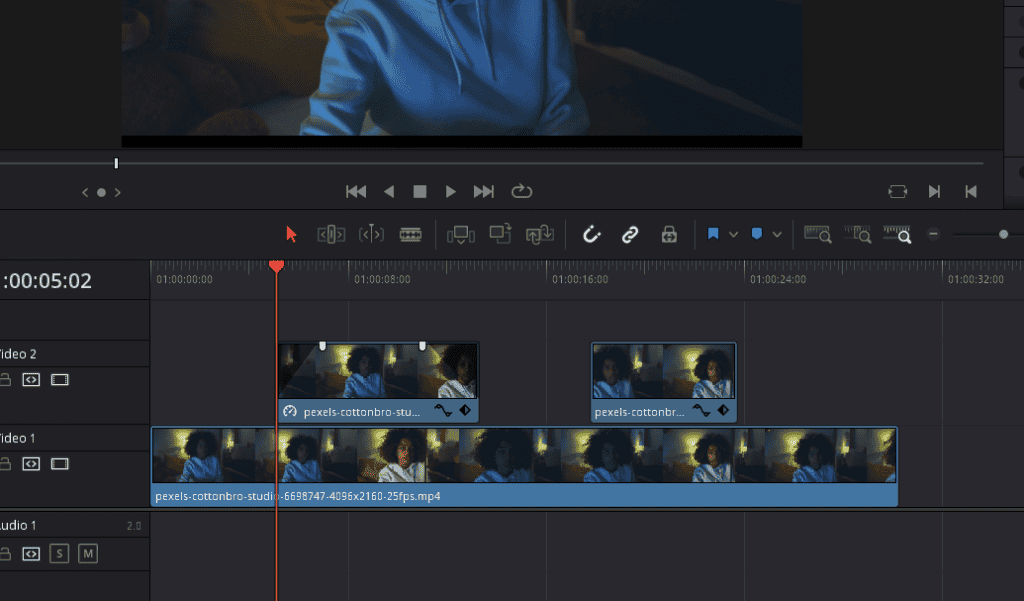
Now, you’ve got the Ghost Effect, but you’ll want it to blend seamlessly into the rest of your video. For this, you’ll need to manipulate the transition between your normal footage and the Ghost Effect footage. Here’s how to create a smooth blend:
- Hover over the top-left corner of the duplicate clip and find the white slider.
- Click and hold to adjust it to blend a few frames into your clip.
- This adjustment will create a ‘fade-in’ effect, providing a smoother transition.
- Do the same thing on the top-right corner of the duplicate clip.
Repeat this process at the beginning and end of each Ghost Effect instance in your video.
6. Enhancing the Ghost Effect
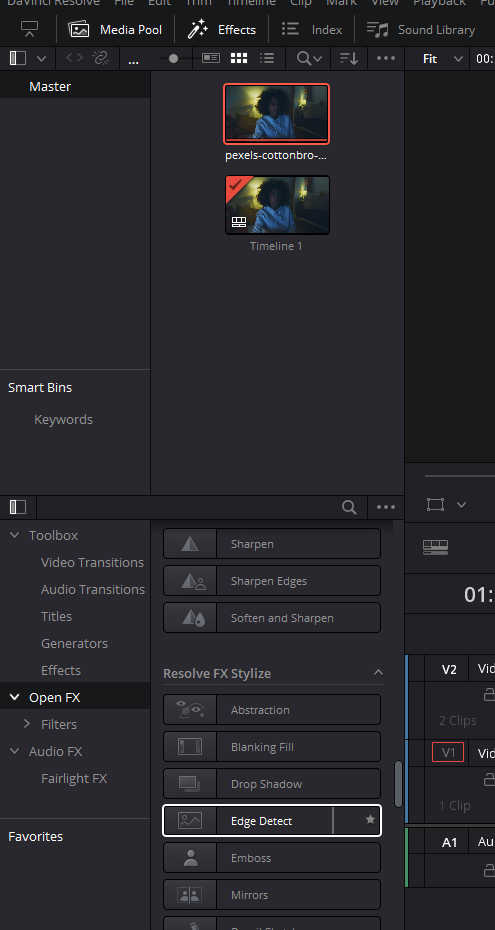
For added drama and visual interest, consider applying a neon outline to your Ghost Effect. Here’s how:
- Navigate to the effects library in DaVinci Resolve by clicking on the ‘Effects’ button on the top-left corner.
- Scroll to ‘Open FX’.
- Find the ‘Edge Detect’ effect.
- Drag this effect onto your Ghost Effect layer in the timeline.
7. Refining Your Neon Outline
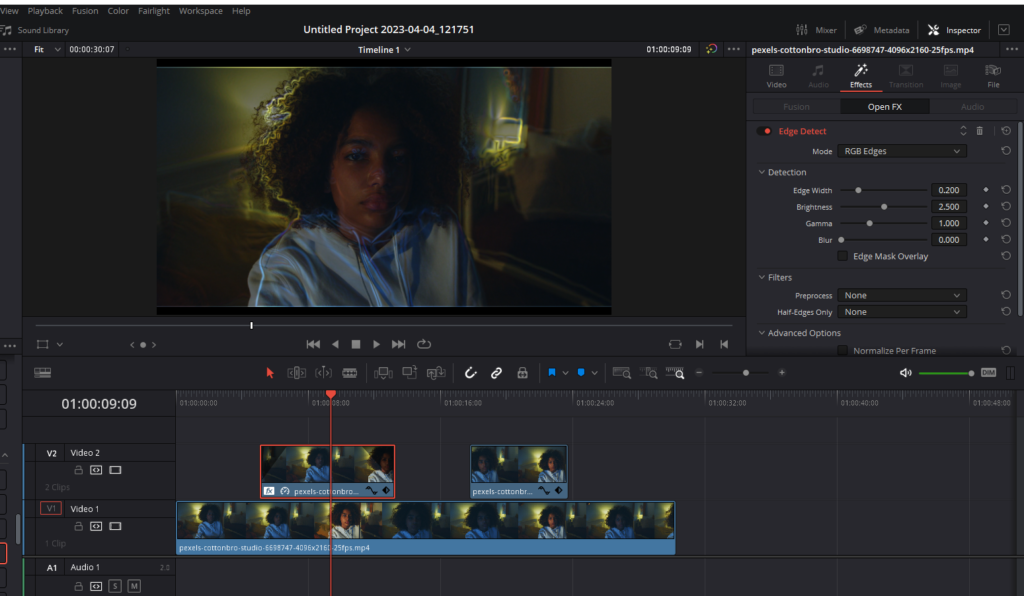
The Edge Detect effect identifies the edges within your footage and applies a neon outline. You can adjust this outline’s appearance as follows:
- While your ghost effect clip is selected, head to the Inspector tab in the top-right corner and select the Effects tab so that you can see the controls of Edge Detect.
- Play around with different controls to see what works best for you.
You’ve now completed your Ghost Effect. With DaVinci Resolve and a careful, methodical approach, you can create amazing visual effects that enhance your videos and capture your audience’s attention.
Enhancing the Ghost Effect with Color Grading in DaVinci Resolve (Method 2)
Color grading is a powerful tool that can significantly enhance the Ghost Effect, transforming your video’s overall aesthetic. In this section, we will delve into a straightforward and effective approach to color grading in DaVinci Resolve, giving your Ghost Effect an added punch.
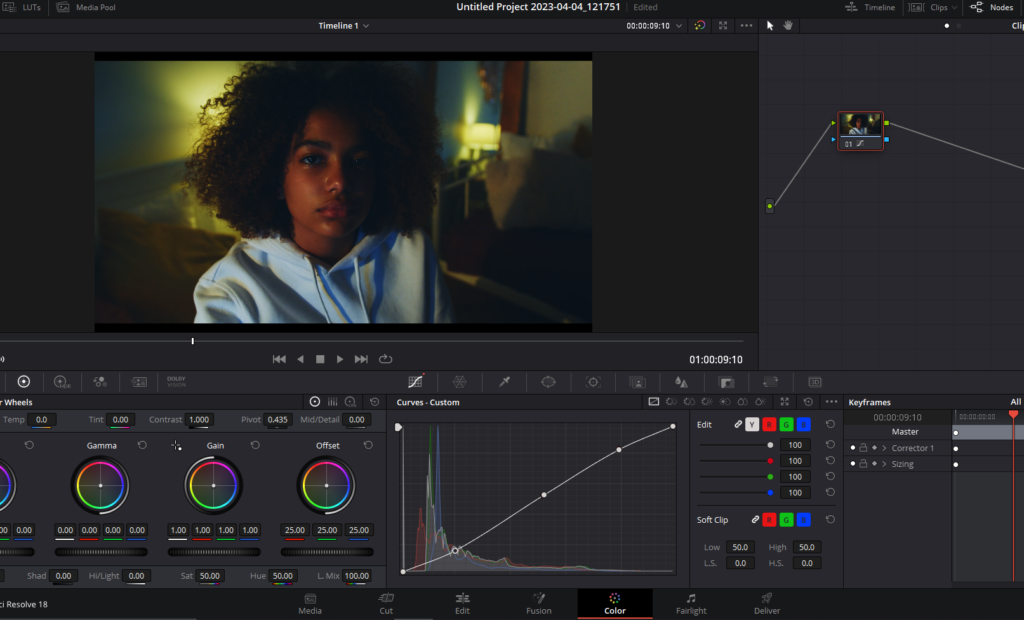
1. Jumping into Color Grading
In this next method, we jump straight into the Color tab of DaVinci Resolve. Here, you have a plethora of tools at your disposal to enhance and modify the look of your video. While there are countless ways to color grade, we will focus on a quick and efficient method that helps elevate the ghost effect.
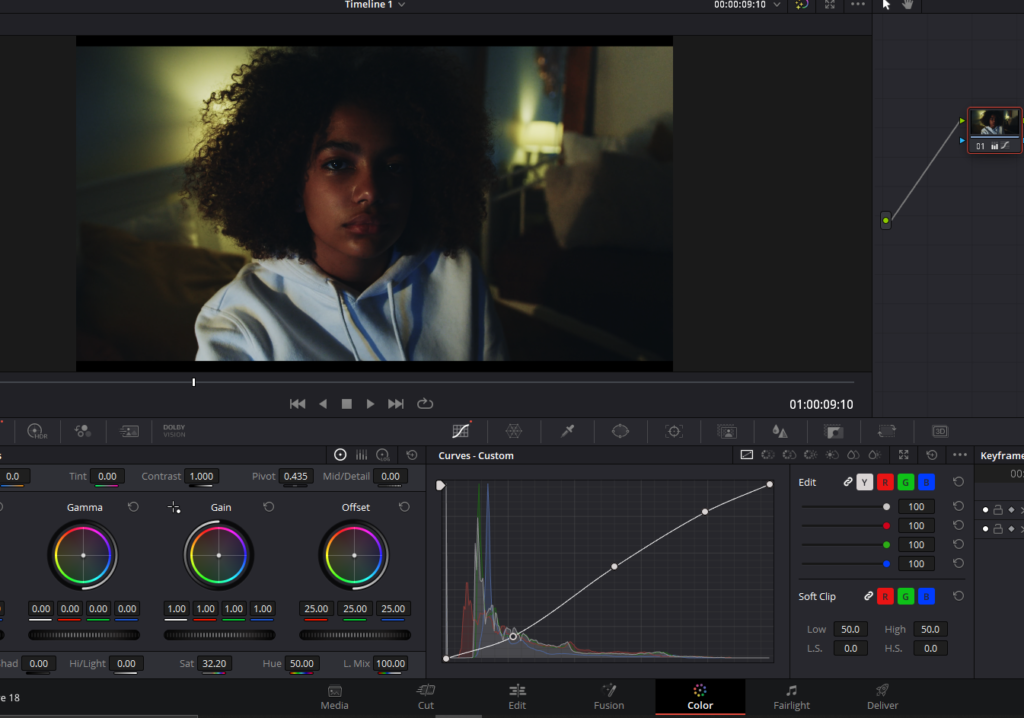
2. Adding Contrast Using Curves
One of the first adjustments you can make to your video is adding contrast. High contrast can create a dramatic, stylized look that pairs perfectly with the Ghost Effect. Here’s how you can do it:
- Click on the most left icon in the menu in the middle to open the ‘Curves’ box.
- If you’re new to curves, the line running from the bottom left to the top right represents your shadows (bottom left) and your highlights (top right).
- Click at any point along the line to create a control point.
- Firstly make a point in the center to isolate the shadow and highlight regions.
- Drag your control point down to lower your shadows, adding depth and contrast to your video. Keep your highlights untouched for balance.
3. Adjusting Saturation
After adjusting contrast, you might find your video a bit too saturated. You can easily adjust saturation by:
- You will find your Saturation control at the bottom left of your screen.
- Adjusting the saturation slider until you achieve your desired look.
Reducing saturation can add to the ‘ghostly’ quality of your video, creating an eerie, otherworldly effect.
4. Adding a Blue Tinge to Shadows
The final step in this color-grading process is to add a touch of color to your shadows. A blue tinge can complement the Ghost Effect nicely, providing a chilling, spectral look. Here’s how:
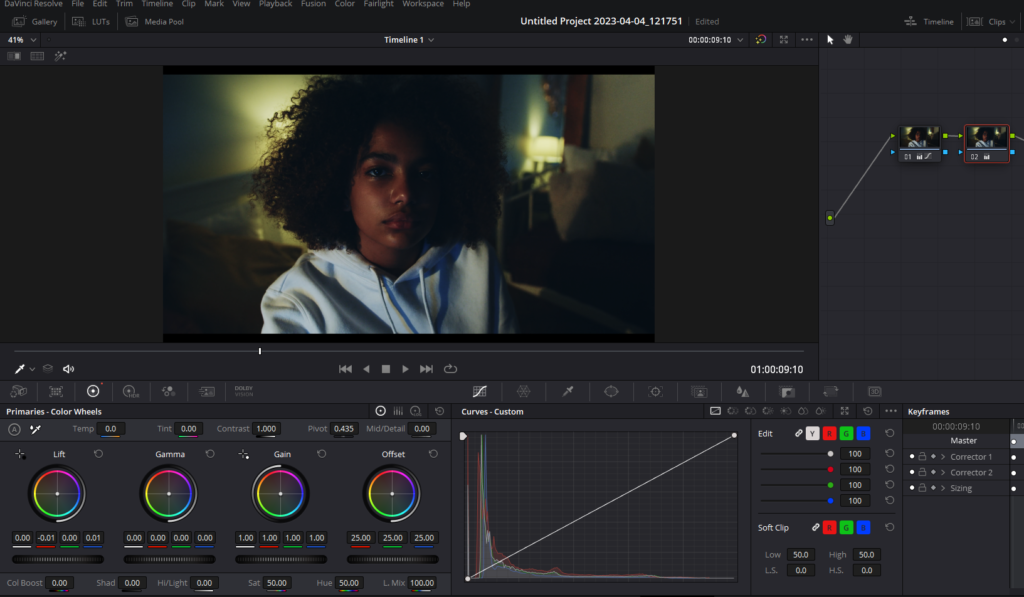
- At this point, it’s best to make a new node for further adjustments. Right-click on the previous node and select, Add Node> Add Serial.
- Within the bottom left area, you’ll see color wheels, including a Lift wheel.
- Click on the center dot of the Lift wheel and drag it around to add different colors to your shadows.
- Drag the dot over to the right to add a blue tinge to your shadows.
This color grading approach, combined with the Ghost Effect, will provide your video with a professional, intriguing look that draws viewers in. Experiment with these tools to find the perfect balance for your video.
Creating an Exorcist-Style Ghost Effect with DaVinci Resolve (Method 3)
When it comes to suspense and horror video editing, few effects can be as chilling as a ghost effect. This method showcases how to create an Exorcist-style ghost effect using DaVinci Resolve. This technique involves crafting a disconcerting, fast-paced head movement effect to introduce a dose of the paranormal into your footage. Here is a detailed, step-by-step guide:
1. Recording the Footage
Begin by recording your footage. Unlike regular videos, this particular effect is achieved through exaggerated head movements. Make wild faces, jerk your head to and fro, and channel the persona of a ghostly character. Although the raw footage may not appear frightening at the outset, rest assured, we’ll transform it into something truly eerie in the following steps.
2. Amplifying the Horror with Speed
The secret ingredient in this Exorcist-style ghost effect is speed. To turn your seemingly harmless footage into a horror spectacle, follow these steps:
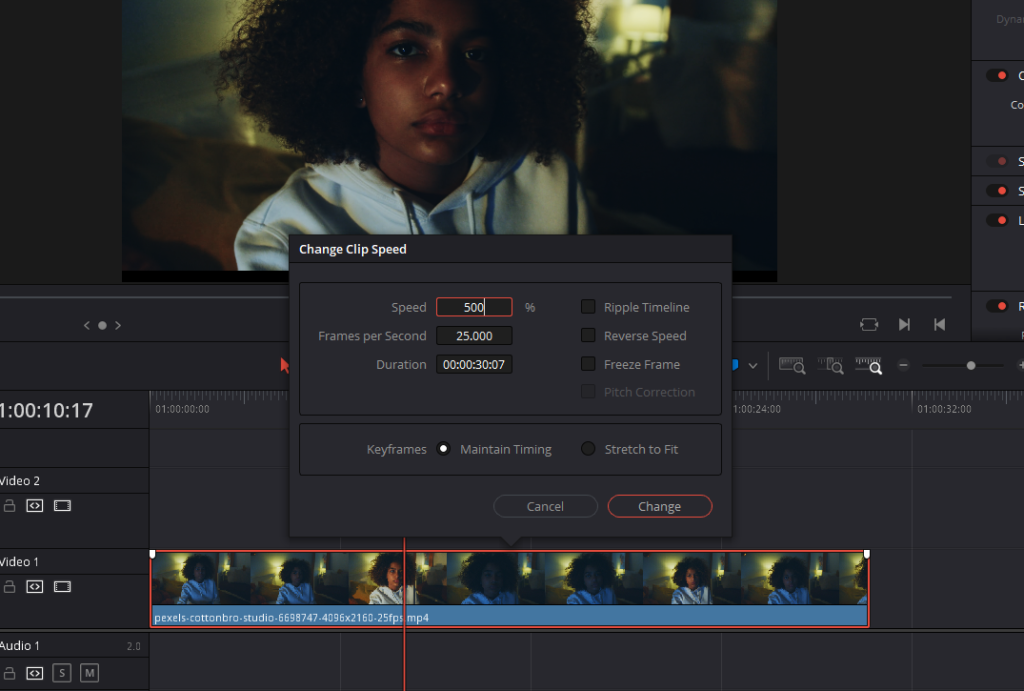
- Access Clip Speed Settings: In the Edit page of Davinci Resolve, right-click on your footage in the timeline. A context menu will appear. Select ‘Change Clip Speed’. A new window with speed adjustment options will open.
- Adjust Clip Speed: Increase the speed to 500%. This value is not set in stone; feel free to experiment with different speeds to create the exact effect you want.
- Apply Changes: After adjusting the speed, click ‘Change’. This action will apply the speed change to your footage.
Once these steps are completed, play your footage. The increased speed will make your movements appear more bizarre and frightening—think horror movie material.
3. The Power of Stop Motion
While your now-accelerated footage could be creepy enough for some videos, you can escalate the horror further by incorporating a stop-motion effect. Here’s how you can apply this effect in DaVinci Resolve:
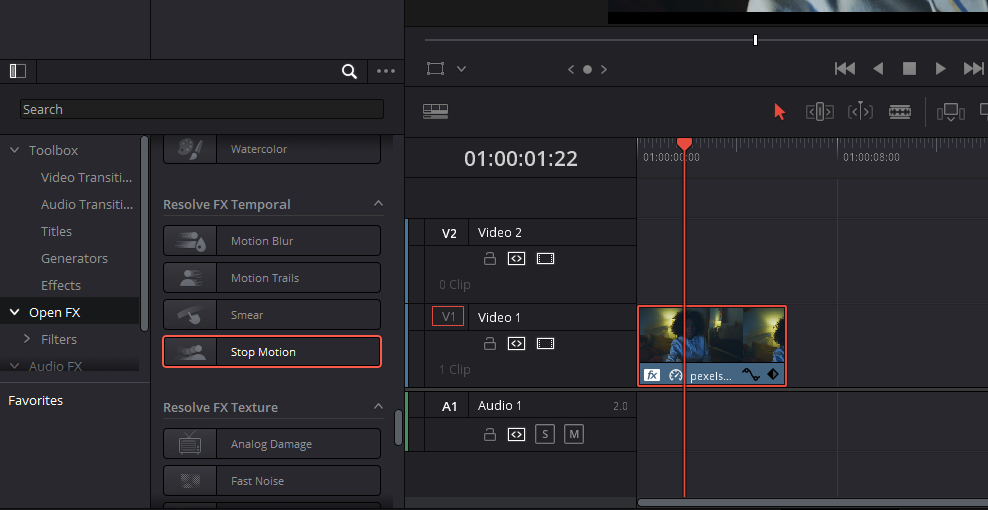
- Navigate to the Effects Library: Locate and open the Effects Library by pressing on the Effects button on the top-left corner of the Edt page. This library houses all the effects you can apply to your clips.
- Find OpenFX: Within the Effects Library, find and click on ‘Open FX’. This menu contains a selection of advanced effects you can use.
- Select Stop Motion: Scroll down the list until you locate the ‘Stop Motion’ effect. Click and drag this effect onto your clip to apply it.
- Adjust Stop Motion Settings: After applying the Stop Motion effect, select your clip to open the ‘Inspector’ in the top-right corner. In the Inspector, click on the ‘Effects’ tab. This tab will display the parameters for the Stop Motion effect.
4. Tweaking the Stop Motion Effect
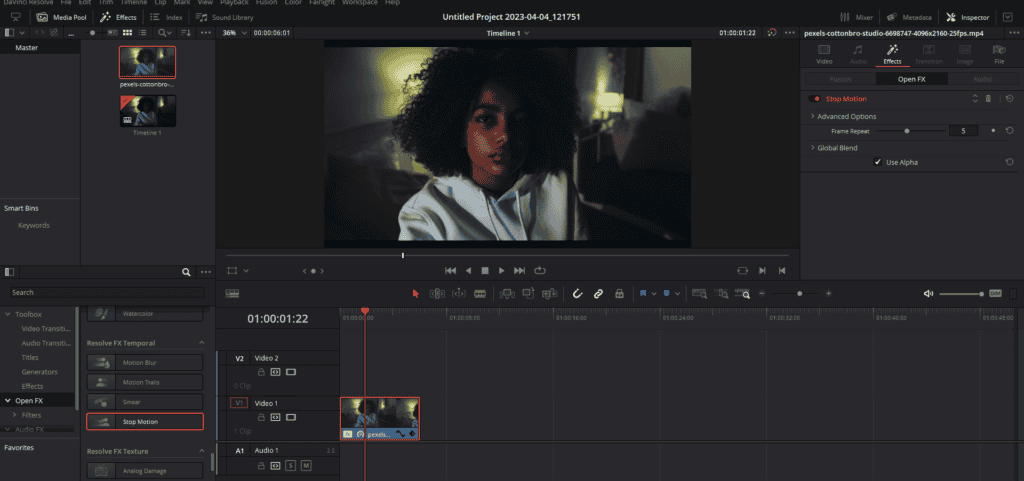
The Stop Motion effect adds a unique, unsettling look to your footage. The ‘Frame Repeat’ parameter, set to five by default, makes the first frame repeat five times before moving to the sixth frame, and so forth. This results in a jumpy, stilted visual that amplifies the creepiness of your footage. Adjust the ‘Frame Repeat’ setting to achieve the exact degree of horror you envision for your video.
5. Masterful Blend for a Ghostly Ambiance
The final touch to truly sell this ghostly effect involves blending the Stop Motion effect with the raw, sped-up footage. This blend creates a ghostly, spectral look that will send chills down your viewers’ spines. Here’s how to achieve this blend:
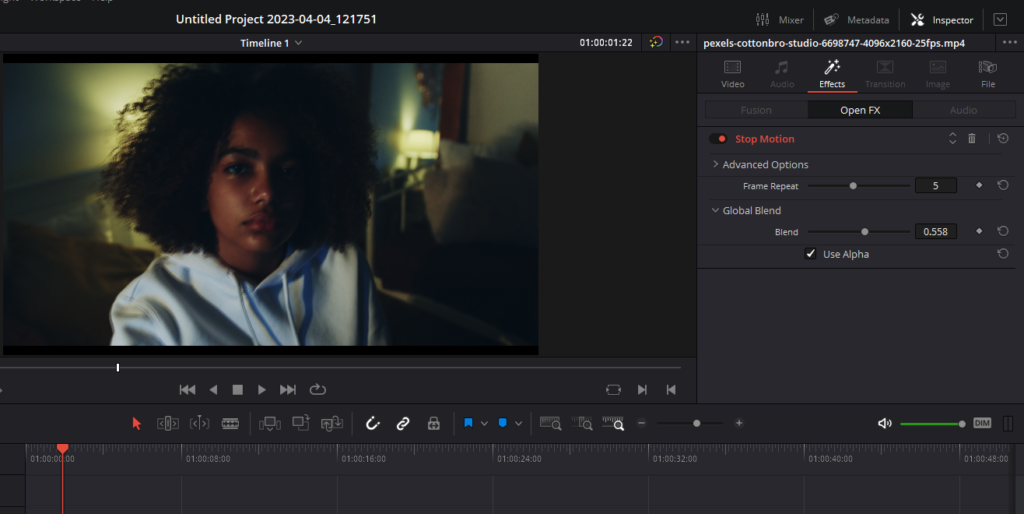
- Locate the Blend Mode: Within the Stop Motion parameters, you’ll find the ‘Blend’ mode.
- Adjust Blend Mode: Alter the ‘Blend’ value to 0.5. This setting ensures both the raw footage and the Stop Motion effect are visible simultaneously, thus creating the desired ghost-like appearance.
6. Advanced Technique: Layering Footage
For those seeking an extra layer of complexity and eeriness, you can layer your newly edited footage over another video clip. To do this:
- Layer Your Footage: Position your ‘ghost effect’ footage on top of another clip on your timeline.
- Adjust Opacity: Select the layered ghost footage and open up the ‘Inspector’. Here, you’ll find an ‘Opacity’ setting. Adjust this value to allow the bottom layer footage to subtly show through, creating a haunting, layered ghost effect.
This technique allows you to introduce the chilling presence of a ghostly figure into diverse scenes, elevating the fright factor in your video project.
Adding Flickering Lights to Enhance the Ghost Effect (Method 4)
One of the classic horror effects used in movies is the flickering light effect. It adds a certain unease and spookiness to the scene, making it more suspenseful. In this method, we will explore how to create this flickering light effect in DaVinci Resolve.
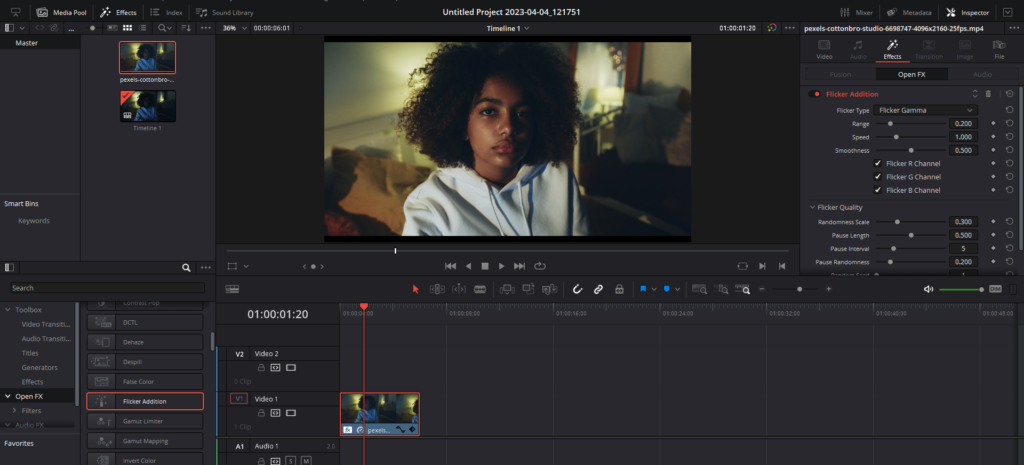
1. Locating the Flicker Addition in DaVinci Resolve
The flickering light effect can be found in DaVinci Resolve’s Effects Library, click on the Effects button on the top-right corner to access it. In the Open FX section find the effect named “Flicker Addition”. To apply it, simply drag it onto your clip.
Upon adding the Flicker Addition effect to your footage, hit play to see the instant transformation. The lighting in your footage will now exhibit a random, flickering behavior that adds a sense of unease and tension.
2. Customizing the Flickering Light Effect
The Flicker Addition effect might be exactly what you’re looking for, but DaVinci Resolve also allows you to modify the effect to better suit your vision. If you want to tweak the effect, follow these steps:
- Open Inspector: Select your clip and open the Inspector in the top-right corner. The Inspector is where you can adjust all the parameters of your effects.
- Access Flicker Addition Settings: Within the Inspector, go to the Effects tab.
- Experiment with Settings: Within the Flicker Addition settings, you can adjust a range of parameters. You’re encouraged to play around and see how they affect your footage.
3. Understanding Flicker Addition Settings
The Flicker Addition settings in DaVinci Resolve are highly customizable, allowing for precise control over the flickering light effect. Here’s a brief rundown of the settings:
- Flicker Type: You can choose between Lift, Gain, Gamma, and Vignette for different types of flicker effects.
- Range: This controls the contrast between the flickering light and the non-flickering parts of your footage. A higher range will result in a more noticeable flicker.
- Speed: As the name suggests, this adjusts the speed of the flicker.
- Smoothness: This setting controls the transition of the flicker, from being on to off, determining whether it’s a sudden or gradual shift.
For this guide, we’ll keep the speed and smoothness as they are by default. However, we’ll reduce the range to around 0.07 to avoid an overly bright flicker. To make the flickering seem more sporadic and unsettling, we’ll increase the randomness setting. The exact settings depend on the desired effect and the nature of your footage.
With these adjustments, the flickering light effect will contribute to a more suspenseful and eerie atmosphere in your footage, enhancing the ghost effect we’ve been developing through these methods. Remember that each piece of footage is unique, so feel free to experiment and adjust these settings to achieve the perfect ghost effect for your project.
And there you have it! You’re now equipped with four dynamic methods to create chilling ghost effects in DaVinci Resolve. Remember, practice makes perfect, so don’t hesitate to explore, experiment, and most importantly, have fun during your creative process. Embrace the uncanny, and let your storytelling rise to new heights of eerie excellence!