Have you ever wanted to know how to remove a green screen in DaVinci Resolve, but never been quite sure how to do it? You’re in luck! In this blog post, we’ll discuss three distinct methods for green screen removal, taking you through the process step by step in the Edit, Fusion, and Color pages of DaVinci Resolve.
Method 1: Removing the Green Screen On the Edit Page Of Davinci Resolve
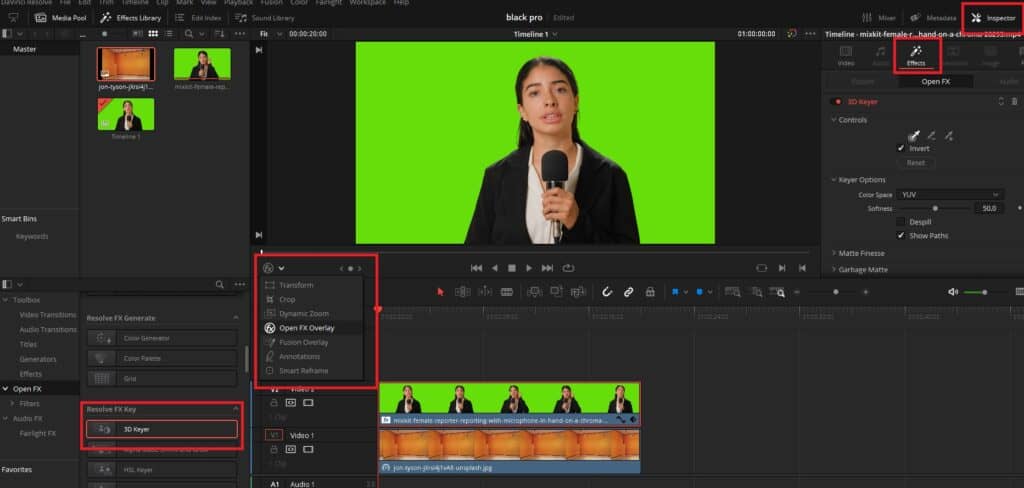
In DaVinci Resolve, the Edit page offers a convenient way to remove green screens by employing the Resolve FX Key filters. These filters can be located within the Open FX category under the Resolve FX Key section in the Effects Library.
For green screen removal, we’ll be focusing on a specific Resolve FX called the 3D Keyer.
What is a 3D Keyer?
The 3D Keyer, inspired by the 3D Qualifier in the Color page, is designed for quickly isolating color ranges in an image. It allows you to simply drag your mouse pointer over the parts of the image you want to key. This creates a selection in a three-dimensional representation of all available colors.
The 3D Keyer is a great starting point for keying blue or green screen backgrounds. Its drag-and-drop functionality combined with its precision makes it a fast and accurate tool for various scenarios. The speed at which you can sample areas of the picture to extract for the final key is one of the 3D Keyer’s main strengths.
However, the 3D Keyer might not provide satisfactory results if your initial samples aren’t accurate, as it lacks fine-tuning options like the Delta Keyer in the Fusion page. Nevertheless, for well-lit subjects, only two or three samples are typically necessary.
Place your background video on a track beneath your foreground video to create a green screen composite. Then, drag the 3D Keyer onto the foreground footage. Select “Open FX Overlay” from the Transform Mode drop-down menu in the lower left of the Timeline Viewer to enable the effect qualifiers to work on the Timeline Viewer. Click on the Effects icon in the Inspector to show the Keyer’s controls.
Detailed steps to remove Green Screen In Edit Page Of Davinci Resolve
- Organize video layers: Position the green screen foreground video on a track above your chosen background video to create the desired composite effect.
- Enable Open FX Overlay mode: Select this mode using the drop-down menu in the lower left of the Viewer, allowing you to interact with the effect GUI controls directly within the Viewer, providing a more intuitive experience.
- Apply the 3D Keyer effect: From the Effects Library on the left, search and drag the 3D Keyer onto the foreground video. This tool excels at quickly and accurately separating the background and foreground elements in your image, making it ideal for green screen removal.
- Open the 3D Keyer controls: Click on the foreground video clip and access the 3D Keyer via the Effects tab in the “Inspector” from the top right corner, where you can find various parameters to refine your keying results.
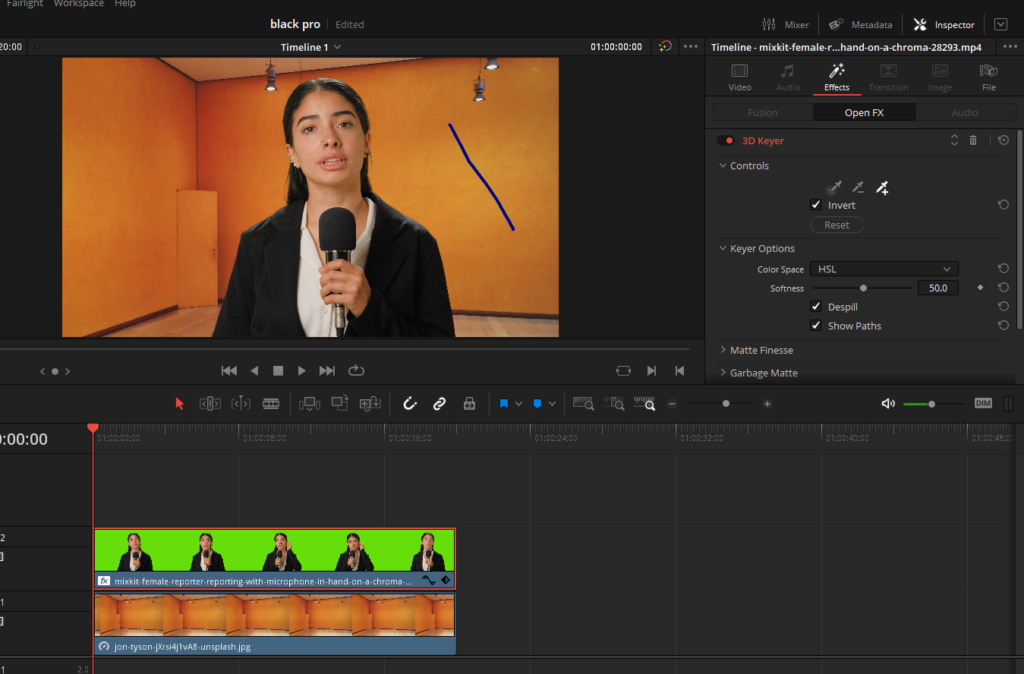
- Use the Pick eye dropper tool: In the Controls section, click the icon and drag it over the green screen in the Timeline Viewer. A blue line represents your selection, and the green screen should mostly disappear, revealing the background video.
- Fine-tune your selection: Employ the Add eye dropper (drawing blue lines) to remove any lingering green screen sections. Utilize the Subtract eye dropper (drawing red lines) to recover any erroneously transparent foreground parts, ensuring a clean composite.
- Activate Despill feature: Check the Despill box in the 3D Keyer settings to eliminate any green light spill that might have reflected onto your foreground subject from the green screen. This helps in maintaining the realism of the composite by removing unwanted color casts.
- Preview and make final adjustments: Scrub through the timeline to review your composite and ensure the green screen removal looks natural. Make any necessary final tweaks to the 3D Keyer settings for optimal results.
Using “Matte Finesse” to create a perfect chroma key
To achieve a sharp and flawless green screen removal, explore the Matte Finesse submenu and its various settings:
- Clean Black: This setting eliminates noise in the black areas of the key, allowing you to fill holes in the background and erode translucent edges. By raising the Clean Black parameter, you can make the dark parts of the key darker and push dark gray areas toward black.
- Clean White: A counterpart to Clean Black, this setting removes noise from the white parts of the key, filling holes in the foreground and expanding translucent edges. Increasing the Clean White parameter lightens the light parts of the key, pushing light gray areas toward white.
- Black Clip: This setting applies a “lift” adjustment to translucent areas of the matte, pushing them toward black. The range is 0 to 100, with 0 being the default.
- White Clip: Opposite to Black Clip, this setting applies a “gain” adjustment to translucent areas of the matte, pushing them toward white. The range is 0 to 100, with 100 as the default.
- Blur Radius: Adding a small amount of blur to a key can help soften problem edges. Be cautious, as excessive blurring may result in a visible “halo” around your subject. The range is 0 to 2000, with 0 as the default. The large maximum blur radius, combined with In/Out Ratio customization, can help you achieve smooth results.
- In/Out Ratio: This setting controls how the Blur Radius is applied to the matte edges. A value of zero applies the blur equally to the inside and outside of the matte edge. Negative values apply the blur only within the matte, while positive values apply it only outside the matte. In/Out Ratio can help eliminate fringing when using the Blur Radius parameter, and it can also fill in small black holes or eliminate speckling in the matte.
Method 2: Removing the Green Screen On the Color Page Of Davinci Resolve
Removing the green screen on the Color Page of Davinci Resolve is very easy and straightforward. Follow the steps below:


- Prepare the composite: Place the background plate on track V1 of the Timeline and the green screen clip on track V2.
- Add Alpha Output: Right-click in the gray area of the Node Editor and select “Add Alpha Output” to create an Alpha Output beneath the Node Tree output in the Node Editor. You will see a blue dot will appear below the green dot at the end of the node tree.
- Color On Node 1: Use Node 1 to color-correct the image for optimal keying. For example, add a LUT to normalize a log-encoded foreground plate or add contrast to introduce separation.
- Create Serial node: Add a Serial node after Node 1. You can use the shortcut Option/Alt + S. Connect its blue square on the right of the node to the blue square you just created.
- Use Qualifier controls: Employ Node 2’s Qualifier controls by clicking on the dropper-looking icon on the bottom to key out the green background. Select 3D qualifier from the drop-down menu on the right at the top. Click on the “circle made by two arrows” to invert the selection.
- Eliminate spill: If there is a green spill in the composite, enable the “Despill” checkbox to remove it.
- Utilize Power Windows: Create a garbage matte to exclude unwanted elements from the shot, using the Tracker palette to make the window follow the foreground subject’s motion.
After completing these steps, you’ll achieve a high-quality green screen composite visible in both the Color and Edit pages of DaVinci Resolve.
Method 3: Removing the Green Screen On the Fusion Page Of Davinci Resolve
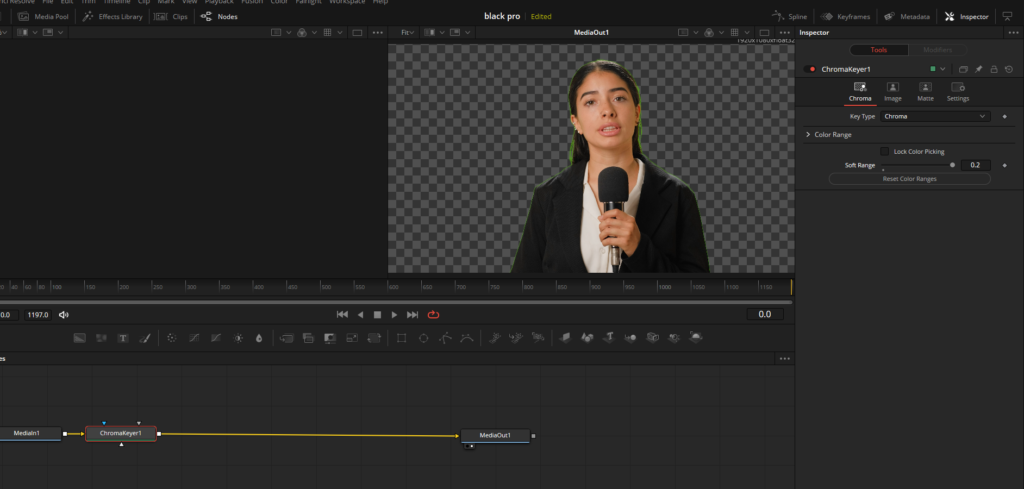
In this section, we’ll focus on removing a green screen background and replacing it with a custom video clip background using the Chroma Keyer node in the Fusion page of DaVinci Resolve.
The Chroma Keyer node generates an alpha channel (matte) by removing selected colors from the scene. Unlike the Delta Keyer or Primatte, which are specifically optimized for keying blue and green colors, the Chroma Keyer works equally well with any color.
- Arrange the Clips: Place your green screen clip on video track 2 and, if necessary, add another video beneath it on video track 1. It will work as the background video. When the green screen is removed, you’ll temporarily see a black screen behind the foreground clip if there is no other clip or image on the video track 1.
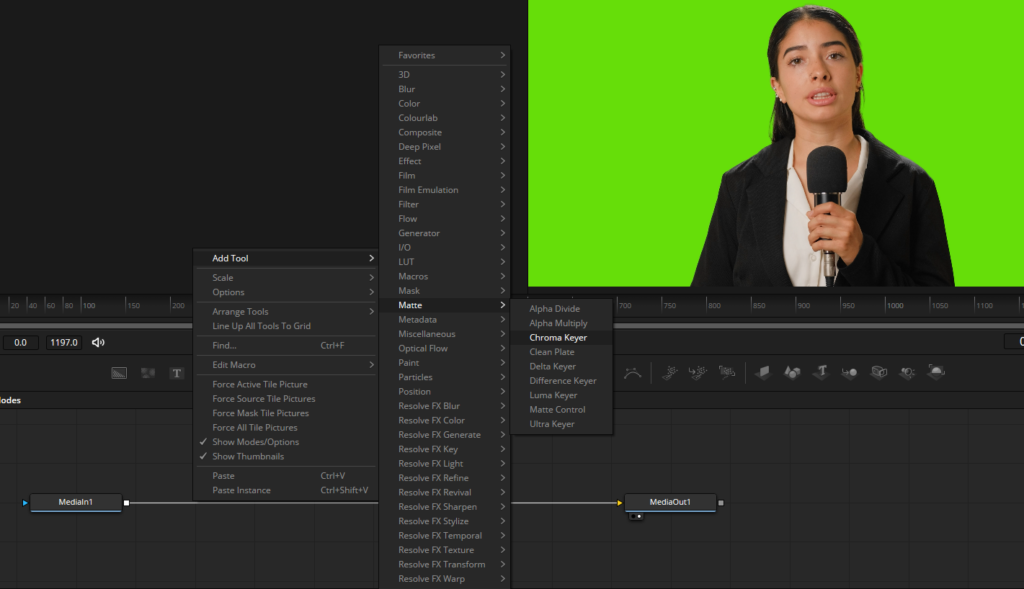
- Access Fusion Page: With the clip selected, navigate to the Fusion page.
- Add Chroma Keyer Node: Insert a single node between Media In and Media Out. To do this, right-click on the line in front of Media In, select “Add Tool,” then choose “Matte” followed by “Chroma Keyer.” The Chroma Keyer node allows you to select a color range and luminance range, removing everything that matches those parameters from the screen.
- Select Color Range: Expand the color range within the Chroma Keyer node. Quickly add to the color range by dragging boxes around the green areas on the screen. The more accurate the selection, the better the green screen removal. Keep adding to the color range by dragging more boxes around the green areas.
- Zoom and Refine: Use the control middle mouse wheel to zoom in for a closer view. Continue to select areas of green surrounding the subject, being careful not to accidentally select the subject’s skin or hair. You can undo a step with Ctrl + Z if needed.
- Handle Green Spill: Tricky areas may include those around the subject where colors blur together, resulting in green color spill. To address this issue, make a few more selections closer to the subject’s body without including the subject.
- Adjust Soft Range: Increase the soft range to blur the edges slightly, digging into the remaining green areas. Be cautious not to set the soft range too high, as it may start removing parts of the subject. Adjust the soft range until it doesn’t negatively affect the subject.
- Review Your Clip: Scrub through your video clip and make sure the green screen has been removed effectively without accidentally removing any important elements of your subjects.
- Add the Background: Go to the Edit page, where you should already have your desired background scene on video track 1. Position this clip so that it serves as the new background for your green screen footage.
- Test Your Composition: Hit play and preview your video to ensure everything looks good and that the green screen removal is seamless.
Further improving the selection with spill removal tool
To further improve your green screen removal use the spill removal tool.
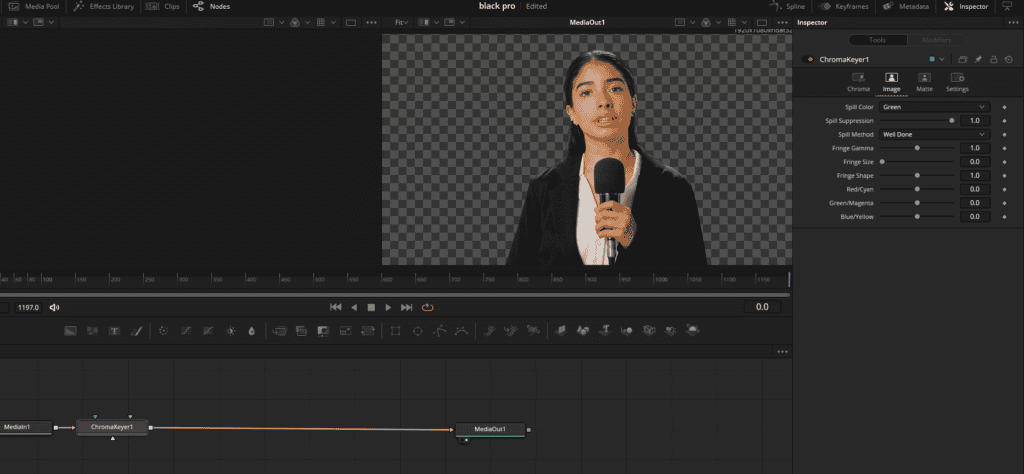
- Access Spill Removal: While still on the Fusion page, navigate to the inspector and switch from the “Chroma” tab to the “Image” tab.
- Adjust Spill Color: Since we are using a green screen, change the spill color to “green” to address any green spill that may be visible on the subject.
- Select Spill Method: Go through the spill method options incrementally, starting with “Rare.” Observe the changes in the image and continue to move down the list until you find a setting that effectively removes the green spill without distorting the overall colors. For me, “Well Done” worked best, while “Burnt” went too far and negatively impacted the image colors.
By utilizing the spill removal tool in combination with the Chroma Keyer node, you can achieve a more seamless and realistic green screen removal, making it difficult to tell that a green screen was ever used. If you want to read about a more advanced way of green screen removal, read, Using Magic Mask To Remove Background In Davinci Resolve.
Conclusion
To achieve the best green screen removal results in DaVinci Resolve, it’s crucial to start with well-shot footage. Here are a few tips for capturing high-quality green screen footage that will make the post-production process smoother:
- Choose the right screen color: Opt for a green or blue screen that contrasts with your subject’s colors. Green is the most common choice due to its distinctiveness and because digital cameras are typically more sensitive to green light.
- Ensure even lighting: Make sure the green screen is evenly lit, with minimal shadows or hotspots, to create a consistent background for easier keying. Soft, diffused lighting works best for this purpose.
- Consider the subject’s clothing and props: Ensure your subject avoids wearing clothing that matches the screen color, as this will complicate the keying process. Also, be mindful of reflective surfaces or props that could catch the green light and become challenging to key out.