
How To Use Magic Mask To Remove Background In Davinci Resolve
Hello everyone. Today I will show you how to use the Magic Mask tool in DaVinci Resolve in order to remove a background from a clip.
The Magic Mask tool is one of the game-changing features in DaVinci Resolve, and today I will show you how to use this excellent tool to remove a background from almost any clip which would be very difficult with other techniques.
Unfortunately, the Magic Mask tool is available only in the studio version of DaVinci Resolve. But it’s also one of the reasons why the studio version is worth purchasing. I hope you will like it. Let’s start
Using Magic Mask To Remove Background In Davinci Resolve
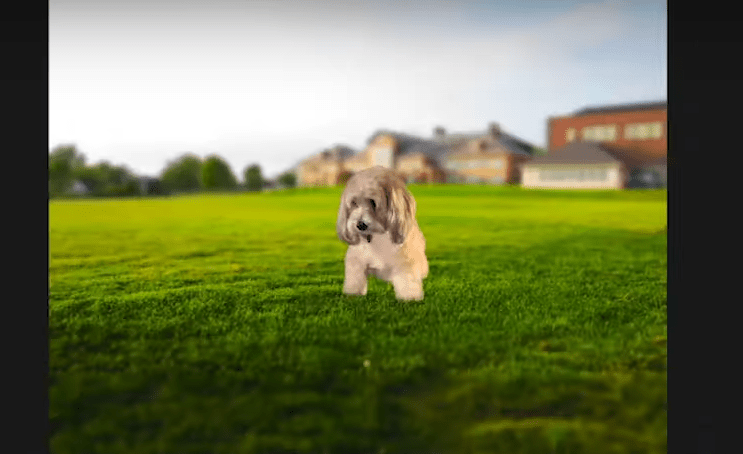
We are in the color tab. I’ve got my clip here. I deliberately chose a clip that is not shot with a green screen, and that is quite tricky because we’ve got some hair at the corners. But also remember the Magic Mask is a very powerful tool, but it has got its limitations.

So if it would be possible to remove a background, it all depends on the clip you work with. Sometimes it can be not easy. But now, let’s go to our Magic Mask tool, and I will tell you quickly what we’ve got here.

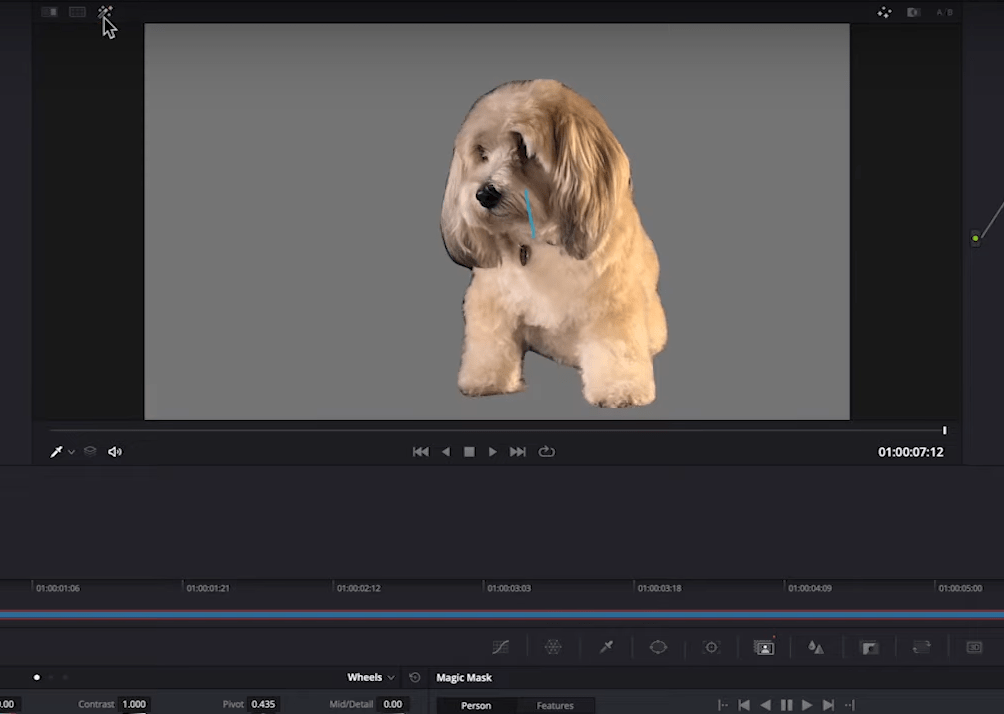
So there’s a slider that we can use to go back and forth within our clip. On the left, we have two options, Person and Features, so you can choose if you want to track the whole person or some individual features of a human body like legs or torso.

But I will pick a person; although the dog is not necessarily a person, it should work in this case as well. Then on the right, we have all other controls that we will be using to refine our Mask.
On the top, we have an invert button that we can use to invert the Mask. And here, we also have a mask overlay that we can toggle on and off in order to see our selection highlighted in red, and I will show you this in a second.
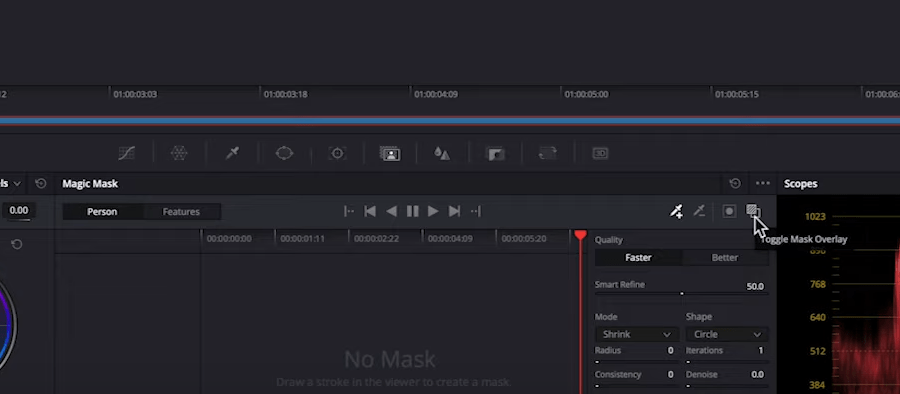
But now, let’s create our Mask. So first, make sure that you’ve got the qualifier with a plus on it selected. And also, the qualifier from a drop-down menu below the preview window should be selected as well.

Now I will draw a line on my subject, and let’s turn the overlay On from the magic mask toolbar. And then our Mask will appear. So as you can see, the Magic Mask did a fantastic job selecting the subject.
But you need to make sure how it looks when you play the video. Also, personally, I wouldn’t say I like to use the red mask overlay. I prefer to turn the highlight on, which is above the preview window. You can also use the shortcut Shift+H to turn on highlight mode. That way, I’m able to see all the edges much better.
So you can see we still have some black parts of the background left here, and we have to fix this. So let’s move to our refining tools that I mentioned earlier, and first, I will switch the quality from faster to better. It will show us a better selection.
Now check the clip by playing it and making sure the Mask remains intact throughout the duration. Remember that the magic mask tool is actually a pretty processor-intensive feature of Davinci Resolve. So depending on your system, it could take a while to track the clip.
Refining the Magic Mask

The selection is still not perfect. We’ve got some parts of the background on the right side, for example. To fix this, we can use the qualifier with minus on it from the Magic Mask toolbar as well. What this tool will do is, it will remove the unwanted parts in your Mask. So I’ll grab it, and I will draw over the black background, two very small strokes, and it disappeared. And now I tracked it back again to see if it worked.
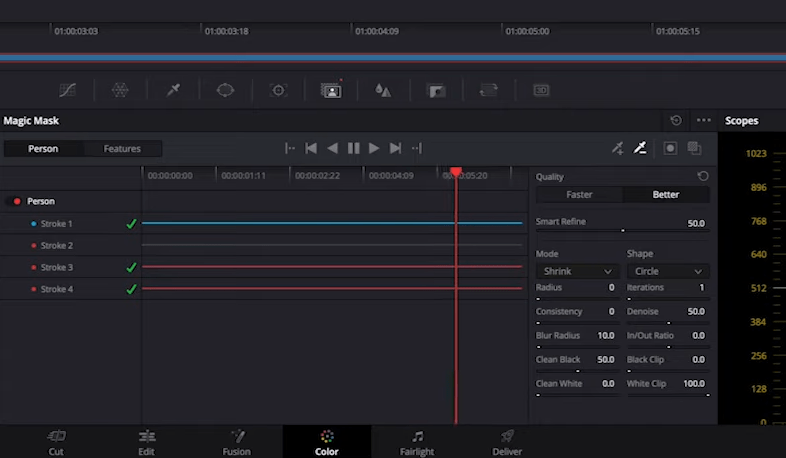
Now we will use some of the refining tools to soften our Mask even better. I normally use Clean White or Clean Black, then the noise and blur radius.
You must be familiar with these options if you know how to use Qualifiers in Davinci Resolve.
Also, remember that this tool is very precise, so you should generally go quite high with these numbers to be able to see a difference. So I usually start from Clean Black, and I then go up to 50. I then go through the whole clip to check it.
Also don’t forget to read our article, How To Remove Green Screen In DaVinci Resolve

Then I use my denoise tool, I usually go up to 30, and then with blur radius, I try with 10. I will change the noise to 50. As usual, it’s all about trial and error.
After playing the clip again and checking how the Mask performs, I think I will go up to 70 with clean black and up to 60 with denoise. My Mask was then perfect and refined.
- Also Read-How to make vignettes in DaVinci Resolve
- Also Read- Best Zoom Techniques In Davinci Resolve
- Also Read- Tips to make a cinematic film with your smartphone
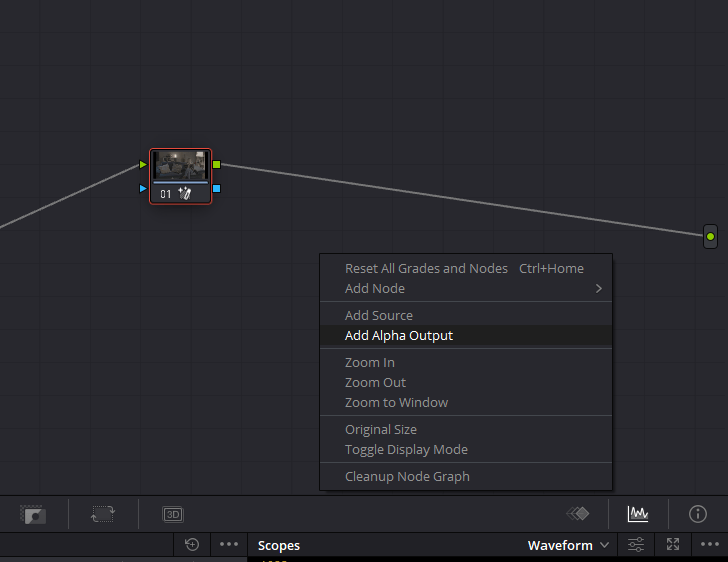
Now that you have fine-tuned your Mask goes to your node graph, right-click and select Add Alpha Output. This will add a blue circle at the end of the node graph. All you have to do is connect the node’s blue line to that Alpha Output you just created.
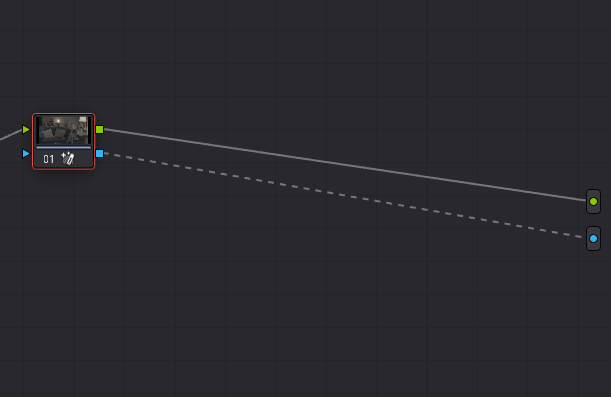
After this step, when you head towards the Edit tab or go to any other option from the menu other than Magic Mask you will see the original background removed and you can now put a background in the video track layer one, and that’s it; you have finally removed the background with magic Mask in Davinci Resolve.
But if you want to export the video without the background (with an alpha channel), you can read the next section.
Export Your Video With An Alpha Channel in DaVinci Resolve
To make videos with partially or entirely transparent components, alpha channels are employed. When putting together a video with numerous layers, these elements are frequently employed. An alpha channel is an extra layer of data that gives each pixel in a clip a transparency value. This enables for partial or complete transparency of segments of a video’s frame when compositing films with numerous layers, alpha channels are commonly applied.
Videos with alpha channels may be quite useful in creative endeavors, and they can be smoothly blended with your other media. Alpha channels are supported by some codecs but not by others. If you’re making videos with alpha channels, though, you may use mattes to easily include these elements into your project, regardless of file type. It was a luma matte if you’ve ever seen a black and white cutout-style clone applied to the end of a video.
Coming back to exporting our video with alpha channel in Davinci Resolve.
Now we will move into the Delivery tab, where the real magic happens because all the settings are done within the Deliver tab. So we’ll click on there, and we will start looking at that.
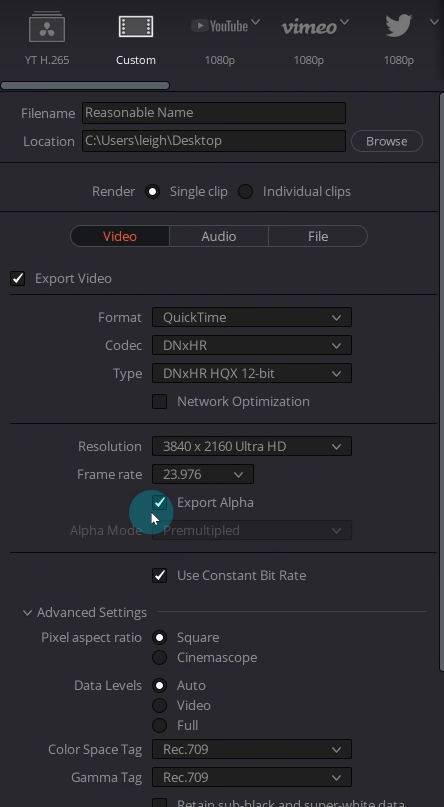
Obviously, you want to choose a location and give it a proper name, and then we’ll move on to the settings. So the name of the game here is to use a codec that has the ability or the compatibility to export an Alpha channel, i.e., exporting a video without a background. In our case, just the dog and not the background.
The codec that I go for is a DNxHR codec from Avid. To access that, you want first to change your format, which is your container or your wrapper. So DNxHR is available in the two flavors of MXF as well as QuickTime.
I personally prefer QuickTime because it’s just a little bit more compatible out in the real world, personally, in my experience, then for the Codec option, you’ll want to come to DNxHR, and then you want to make sure you choose a type of this codec which level of compression to make sure you can access the Alpha.
So basically, HQX 12 bit or above. So basically, ” DNxHR 444 10-bit” and “DNxHR 444 12-bit” will all allow you to access and enable the Export Alpha button.
If I choose Codec Type below then that, the Export Alpha button will disappear.

Then the next thing we need to talk about is the Alpha Mode option; as you will see, it’s by default unaccessible to change, and it’s set to premultiplied, which in our case is actually fine.
Premultied is what we want. However, if you’re going to access the straight Alpha mode and not the premultiplied, you want to come up to the render bar here and go from the single clip and switch this to an individual clip.
Now that opens up the Alpha mode to be changed to straight. So I’ll go back to a single clip, and that being greyed out is not going to bother us.
Then from there on in, it’s the same old render settings as per usual. Whatever it is that you require, you can go with that, and it’s added to the render queue, and you can go ahead and render that out, and that will render the transparency on the Alpha channel for you to be dragged and dropped in later on whichever NLE software you are using to edit your project further or to give it to the client.
If you are going to bring this back into Davinci Resolve, you can just put this video with alpha channel on video track number 2 and put the background layer or the video in track number 1.
So that’s it for this article! We hope it answered all your questions and doubt.