Hi, I’m Salik, the author of FilmmakingElements.com. I have been a filmmaker for over 10 years. I am also a certified DaVinci Resolve Trainer and I have used DaVinci Resolve for many of my projects. When shooting video, it’s common to use a tripod to ensure stable footage. But sometimes, a completely static shot might appear too lifeless, especially if the scene is dynamic or high-energy, like people dancing or an intense action sequence.
That’s where the camera shake effect comes in. This effect replicates the natural motion that occurs when footage is shot handheld. It creates the impression that the camera, and by extension the viewer, is part of the scene, making the footage feel more immersive and lively. In this article we will share 2 methods of adding camera shake effect in Davinci Resolve.
Method 1: Applying Camera Shake Effect In Davinci Resolve On the Edit Page
Step 1: Selecting Your Clips
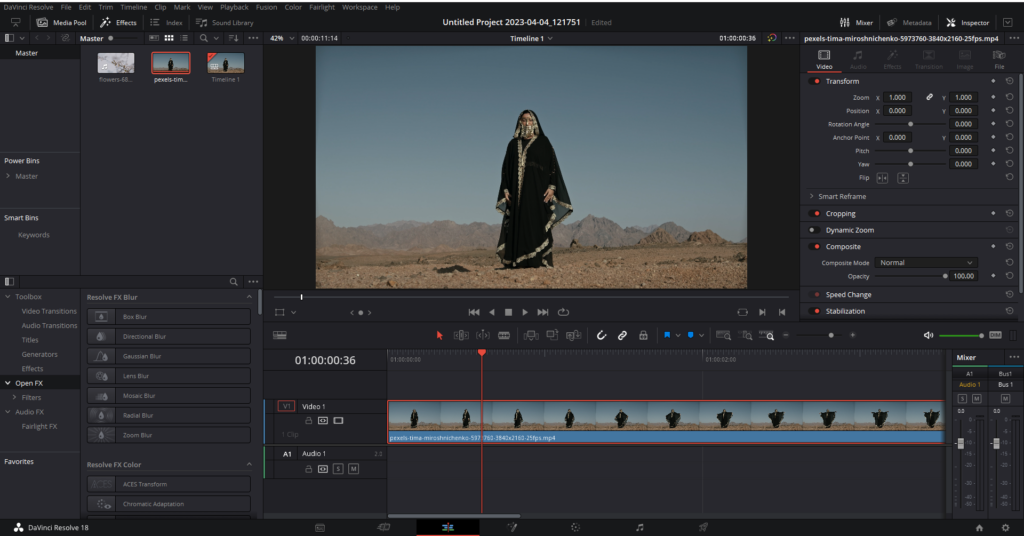
The first step in this process is to select the clips where you want to apply the camera shake effect. You might have some footage where the camera is static, locked off on a tripod. The scene is lively, but the camera movement doesn’t reflect that. This type of footage is a perfect candidate for the camera shake effect.
Step 2: Searching for the Camera Shake Effect
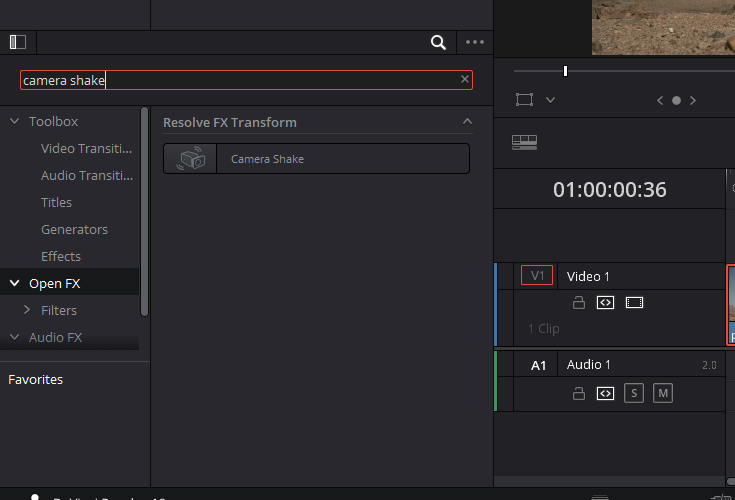
With your clips selected in the timeline on the Edit page of Davinci Resolve, navigate to the effects library in DaVinci Resolve. To open the effects library click on the Effects button in the top left corner. In the search bar, type ‘Camera Shake.’ You’ll find the ‘Camera Shake’ effect under the ‘Open FX’ category. Drag this effect onto your chosen clip to apply it.
Step 3: Navigating to the Inspector
Next, with your clip still selected, navigate to the Inspector, found in the top right corner of the DaVinci Resolve interface. In the Inspector, you’ll find a tab labeled ‘Effects.’ Click on this to reveal all the settings for the camera shake effect.
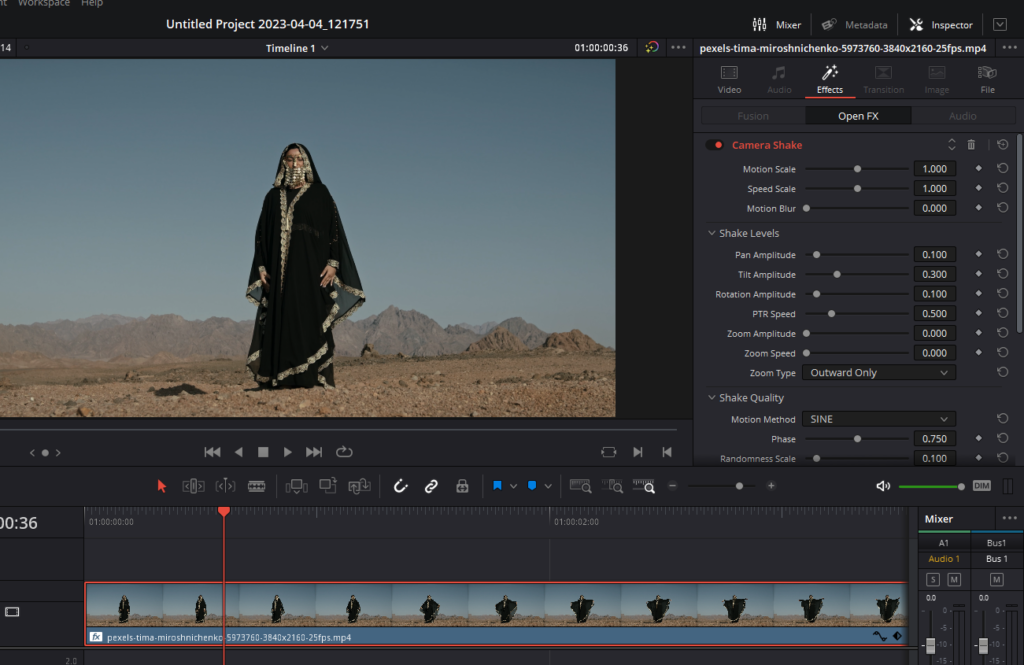
The Camera Shake Settings
The camera shake effect in DaVinci Resolve offers an array of settings that allow you to fine-tune your effect, tailoring it to your specific needs. Let’s delve into these settings and see how each one affects your footage.
Motion Scale
‘Motion Scale’ controls the magnitude or intensity of the camera shake. When you drop this setting down to zero, you’ll see there’s no motion added to your footage. If you slowly increase this setting, you’ll start to notice a subtle movement in your footage, mimicking a gentle, handheld shake. Cranking it up more will exaggerate the motion, making the shake more intense, replicating a more vigorous handheld recording.
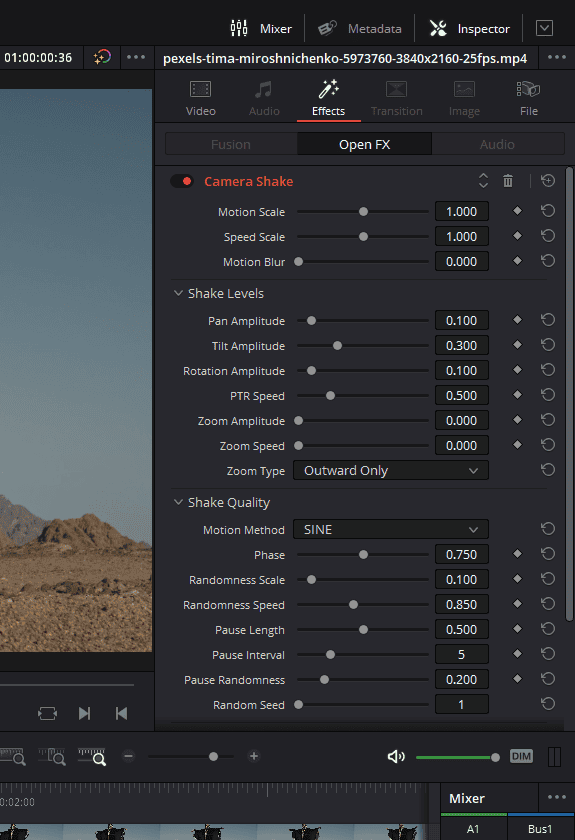
Speed Scale
‘Speed Scale’ alters the speed of the camera shake effect. Lower values create slow, very subtle motions, resembling a gentle sway. As you increase this setting, the speed of the camera shake ramps up, simulating the effect of a faster, more chaotic handheld recording.
Motion Blur
Adding ‘Motion Blur’ to your camera shake can enhance the feeling of movement in your footage. Without motion blur, the shake might look unrealistic, as natural camera movement usually introduces some blur. By increasing the ‘Motion Blur’ setting, you can add a blur effect that matches the motion of the shake, making the effect more convincing.
The above settings are the global controls for the camera shake effect, influencing the overall motion and speed of the shake. Below these settings, DaVinci Resolve provides more specific controls, allowing for greater customization and fine-tuning of the shake effect.
Pan, Tilt, and Rotation
These settings influence the directionality of your camera shake. You can adjust each one independently to create an array of effects. ‘Pan Amplitude’ controls the side-to-side movement. Increasing this setting will create the effect of the camera rocking back and forth. ‘Tilt Amplitude’ handles the up-and-down motion. Raising this will give the impression of the camera nodding up and down. The ‘Rotation Amplitude’ deals with the rotational aspect of the camera shake. Adjusting this will mimic the effect of the camera twisting around its lens axis.
Zoom Amplitude and Zoom Speed
These settings manage the zooming component of your camera shake. ‘Zoom Amplitude’ determines how much the camera zooms in and out during the shake, while ‘Zoom Speed’ controls how quickly these zooms occur. You can create a variety of effects with these settings, from subtle zooms that barely notice to intense zooms that dramatically alter the frame.
Shake Quality
‘Shake Quality’ allows you to adjust the type of motion in your shake effect. Options include ‘Sine,’ ‘Rectified Sine,’ ‘Rectified Sine Invert,’ and ‘Square Wave.’ The ‘Sine’ option typically produces the most natural and fluid motion, but experimenting with the other options can yield interesting effects.
Phase and Randomness Scale
These controls manage the unpredictability of the camera shake. The ‘Phase’ setting alters the starting point in the shake cycle, while the ‘Randomness Scale’ introduces randomness to the motion, making it less uniform and more unpredictable, further enhancing the handheld feel.
Pause Length, Pause Interval, and Pause Randomness
These settings deal with the pauses between camera movements. ‘Pause Length’ controls how long each pause is, ‘Pause Interval’ determines the time between pauses, and ‘Pause Randomness’ introduces variability into the timing of these pauses. Adjusting these settings can help you create a more natural, less mechanical camera shake.
Border Type and Zoom to Crop
These settings help you manage the edges of your footage during the shake. When the camera shake is intense, you might start seeing the corners of your video, resulting in black borders. To avoid this, you can change the ‘Border Type’ to ‘Reflect,’ which mirrors the image at the edge, creating a seamless continuation of the footage. Alternatively, you can use ‘Zoom to Crop’ to zoom in on the video, ensuring the borders aren’t visible.
After adjusting these settings to your satisfaction, preview the footage. If the camera shake effect enhances the mood and feel of the scene, great! You’ve successfully added a new layer of dynamism to your footage.
The camera shake effect can be a potent tool in your video editing arsenal, lending an additional layer of immersion and energy to your footage. With DaVinci Resolve’s array of settings, you can fine-tune the effect to perfectly suit your needs, whether you’re looking for a subtle sway or an intense handheld shake. So go ahead, experiment with these settings, and see how the camera shake effect can bring new life to your video projects.
Method 2: Applying Camera Shake Effect In Davinci Resolve On Fusion Page
In this section, we’re going to explore a second method of adding this effect – this time, through Davinci Resolve’s Fusion page.
Step 1: Preparing Your Timeline
The first crucial step is to find a clip that is shot in a static manner.
Select the clip you want the camera shake effect on, and click on the wand-looking icon in the bottom menu to head to the Fusion page of Davinci Resolve.
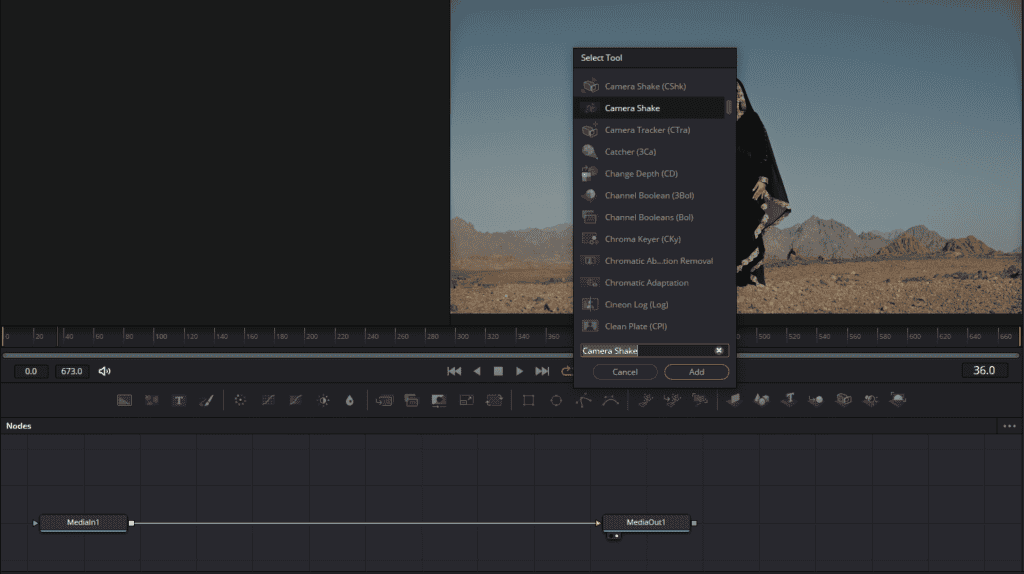
The next step is to introduce the camera shake effect to your footage. Click and select the MediaIn1 node and press the ‘Shift’ and ‘Space’ keys simultaneously to open the tool selector. In the search bar, type “camera shake”. Among the options presented, select the second camera shake effect, not the first, and click on Add. The second option boasts a wider array of control settings, which will be useful for finessing the effect.
After you’ve added the camera shake node, click on it and head to the border type drop-down menu on the right side and select ‘reflect’. This setting ensures the edges of the footage will mirror or ‘reflect’ their adjacent content, preventing black borders that may appear due to the camera shake.
Step 2: Tailoring the Camera Shake: Pan, Tilt, and P-A-T-R Speed
The key to a believable camera shake effect is in the details. Bring your pan amplitude down to zero and your tilt amplitude up to the maximum. This simulates the vertical movement of a handheld camera. Of course, you can increase the pan amplitude to make the camera shake more realistic.
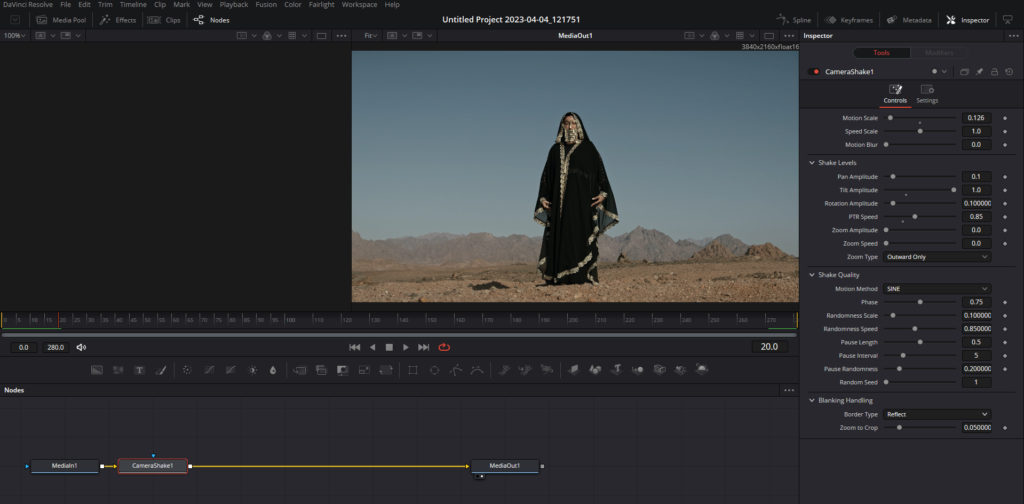
Next, adjust your P-T-R speed (Pan, Tilt, and Rotate Speed) to around 8.5. This setting controls the frequency of the X and Y movement in the shake effect. At 0.85, you should see a noticeable, organic camera shake.
Play around with Motion Scale and Speed Scale to control the intensity of the camera shake. The lesser the better and more believable.
Bass Shake Effect In Davinci Resolve (Bonus Tip)
This effect is a fast and easy way to add power and energy to your videos, making them more dynamic and engaging for viewers. In this section, we will walk through how to create this effect using DaVinci Resolve.
Step 1: Prepare Your Footage and Music
Start by selecting a video clip and a song or audio clip with heavy bass. The Bass Shake Effect is most effective when paired with music that has a strong, noticeable bass beat. Import your chosen footage and music into DaVinci Resolve. Place the video and the audio on the timeline on the Edit page of Davinci Resolve.

Step 2: Identify the Bass Beats
Listen to your music within DaVinci Resolve and mark the heavy bass beats. You can do this by hitting ‘M’ on the keyboard to add a marker each time you hear a bass beat while the music is playing. If necessary, fine-tune your markers to ensure they align exactly with the bass beats in the music.
Step 3: Add an Adjustment Clip
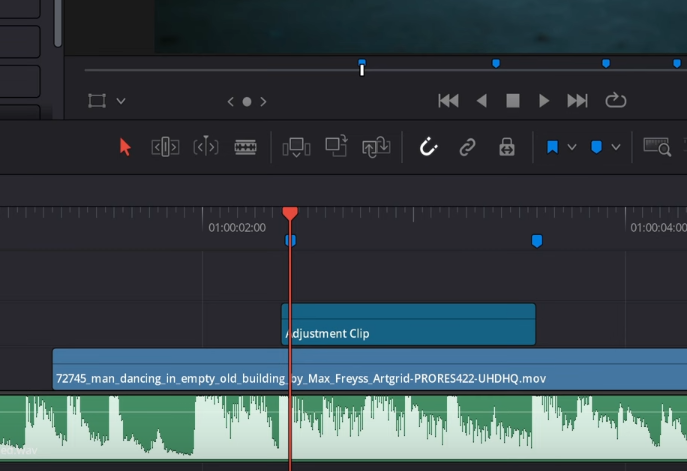
Next, add an adjustment clip to your timeline. You can find this under the effects library in DaVinci Resolve. Click on the Effects button in the top left corner and search for Adjustment Clip in the search bar. Drag the adjustment clip into the timeline on video track number 2, cut it at the next bass hit, and delete everything to the right of it. This adjustment clip should end at the next bass hit.
Step 4: Apply Zoom Blur
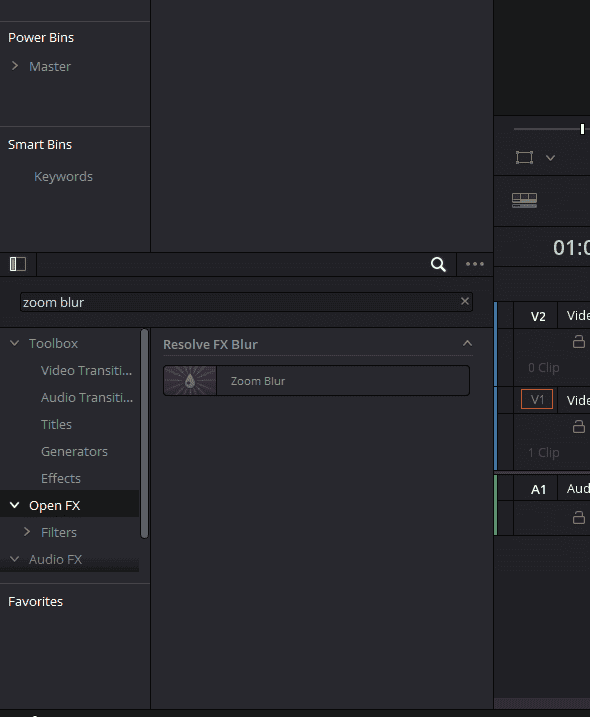
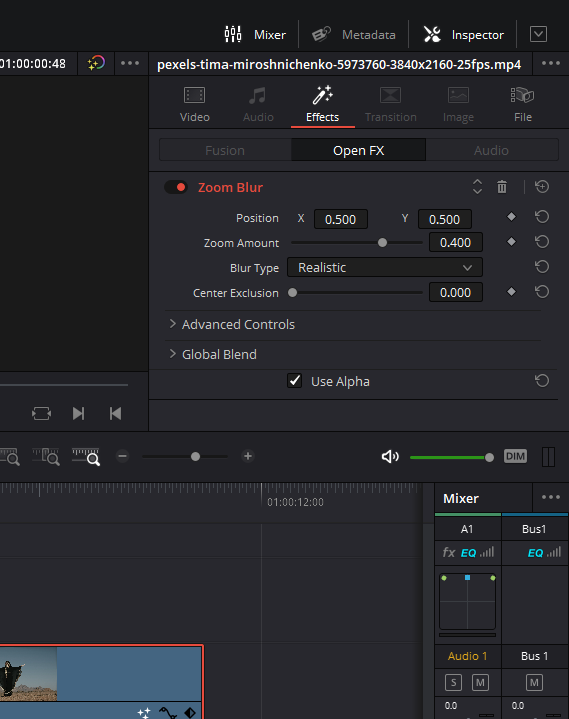
In the effects library, find the “Zoom Blur” effect and drag it onto the adjustment clip. Click on the inspector button on the top-right and then click on effects to see the controls for Zoom Blur. Adjust the center exclusion to about 0.120 and increase the zoom amount to around 0.600.
Step 5: Apply Prism Blur
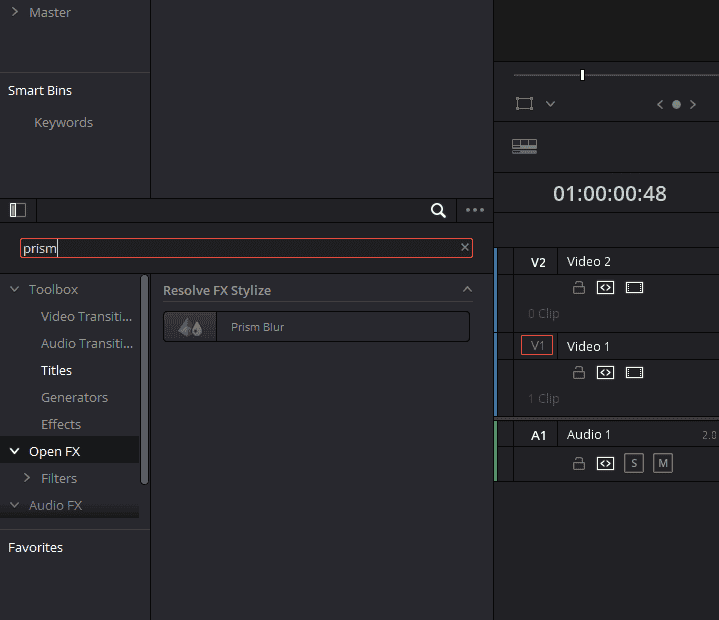
For an even more pronounced Bass Shake effect, you can add a Prism Blur to the adjustment clip.
This effect is accessible from the Effects menu. Search for the Prism Blur and drag and drop it on the Adjustment Clip. Once you’ve added the Prism Blur effect, head to the inspector panel on the right and adjust its Position parameter so that it is centered on your main subject. After doing this, you will need to decrease the blur strength according to your preference. The aim is to enhance the subject’s prominence without overwhelming the footage with blur.
For a touch of additional visual interest, you can incorporate a chromatic aberration-like effect. This is achieved by adjusting the ‘aberration distance’ setting to approximately 0.170. Furthermore, you will want to modify the ‘aberration strength’ to around 0.360. As these modifications are made, be sure to leave the position as it is. These adjustments contribute to creating a visually striking, dynamic Bass Shake effect that complements your footage and music selection.
Step 6: Add Dynamic Zoom
At this juncture, you should see a distinct Bass Shake effect on your footage. However, to amplify its impact and create a more immersive viewing experience, you can incorporate Dynamic Zoom. This powerful feature adds an abrupt zoom effect that syncs perfectly with the bass hits in your music.
With the adjustment clip selected, go to the Video tab in the Inspector panel on the right and turn on Dynamic Zoom. Once enabled, navigate to the ‘Dynamic Zoom Ease’ setting and switch it from ‘Linear’ to ‘Ease Out’. This adjustment ensures that the zoom effect is most pronounced at the onset of the bass hit and gradually reduces towards the end. The result is a rhythmic visual ‘punch’ that heightens viewer engagement and enhances the overall quality of your video.
Thank you for reading this tutorial on adding camera shake effects in DaVinci Resolve. We hope you found it insightful and engaging, and that it inspires you to experiment with these techniques in your future video editing projects. Remember, the key to mastery lies in patience and practice. So go ahead, get creative, and let your videos come alive with dynamic camera movements.