Hi, I’m Salik, the author of FilmmakingElements.com. I have been a filmmaker for over 10 years. I am also a certified DaVinci Resolve Trainer and I have used DaVinci Resolve for many of my projects. In the dynamic world of video production, ensuring your content looks its best is essential. Whether you’re a seasoned professional or just starting your journey into the realm of video editing, you’ve likely heard of DaVinci Resolve.
A powerhouse in the industry, this software provides a vast array of features, enabling users to create high-quality videos with ease.
But what if your footage is slightly blurry or doesn’t have the crispness you’re striving for? That’s where video sharpening comes into play. If you have used a low-quality camera, GoPro, or even a drone this article is for you.
In this article, we delve into the process of sharpening videos in DaVinci Resolve, focusing on four different methods that can help you enhance your content’s visual quality.
These techniques will empower you to make your videos clearer, bring out the fine details, and make your work stand out, regardless of whether you’re working on a professional film project, a YouTube video, or a personal movie.
Sharpening in DaVinci Resolve – Method 1
Looking to transform your footage from a soft appearance to a sharper, crisper image? DaVinci Resolve offers a convenient and straightforward way to achieve this. Here’s a quick method that I’ve found effective and easy to apply, even for beginners.
Step 1: Open DaVinci Resolve and Import Your Clip
Begin by launching the DaVinci Resolve software on your computer. Once open, import the video clip you intend to sharpen into the timeline. This process is as simple as navigating to the ‘File’ menu, clicking ‘Import’ and then ‘Media’ from the menu on top, and then selecting the video from your computer’s storage.
Step 2: Navigate to the Color Tab
After importing your video clip, look at the interface’s bottom. You will find several tabs – Media, Cut, Edit, Fusion, Color, Fairlight, and Deliver. Each tab represents a different workspace within DaVinci Resolve, with the Color Tab dedicated to color correction and grading. Click on the Color Tab, represented by a circular icon, to proceed.
Step 3: Introduction to Nodes and How to Use Them
Within the Color Tab, you’ll find Nodes on the right upper section – a powerful feature in DaVinci Resolve that lets you apply different corrections or effects to your video. Nodes function similarly to layers in Adobe Premiere Pro but provide a non-destructive and flexible way to adjust your clip.
Usually, I add two additional nodes to the base node to apply various corrections and effects without tampering with the original clip. To add a new node, simply use shortcut ALT + S.
Step 4: Color Your Video Clip
Once your nodes are set, use the second node to add your preferred color grading or Lookup Tables (LUTs). To apply a LUT, right-click on the node, select ‘LUT’ and choose your preferred LUT. This step is optional if your video clip is already colored or if you prefer the original color grading.
Step 5: Adjust the Color Space
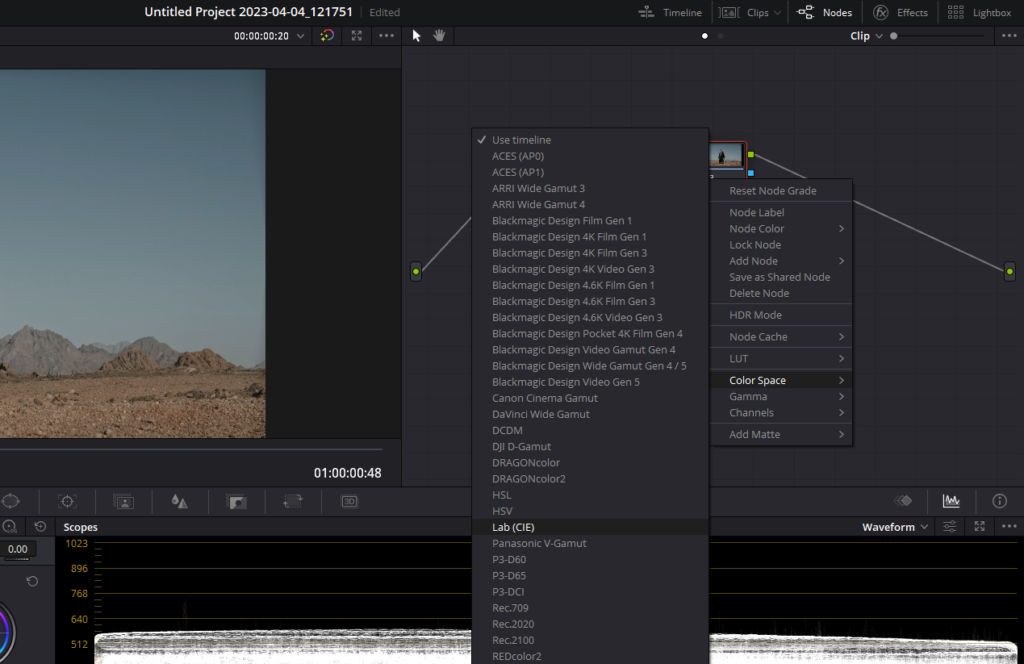
Now, focus on the third node. Right-click on it and select the ‘Color Space’ option. From the dropdown menu, select ‘Lab (CIE).’ This action doesn’t cause any immediate visual changes, but it prepares your video for the upcoming sharpening adjustments.
Step 6: Deselect Channels
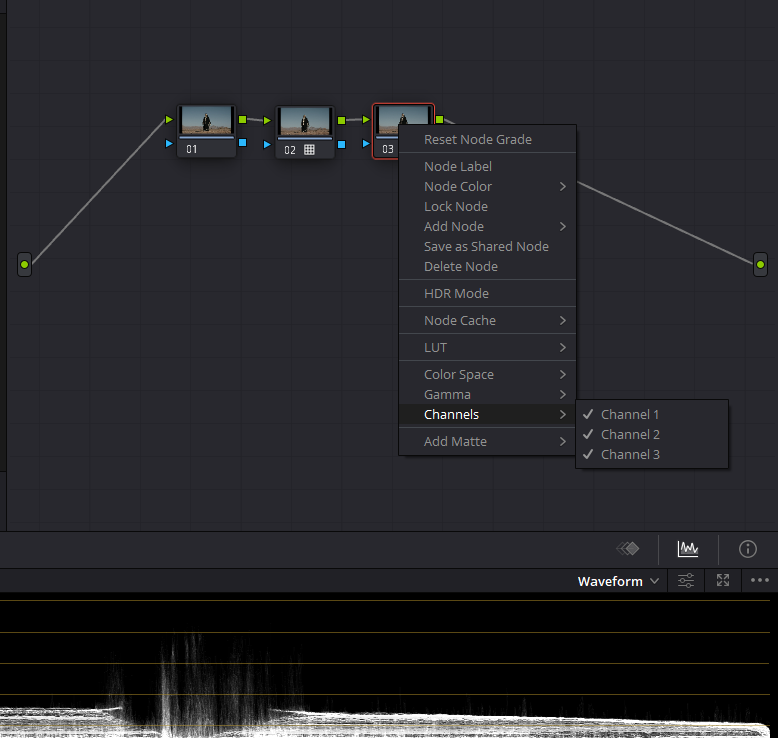
Next, right-click on the third node again and select ‘Channels.’ A list of channels will appear. Uncheck both ‘Channel 2’ and ‘Channel 3’.
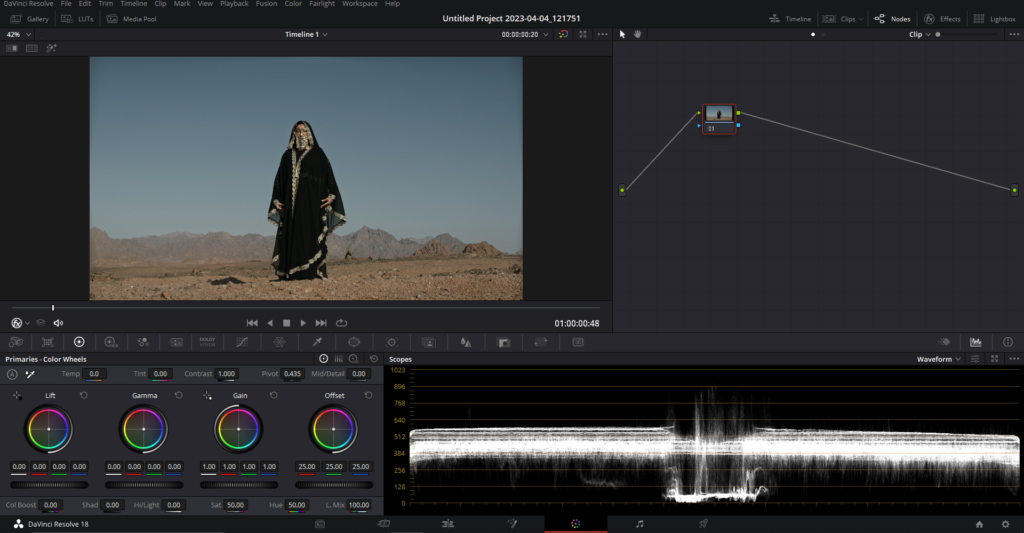
Step 7: Adjust the Radius for Sharpening
Lastly, it’s time to make the actual sharpening adjustments. Navigate to the ‘Blur’ section in the panel, symbolized by a teardrop and a triangle icon. Here, you’ll find the ‘Radius’ option – the key to video sharpening.
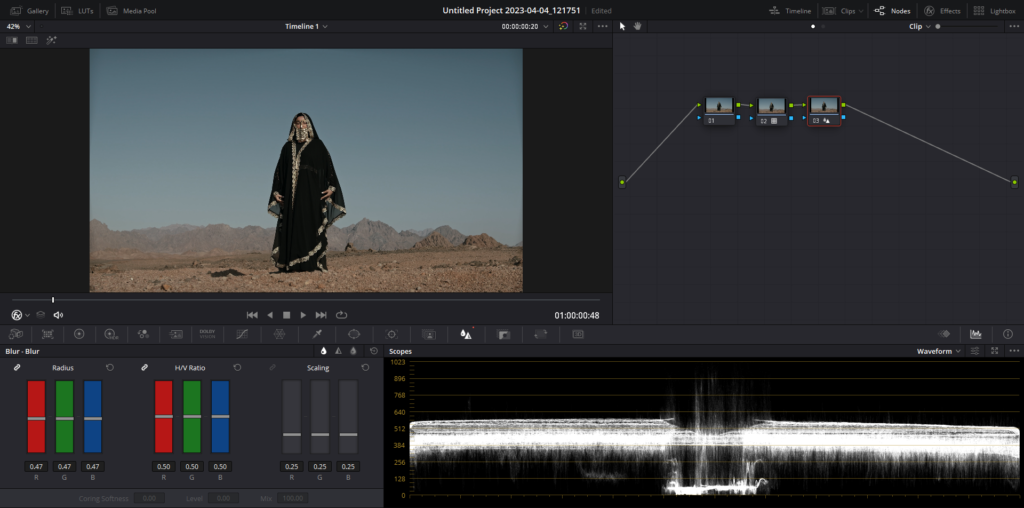
Dragging the Radius slider down will increase the sharpness of your video. I generally recommend a Radius value of around 0.46, but you’re free to experiment. Keep in mind, however, that drastically reducing the Radius might over-sharpen your video and make it look artificial, while increasing it will make the video softer.
And that’s it! You’ve now sharpened your video in DaVinci Resolve, enhancing its visual appeal. This method is not only effective but also easy to reproduce for multiple video clips.
Sharpening in DaVinci Resolve – Method 2
The Sharpen plugin is another effective tool within DaVinci Resolve that you can leverage to enhance your video’s clarity and crispness. This tool allows for granular control over the sharpening effect, providing different settings for various detail levels. Here’s a step-by-step guide on how to use the Sharpen plugin:
Step 1: Create a New Node
Start on the Color Page of DaVinci Resolve. To create a new node, press Alt + S. Nodes are a fundamental part of the color grading process in DaVinci Resolve, allowing you to isolate different effects and adjustments.
Step 2: Open the Effects Library
Click on the effects button located at the top right corner of the screen. This action will open the effects library, a treasure trove of various effects and filters you can apply to your video.
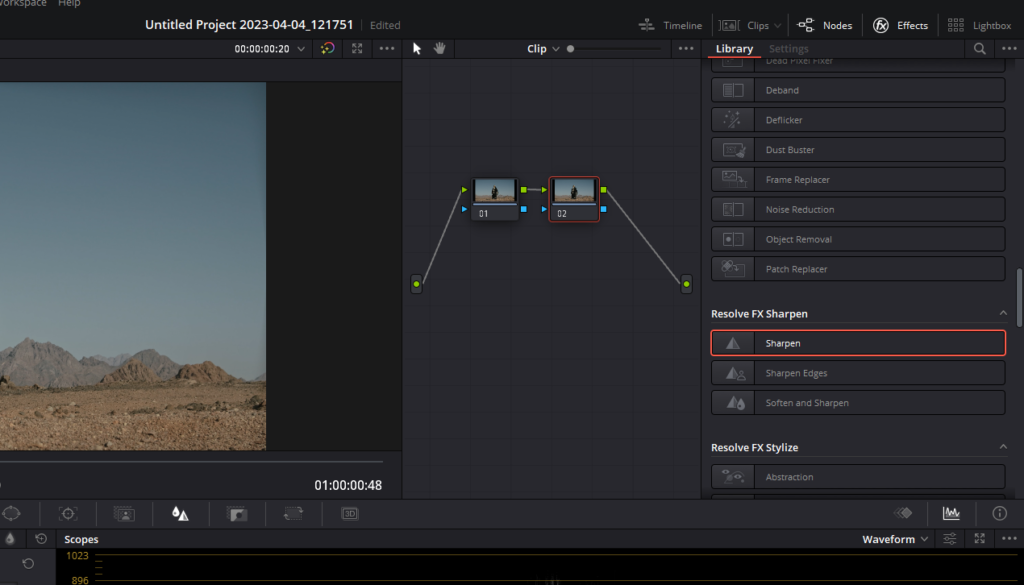
Step 3: Apply the Sharpen Plugin
Look for the plugin named “Sharpen” within the effects library. Drag and drop this plugin onto the node you created in Step 1. Click on the node to access the settings of this plugin on the right side of the screen.
Step 4: Understand the Sharpen Plugin Function
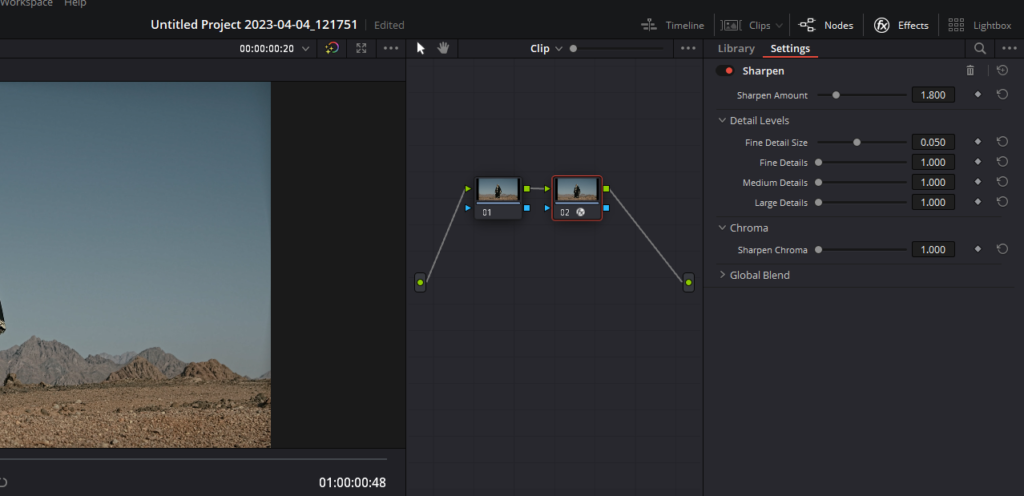
The Sharpen plugin works by dividing the image into four levels of detail – fine detail size, fine details, medium details, and large details. This division allows you to apply different amounts of sharpening to each of these image structures, offering immense control over the sharpening effect.
Step 5: Tweak the Main Controls
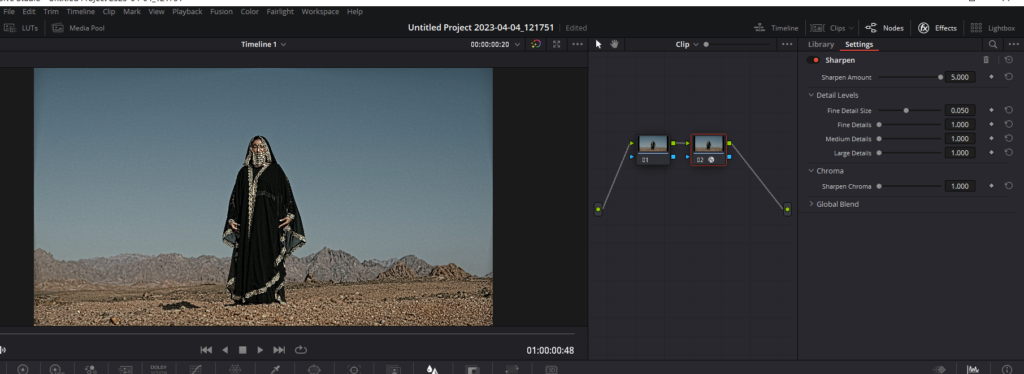
The main controls determine the overall sharpening effect. The primary global control, “Sharpen Amount,” lets you add sharpening to the image. The default value is 1.800, where 0 implies no sharpening, and 5.000 is the maximum sharpening. To further refine the result, use the controls in the “Detail Levels” section.
Step 6: Adjust Detail Levels
The “Detail Levels” section lets you customize the sharpen effect in a highly specific way. It includes sliders for “Fine Detail Size,” “Fine Detail,” “Medium Details,” and “Large Details.” Each of these sliders governs the sharpness of different types of details in the image, from extremely fine details like skin pores and hair strands to the largest details like eyelids and shadows.
Step 7: Use Chroma Control
Lastly, there’s a special control called “Sharpen Chroma.” This control lets you selectively sharpen the chroma of the image while leaving the luma (Y) unaffected. However, be cautious with this control, as overuse can lead to unnatural results.
With these steps, you can maximize the Sharpen plugin’s potential in DaVinci Resolve to achieve highly tailored and controlled video sharpening. Remember, the goal is to enhance your video’s clarity without losing its natural appeal, so always be moderate with your adjustments.
Sharpening in DaVinci Resolve – Method 3
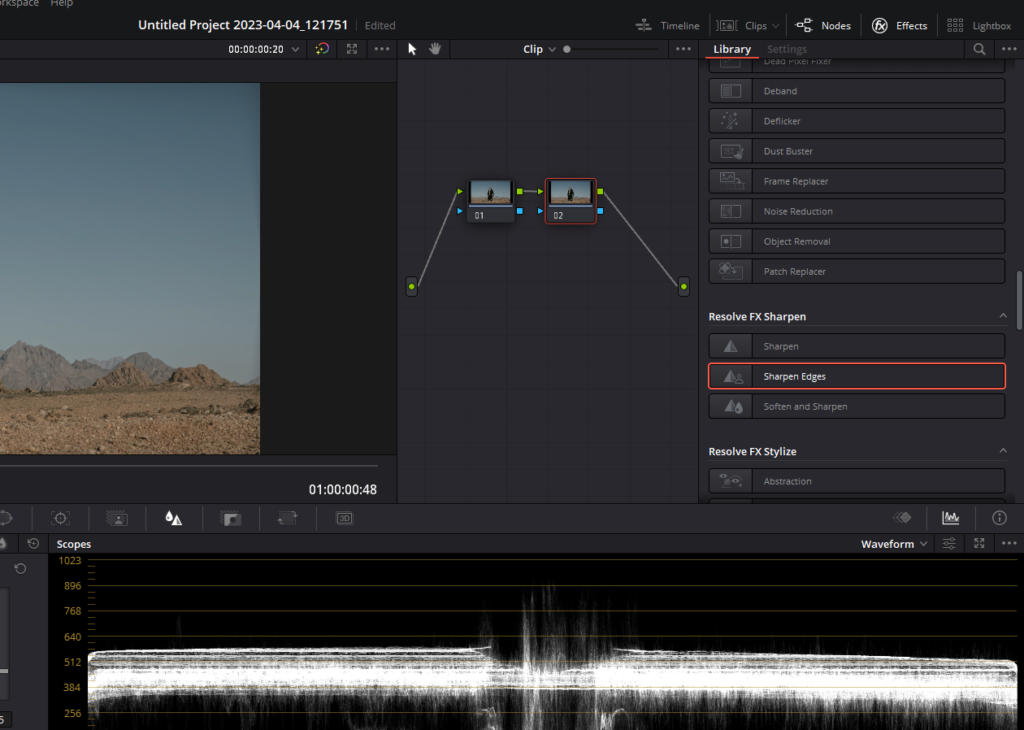
If you’re aiming to accentuate the edges in your video footage, the “Sharpen Edges” plugin within DaVinci Resolve is the tool for you. This plugin focuses on detecting edges to create a key used to limit sharpening to the selected edge details of an image. It’s particularly useful when you’re trying to make mildly soft-focus clips less noticeable. Here’s a comprehensive guide on how to use the Sharpen Edges plugin:
Step 1: Create a New Node
Start on the Color Page of DaVinci Resolve. Press Alt + S to create a new node, which forms the basis for your color grading and effects application.
Step 2: Open the Effects Library
Click on the effects button located at the top right corner of the screen to open the effects library. This library is your go-to place for all kinds of video effects and filters.
Step 3: Apply the Sharpen Edges Plugin
Search for the plugin named “Sharpen Edges” within the effects library. Drag and drop this plugin onto the node you created earlier. Click on the node to access the settings of this plugin on the right side of the screen.
Step 4: Adjust the Main Controls
The main controls determine the overall sharpening effect. They include the “Sharpen Amount,” which is the primary global control for adding sharpening to the edges detected by this filter, and “Sharpen Radius,” which controls the granularity of the detail added using Sharpen Amount.
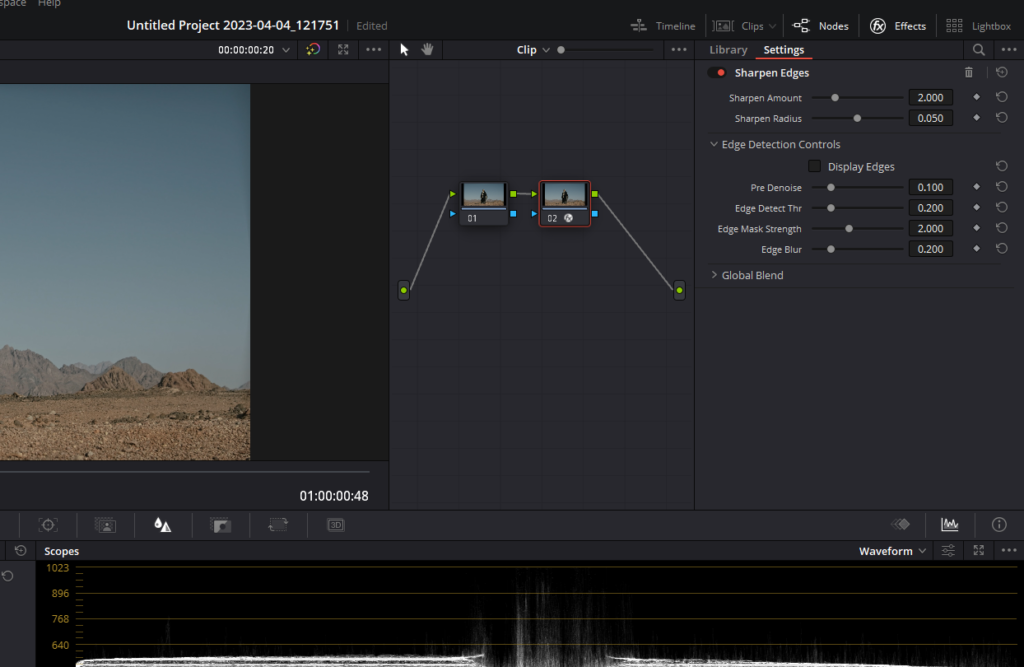
Step 5: Tweak the Edge Detection Controls
The Edge Detection Controls let you customize the sharpen effect in very specific ways. They include:
- “Display Edges”: This checkbox provides a grayscale preview of the edges being detected for sharpening. It lets you see the effect of the other controls in this group on the key determining which parts of the image are sharpened.
- “Pre Denoise”: This control smooths the matte to remove individual pixels of noise, allowing you to minimize or enhance edges from the key.
- “Edge Detect Threshold”: This control allows you to adjust how strong edge detail needs to be to be included in the key.
- “Edge Mask Strength”: This control lets you increase or decrease the intensity of the edges in the key, and thus, the intensity of sharpening in those areas.
- “Edge Blur”: This control lets you determine the softness of the edges in the key, allowing you to adjust the breadth of image detail included in the sharpening operation.
By carefully adjusting these controls, you can ensure that the Sharpen Edges plugin precisely targets the parts of your video footage that you want to enhance. Remember, while sharpening edges can significantly improve your video’s overall look, overuse can lead to an unnatural appearance. Therefore, it’s best to apply this effect moderately and gradually.
Sharpening in DaVinci Resolve – Method 4
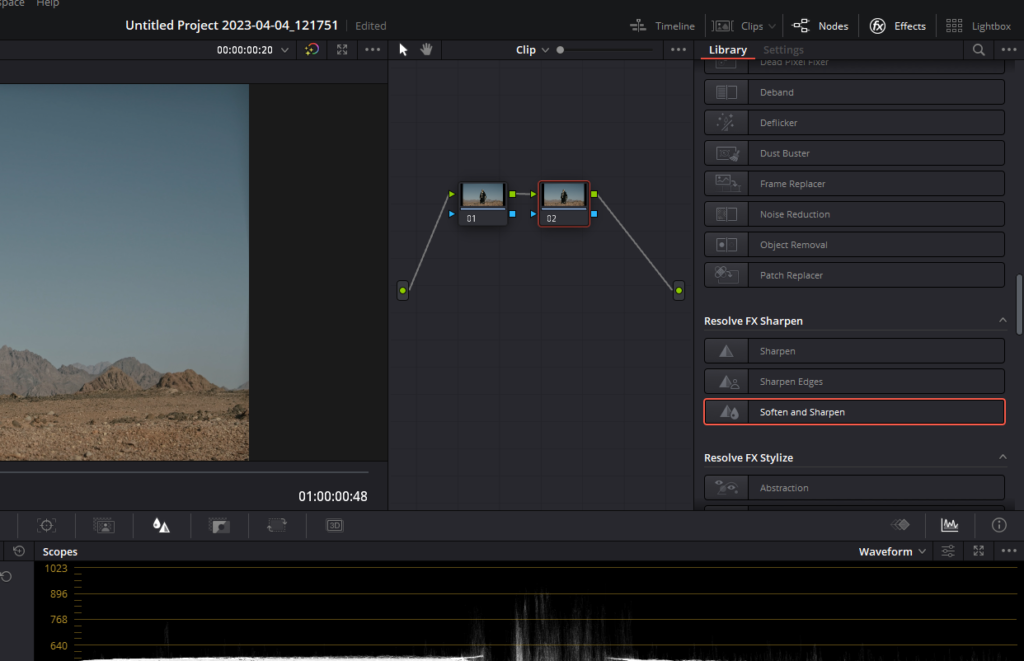
The “Soften and Sharpen” plugin within DaVinci Resolve offers a remarkable balance between smoothing some details and adding sharpness to others in your video footage. It’s an excellent tool when you want to minimize unwanted blemishes, wrinkles, or scarring, especially when isolating skin within a window or qualifier. Let’s delve into how you can harness this plugin to enhance your video quality:
Step 1: Create a New Node
Initiate this process on the Color Page of DaVinci Resolve. Press Alt + S to generate a new node, forming the foundation for your effects application.
Step 2: Open the Effects Library
Click on the effects button, located on the top right corner, to open the effects library. This repository contains all the video effects and filters you need.
Step 3: Apply the Soften and Sharpen Plugin
Within the effects library, search for the plugin named “Soften and Sharpen”. Drag and drop it onto the node you created. Then, click on the node to access the settings of this plugin on the right side of your screen.
Step 4: Manipulate the Main Controls
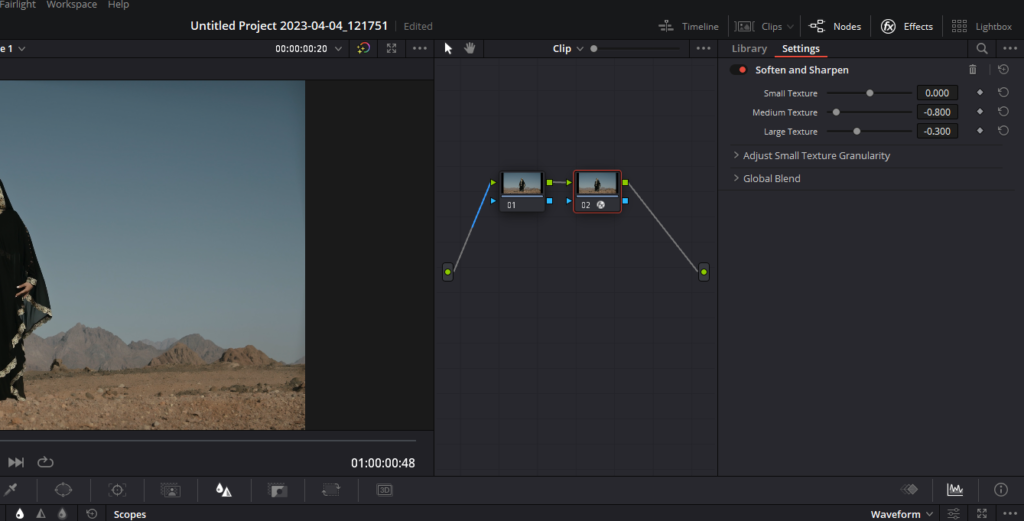
The main controls of this plugin include the Small, Medium, and Large Texture sliders. Each of these can be adjusted into both negative and positive values. At 0, no change is made to the corresponding details of the image. Negative values remove the corresponding details, and positive values add sharpness to the corresponding details of the image.
- “Small Texture” affects extremely fine detail such as skin pores and strands of hair.
- “Medium Texture” impacts coarser detail such as freckles, wrinkles, and clusters of hair.
- “Large Texture” affects the largest details in the image, like eyelids, eyebrows, edges of lips and noses, and edges where hair meets the face.
Keep in mind that what’s identifiable as a small, medium, or large structure heavily depends on the framing of the subject of the shot. For example, these structures would differ significantly between a long shot and a closeup.
Step 5: Adjust Small Skin Texture Granularity
The “Small Texture Size” control lets you adjust the threshold that differentiates Small Textures from Medium and Large Textures. This control helps you fine-tune the Small Texture that you want to preserve. Raising this value includes more of the image as small details, while lowering this value excludes more of the image from small details.
Using the Soften and Sharpen plugin in DaVinci Resolve offers an effective way to enhance the visual appeal of your video footage. It allows for a careful balance between sharpening and smoothing various details, resulting in a more polished and professional video. As always, remember to make adjustments gradually and in moderation to maintain a natural and appealing look.
Conclusion
Sharpening your videos can dramatically enhance their visual appeal, making them more engaging for your audience. Regardless of the method you choose, DaVinci Resolve provides a powerful toolset to help you achieve the level of crispness you desire in your footage.
In this article, we’ve explored four unique methods to sharpen videos in DaVinci Resolve. Whether you’re manipulating nodes in the color tab, using the Sharpen plugin, Sharpen Edges, or the Soften and Sharpen plugin, each method offers its own unique advantages. Experiment with these techniques and see which one best suits your style and the requirements of your project.
Remember, improving your video editing skills is a journey, and every piece of knowledge you gain brings you one step closer to mastering this craft. Continue to explore, learn, and grow in your proficiency with DaVinci Resolve.
We hope you found this article helpful and enlightening. Thank you for reading, and happy video editing!