Hi, I’m Salik, the author of FilmmakingElements.com. I have been a filmmaker for over 10 years. I am also a certified DaVinci Resolve Trainer and I have used DaVinci Resolve for many of my projects. Whether you’re a seasoned professional or a budding novice in the world of video editing, DaVinci Resolve is a powerful tool that can help you bring your creative vision to life. But even the best tools can present unique challenges, and for some users, one of those challenges has been navigating DaVinci Resolve’s user interface (UI) scaling. Whether the UI appears too big or too small on your screen, it can significantly impact your workflow and productivity.
In this article, we’ll delve into four fixes to DaVinci Resolve UI scaling issues. Each solution is designed to help you tailor the application’s appearance to your needs, so you can spend less time squinting at the screen or scrolling unnecessarily, and more time perfecting your video projects.
Fix #1: Adjusting DaVinci Resolve UI Scaling from Within the Application
A. Introduction to the Problem
This issue is often experienced when transitioning from older versions of the software to newer iterations. The good news is that there’s a relatively straightforward way to resolve this issue from within the program’s preferences.
B. Locating the UI Display Scale Setting
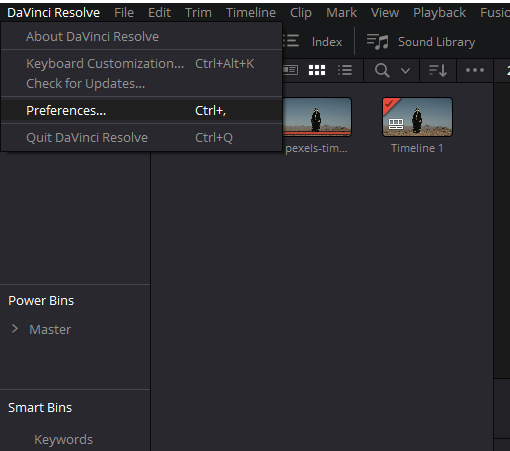
The first step to rectifying this issue is to navigate to the application’s preferences. Here’s how:
- Open the DaVinci Resolve Menu: Look for the DaVinci Resolve button at the top of the screen and click on it to open up the menu. This will open a dropdown menu with several options.
- Go to Preferences: In the dropdown menu, click on ‘Preferences’. This will open a new window with numerous tabs and settings that allow you to customize your DaVinci Resolve experience.
- Access User UI Settings: Within the Preferences window, locate the ‘User’ section and then find ‘UI Settings’.
C. Adjusting the UI Display Scale
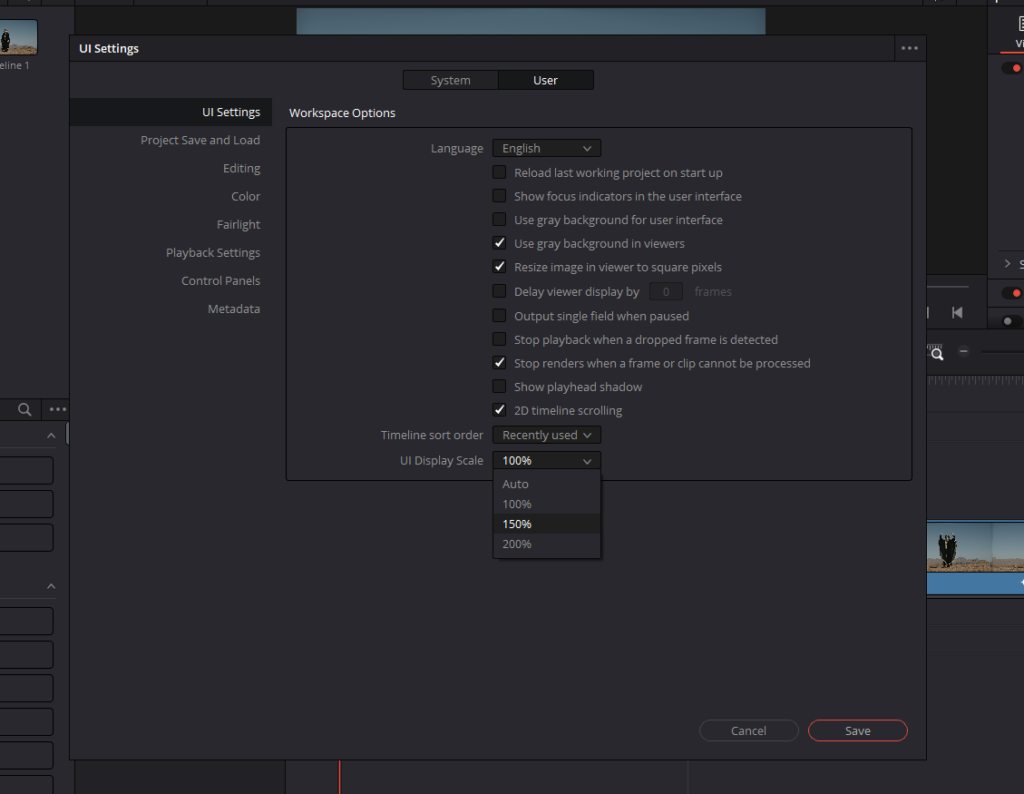
Within the ‘UI Settings’, you’ll find an option labeled ‘UI Display Scale’. This setting allows you to adjust the scaling of the DaVinci Resolve interface.
- Adjust the UI Display Scale: If your interface appears too large or too small, you can adjust the scale here. For example, if your Windows scaling is set to 125%, setting the UI Display Scale to 100% might solve your scaling issues. However, this setting is not a one-size-fits-all solution – you may need to experiment with different values to find the one that suits your setup best.
- Save Changes and Restart: After adjusting the ‘UI Display Scale’, click ‘Save’. However, the changes will not take effect until you restart DaVinci Resolve. Close and reopen the application to see the changes in effect.
Fix #2: Understanding and Managing Screen Resolution and UI Scaling
A. Understanding the Problem
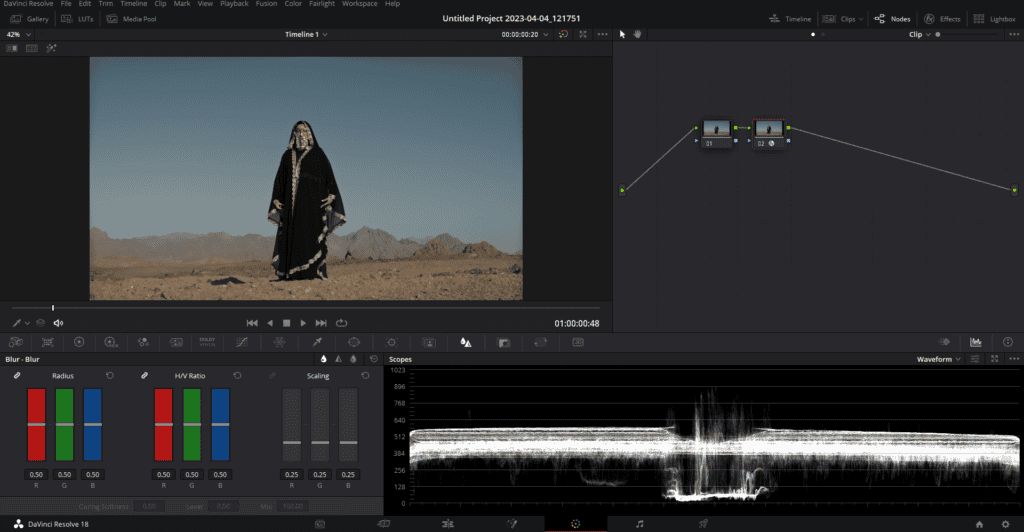
Many DaVinci Resolve users often wonder why their UI appears different compared to others. The layout, the number of color panels on the color page, and even the size of the tools can vary. This discrepancy is usually due to the differences in monitor resolution and UI scaling settings.
B. How Resolution and UI Scaling Affect the Layout
On a high-resolution display (UHD or HD), the color page in DaVinci Resolve typically features three main sections: the color palette, color wheels, and a third section for keyframes, scopes, and info. However, on a screen with a different resolution, aspect ratio, or altered UI scaling, DaVinci Resolve may present these sections differently.
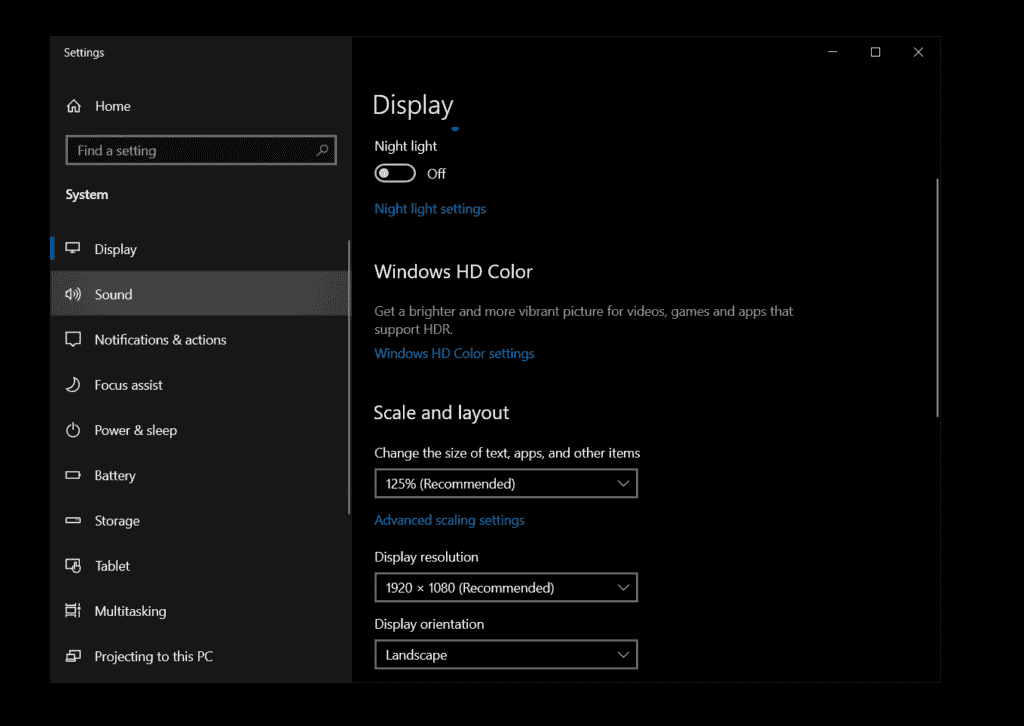
If you right-click anywhere on the desktop and go to Display Settings, you will find an option called Scale and Layout. Here you can change the scale of the UI.
For example, if you’ve set the UI scaling in your Windows display settings to 150% to ease readability, the layout will adjust accordingly. If this is reduced to 100%, the tools will appear smaller, but you’ll maintain a similar layout.
C. Managing Layout Changes Across Different Monitors
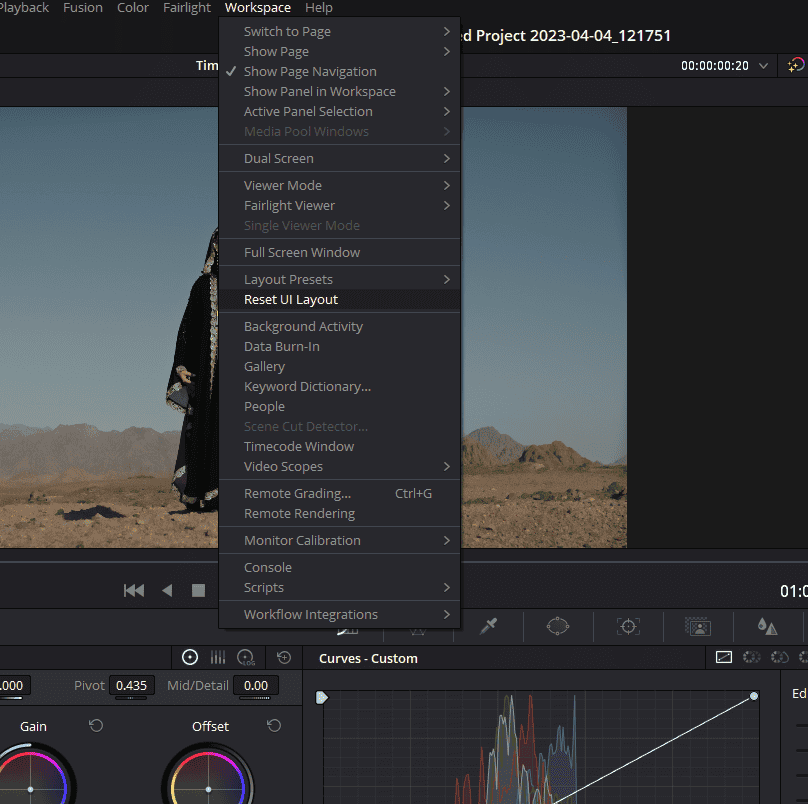
If you move DaVinci Resolve to a lower resolution monitor, the layout may appear ‘smashed together’, with the buttons and palettes becoming more compact. DaVinci Resolve has a built-in solution for this: under the ‘Workspace’ tab on the menu on top, select ‘Reset UI Layout’. This command resets everything, adjusting the layout to your current screen resolution. For an even more spacious working environment, select ‘Full Screen Window’ under the ‘Workspace’ tab to hide your taskbar.
D. Working with Higher UI Scaling
With a higher UI scaling value, like 250%, the layout might look a bit odd. But, even in these scenarios, DaVinci Resolve functions consistently, providing access to all the same tools.
To improve the layout, double check your resolution and UI scaling. A balance of UHD resolution and a UI scaling of 150% often works well. If the layout still seems off, remember to reset the UI layout and switch to full screen. Sometimes, you might need to reset the layout a couple of times to get everything back in order.
E. Tips for Working on Lower Resolution Screens
If you’re working on a laptop or a lower-resolution monitor, your layout may have fewer palettes. However, all features, like scopes, can still be accessed by clicking the ‘Expand’ button, opening a floating scopes window.
If you ever lose track of a floating window, like the scopes window, simply go to ‘Workspace’ and select ‘Reset UI Layout’. This will bring all your windows back to the center, ensuring you never lose access to any tools.
Fix #3: Adjusting Preferences and Using PowerShell
A. Identifying the Issue
Many users have reported changes in DaVinci Resolve’s scaling behaviors after updating their software. For instance, users who were previously content with their settings have found that the same configurations don’t work correctly after an update. In such cases, the software’s fonts and windows may appear disproportionately large, even with scaling set to a previously suitable value like 125%.
B. Experiencing the Problem
The interface may show enlarged fonts and windows, which can disrupt your workflow. For instance, if you are in the editing interface with the Inspector open, the interface elements may be so large that you’re forced to close the Inspector to get the dual viewer option. In short, everything appears too big, and the scaling does not seem to respond to adjustments.
C. Implementing the Fix
To remedy this issue, you can create a secondary shortcut for DaVinci Resolve, or modify the original one. This step involves using PowerShell to open Resolve with specific high DPI settings set to zero. Here’s how you can do it:
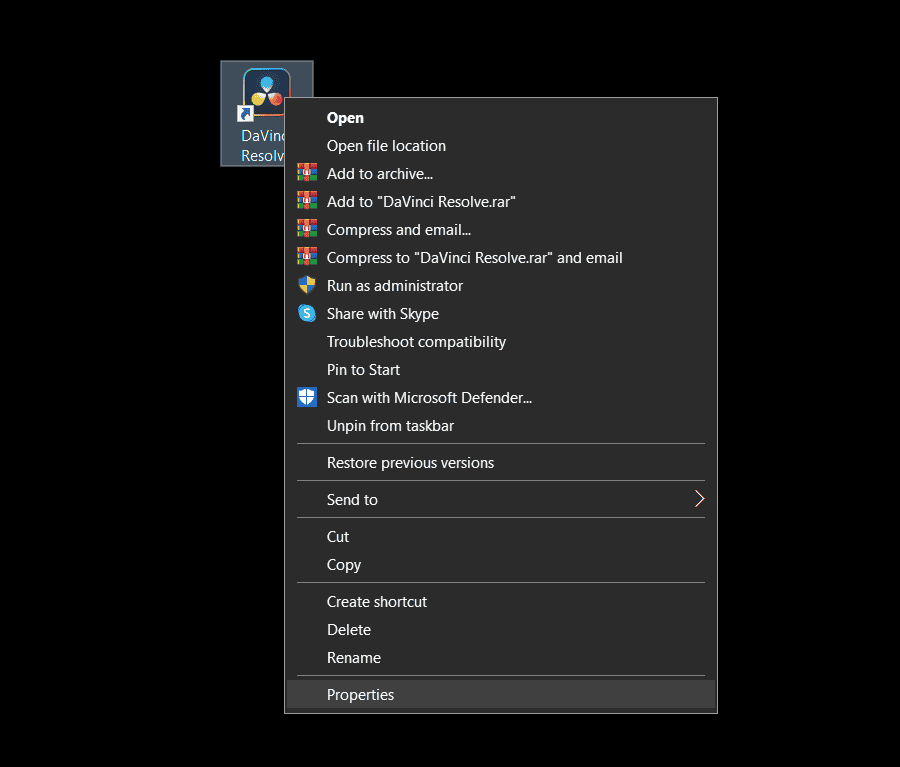
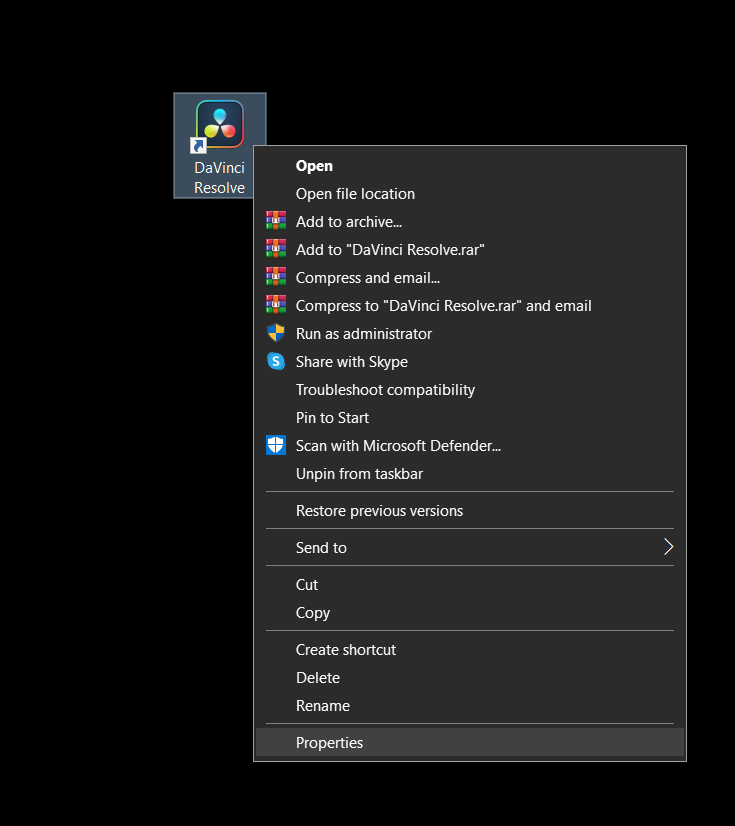
- Right-click on the DaVinci Resolve shortcut on your desktop and select Properties.
- Under the Target field, you will see the current path for DaVinci Resolve.
- In this field, paste the following command:
- C:\Windows\System32\WindowsPowerShell\v1.0\powershell.exe -WindowStyle Hidden “$Env:QT_ENABLE_HIGHDPI_SCALING=0;start ‘C:\Program Files\Blackmagic Design\DaVinci Resolve\Resolve.exe'”
- Make sure to replace the path to DaVinci Resolve with your computer’s path to Davinci Resolve.
- Click Apply and then OK to close the properties window.

D. Verifying the Solution
Now, if you open DaVinci Resolve using this modified shortcut, you’ll notice that the splash screen appears smaller. Once inside the edit page, you’ll regain the ability to use dual viewers even with the Inspector open.
Fix #4: Correcting Font Size and User Interface Issues in DaVinci Resolve
A. The Issue
Some users may encounter issues with the font size or the user interface, particularly the elements appearing too small or too large.
B. The Solution: Changing DaVinci Resolve’s DPI Settings
- Right-click on the DaVinci Resolve Shortcut: You’ll probably find this on your desktop. Right-click on the icon, and in the menu that pops up, click on ‘Properties’.
- Navigate to the Compatibility Tab: Once the properties window opens, you will see several tabs. Click on the one that says ‘Compatibility’.
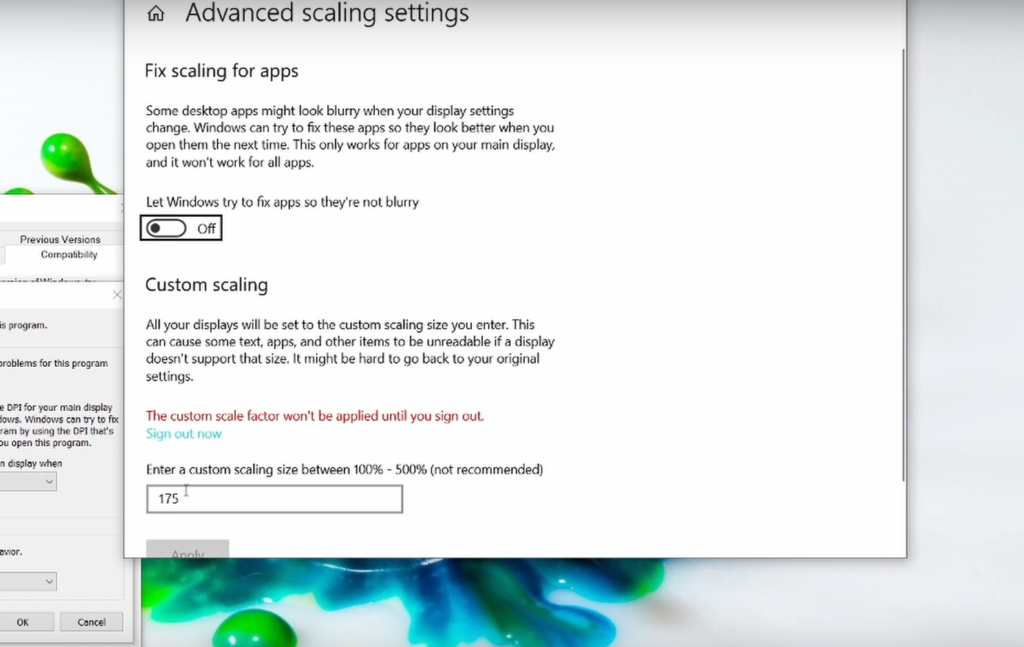
- Change High DPI Settings: Within the Compatibility tab, find the button that says ‘Change high DPI settings’ and click on it. This will open a new window with several options related to your software’s DPI settings.
- Program DPI: In this window, Check the box that says ‘Use this setting to fix scaling problems for this program instead of the one in Settings’ and ensure ‘System’. Click on ‘Open Advanced Scaling Settings.’
- Adjust Advanced Scaling Settings: In this window, there’s a space to input a custom scaling size. If the interface is too small, you might want to set it to 175%. Conversely, if the interface is too large, you might want to lower this value. Apply the changes.
C. Verifying and Fine-Tuning the Solution
It is best to restart your computer at this point. After your system restarts, open DaVinci Resolve. The splash screen should now appear larger, indicating that the changes have taken effect. Once the program loads, you’ll see that the interface elements and fonts are larger and easier to read, making your editing process smoother.
However, you might find the new scale too large. In that case, simply repeat the steps above, but this time, enter a lower value in the advanced scaling settings. This process might take a few tries to get the perfect scale for your needs.
D. Additional Customization Tips for an Optimal User Interface
While DaVinci Resolve does not provide a built-in option to change the font size or background directly, you can still adjust the background color to reduce contrast and make the interface easier on the eyes. To do this, go to ‘DaVinci Resolve’ > ‘Preferences’. In the ‘User’ > ‘UI Settings’ section, check ‘Use grey background in viewers’ and ‘Use grey background in color viewers’.
Make sure to explore the preferences section, as it contains many options that can enhance your working experience with DaVinci Resolve. For example, enabling the ‘automatically load the last project you were working on’ option can save you time, especially if you’re working on a long-term project.
Last Words
I truly appreciate the time you’ve taken to read this blog post. Your continuous support and interest in our content is what keeps us going. I hope you found this information valuable and that it helps you navigate your DaVinci Resolve experience more smoothly. Stay tuned for more insightful posts in the future. Thank you again for reading!