Hi, I’m Salik, the author of FilmmakingElements.com. I have been a filmmaker for over 10 years. I am also a certified DaVinci Resolve Trainer and I have used DaVinci Resolve for many of my projects. Today, we delve into the fascinating world of Look-Up Tables (LUTs) – specifically, the Kodak 2383 LUT in DaVinci Resolve. We will share two methods on how to use Kodak 2383 LUT in Davinci Resolve.
Before we discuss the Kodak 2383 LUT, did you know that DaVinci Resolve is home to 12 built-in film print emulation LUTs? If you’re an experienced user, you’ve likely explored these already. But for beginners or those just venturing into the world of LUTs, this fact may come as a surprise. Rest assured, these high-quality LUTs are part of the DaVinci Resolve software package and can significantly enhance your editing process.
Among the dozen film print emulation LUTs, six variants are of the Kodak 2383.
Applying a film print emulation LUT in DaVinci Resolve differs from adding a standard creative LUT. Since these LUTs are designed for a specific input, it’s crucial to ensure you’re providing the appropriate feed. Otherwise, your final result may not appear as expected.
Method 1: Using Kodak 2383 in DaVinci Resolve with Color Space Transform
The process of using the Kodak 2383 LUT in DaVinci Resolve can be a rewarding journey into the nuanced world of color grading. However, to truly unlock the potential of this cinematic tool, understanding and correctly implementing it is crucial. This in-depth guide provides a comprehensive step-by-step process to help you navigate this journey.
Step 1: Understanding Kodak 2383
Before embarking on the practical application of the Kodak 2383 LUT, it’s essential to establish a foundational understanding of this tool. Kodak 2383 is more than just a film print; it’s a piece of cinema history that continues to influence contemporary filmmaking.
In the traditional film process, movies captured on film stock are scanned digitally and then printed onto Kodak 2383 film stock for projection in theaters. This process, known as film print emulation, imparts a distinctive aesthetic to the footage that is widely recognized and appreciated.
Though digital projection has largely replaced film projection in modern theaters, the Kodak 2383 aesthetic is still in demand. Known for its vibrant colors, deep blacks, neutral highlights, and a distinctive filmic style, the Kodak 2383 look adds a classic cinematic charm to footage. Its continued popularity is a testament to its timeless appeal.
Step 2: Preparing Your Clip
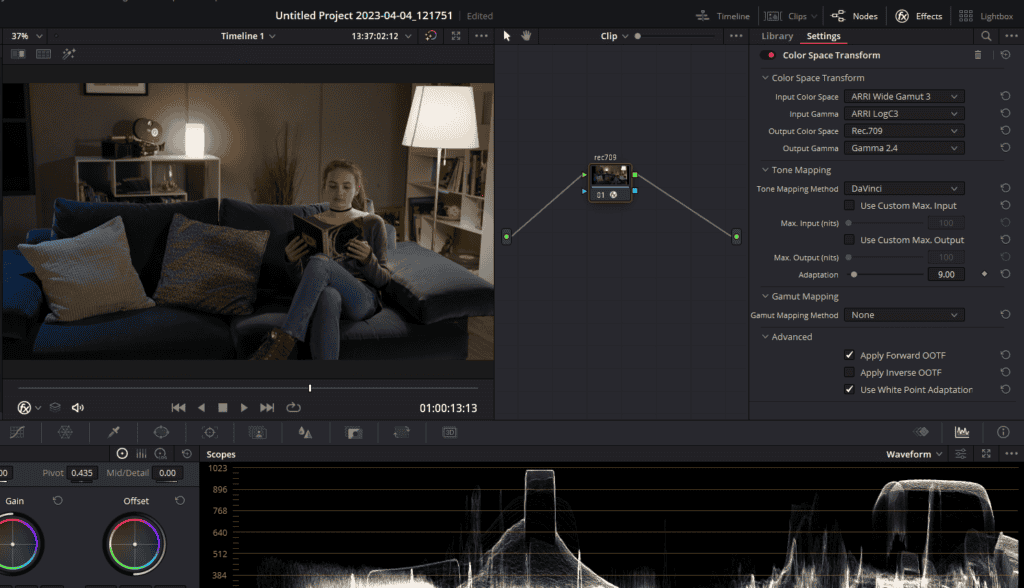
The journey to achieving the Kodak 2383 look begins with preparing your footage. Suppose your clip was shot using an Arri Alexa camera in Arri LogC. Your first task is to convert this footage into a more standard color space – Rec709. Put the clip on the timeline and move to the Color page of Davinci Resolve.
You need to apply a color space transform to the last node in your color grading node tree. For simplicity, let’s name this node “Rec709.” To name a node, right-click on it and select Node Label:
- Navigate to the ‘Effects’ panel in DaVinci Resolve by clicking on the Effects button on the top right corner.
- Search for the ‘Color Space Transform’ effect.
- Drag and drop this effect onto your “Rec709” node.
- In the Input Color Space, select Arri Wide Gamut, and in Input Gamma, choose Arri LogC3.
- In the Output Color Space choose Rec.709 and in the Output Gamma, choose Gamma 2.4.
After applying these changes, take a moment to compare the before and after shots. This will help you appreciate the transformation that has occurred and better understand the role of color space transformation in the grading process.
Step 3: Identifying Common Mistakes
A common pitfall that many inexperienced Davinci Resolve users stumble into is applying the LUT directly to footage that has been converted to Rec 709. This often results in undesirable aesthetic consequences such as crushed blacks and blown-out whites.
Why does this happen? The answer lies in the nature of these LUTs. They are designed with a specific input in mind – scanned film footage. This type of footage exists in a color space gamma known as Cineon Film Log, which is different from Rec709.
Step 4: Properly Applying the LUT
To apply the LUT correctly, you must ensure that your footage matches the LUT’s expected input color space. This requires a second color space transformation.
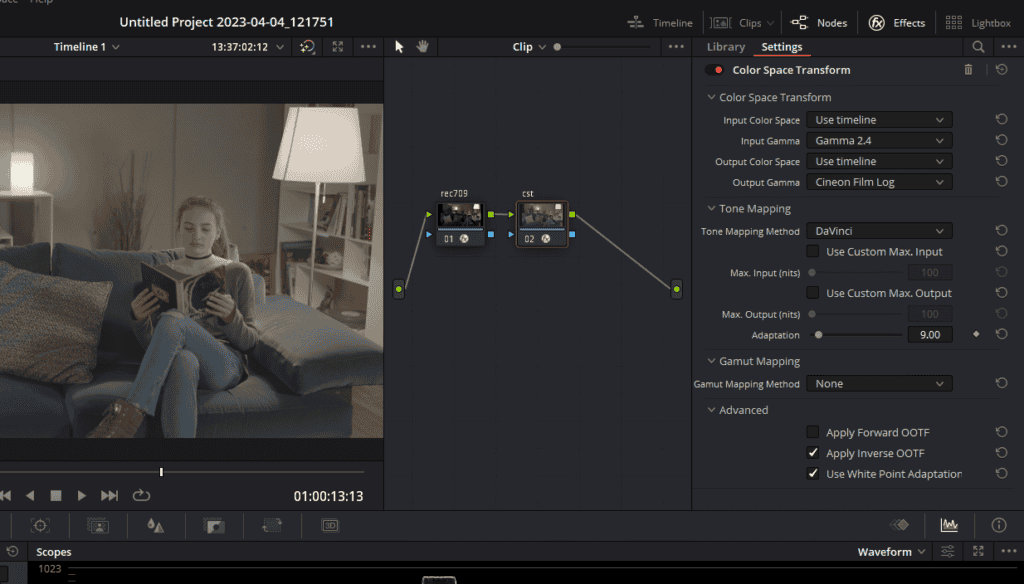
- Begin by creating a new node. To create a node, you can use the shortcut (Alt+S on Windows, Option+S on Mac). Name it “CST” (Color Space Transform).
- Go back to the ‘Effects’ panel on the top right corner and drag the ‘Color Space Transform’ effect onto your “CST” node.
- Change the Input Gamma to Gamma 2.4 and Output Gamma to ‘Cineon Film Log.’
Now, your footage has been transformed from Rec 709 to Cineon Film Log. You’re ready to apply the Kodak 2383 LUT.
Step 5: Adding the LUT
To apply the LUT, you’ll create another node specifically for this purpose. Follow these steps:
- Create a new node in your node tree.
- Name this node something descriptive, like “Kodak LUT,” to keep your workflow organized.
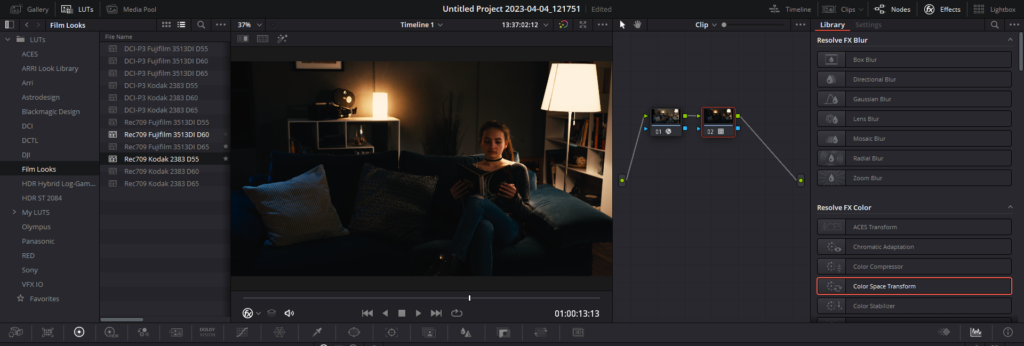
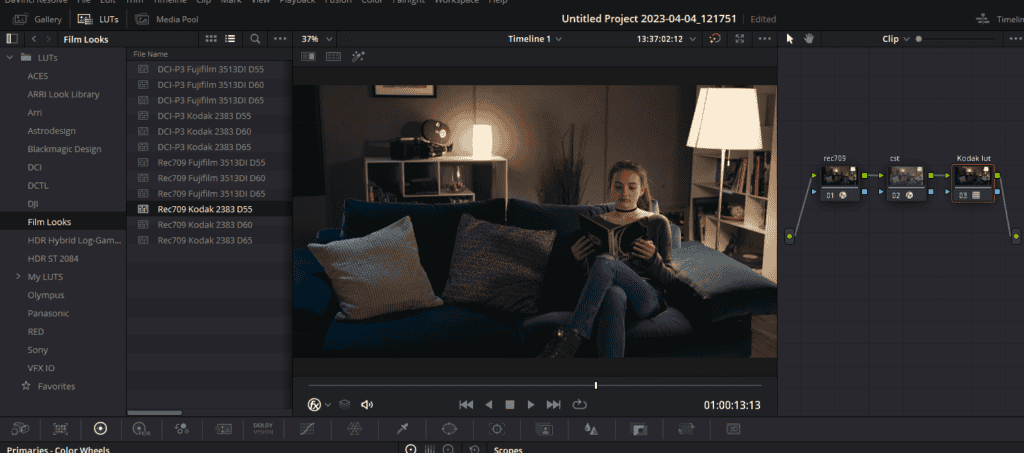
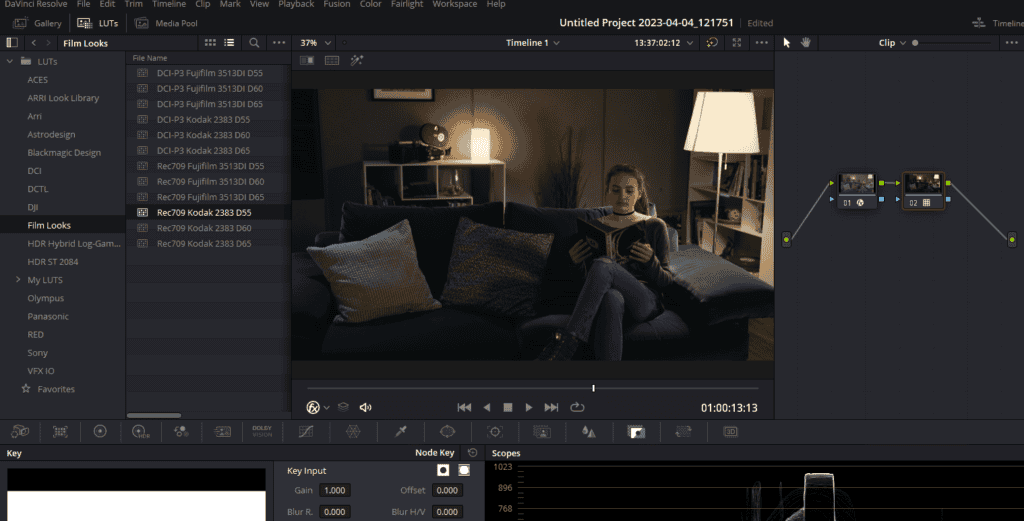
- Navigate to your LUTs by clicking on the LUTs button in the top left corner.
- Select Film Looks from the menu on the left. This is the default location of the Kodak 2383 LUTs.
- Select and double-click the Rec709 Kodak 2383 D55, known for being the warmest version.
- Apply this LUT to your newly created node.
- You can also use the D60 and D65 variants.
After performing these steps, take another moment to compare the before and after shots. This will give you an understanding of the dramatic change that the LUT has imparted onto your footage.
Step 6: Adjusting the LUT Intensity
At this point, you might feel that the effect of the LUT is too intense. It’s not uncommon to want to dial back the effect to achieve a more subtle look. However, it’s essential to approach this step correctly to avoid common mistakes.
Here’s the correct way to adjust the LUT intensity:
- Begin by highlighting the “CST” node and the node with the LUT on it.
- Right-click and select “Create Compound Node.” This action combines these two nodes into one, allowing you to control their combined effect.
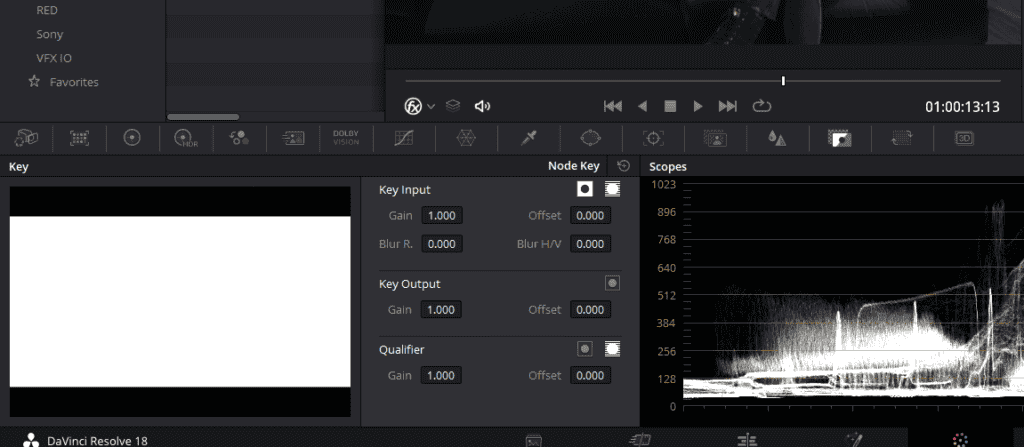
- To modify the intensity of the Kodak LUT you’ve applied, you will need to use the Key panel. You can find this panel situated underneath the viewer.
- In the Key panel, seek out the section labeled “Key Output.” Within this area, you’ll find a setting called “Gain.” This control allows you to alter the intensity of your applied LUT.
- Manipulate the Gain by moving its slider. You can pull it left to reduce the intensity or push it right to increase it.
Step 7: Finalizing Your Grade
After applying and adjusting the LUT, you’re almost done. However, you might still want to make further adjustments to your footage. This could involve changing the exposure, balancing the shot, or making other tweaks to perfect your image.
Important to note is that any additional changes should be made on the nodes before the conversion. This is because these nodes still operate in the original color space of your footage, allowing for more accurate adjustments.
Method 2: Using Kodak 2383 in DaVinci Resolve with ACES Transform
DaVinci Resolve is renowned for its powerful color grading and correction capabilities, making it a preferred choice for many professional filmmakers and colorists. An advanced tool like the ACES Transform OFX plugin can further enhance the capabilities of this software, particularly when working with film print emulation LUTs like the Kodak 2383.
Step 1: Setting Up Your Nodes
Initiate this process by setting up your node structure on the color page of DaVinci Resolve. For this guide, we’ll be working with two nodes. If you’re new to Davinci Resolve, nodes are akin to layers in other software, allowing you to stack different effects and corrections. To create a node, you can use the shortcut (Alt+S on Windows, Option+S on Mac).
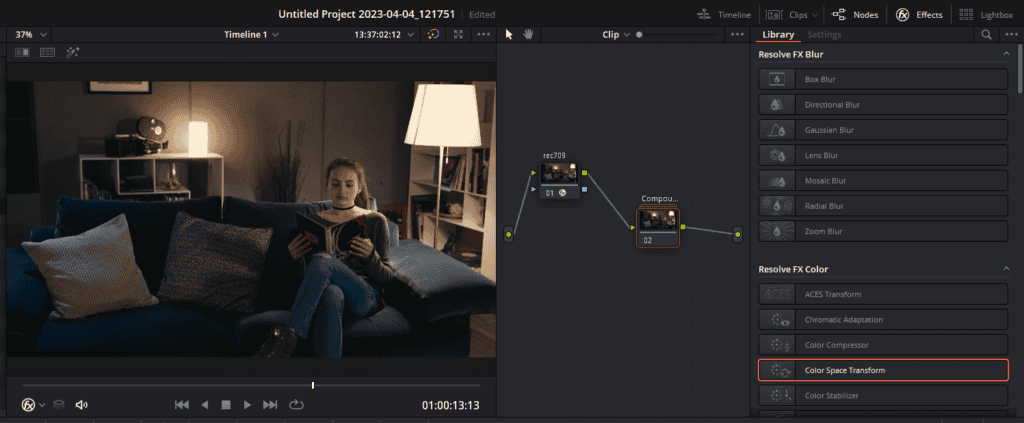
Step 2: Applying ACES Transform
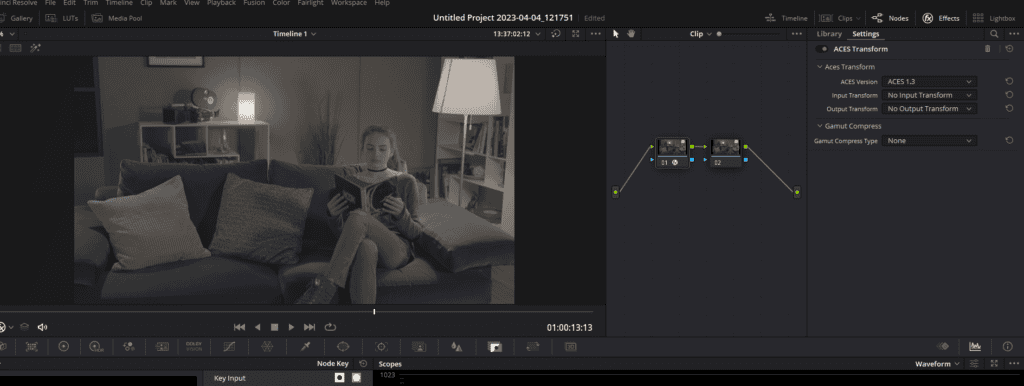
In the first node, apply the ACES Transform OFX. You can locate this effect by clicking on the ‘Effects’ button on the top right corner and searching for “ACES Transform.” Once you’ve found it, simply drag and drop the effect onto the first node.
The ACES Transform allows you to convert your footage from one color space to another without the need for working in the ACES color space. For this guide, we’ll be converting from ARRI LogC3 to the Academy’s ADX 10 color space. This color space has a similar encoding to Kodak’s Cineon Log, making it suitable for our Kodak 2383 LUT.
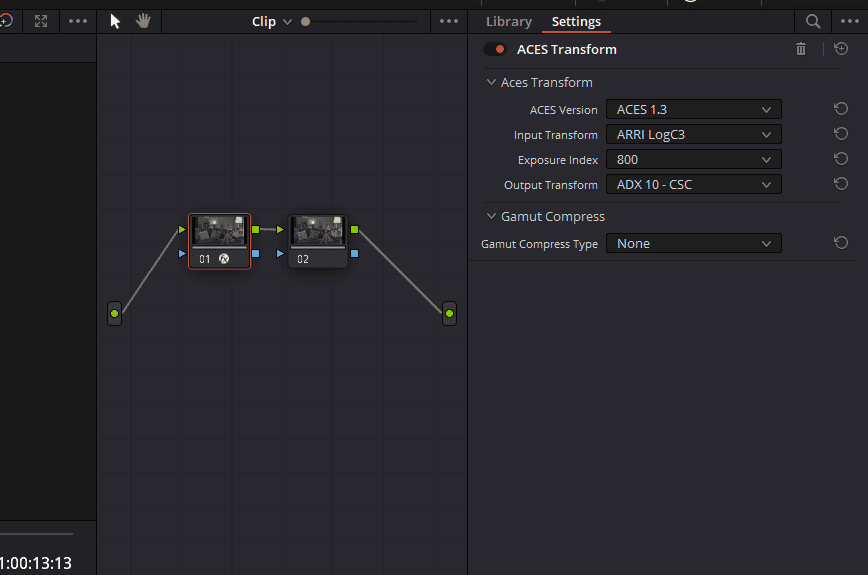
- Click on the node with ACES Transform
- In the Input Transform, select, Arri LogC3
- In the Output Transform, select, ADX 10- CSC
It’s crucial to note that we’re only using the ACES Transform for the input transform. We’ll leave the display transform to be handled by the Print Film Emulation (PFE) LUT, which we’ll apply later.
Step 3: Applying the PFE LUT
Having converted our footage to ADX 10 color space, we can now apply the Kodak 2383 LUT.
- Select the second node you created (make sure it’s the last node of your node tree)
- Click on the LUTs button, located in the top left corner.
- Click on Film Looks from the menu on the left.
- Double-click on the Rec709 Kodak 2383 D55
This LUT is designed to work with a film negative that carries a Cineon tone curve. Add this LUT at the end of your node structure to allow it to handle the display transform of your image.
Step 4: Applying Gamut Compression
Before finalizing the grade, there’s one last crucial step – applying gamut compression. This step ensures that any out-of-gamut values that may have resulted from the ADX 10 color space transformation do not get clipped. This process helps maintain the integrity of your image, preserving all the data and ensuring a smooth, clean look.
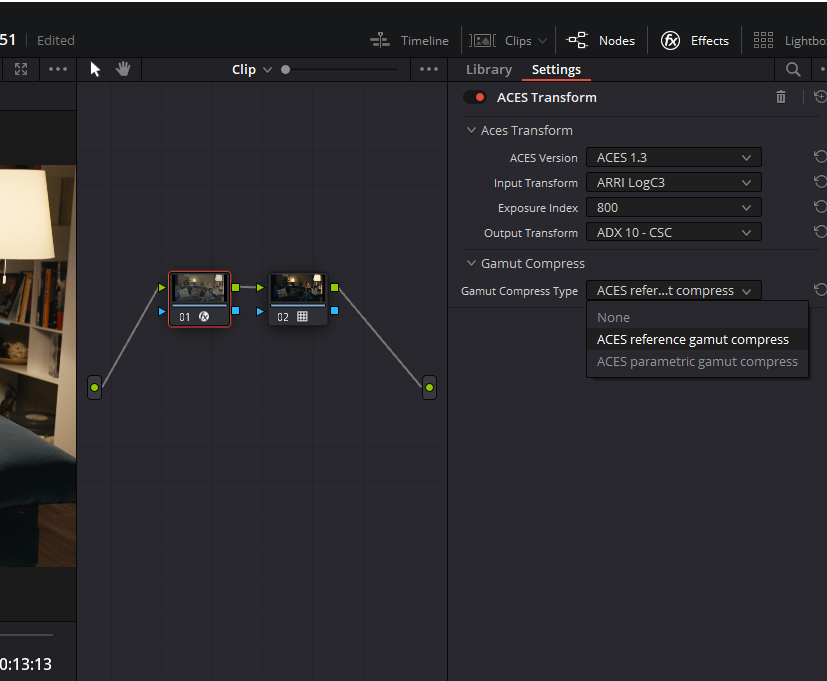
- To apply gamut compression, click on the node with ACES Transform.
- Choose, ACES reference gamut compress from the Gamut Compress Type drop-down menu.
As we wrap up this in-depth exploration of using Kodak 2383 LUT in DaVinci Resolve, I want to extend a sincere thank you for taking the time to read through this blog post. I truly appreciate your interest and dedication to expanding your filmmaking and color grading knowledge.
Whether you’re a seasoned professional or a passionate amateur, I hope you found these insights helpful in enhancing your creative process. Remember, the magic of filmmaking and post-production lies in the exploration of new techniques and the continual honing of your craft.
Please continue to visit us for more valuable tips, guides, and discussions on filmmaking elements. Your journey to mastering the art and science of filmmaking is ongoing, and we’re here to support you every step of the way.
Once again, thank you for reading. Keep experimenting, keep learning, and most importantly, keep creating!