Hi everybody! Welcome Back! This article tells you everything you need to know about How to Color Grade Sony S-log3 and HLG In Davinci Resolve.
So this tutorial is dedicated to all the filmmakers who are grinding and cannot afford those costly cinema camera setups for their indie film projects but want cinematic quality to the footage.
Now Sony has been releasing top-of-the-line cameras for indie filmmakers that shoot professional-quality videos and are even better for photography. Sony has been improving on its color science, but no article on the web talks about leveraging the data captured by the sensor.
By the end of this tutorial, you will learn how to grade Sony S-log3 and HLG and not depend on any LUTs for your color grading projects.
How To Color Grade Sony S-log3 (PP8 and PP9) In Davinci Resolve Using Color Space Transform
We all know that Sony S-Log3 is filmmakers’ most used color space when shooting on a Sony camera. Now the place where most of you guys are confused is which color space is better when shooting S-log, PP8([S-Gamut3.Cine) or the PP9(S-Gamut3).
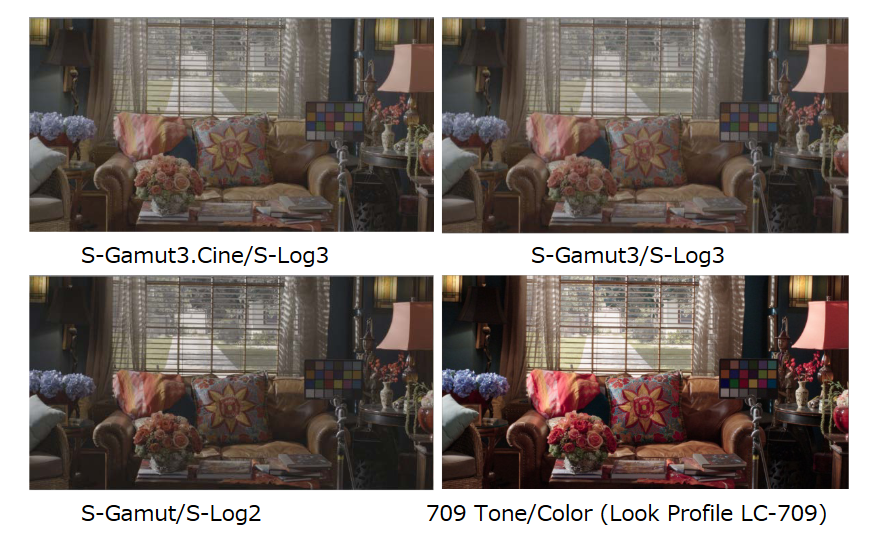
S-Gamut3.Cine, which is PP8 on Sony Cameras, is a gamut similar to that of film negatives used by T.V productions when shooting on film was a thing, hence the name has “.cine.”
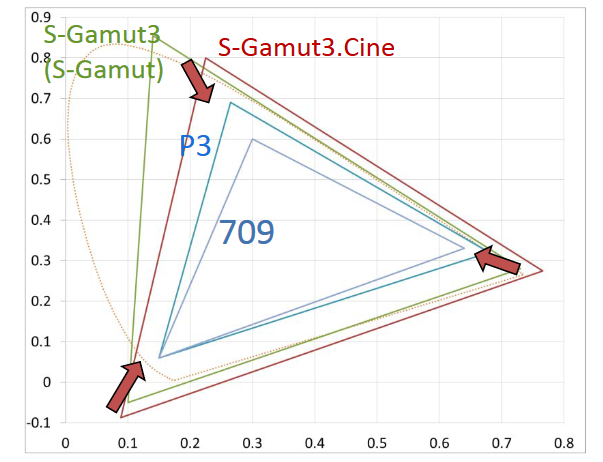
Whereas S-Gamut3 is concerned, which is PP9 on Sony Cameras, it uses a camera native wide color space which is a bigger gamut than PP8 and can be suitable for archiving.

Both the S-log, PP8, and PP9 picture profiles use an S-log 3 gamma curve similar to the Cineon curve and give more stops of dynamic range than S-log2.
Which profile to use is your personal preference, do tests and see which one suits you best. I love the results of S-Gamut3.Cine. Now coming to the steps on how to color grade S-log3:
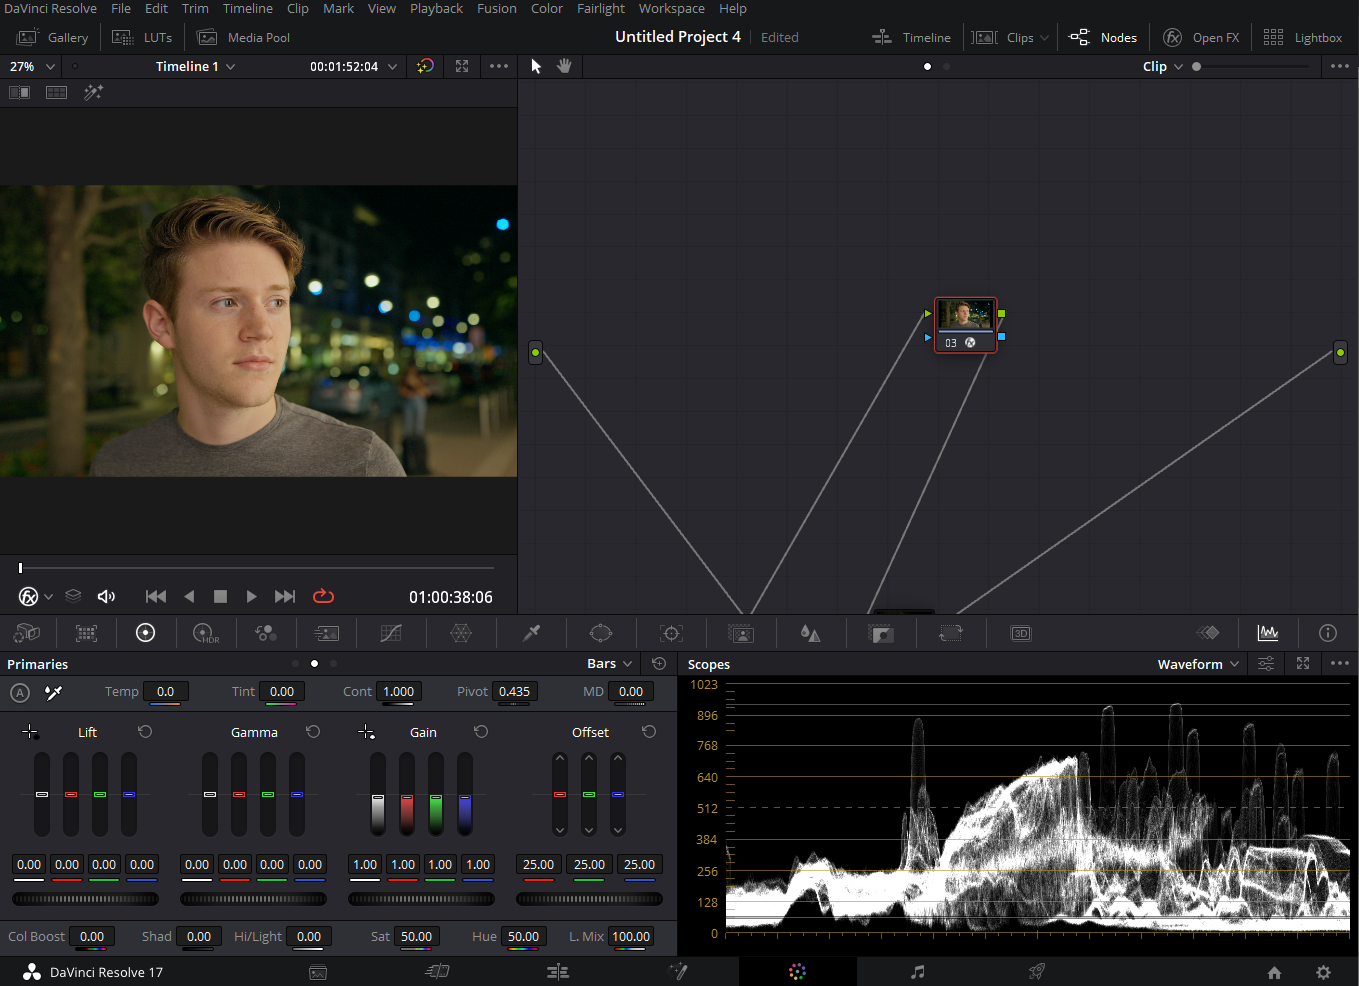
- After you are done editing, go to the color page
- From the top-right corner, click on “Effects.”
- Scroll down, click and drag “Color Space Transform” onto a node
- In “Input Color Space,” choose “Sony S-Gamut3.Cine,” if using the PP8 S-log3 profile.
- If using PP9 S-log3 profile, in “Input Color Space,” choose “Sony S-Gamut3.”
- Choose “Sony S-Log3” in “Input Gamma“
- Select “Rec.709” in “Output Color Space“
- Select “Gamma 2.4” in “Output Gamma.”
- In “Gamut Mapping Method,” select “Saturation Compression.”
- Make sure you put this node at the end of your node tree and do creative and secondary grading before it.

Remember that your Output color space and gamma can vary depending on what display technology you deliver. For example, it can be “P3-DCI” and “Gamma 2.6” when delivering for projection in theaters.
Creating the Subjective Look with Serial Nodes and Tools
After you’ve set up your color space and gamma in Davinci Resolve, the next step is diving into the artistry of color grading. For this, you’ll want to make use of serial nodes and various tools available in Davinci Resolve to give your footage a unique and compelling look. Here’s how to proceed:
- Adding Serial Nodes: Before your final node where you’ve applied the “Color Space Transform,” create several serial nodes. This is crucial because it allows you to separate your grading tasks into different steps, making adjustments easier to manage and fine-tune.
- Basic Corrections: Use the first serial node for basic corrections. Here you can adjust exposure, contrast, and saturation to set the base for your creative grading.
- Temperature and Tint: In another serial node, use the “Temperature” and “Tint” controls to correct any color imbalances and to set the mood of your scene.
- Lift, Gamma, Gain: On the next node, you can make more precise adjustments to the shadows, midtones, and highlights using the Lift, Gamma, and Gain wheels. This is where you can fine-tune the look of your image and give it a specific tone.
- Secondary Grading: In additional nodes, focus on secondary grading tasks like enhancing skin tones, adding masks, or isolating specific colors for enhancement or correction.
- Special Effects: If your project calls for it, use another serial node to add any special effects like lens flares, vignettes, or grain.
- Final Tweaks: Before your last node where you have the “Color Space Transform,” use another serial node for any last-minute tweaks. This could include overall saturation adjustments, fine-tuning the contrast, or adding a final color boost.
Color Grading S-log3 in ACES-Davinci Resolve
Now that more and more people are getting to know about ACES workflow. A lot of people want to try it out! So why should you not? ACES is not just a color management system, but your project will be future-proof if you choose to work in it.
ACES is a color management standard introduced by OSCAR to standardize a color space throughout the film industry, whether the VFX department or color grading, for a smoother and more efficient pipeline.
It is a massive color space, so if you are delivering a project in SDR and in the future, the client comes back to you and says he wants the same project in HDR, all you have to do is change a setting, and ACES will do the complex job in a blink. Don’t worry; I am going to tell you how to color grade Sony S-log3 (PP8 & PP9 both) in ACES workflow:
- Click on the gear-looking icon on the right bottom corner to open “Project Settings.”
- You can also do the same by clicking on File and selecting “Project Settings” from the top left corner.
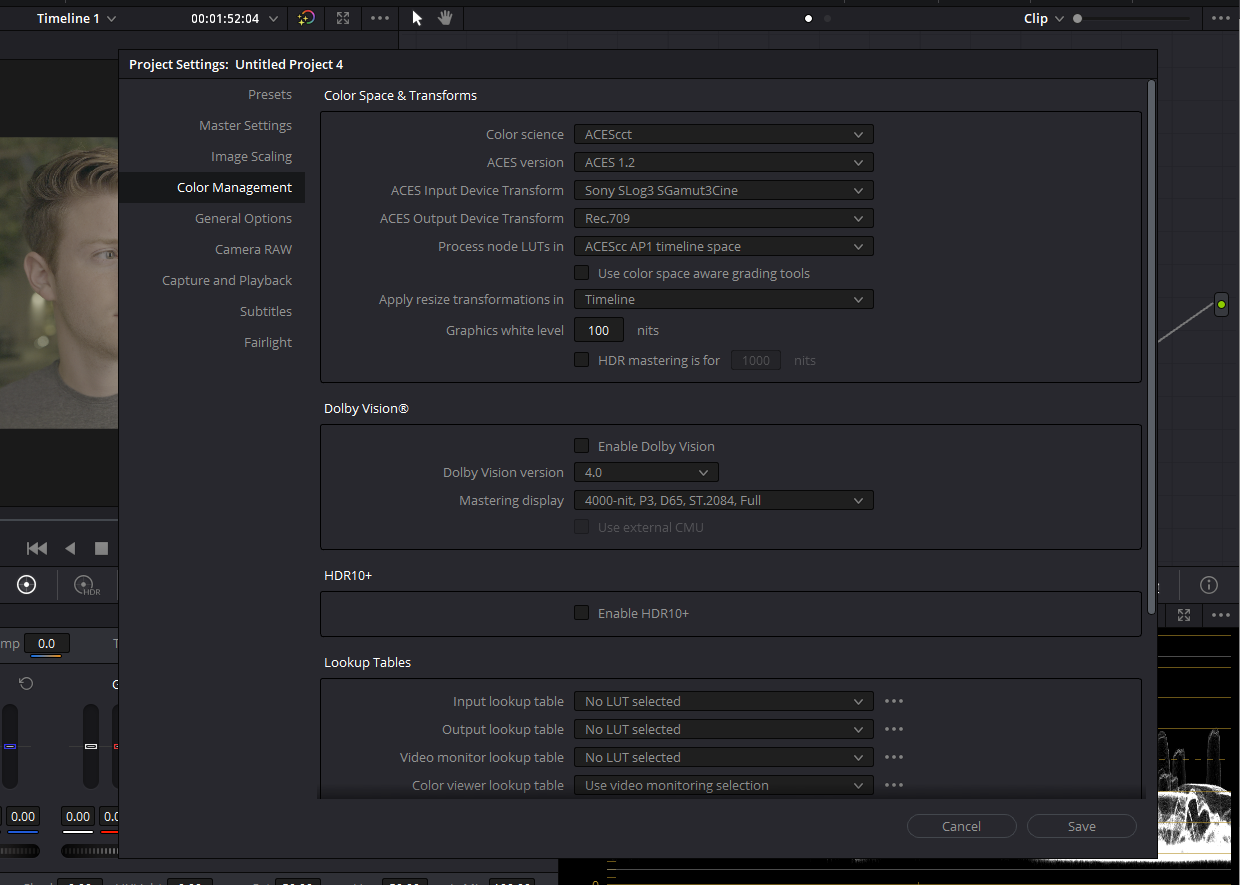
- As we know, ACES is a color management system; select “Color Management” from the left menu.
- In the “Color science” drop-down menu, choose ACEScct
- You can also use ACEScc, but ACEScct has better black values.
- Choose the latest version you have from the “ACES version” drop-down menu.
- Always use the latest Davinci Resolve for using the latest color spaces and leverage it the best.
- In “ACES Input Device Transform,” choose “Sony SLog3 SGamut3Cine” if using PP8 Sony Profile.
- In “ACES Input Device Transform,” select “Sony SLog3 SGamut3” if using PP9 Sony Profile.
- Inside “ACES Output Device Transform,” select “Rec.709.”
- You can change this setting according to the display you are delivering for.
- Hit Save
- Use multiple serial nodes for tasks like basic corrections and color balancing with Temperature and Tint and creating a subjective look according to the project.
- Employ additional nodes for precise adjustments using Lift, Gamma, Gain, and for secondary tasks like skin tones and special effects.
Color Grading S-log3 Using Davinci Resolve Color Management
You’ll need to set up your color management settings.

- Open “Project Settings” and navigate to the “Color Management” tab.
- In the Color Science dropdown menu, choose Davinci YRGB Color Managed. Untick ‘Automatic color management’ In ‘Color Processing Mode’, choose “Custom” This will give you more advance options to control your workflow.
- Configure the Input Color Space for your S-Log3 footage by selecting “S-Gamut3.Cine/S-Log3” in the “Input Color Space.” For the “Timeline Color Space,” choose “Davinci WG/Intermediate.”
- Choose the appropriate Output Color Space for your project. The recommended option is usually “Rec.709 Gamma 2.4.”
- Click “Save” to apply your color management settings. You’re now ready to begin color grading your S-Log3 footage to enhance your project’s visual storytelling.
How To Color Grade Sony HLG (PP10) In Davinci Resolve
Sony’s PP10 uses HLG color space which can be a good alternative when delivering for HDR displays. Many indie filmmakers use HLG for SDR deliveries which is not the best use.
However, in this tutorial, I will teach how to color grade Sony HLG in Davinci Resolve; you can use my technique to even deliver in SDR format. I am not a big fan of using the HLG workflow because my clients only demand an SDR version on the color grade.

HLG stands for Hybrid LOG GAMMA; you must understand that this color space was never meant to be used by the camera sensor to capture data. Instead, it is an HDR standard and format developed by the BBC (British Broadcasting Corporation) to display HDR content. It is just like Dolby Vision.
Follow these steps to grade Sony HLG In Davinci Resolve:
- After completing your edit go to the color page
- Select a node and click on “Effects,” situated on the top right corner.
- Search for “Color Space Transform” and drag it onto a node.
- In “Input Color Space,” choose “Rec.2020.”
- You can also select “Rec.2100.”
- In “Input Gamma,” choose “Rec.2100 HLG.”
- In “Output Color Space,” select “Rec.709.”
- Inside “Output Gamma” choose “Gamma2.4.”
- Output gamma will differ if you are delivering for HDR.
- Keep this node at the end of your node tree.
- Also, you need a display that supports HLG format to display the data correctly, which is shot on Sony HLG.
Creating the Subjective Look with Serial Nodes and Tools
After configuring your color space and gamma in DaVinci Resolve, the creative realm of advanced color grading awaits you. Below is a streamlined guide on how to build a captivating visual story:
1. Implement Serial Nodes:
Before inserting your final “Color Space Transform” node, create multiple serial nodes. This layered approach helps in breaking down your grading tasks, making each step easily adjustable.
2. Fundamental Corrections:
In the first serial node, tackle basic corrections. Adjust key elements like exposure, contrast, and saturation to set a strong foundation for creative grading.
3. Nuanced Adjustments:
Move to subsequent nodes for more refined tweaks. Utilize tools like “Temperature” and “Tint” for color balance, and work with “Lift, Gamma, Gain” wheels for meticulous control over shadows, midtones, and highlights.
4. Secondary Grading & Artistic Touches:
Employ additional nodes for specialized tasks such as skin tone enhancement, color isolation, and mask addition. If your project demands, introduce artistic flares like lens effects or vignettes.
5. Finalizing the Grade:
Before reaching your terminal “Color Space Transform” node, allocate one last serial node for last-minute adjustments. This could include global saturation tweaks, contrast fine-tuning, or a last dash of color enrichment.
ACES workflow to color grade Sony HLG In Davinci Resolve
ACES workflow to color grade is straightforward and does not require you to be a rocket scientist. Though I have already said it, I will repeat it again. It’s best to use the PP10(HLG) color space only when delivering HDR content.
You can also use the standard Sony S-log3 (PP8 or PP9) color space to deliver HDR content. The best-suited workflow for HDR deliverables is working in the ACES workflow. Follow these steps:
- Go to “File,” select “Project Settings” from the top left corner.
- Select “ACES 1.2” or “ACES 1.3“. Choose the latest one your Davinci Resolve has.
- In “ACES Input Device Transform,” choose “Rec.2020 HLG (1000 nits).”
- In “ACES Output Device Transform,” choose “Rec.709.”
- Make sure “ACEScc AP1 timeline space” is selected in “Process node LUTs in“
- Hit Save.
This workflow will change your Sony HLG to Rec.709 and give you a good starting point color grade. Using your primary wheels and secondary tools, you can work on the creative color grading according to the project demands.
Also, it’s very typical if your Primary Wheels do not behave normally. In ACES, your Primary Grading tools will act differently. The grading tools behave more linear, and some people have a hard time getting used to it. If you too don’t like how your tools behave, follow these steps:
- Right-click on a node.
- In “Color Space,” choose “Rec.709.”
- In “Gamma,” select “Gamma 2.4.”
Color Grading Sony HLG Using Davinci Resolve Color Management

Here are the steps to color grade Sony HLG footage using Davinci Resolve Color Management:
- Click on the gear-looking icon in the bottom right corner to open the “Project Settings” panel.
- Navigate to the “Color Management” tab.
- In the “Color Science” dropdown menu, select “Davinci YRGB Color Managed.”
- Choose “Custom” in the “Resolve Color Management Preset” dropdown menu.
- Click on the check box which says “Use Separate color science and gamma.”
- In the “Input Color Space” first box, select “Rec.2020” as the color space.
- In the second box, select “Rec.2100 HLG” as the gamma.
- For “Timeline Color Space,” select “Davinci WG/Intermediate.”
- Choose “Rec.709 Gamma 2.4” as the Output Color Space for your project.
- Hit “Save.”
- Start creating a visually appealing look that enhances the storytelling of your project using the provided starting point.
Conclusion
There is no doubt why Sony cameras are famous among indie filmmakers. It is not only used in indie films but also high-end commercials. Knowing how to color grade Sony S-log3 and HLG not only makes your projects look good but also increases your monetary value.
I hope this article is super helpful and you enjoyed your free LUT pack. Thanks for reading!