Welcome back to FilmmakingElements.com, this is Salik, the author of the blog. In this article, we will delve into the world of Frame Blending in DaVinci Resolve, a method used for Frame Interpolation. With over 10 years of experience in filmmaking and as a certified DaVinci Resolve Trainer, I have utilized DaVinci Resolve for numerous projects, harnessing the power of Frame Blending to enhance the visual fluidity of my works.
Understanding Frame Blending for Frame Interpolation: A Primer
Frame Interpolation is a critical technique for achieving smooth slow-motion effects or handling footage with varying frame rates, especially in professional video editing platforms like DaVinci Resolve. Frame Blending, as a subset of Frame Interpolation, plays a pivotal role in this endeavor, ensuring smooth transitions between frames to create a visually pleasing motion.
What is Frame Blending?
Frame Blending is a technique employed to generate new intermediary frames between existing ones by averaging or blending the pixel values of consecutive frames. This process is essential when you’re looking to slow down your footage and desire a smoother, more natural motion, devoid of the usual jitter or choppiness that can occur with standard frame rate conversions.
Significance of Frame Blending in Frame Interpolation
Frame Interpolation encompasses techniques like Frame Blending and Optical Flow to create new frames in a sequence, thus smoothing out the motion in videos. While Frame Blending focuses on averaging pixel values, more advanced techniques like Optical Flow analyze the motion trends between frames to generate new intermediary frames. Understanding the nuances of Frame Blending is the stepping stone to mastering Frame Interpolation in DaVinci Resolve, allowing you to select the most appropriate method based on your project requirements.
Step-by-Step Guide to Frame Blending in DaVinci Resolve on the Edit Page
Frame Blending is an essential technique within the realm of Frame Interpolation, especially when you’re working with slowed-down footage and aim to achieve smoother, more fluid motion. DaVinci Resolve provides an intuitive platform for executing Frame Blending, ensuring that your visuals are not only captivating but also professionally polished. In this section, we’ll meticulously guide you through the process of applying Frame Blending on a clip level within the Edit page of DaVinci Resolve.
Preparing Your Workspace
Before delving into Frame Blending, ensure you have your project opened in DaVinci Resolve, with the clip you intend to work on already imported and placed on the timeline.
Navigating to the Edit Page
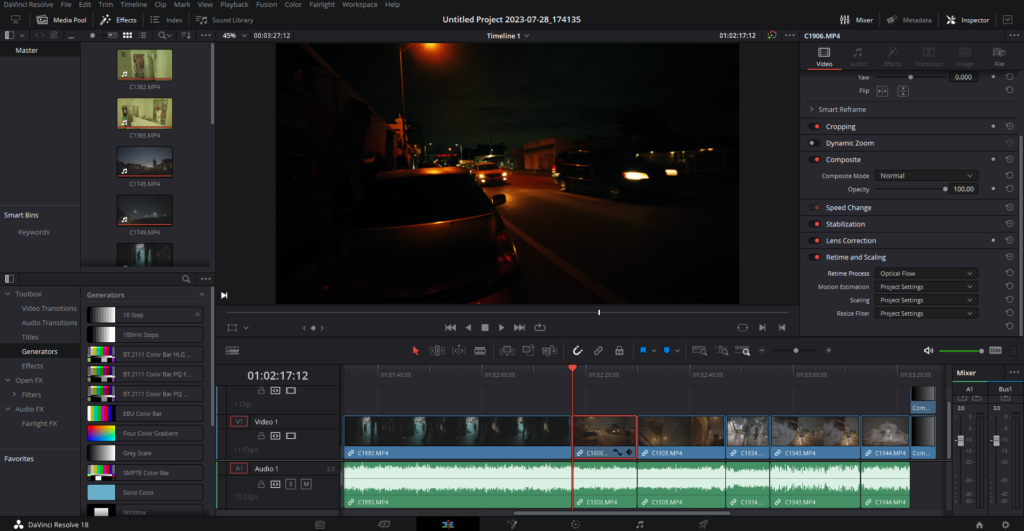
- Accessing the Edit Page: Begin by navigating to the Edit page of DaVinci Resolve. This can be done by clicking on the ‘Edit’ tab located at the bottom of the screen.
Selecting Your Clip
- Choosing the Desired Clip: Click on the clip on your timeline that you’ve slowed down or wish to apply Frame Interpolation to. It’s crucial to select the right clip to ensure the desired outcome.
Accessing Inspector Panel
- Opening the Inspector Panel: Once your clip is selected, proceed to click on the ‘Inspector’ button, which is situated in the top right corner of the interface. The Inspector panel is where you’ll find the settings necessary for Frame Blending.
Navigating to Retime and Scaling Settings
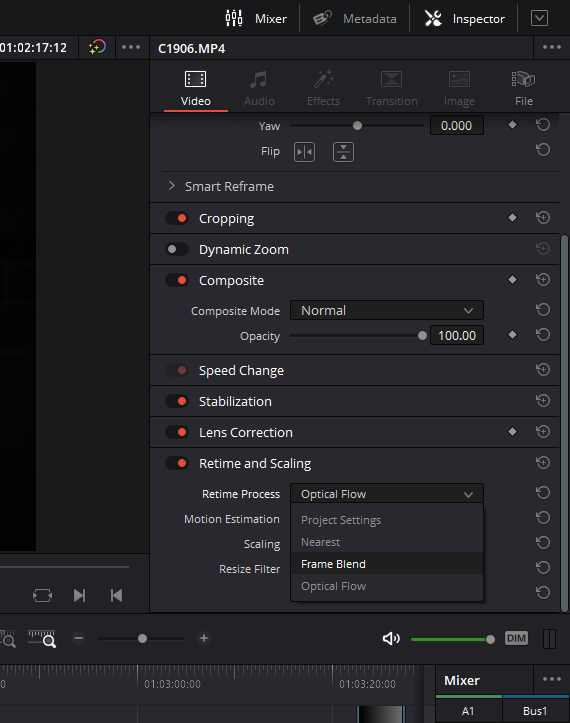
- Locating Retime and Scaling: In the Inspector panel, scroll down until you stumble upon the ‘Retime and Scaling’ section. This section houses the settings for Frame Interpolation techniques including Frame Blending.
Adjusting Retime Process Settings
- Selecting Frame Blend: Within the ‘Retime and Scaling’ section, locate the ‘Retime Process’ drop-down menu. Click on it to expand the menu, and then select ‘Frame Blend’ from the list of options.
Reviewing Your Work
- Evaluating the Output: After applying Frame Blending, play back your clip to observe the smoother motion achieved through this technique. Make any further adjustments if necessary to attain the desired visual fluidity.
Implementing Frame Blending on a Project Level in DaVinci Resolve
The versatility of DaVinci Resolve shines through its capability to apply Frame Blending not only on individual clips but across an entire project. This overarching approach ensures a consistent frame interpolation treatment to all clips necessitating such processing, thereby saving time and promoting uniformity in visual presentation. In this section, we will guide you through a meticulous procedure to activate Frame Blending on the project level, ensuring that every clip requiring frame interpolation will be seamlessly frame blended.
Setting the Stage for Project Level Frame Blending
Before embarking on the journey of project-level Frame Blending, it’s prudent to have your project ready and loaded in DaVinci Resolve. Ensure all the clips you intend to work on are properly imported and arranged on the timeline.
Accessing Project Settings
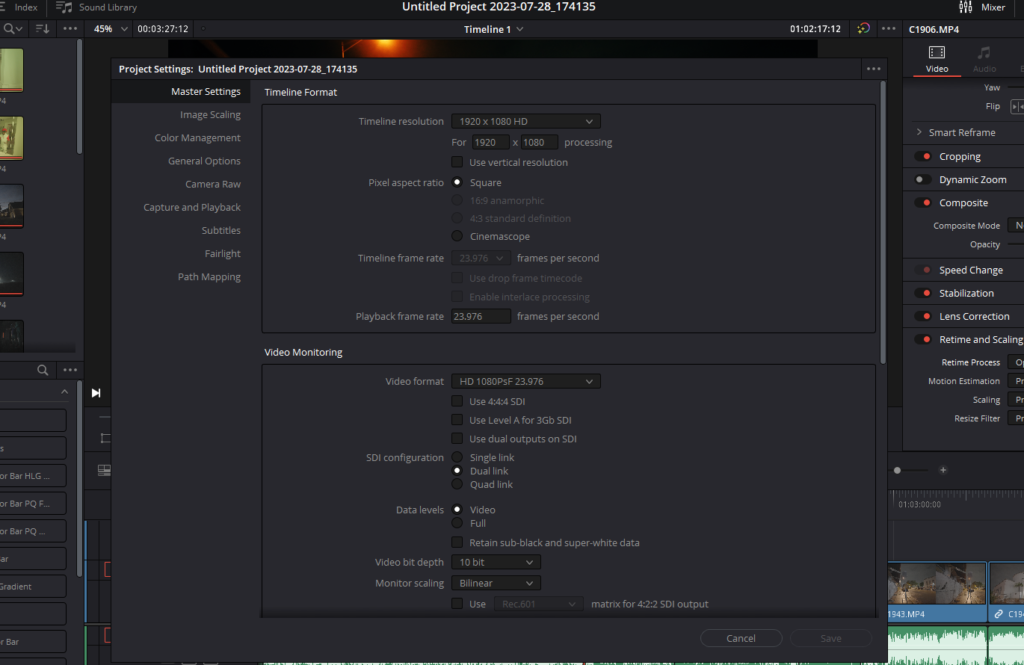
- Navigating to Project Settings: Kickstart the process by clicking on the Project Settings icon, which resembles a gear and is positioned at the bottom right corner of the DaVinci Resolve interface. This action will usher you into the comprehensive project settings realm.
Traversing to Master Settings
- Locating Master Settings: Within the Project Settings dialog, locate and select the ‘Master Settings’ tab. This tab encapsulates a wide array of project-wide configurations, paving the way to the Frame Interpolation section.
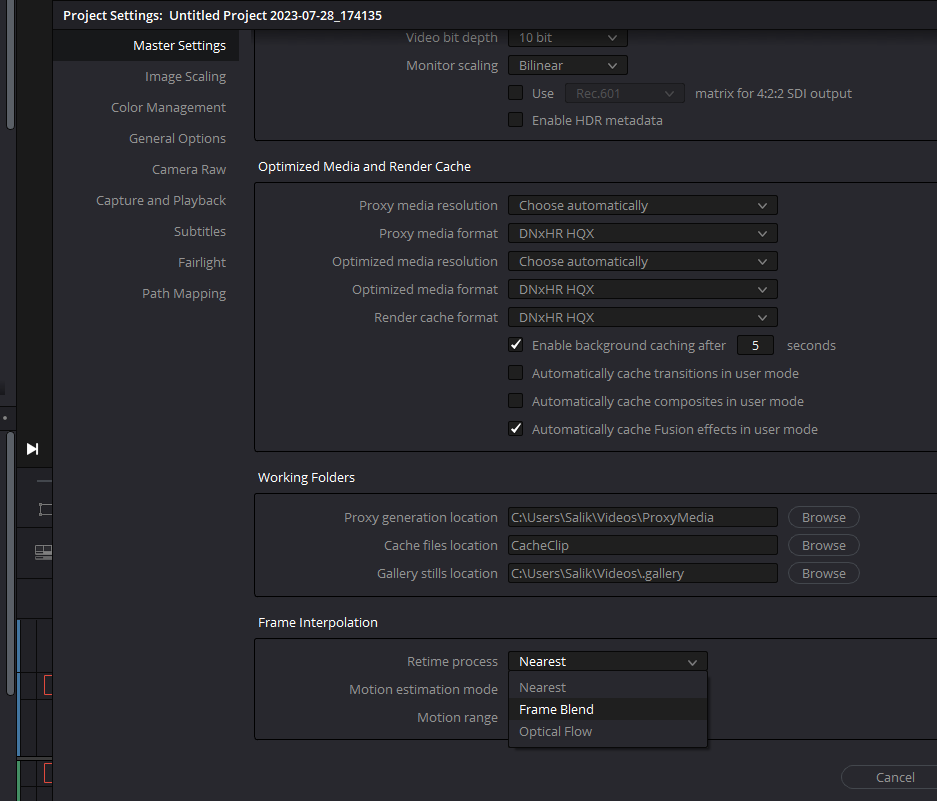
Delving into Frame Interpolation Section
- Scrolling to Frame Interpolation: In the Master Settings tab, scroll down the list of options until you unearth the ‘Frame Interpolation’ section. This segment is the gateway to defining how frame interpolation will be handled across your project.
Selecting Frame Blend for Retime Process
- Activating Frame Blend: Within the Frame Interpolation section, spot the ‘Retime Process’ drop-down menu. Click to expand this menu, and amidst the options presented, select ‘Frame Blend’. This action instructs DaVinci Resolve to employ Frame Blending as the default frame interpolation technique for your project.
Applying and Reviewing Your Settings
- Saving Your Configuration: After selecting ‘Frame Blend’, ensure to save your project settings by clicking on the ‘Save’ button. This action will apply Frame Blending across your project, fostering smoother motion in all clips requiring frame interpolation.
- Evaluating the Outcome: Post application, review your timeline and playback the clips to scrutinize the Frame Blending effect. Revel in the smoother transitions and refined visual output that project-level Frame Blending affords.