
Welcome back to Filmmakingelements.com, we’re gonna be talking about how can we get more professional and better-sounding audio in our videos and how to make audio sound better in Davinci Resolve. Sound — it’s the invisible element that can make or break your film. While visuals capture the eye, it’s the audio that truly captivates the heart. Here at Filmmakingelements.com, I understand the pivotal role that impeccable sound quality plays in the world of filmmaking. Thus, I am thrilled to present a comprehensive guide that illuminates the path to achieving stellar audio in your videos, with a special emphasis on harnessing the power of DaVinci Resolve.
The Art of Microphone Placement: A Deep Dive into Achieving Pristine Audio Recording
Before we immerse ourselves in the intricate world of DaVinci Resolve post-production, it’s imperative to understand the essence of sound recording. The core of any high-quality audio lies in the recording phase itself. A well-recorded audio source drastically simplifies the post-production process and leads to an impeccable outcome. Let’s delve deeper into the dynamics of microphone placement and choice:

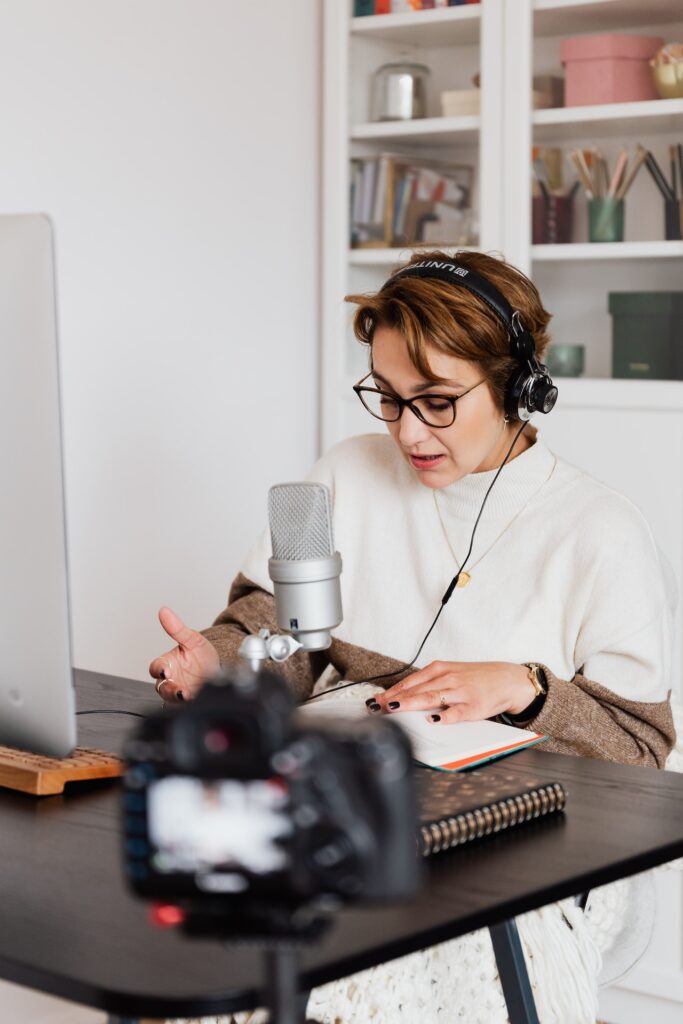
- The Proximity Principle: The physical distance between your sound source and the microphone can greatly influence your recording’s clarity and richness. For vloggers, maintaining a close proximity – about a foot or so from the camera’s microphone – can dramatically enhance audio clarity. This closeness minimizes the risk of capturing unnecessary ambient noise and focuses on the primary sound source.
- Lavalier Mics – Discreet but Powerful: Lavalier or ‘lav’ mics, though small, can be mighty allies for audio recording, especially for interviews or presentations. The placement is paramount. Ideally positioned on the collar, it can capture voice nuances perfectly. However, a misplacement, say farther down on the chest or under layers of clothing, can mute the sound or introduce rustling noises.
- The Dynamics of Boom and Desk Mics: Perfect for controlled environments like studios or home offices, boom and desk mics cater to a range of recording setups. The golden rule is to position the microphone just outside the camera’s frame. This ensures it remains invisible to viewers while capturing the speaker’s voice without diluting it with ambient sounds.
- Navigating Ambient Challenges with Shotgun Mics: Ambient noise is the bane of clear audio recording. Shotgun mics, with their directional recording patterns, are designed to tackle this challenge head-on. Their design allows them to hone in on the sound source directly in front of them, significantly reducing noise from other directions.
- Striking the Right Balance in Frame: Visual aesthetics and audio quality often walk a tightrope, especially when it comes to microphone visibility. The objective is to position the microphone as close as possible to the speaker without it being visible in the shot. By ensuring the mic is just outside the frame but close to the subject, one can capture crisp audio without compromising video aesthetics.
- Adjustments & Angles: Every recording scenario is unique. Therefore, it’s not just about having the microphone close, but also ensuring it’s angled correctly to capture the speaker’s voice optimally. Minute adjustments, even tilting the mic slightly, can sometimes make all the difference in audio clarity.
Setting the Perfect Audio Levels for Seamless Post-Production in DaVinci Resolve
The journey to impeccable sound in your videos starts long before the editing process. While tools like DaVinci Resolve offer powerful audio refining capabilities, capturing the sound correctly at the source is crucial. In this segment, we will dive into the importance of monitoring and setting the right audio levels during the recording phase and how it sets the stage for effective post-production.
- Why Audio Levels Matter: Your recording device or camera’s audio levels act as a crucial guide. Keeping a keen eye on these levels ensures that you’re capturing sound that’s neither too soft nor peaking, which might result in distortion.
- Interpreting Audio Level Indicators: Aiming for an audio level around -12 DB ensures that the sound isn’t too loud or soft, striking a balance that’s apt for editing.
- The Pitfall of Peaking: A common mistake is letting the audio peak, which means it’s too loud and likely distorted. Such sections of your recording become virtually unusable during the editing phase since they often sound harsh and clipped.
- Laying the Foundation for DaVinci Resolve: Once you’ve nailed the perfect recording, it’s time to harness the power of DaVinci Resolve. Part one of our guide will delve into how to tweak the Equalizer (EQ) settings in Resolve to enhance the clarity and tonal quality of your audio.
Optimizing Audio in DaVinci Resolve: Getting Your Levels Just Right
Fine-tuning audio can make a significant difference in the final quality of any video project. Using DaVinci Resolve, filmmakers have a potent tool at their disposal to perfect this aspect. This segment is dedicated to guiding you on how to optimize and fine-tune audio within DaVinci Resolve.
- Starting on the Right Foot: Before diving into Davinci Resolve, it’s essential to have a good recording. This can’t be emphasized enough: a quality recording is foundational. The age-old adage rings true here – “garbage in, garbage out.” Therefore, having set your audio levels appropriately during the recording phase on your camera and microphone is crucial.
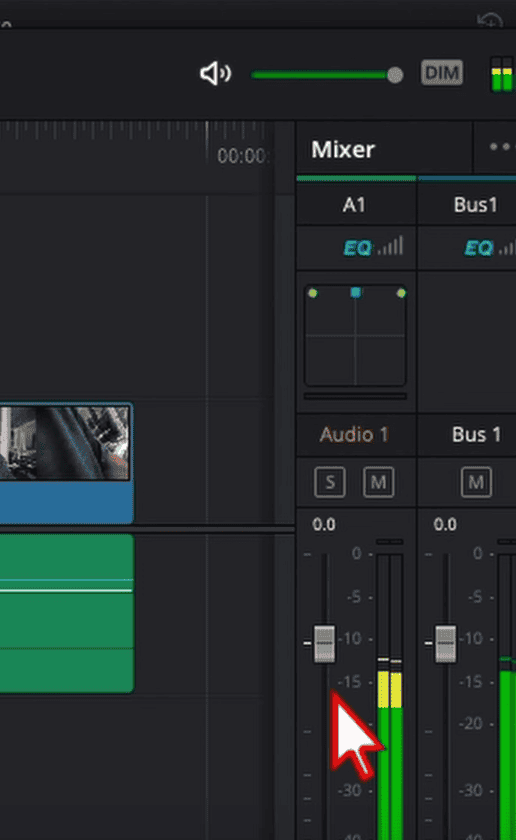
- Audio Level Checks within Resolve: Even if you’ve been diligent during recording, a quick double-check in Davinci Resolve never hurts. Play through your clip and keep an eye on the audio levels in the Mixer tab on the right of your timeline on the Edit page of Davinci Resolve. Ideally, vocal levels should hover around the -10 dB mark. This ensures clarity without the risk of distortion or peaking.
- The Importance of Proper Monitoring: The tools you use to monitor audio can greatly influence the adjustments you make. Headphones, especially those designed for editing, provide an intimate listening experience. They allow you to catch minute details and make precise adjustments. However, studio monitor speakers can also be valuable, offering a different perspective on the sound, especially in terms of spatial representation.
- Assessing Sample Clips: Play through a sample clip to ensure the audio sits around the desired -10 dB range. If it’s close enough and the sound is clear, you’re on the right track!
Adjusting Audio Levels in DaVinci Resolve: Step-by-Step Guide
As part of our article “Enhancing Your Sound in DaVinci Resolve,” let’s delve into adjusting audio levels for an optimal listening experience.
- Understanding the Ideal Audio Level: The sweet spot for many audio recordings, especially vocals, is around -10 dB. This level ensures clarity without the risk of distortion or overpowering other elements.
- Checking the Current Levels: Before making adjustments, play back your clip to see where your levels currently stand. If they aren’t hovering around the desired -10 dB mark, it’s time to make some changes.
- Making Adjustments in the Edit Tab:
- Navigate to the edit tab within DaVinci Resolve.
- Select the clip you wish to adjust.
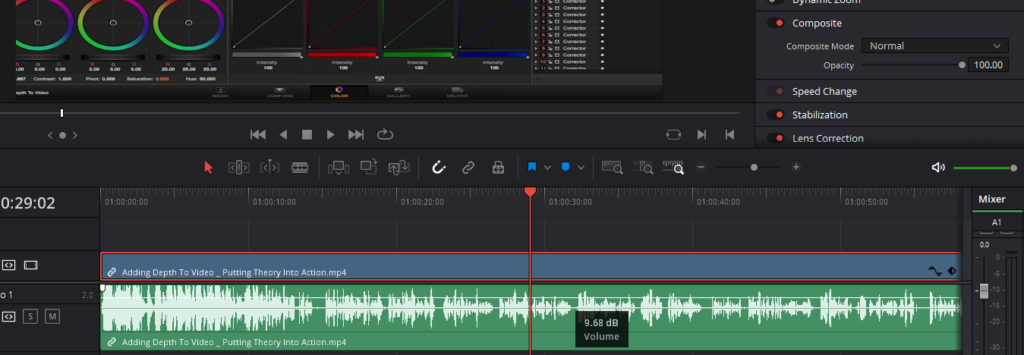
- You’ll notice a line running through the middle of your audio waveform; this represents your volume level.
- Click and drag this line up to increase the volume or down to decrease it.
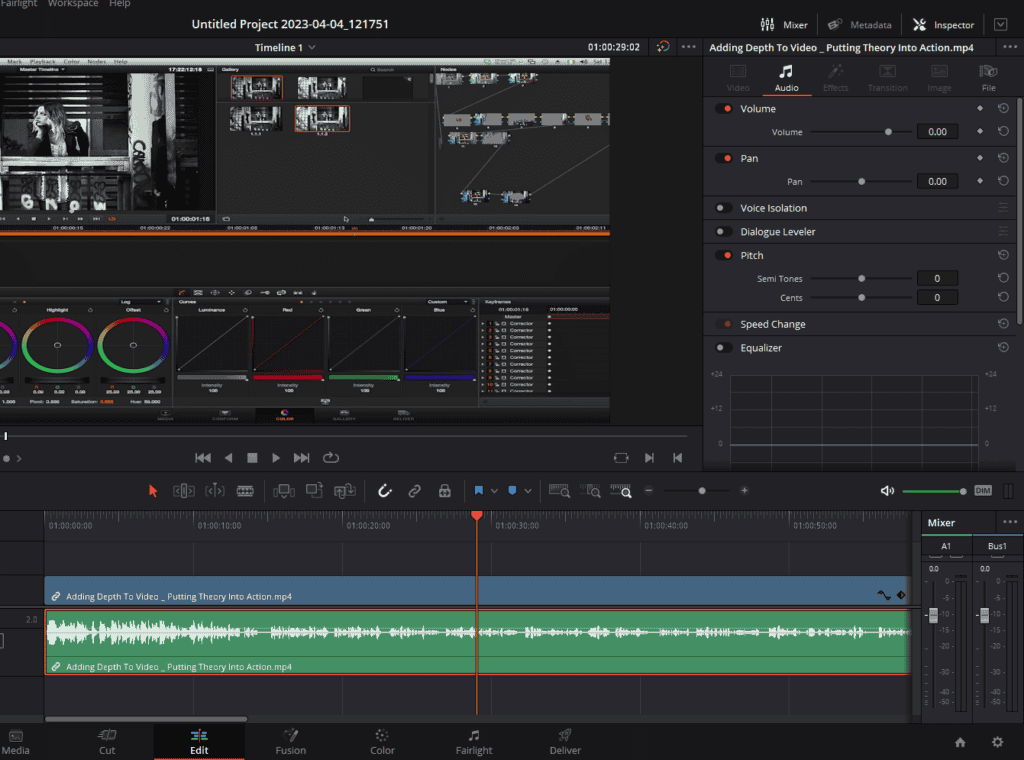
- Utilizing the Inspector for Volume Adjustments:
- With your clip selected, head to the Inspector tab located at the top right corner of the interface.
- Within the Inspector, find the audio tab.
- Here, you’ll find a volume slider. You can slide this to the right to boost the volume or to the left to reduce it.
- Re-checking After Adjustments: After making your desired changes, it’s always a good practice to play back the clip once more. Ensure that your adjustments bring the audio levels close to the -10 dB mark.
Perfecting Your Audio with EQ in DaVinci Resolve
Audio is an essential aspect of any film or video project. It can evoke emotions, set the tone, and either engage or disengage an audience. One vital tool in the audio editing arsenal is the Equalizer or EQ. Let’s dive into the art of EQ editing within DaVinci Resolve and how it can significantly enhance your audio quality.
- Where to Start with EQ:
- DaVinci Resolve offers EQ adjustments both in the “Edit” tab and the “Fairlight” section. While the “Edit” tab provides basic tweaks on a clip-by-clip basis, heading to the “Fairlight” section lets you apply edits to entire tracks, optimizing consistency and efficiency.
- Navigating the Edit Tab:
- Within the “Edit” tab, select the clip you want to modify.
- Ensure your Inspector tab is open and navigate to the audio section.
- Here, you can activate the equalizer and make preliminary adjustments. However, remember that changes made here affect only the selected clip.
- Transitioning to Fairlight for Track-Wide Adjustments:
- Click the “Fairlight” tab, symbolized by musical notes at the bottom.
- Accessing the EQ within Fairlight:
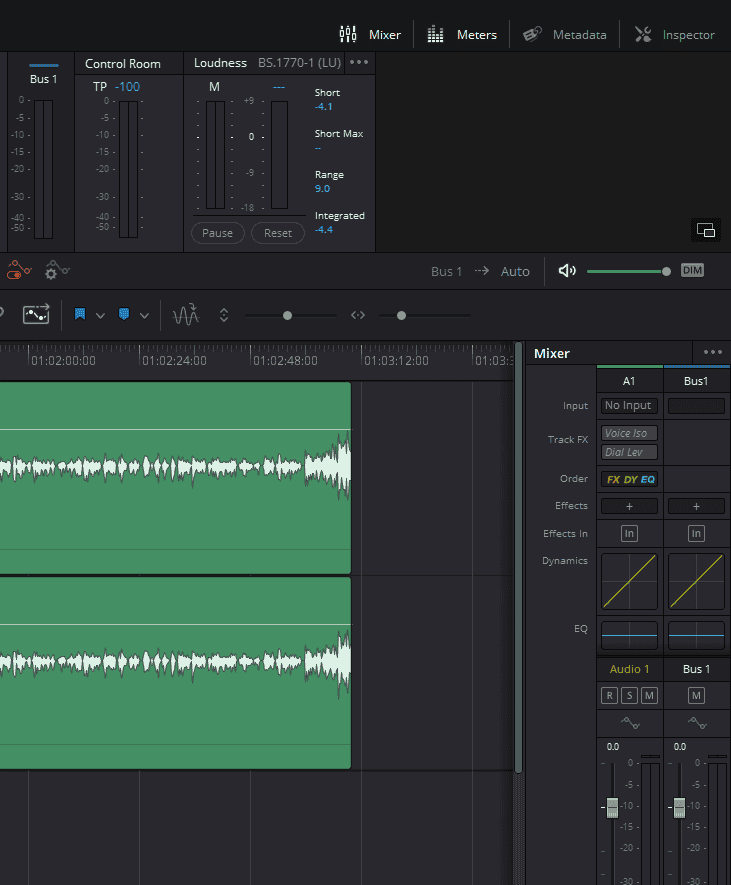
- Be sure your mixer is open. By clicking on the Mixer button on the top-right corner.
- Within the mixer, locate the EQ section on the right of the timeline.
- Double-clicking on EQ opens up the full range of EQ settings and adjustments.
- Why Use Fairlight for EQ Adjustments:
- The flexibility to apply EQ adjustments to entire tracks ensures consistency, especially when using the same microphone for various clips. Grouping clips by microphone type and creating separate tracks for them provides the ability to make unified adjustments, ensuring consistent audio quality.
Enhancing Your Sound: Tackling Muddy Vocals with DaVinci Resolve Audio Editing
Muddy vocals can be a recurrent challenge in audio editing. They can obscure the clarity of your recording, making your content feel amateurish. However, with the right tools and techniques, particularly in DaVinci Resolve, you can transform that muffled sound into crystal-clear audio and make audio sound better in DaVinci Resolve. Here’s how:
- Understanding Muddy Vocals:
- Muddy vocals refer to the voice recordings that are dominated by unnecessary low frequencies. These frequencies can overshadow the main vocal lines, leading to a heavy, unclear, and boomy sound.
- The Solution: High Pass Filter:
- A high pass filter can be your best ally in combatting muddy vocals. It works by allowing frequencies above a set threshold to pass through, while filtering out the lower, muddying frequencies.
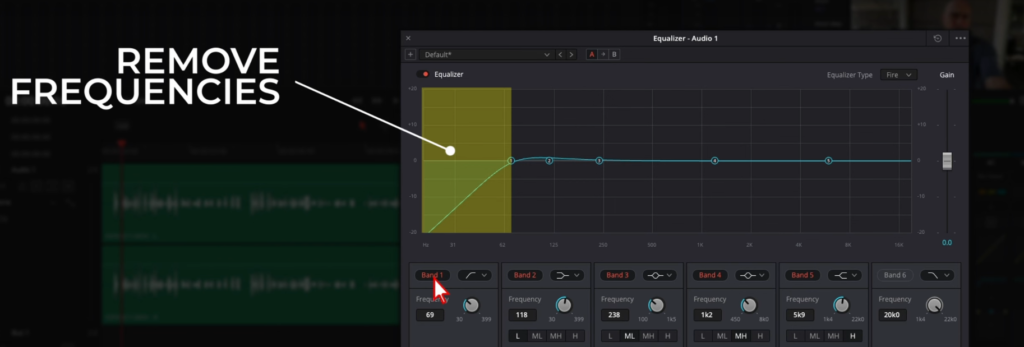
- Configuring the High Pass Filter in DaVinci Resolve:
- Within DaVinci Resolve’s EQ settings, look for the high pass filter option, assigned to ‘Band 1’. Activating it lets you set the desired frequency cut-off.
- Calibrating the Right Frequency:
- Play around with the circle knob present in the ‘Band 1’ section. Although the perfect frequency varies with each recording, a good starting point for vocals is between 100 to 150 Hz. Listening back while adjusting the filter will help pinpoint the ideal setting for clarity without sacrificing depth.
- Mic Specifics Matter:
- Remember that different microphones capture frequencies differently. Depending on your microphone’s characteristics, you might need to adjust the high pass filter frequency. It’s crucial to get acquainted with your equipment for optimal results.
- A/B Testing for Best Results:
- For the most refined outcome, toggle the high pass filter on and off during playback. This A/B comparison will give you a direct understanding of the filter’s impact, ensuring you’ve hit the sweet spot for clarity.
Enhancing Your Sound: Balancing High-Pitched Frequencies in DaVinci Resolve Audio Editing
While dealing with muddy vocals is one part of the puzzle, high-pitched noises or a hiss can be equally distracting in an audio clip. Balancing audio is not only about tackling the low end, but also ensuring that the high frequencies don’t introduce unwanted distractions. Here’s how to address these high-pitched noises using DaVinci Resolve and make audio sound better in DaVinci Resolve:
- The Challenge of High-Pitched Noises:
- At times, recordings may capture unintended high-frequency sounds. These noises can come across as hissing or a sharpness that detracts from the audio’s clarity and quality.
- The Low Pass Filter: Your High-Frequency Solution:
- The antidote to these high-pitched noises is the low pass filter. Contrary to the high pass filter, this one allows frequencies below a specific threshold to pass through, reducing higher frequencies that could sound shrill.
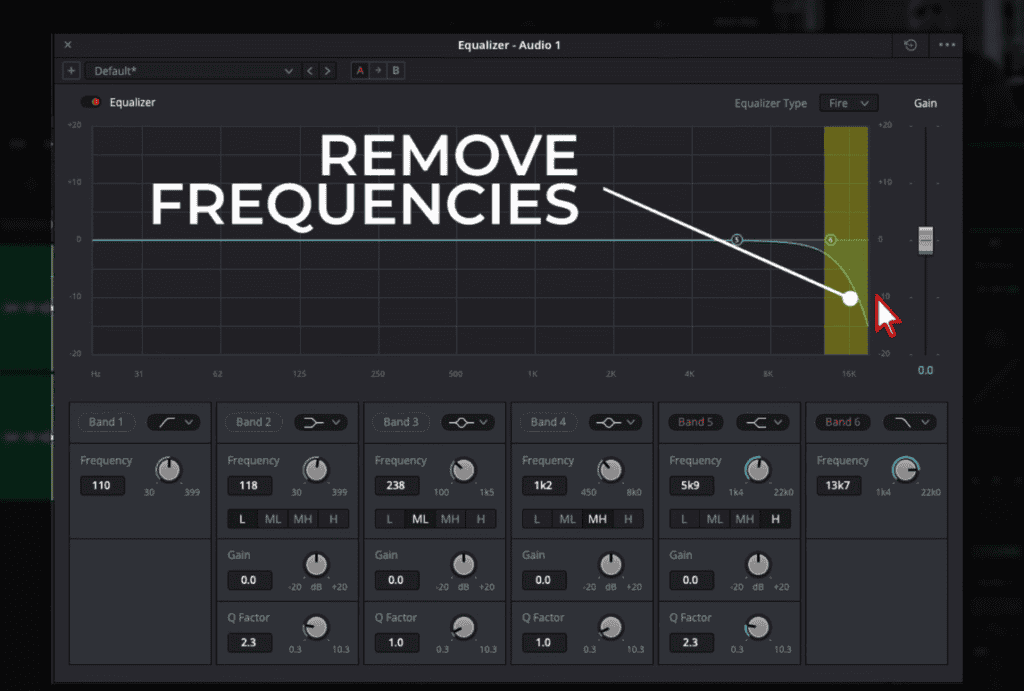
- Activating the Low Pass Filter in DaVinci Resolve:
- Within the EQ settings, locate and activate ‘Band 6’ for the low pass filter. Adjusting this setting enables you to determine which higher frequencies are allowed through.
- Striking the Balance with Dual Filters:
- After setting your high pass filter (for example, around 121 Hz), turn on the low pass filter to roll off the undesirable higher frequencies. Doing so creates a balanced sound that neither feels muddy nor too sharp.
- Tuning to Perfection:
- To truly hear the effect of the low pass filter, toggle it on and off while playing back your clip. Though the differences might be subtle, careful listening can help you pinpoint unwanted high frequencies. Remember not to set the filter too aggressively, as overly diminishing high frequencies can make the audio sound muffled.
- Finding the Sweet Spot:
- Every audio clip is unique. Play around with the circle knob present in the ‘Band 6’.
Enhancing Your Sound: Refining Vocal Clarity with EQ in DaVinci Resolve Audio Editin
While previously we delved into managing the highs and lows of your sound, the mid-range – particularly where the human voice predominantly exists – is equally crucial. Ensuring that this range is optimized for clarity can dramatically enhance vocal quality. Here’s a step-by-step breakdown to achieve just that:
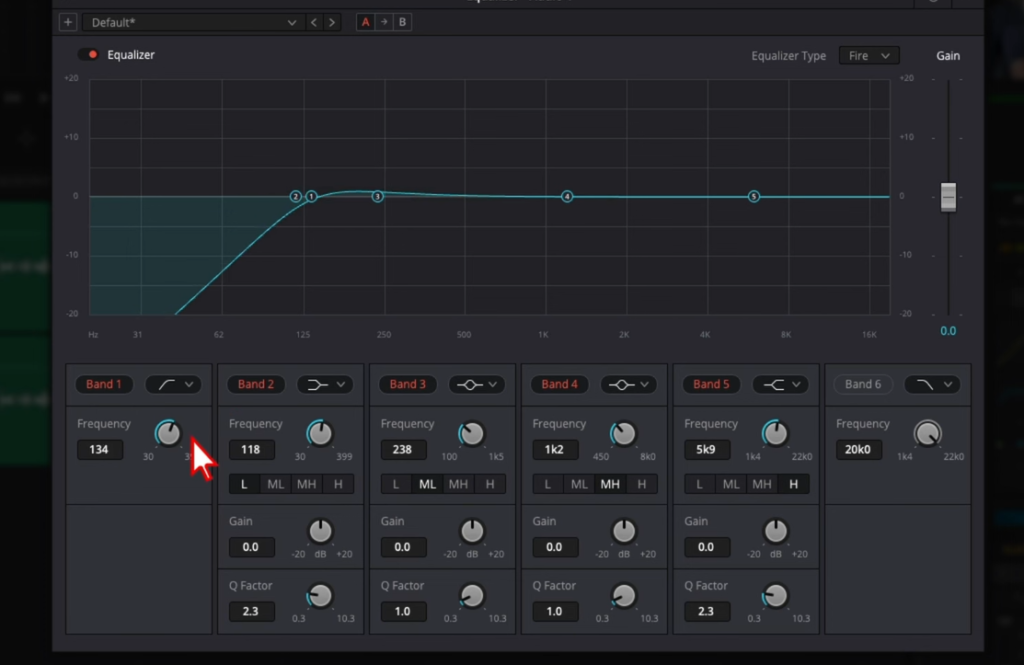
- The Significance of the Mid-Range:
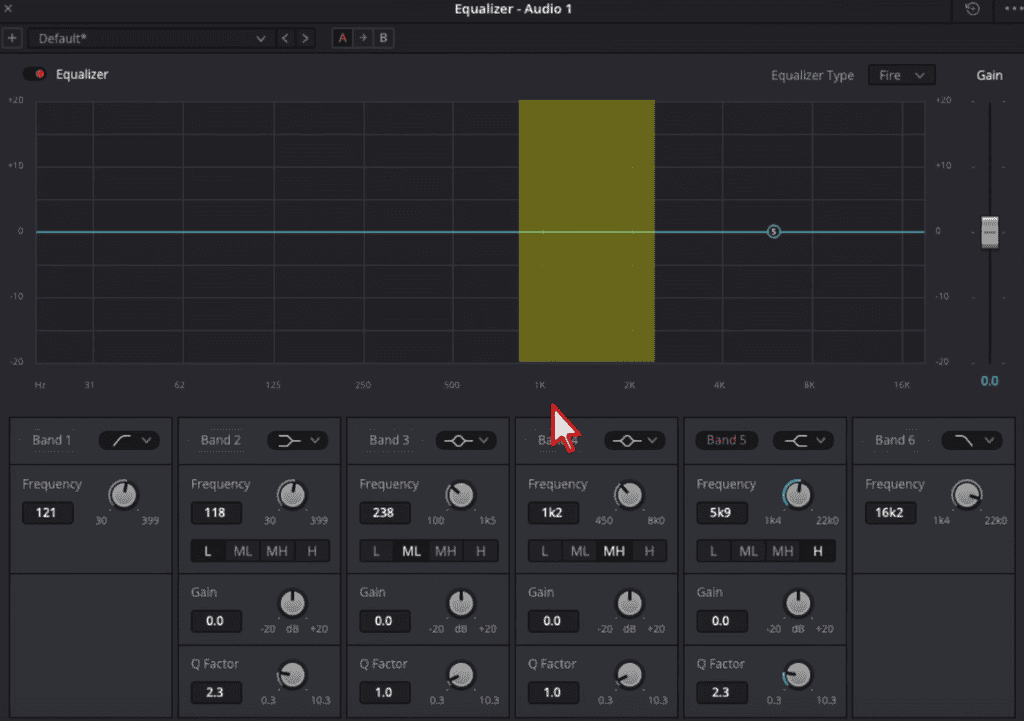
- The human voice primarily occupies the 1,000 to 2,000 Hertz range. Within this range, some frequencies may sound harsh or distort the vocal clarity, making it necessary to adjust them for the best audio quality.
- Identifying Harsh Frequencies:
- By placing an EQ point within this 1k-2k Hertz spectrum, you can pinpoint the harsh-sounding areas. Often, a slight reduction in these problematic frequencies can significantly improve vocal clarity.
- Practical Steps in DaVinci Resolve:
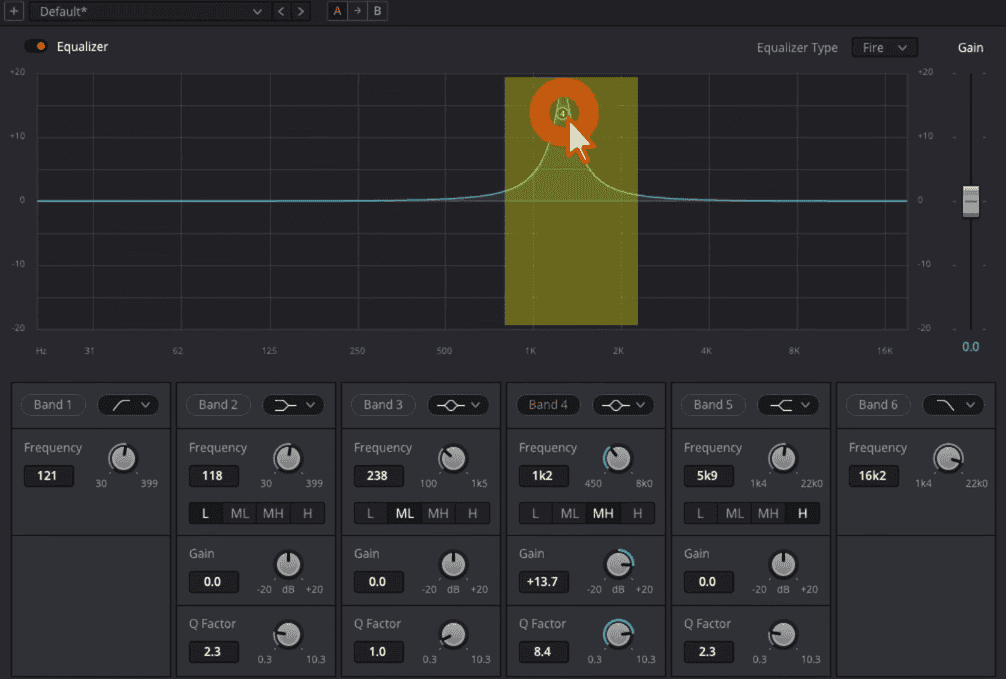
- To begin, choose a point on your EQ – say ‘Band 4’, though any point would work. With the Q factor amped up of ‘Band 4’, which sharpens the EQ curve, play the clip and navigate within the 1-2k Hertz range. Listen intently for any harshness or unpleasant tonal quality.
- Adjusting for Clarity:
- Upon identifying the problematic frequency (e.g., a sound that is too sharp or piercing), reduce it to smoothen out the audio. A drop of around 6 dB can make a significant difference, but always trust your ears and the uniqueness of your clip for the best adjustment.
- Comparative Listening for Perfection:
- Always compare the modified audio with the original. Play back the segment without the EQ adjustment, and then with it. This side-by-side comparison provides a clear insight into the improvements you’ve made.
- Understanding the Variables:
- Bear in mind that the exact problematic frequency varies depending on the individual voice, the microphone used, and other ambient factors. Typically, however, it lies somewhere between a little below 1k and slightly above 2k Hertz.
Conclusion
Thank you for joining us on this deep dive into audio enhancement using DaVinci Resolve. This is exactly how you make audio sound better in Davinci Resolve. As filmmakers, we have the power to captivate our audience not just with visuals, but with sound. Let us harness the tools at our disposal, embrace the art of listening, and elevate our films to new auditory heights. Keep experimenting, refining, and evolving. Until next time, happy filmmaking from all of us at Filmmakingelements.com!