
In the ever-evolving world of filmmaking and post-production, the transition from Standard Dynamic Range (SDR) to High Dynamic Range (HDR) is becoming increasingly popular. This shift is not just a technical upgrade but a creative enhancement, allowing filmmakers to present their vision with greater clarity, depth, and vibrancy. DaVinci Resolve, a leading color grading software, has equipped professionals with the tools needed to make this transition smoothly.
SDR has been the standard for television and cinema for decades. It provides a specific range of brightness and color, which, while satisfactory for most content, has its limitations. Enter HDR – a technology that expands this range, offering brighter whites, darker blacks, and a broader spectrum of colors in between. The result? A more lifelike and immersive viewing experience.
DaVinci Resolve’s capabilities in handling both SDR and HDR make it a go-to choice for colorists and filmmakers looking to delve into the realm of HDR. Whether you’re converting an existing SDR project or starting fresh with HDR in mind, DaVinci Resolve offers a streamlined workflow to achieve optimal results. In this article, we’ll walk through the process of SDR to HDR conversion using DaVinci Resolve, highlighting key steps, tips, and techniques to ensure a successful transition.
Switching from SDR to HDR In Davinci Resolve: Steps
Converting content from SDR to HDR in DaVinci Resolve can seem like a daunting task, but with the right approach, it becomes a straightforward process. Here’s a step-by-step guide to help you navigate this transition seamlessly:
1. Prepare Your Project:
- Open your DaVinci Resolve software.
- Load the project you wish to convert from SDR to HDR.
2. Duplicate the Timeline:
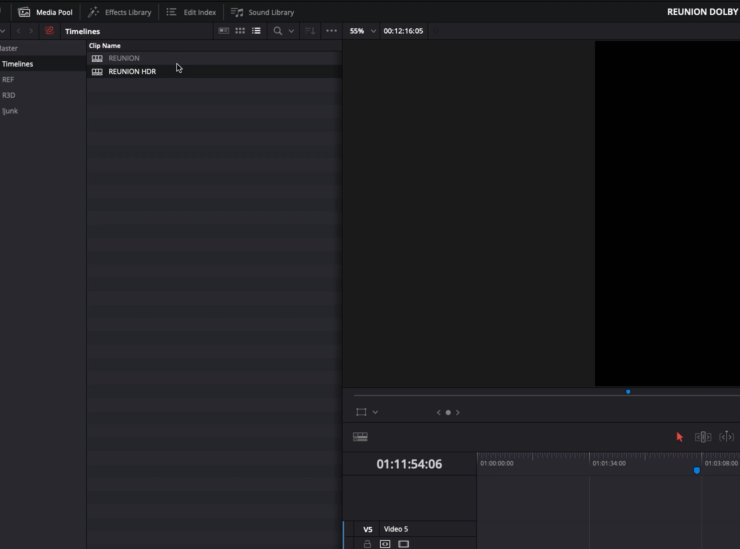
- On the Edit page of Davinci Resolve, right-click on your current SDR timeline in the Media Pool on the left side window.
- Select the “Duplicate” option. This ensures you have a backup of your original SDR version and a new version for HDR conversion.
3. Adjust Timeline Settings:
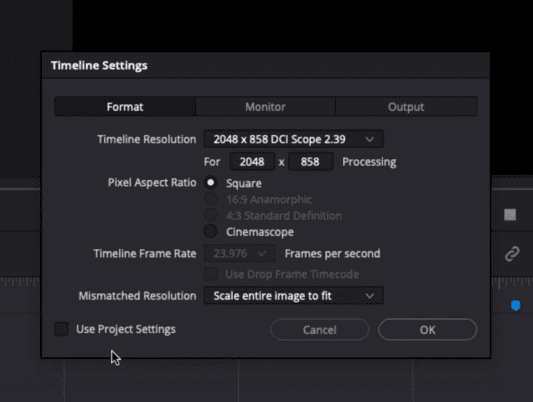
- Right-click on the newly duplicated HDR timeline.
- Navigate to “Timelines” and then “Timeline Settings.”
- Within the settings, deselect the “Use Project Settings” option. This allows you to have different settings for this timeline compared to others.
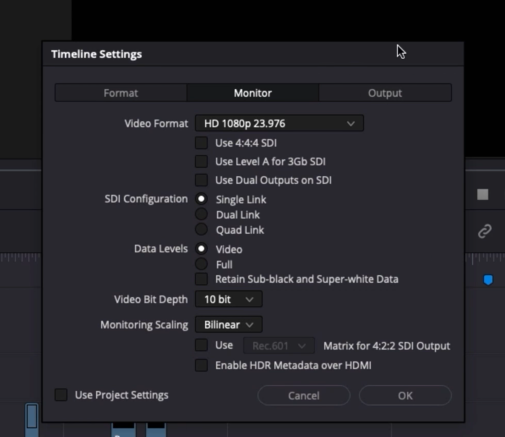
- For the HDR version, go to the ‘Monitor’ tab and switch over to ‘Full’ in ‘Data levels’.
4. Transition to the Color Page:
- Click on the “Color” tab at the bottom of the screen.
- Here, you’ll change your SDR grade to HDR.
5. Implement Node-Based ACES Workflow:
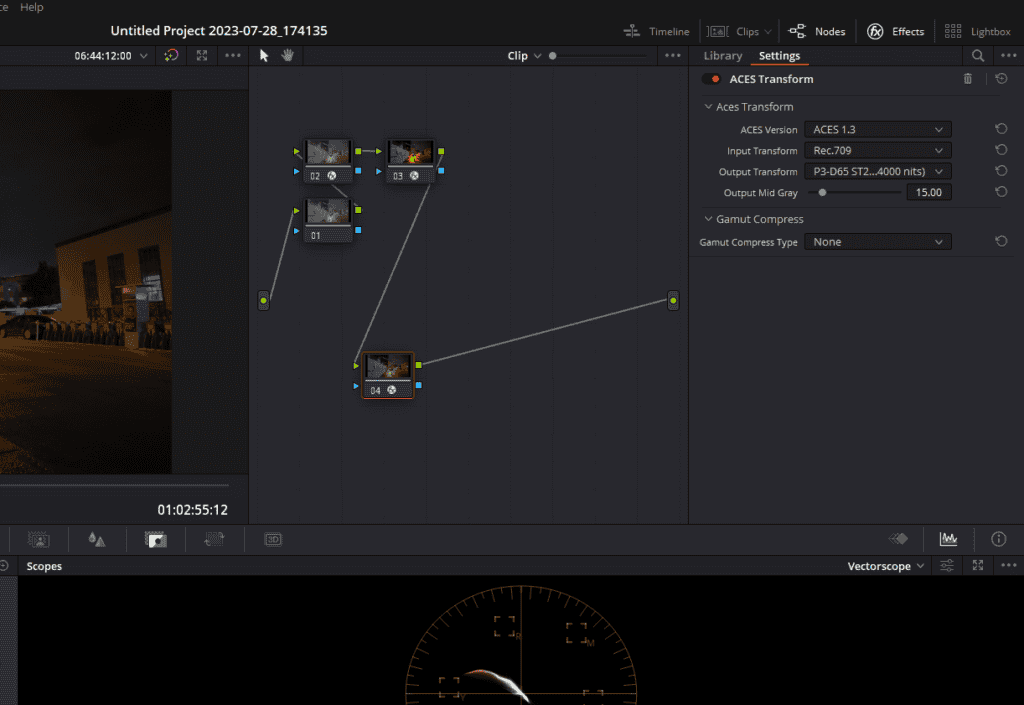
- Ensure you use the last node in your node tree for your ACES Transform SDR to HDR conversion.
- Click on the ‘Effects’ button on the top-right corner.
- Find the ‘ACES Transform’ and drag and drop it onto the last node of the node tree.
- Click on that node for its settings to appear on the right.
- Select the latest ‘ACES Version’ from the drop-down menu.
- In your ‘Input transform’ select ‘Rec. 709‘ (standard for SDR) and in your ‘Output Transform’ select P3-D65 ST2084 (4000 nits). You have successfully changed your SDR grade to HDR in Davinci Resolve.
- Now before you make changes and do trim pass for your HDR grade, it is important to change your Waveform and Parade scopes to HDR as well.
- In the scopes in the bottom right corner, click on the horizontal three dots and select Waveform Scale Style> HDR (ST.2084/HLG).
6. Adjust Your Reference Monitor:
- If you’re using an external reference monitor, ensure it’s set to HDR mode. This lets you view real-time changes in the desired format.
- For instance, if using a Flanders scientific reference monitor, switch it to P3D65 PQ with full range data levels.
7. Review & Adjust:
- Play the timeline to see the initial conversion results.
- Take note of areas that need adjustment. This might include overly bright spots, imbalanced colors, or other discrepancies.
- Use DaVinci Resolve’s suite of tools to tweak and perfect the HDR look.
8. Finalize:
- Once satisfied with the HDR look, save your project.
- You can now export the HDR version for your desired platform or continue with further post-production processes.
Remember, the goal of this conversion isn’t just to amplify brightness and color but to enhance the overall viewing experience while staying true to the original creative intent.
Switching Monitor Modes to HDR
When converting from SDR to HDR, ensuring that your monitor is correctly set to HDR mode is crucial. This adjustment ensures you view colors, highlights, and shadows in their full dynamic range, providing a more accurate representation of what the final output will look like. Here’s a step-by-step guide to making this change:
- Identify Your Monitor Type: Before making any adjustments, it’s essential to know the make and model of your monitor. Different brands may have varied settings and methods to switch to HDR mode.
- Access Monitor Settings: Most modern monitors come with on-screen settings that you can navigate using buttons or touch-sensitive areas on the monitor itself. Locate the menu or settings button on your monitor.
- Navigate to the Display or Picture Settings: Once inside the monitor’s menu, look for categories like ‘Display’, ‘Picture’, or ‘Video’. This is where you’ll typically find the HDR mode settings.
- Switch to HDR Mode: Within the appropriate section, there should be an option to switch between SDR and HDR modes. Select HDR. Some monitors might have different levels of HDR, like HDR10 or Dolby Vision. Choose the one that matches your project requirements.
- Save and Exit: After selecting HDR mode, ensure you save the changes. Exit the monitor’s menu.
- Use External Tools if Necessary: Some high-end reference monitors, like the Flanders scientific reference monitor mentioned in the transcript, offer external utilities to switch modes. These tools can be beneficial, allowing changes without manually pressing monitor buttons.
- Verify the Change: Once you’ve switched to HDR mode, you should notice a visible change in brightness and color depth on the monitor. Ensure that what you see aligns with the expected HDR output.
- Adjust Further if Needed: If colors seem off or highlights appear too bright or too dim, dive back into the monitor settings. Adjust the brightness, contrast, or specific color settings until you achieve a pleasing and accurate HDR display.
Remember, the goal is to achieve a display that provides the most accurate representation of the HDR content you’re working on.
Emphasizing Scene Elements in HDR
When transitioning from SDR to HDR, certain elements in a scene may either pop too much or not enough due to the expanded dynamic range. It’s essential to strike a balance so that the viewer’s focus remains on the intended subject. Here’s a step-by-step guide to effectively emphasize scene elements in HDR:
- Understand the Scene’s Focus: Before making adjustments, identify the main subjects or elements in the scene. What do you want the viewer to focus on? Is it a character, an object, or perhaps a specific background element?
- Analyze the Current Brightness Levels: Review the scene’s current brightness levels, especially in areas that seem too bright or too dull. In HDR, the increased dynamic range can make highlights appear more intense, potentially drawing attention away from the scene’s main subject.
- Adjust Highlight Intensity: If certain highlights, like a window or lamp, appear too bright and distracting, reduce their intensity. This can be done using color grading tools, where you can selectively dial down the brightness of these highlights.
- Enhance Main Subjects: For primary subjects or elements that might now appear too dim in HDR, increase their brightness or contrast. This will ensure they remain as the focal point, even with the expanded dynamic range.
- Balance the Overall Scene: After making adjustments to specific elements, review the entire scene. Ensure that the changes don’t create an imbalance in the scene’s overall look and feel. The goal is a harmonious balance where every element is clearly visible, but the main subjects still stand out.
- Use Masks or Power Windows: To make precise adjustments to specific areas, use masks or power windows in your grading software. These tools allow you to target specific parts of the scene without affecting the entire image.
Managing Graphics and Titles in HDR
While transitioning from SDR to HDR, graphics and titles present unique challenges. Their appearance and clarity can change drastically due to the expanded dynamic range. Follow these steps to ensure your graphics and titles transition smoothly into HDR:
1. Identify Graphics and Titles:
- Review your timeline to pinpoint where overlay graphics, blended footage, and titles appear.
- Note any titles generated directly in Resolve, as they may require special attention during the conversion process.
2. Isolate Graphic Elements:
- Place all graphics on specific video tracks (e.g., Video 4 and Video 5) for easy management.
- Temporarily disable these tracks by unchecking their visibility. This allows you to focus solely on the footage during initial grading.
3. Adjust Graphics for HDR Brightness:
- HDR’s enhanced brightness can make graphics appear washed out or overly vibrant.
- Tweak the brightness, contrast, and saturation of each graphic to ensure they remain clear and legible in HDR.
4. Check Text Legibility:
- Titles and text graphics need to be easily readable against varying backgrounds.
- Adjust the font color, shadow, or outline to ensure text stands out and remains legible.
Conclusion: The Advantage of Using an SDR Grade as a Starting Point for HDR
In the realm of film and video editing, transitioning from Standard Dynamic Range (SDR) to High Dynamic Range (HDR) can often feel like stepping into a vast, uncharted territory. However, the journey is made significantly smoother when we use an SDR grade as our foundation.
- Familiar Ground: Starting with an SDR grade means working with a version of the film that you’re already acquainted with. This familiarity can serve as a guiding light, helping you identify areas that need adjustments in HDR without feeling overwhelmed.
- Efficient Workflow: Much of the groundwork, like power window tracking, qualifiers, shot matching, and establishing overall looks, has already been laid out in the SDR version. This means less time starting from scratch and more time refining the visuals to harness the full potential of HDR.
- Anticipating Challenges: Watching the SDR version helps in anticipating challenges that might arise in HDR, especially in areas like highlights or color balancing. Being proactive can save valuable time in post-production.
- Creative Consistency: Using an SDR grade ensures that the core essence and creative intent of the original film remains consistent. While HDR provides an expanded color volume and dynamic range, the foundational narrative and artistic direction stay true to the original vision.
- Flexibility: Starting with an SDR grade doesn’t mean being confined to its limitations. On the contrary, it provides a flexible base to experiment, tweak, and enhance scenes, ensuring they shine even brighter in HDR.