
Welcome back to FilmmakingElements.com! I am Salik, and today we’re diving deep into HDR To SDR Conversion In Davinci Resolve. The transition between High Dynamic Range (HDR) to Standard Dynamic Range (SDR) is a crucial step in the post-production process, ensuring that your content is viewable across a range of devices without compromising on its original quality. With advancements in technology, we’re witnessing a growing demand for HDR content. But what happens when you need to convert it to SDR for broader accessibility? In this article, we’ll explore two effective ways to achieve this conversion using DaVinci Resolve, ensuring that your visuals retain their essence and charm.
HDR to SDR Conversion in DaVinci Resolve Using Color Space Transform Feature
DaVinci Resolve, known for its advanced color grading capabilities, provides an array of tools to ensure that your content looks its best across all platforms. One such tool is the Color Space Transform feature, which can be employed to convert High Dynamic Range (HDR) footage to Standard Dynamic Range (SDR). If you’re looking to undertake this conversion, follow our comprehensive guide below:
- Setting Up Your Workspace:
- Open your DaVinci Resolve project.
- Navigate to the Color Page, which is the heart of DaVinci’s color grading operations.
- Locating the Necessary Tools:
- Direct your attention to the top-right corner of the screen. Here, you’ll find the ‘Effects’ tab.
- Once clicked, this tab will reveal a dropdown menu filled with various tools and effects.
- Harnessing the Power of Color Space Transform:
- Scroll through the dropdown until you come across the ‘Color Space Transform’ option. This OpenFX plugin (OFX) is designed specifically for tasks like HDR to SDR conversion.
- To apply this effect, simply drag and drop the Color Space Transform OFX onto the final node in your node tree. By placing it on the last node, you ensure that the conversion takes place after all other color adjustments have been made.
- Diving into Input Parameters:
- With the Color Space Transform applied, it’s time to set your input parameters. Two combinations are commonly used, and while both are effective, they can yield slightly different results. Experiment with both to find your preferred setting.
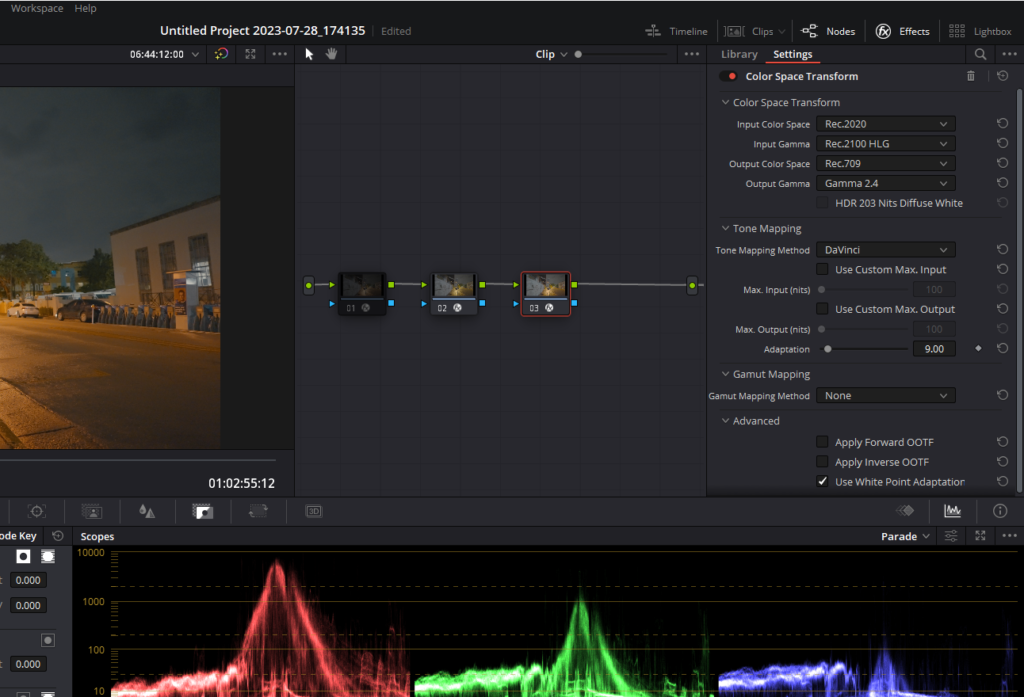
- First Combination:
- In the ‘Input Color Space’ dropdown, select ‘Rec.2020’.
- Moving to ‘Input Gamma’, choose ‘Rec.2100 HLG’.
- Alternative Combination:
- For the ‘Input Color Space’, choose ‘Rec.2100’.
- Then, for ‘Input Gamma’, select ‘ST2084’.
- Adjusting the Output Parameters:
- The next step is to determine how your converted footage will look in SDR. To set these parameters:
- Choose ‘Rec.709’ in the ‘Output Color Space’ dropdown. This is the industry-standard color space for SDR content.
- For ‘Output Gamma’, opt for ‘Gamma 2.4’. This gamma setting ensures that your content will appear consistently across most SDR displays.
- The next step is to determine how your converted footage will look in SDR. To set these parameters:
- Fine-Tuning Your Content:
- After setting your input and output parameters, play back your footage. Observe the colors, shadows, and highlights to ensure everything looks natural.
- If needed, make additional color adjustments in your node tree to fine-tune the look of your converted footage.
HDR to SDR Conversion in DaVinci Resolve Using ACES Transform Feature
DaVinci Resolve is renowned for its vast color grading capabilities, offering multiple tools and features to ensure your visuals are of the highest quality. One such potent tool is the ACES Transform feature, tailored for converting High Dynamic Range (HDR) content to Standard Dynamic Range (SDR). For those looking to master this method, here’s a comprehensive and user-friendly guide:
- Preparing Your Workspace:
- Begin by launching your DaVinci Resolve project.
- Head straight to the Color Page, your central hub for all color grading actions.
- Finding the ACES Transform Tool:
- Focus on the top-right corner of the screen where you’ll locate the ‘Effects’ tab.
- Clicking on this will unveil a dropdown brimming with various effects and tools.
- Implementing the ACES Transform:
- Among the list, you’ll find the ‘ACES Transform’ option. Recognized by its precision and reliability, this OpenFX plugin (OFX) is the key to our conversion process.
- To activate this feature, drag and drop the ACES Transform OFX onto the last node of your node tree, ensuring the conversion is the final step after all color corrections.
- Configuring the ACES Parameters:
- With the ACES Transform in place, it’s crucial to set the parameters correctly:
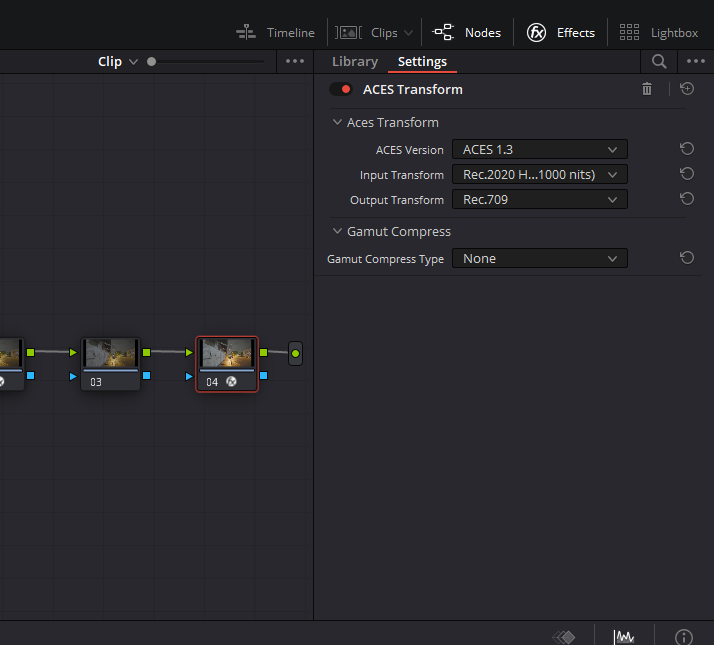
- Select the node to which you’ve applied the ACES Transform.
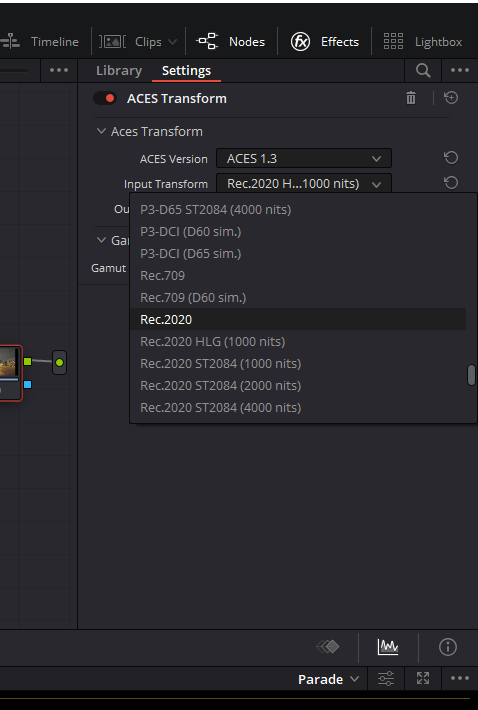
- In the ‘ACES Version’ dropdown menu, opt for the latest ACES version available. Staying updated guarantees optimal results.
- Moving on to ‘Input Transform’, you’ll notice multiple HDR options. Each ‘flavor’ of HDR has its unique characteristics, so it’s essential to experiment and determine which suits your content best. Your options include:
- Rec.2020 HLG (1000 nits)
- Rec.2020 ST2084 (1000 nits)
- Rec.2020 ST2084 (2000 nits)
- Rec.2020 ST2084 (4000 nits)
- For ‘Output Transform’, select ‘Rec.709’. This is the universally accepted standard for SDR content, ensuring wide compatibility.
- With the ACES Transform in place, it’s crucial to set the parameters correctly:
- Review and Refine:
- After configuring the parameters, play your footage to evaluate the conversion. Pay close attention to the hues, contrast, and brightness to ensure the visuals retain their essence.
- If necessary, delve back into the node tree to make any fine-tuning adjustments for a perfect finish.
- Also Read: SDR To HDR Conversion In Davinci Resolve
- Also Read: Davinci Resolve Color Shift DCTL: Free Download
- Also Read: Davinci Resolve Split Tone DCTL: Free Download