
Hi, I’m Salik, the author of FilmmakingElements.com. I have been a filmmaker for over 10 years, and I have used DaVinci Resolve for many of my projects. If this is your first time visiting, I’m delighted to introduce myself. I am a certified DaVinci Resolve Trainer, dedicated to providing insights and solutions to the challenges you face while working with DaVinci Resolve. In this post, we will dive deep into a common query I receive: “How do I deinterlace in DaVinci Resolve?” Not only will we break down the deinterlacing process, but we’ll also touch upon deflickering. So, without further ado, let’s get started.
What is Interlace?
Before delving into the process of deinterlacing in DaVinci Resolve, it’s crucial to have a foundational understanding of what interlacing is and its historical relevance.Interlacing is a technique developed in the 1930s and 1940s to enhance the perception of video smoothness without consuming additional bandwidth. This method allowed video frame rates to seemingly double without an actual increase in the transmission rate.
How Does It Work?
The principle behind interlacing is the division of each video frame into two separate fields: the odd field and the even field. Instead of transmitting a full frame at once, these fields are alternately broadcasted or displayed. Each of these fields captures half of the frame’s lines or rows of pixels, and they are shown in rapid succession, approximately every 1/60th of a second. When played back at this speed, the human eye perceives it as a continuous image, making movements, especially rapid ones like in sports broadcasts, appear smooth.
Why Is Deinterlacing Necessary?
While interlacing was a revolutionary solution for its time, it poses challenges in today’s digital age. Editing interlaced footage on a frame-by-frame basis can be cumbersome. Furthermore, with the advent of progressive displays, such as LCDs and plasmas, the drawbacks of interlacing become evident. On these screens, the distinct lines of interlaced videos can be conspicuous, leading to a jagged and less clear image.
This visibility of interlaced lines detracts from the viewing experience and emphasizes the importance of converting or deinterlacing such footage to adapt to modern display technologies. This is where the need to deinterlace in tools like DaVinci Resolve comes into play.
What is Deinterlacing?
Interlaced video is a byproduct of older broadcast systems and is still present in some recording scenarios today. In this method, each video frame is split into two half-frames, with one capturing the even lines and the next capturing the odd lines. As the camera captures these alternating half-frames in real-time, it essentially skips every other line. This alternating capture process was a means to effectively double the perceived video smoothness without increasing the transmission’s bandwidth.
Why is Deinterlacing Important?
In our modern digital era, most display devices, such as LCD, LED televisions, digital projectors, and computer monitors, are designed for progressive scan – they show entire images sequentially. Thus, displaying interlaced footage on these devices can result in visual artifacts and a less-than-optimal viewing experience.
Deinterlacing addresses this by converting the interlaced video into a progressive format, where each frame displays all its lines sequentially. This conversion ensures compatibility with modern displays and provides a clearer, artifact-free image.
How is Deinterlacing Achieved?
- Line Doubling: This is a straightforward method where the even or odd lines in the video are simply duplicated to fill in the missing lines. While this method is quick, it can sometimes result in reduced image quality.
- Motion-Adaptive Deinterlacing: A more advanced method, this approach examines both the preceding and succeeding frames to intelligently estimate the missing lines in each half frame. By analyzing the motion and content of the footage, this method often provides a smoother and clearer result than line doubling.
How to Deinterlace in DaVinci Resolve?
Interlacing was a technique introduced in the early days of television to maximize perceived video quality within the limitations of bandwidth and screen technology. Today, with advancements in display technology and the ubiquity of digital media, interlaced videos can appear flawed with horizontal lines, especially during fast motions. For contemporary video projects, especially ones that integrate older footage, deinterlacing becomes vital.
DaVinci Resolve, being one of the premier video editing tools, provides a straightforward yet comprehensive approach to deinterlacing. Here’s a detailed guide:
1. Understanding the Interlace Problem:
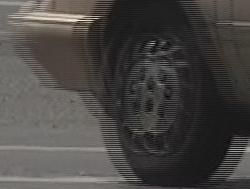
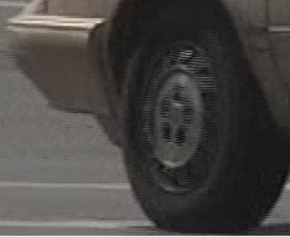
When you incorporate older footage or clips shot with certain types of cameras into your project, you might notice a series of horizontal lines, especially in sections with rapid movement. This effect, known as interlacing, stems from how some older cameras recorded video — by capturing alternate lines of the image in quick succession rather than the whole image at once.
2. Locating the Affected Clip in DaVinci Resolve:
- Open DaVinci Resolve and import your project.
- In the Edit tab, skim through your timeline to identify the clip or clips exhibiting the interlacing effect.
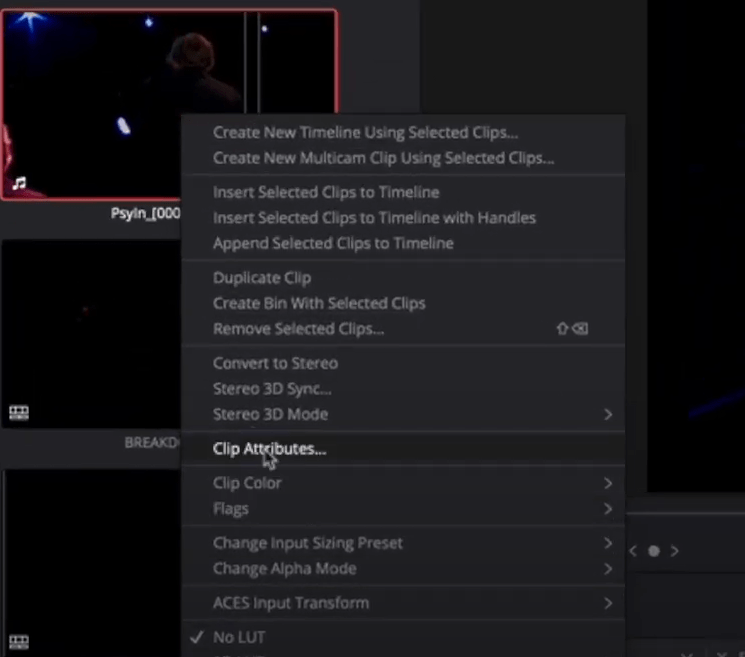
3. Accessing Clip Attributes:
- Right-click on the specific clip in your timeline that needs deinterlacing.
- From the dropdown context menu, select the “Clip Attributes” option. This will open a new window where you can adjust various properties of the clip.
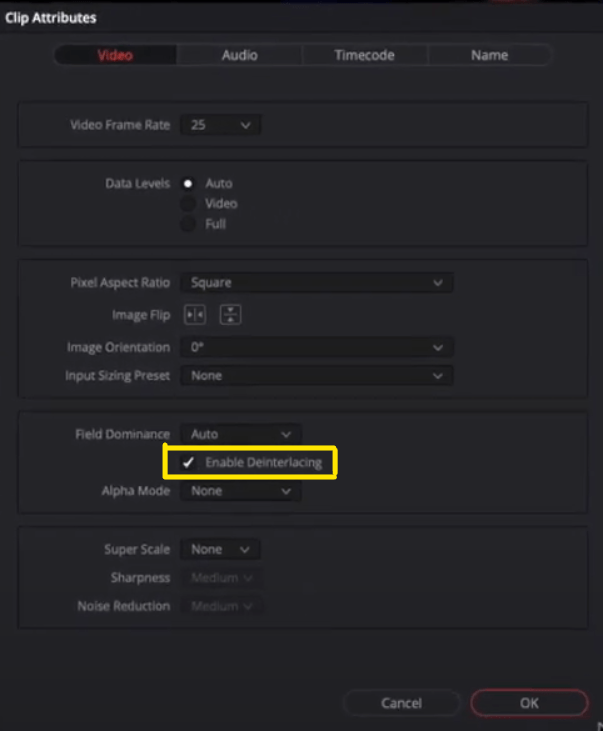
4. Initiating the Deinterlacing Process:
- In the Clip Attributes window, you will find multiple tabs. Navigate to the “Video” tab, which is generally the first tab.
- Within this tab, there is a section or checkbox labeled “Deinterlace.” By default, this might be unchecked or disabled.
- Click on or check this option to enable deinterlacing for the chosen clip.
5. Review and Finalize:
- After enabling deinterlacing, click “OK” at the bottom of the Clip Attributes window to apply your changes.
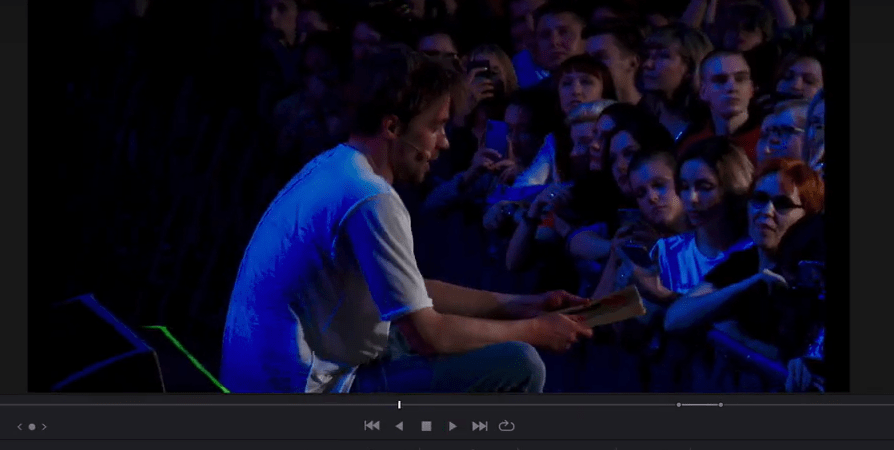
- Play back the clip in your timeline to ensure the interlacing artifacts have been effectively removed. The video should now display smoothly, free of the disruptive horizontal lines.
- Continue editing your project as needed, and when you’re ready, proceed to export.
- Also Read- What is lens flare in filmmaking? Secret recipe to cinematic storytelling?
- Also Read- 10 Common Mistakes Made by Amateur DP/Cinematographers
- Also Read- How To Fake Golden Lighting Effect Without Golden Hour- 5 Epic Ways
How to Deflicker in DaVinci Resolve?
In the realm of video post-production, two common processes to improve footage quality are deflickering and deinterlacing. While deinterlacing deals with the removal of horizontal lines caused by interlaced recording, deflickering addresses inconsistent brightness across frames. If your video has issues of flickering, here’s how to remedy it in DaVinci Resolve:
1. Switch to the Color Workspace:
- Begin by opening your project in DaVinci Resolve.
- Click on the “Color” tab at the bottom, transitioning you to the color grading section.
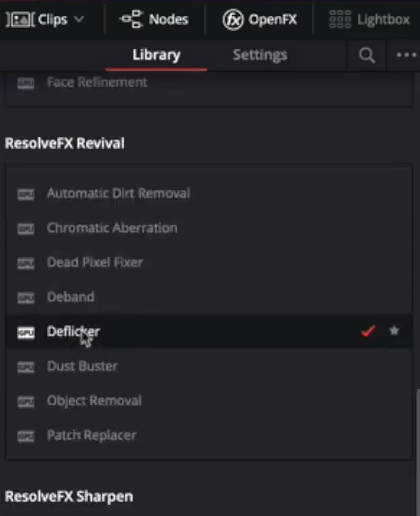
2. Open the Effects Library:
- On the upper right corner of your screen, locate and select the “Effects” option to reveal a variety of video effects.
3. Find the Deflicker Tool:
- In the Effects panel, scroll or search to locate the “Deflicker” tool amidst the list of effects.
4. Apply the Deflicker Effect:
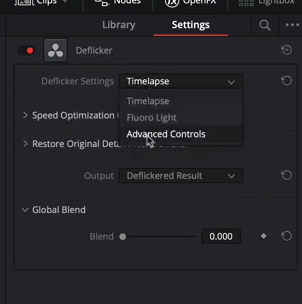
- Drag the “Deflicker” option onto the node that exhibits flickering.
5. Assess the Outcome:
- Preview the treated clip to check if the flickering has been effectively minimized or eradicated. For optimal results, adjust the effect settings as needed.
By leveraging DaVinci Resolve’s deflickering tool, you can ensure a consistent brightness across your video, complementing other quality-enhancing processes like deinterlacing.
It’s not perfect, but you can go to the advanced settings from the setting option, as shown in the screenshot, and play with it. Moreover, it’s not going to help you if your camera is moving; at least I couldn’t fix that, but if it’s steady, you can get rid of the flickering in 90 percent.
So, I hope you were able to find the answer to all of your questions regarding DaVinci Resolve, like How to Deinterlace in DaVinci Resolve? and How to Deflicker in DaVinci Resolve? And if you have any more doubt regarding DaVinci Resolve, make sure to check out our other articles. If you have any suggestions feel free to contact us.